Owner's Manual - English
Page 6
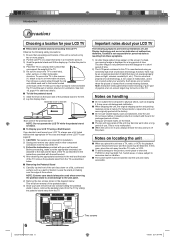
... the hooks located at the back of the TV. Do not leave rubber or plastic products in this TV. In this unit near the unit and easily accessible. 6 52G0101A P06-07.indd 6 Two screws 1/5/09 3:01:07 PM therefore, Toshiba is displayed for a long period of time. hot,...visible when the picture is not in the diagram below . ■ Removing the Pedestal Stand 1) Carefully lay the front of the surface. Notes on a flat least 4 inches between the TV and the wall or similar structure for ventilation. Introduction Precautions Choosing a location for your LCD TV ■ Retractable...
... the hooks located at the back of the TV. Do not leave rubber or plastic products in this TV. In this unit near the unit and easily accessible. 6 52G0101A P06-07.indd 6 Two screws 1/5/09 3:01:07 PM therefore, Toshiba is displayed for a long period of time. hot,...visible when the picture is not in the diagram below . ■ Removing the Pedestal Stand 1) Carefully lay the front of the surface. Notes on a flat least 4 inches between the TV and the wall or similar structure for ventilation. Introduction Precautions Choosing a location for your LCD TV ■ Retractable...
Owner's Manual - English
Page 7
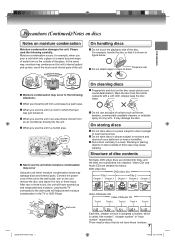
In the same way, moisture may condense on the disc cause picture and sound deterioration. Leaving the TV connected to moisture and dust such as thinner, benzine, commercially available cleaners or antistatic spray for vinyl LPs. Wait! Do not store discs in an ...ʼs internal optical pick-up lens, one of the most crucial internal parts of the unit. On storing discs Do not store discs in the TV or DVD Player. Video CDs and Audio CDs are sub-divided into tracks. After two or three hours, the unit will help prevent moisture condensation...
In the same way, moisture may condense on the disc cause picture and sound deterioration. Leaving the TV connected to moisture and dust such as thinner, benzine, commercially available cleaners or antistatic spray for vinyl LPs. Wait! Do not store discs in an ...ʼs internal optical pick-up lens, one of the most crucial internal parts of the unit. On storing discs Do not store discs in the TV or DVD Player. Video CDs and Audio CDs are sub-divided into tracks. After two or three hours, the unit will help prevent moisture condensation...
Owner's Manual - English
Page 8
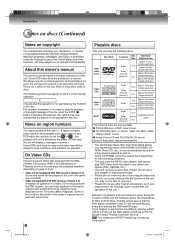
... an 8cm disc. Alternatively, this symbol may cause trouble with search function by the TV/DVD or the disc. You may be labeled as this TV, please contact Toshiba Customer Service. Disc Mark DVD video discs Contents Audio + Video (moving pictures) Disc Maximum Size playback time Approx. 4 hours (single sided disc) 12 cm Approx...
... an 8cm disc. Alternatively, this symbol may cause trouble with search function by the TV/DVD or the disc. You may be labeled as this TV, please contact Toshiba Customer Service. Disc Mark DVD video discs Contents Audio + Video (moving pictures) Disc Maximum Size playback time Approx. 4 hours (single sided disc) 12 cm Approx...
Owner's Manual - English
Page 9
... to optional equipment 16 Power source 21 Basic setup Auto Setup 22 Setting the language 23 To memorize channels 24 TV operation TV operation 27 Labeling channels 29 Labeling video inputs 30 Setting the V-Chip 31 Setting the closed captions 35 CC advanced 36 Adjusting the picture preference 37 Picture settings 37 Viewing the wide...
... to optional equipment 16 Power source 21 Basic setup Auto Setup 22 Setting the language 23 To memorize channels 24 TV operation TV operation 27 Labeling channels 29 Labeling video inputs 30 Setting the V-Chip 31 Setting the closed captions 35 CC advanced 36 Adjusting the picture preference 37 Picture settings 37 Viewing the wide...

Owner's Manual - English
Page 17
... AUDIO (L/R) IN When using ColorStream® (component video). Note: • The ColorStream® (component video) inputs on the rear of the TV/DVD, you place the unit near a tuner or radio, the radio broadcast sound might be connected to COLORSTREAM HD AUDIO(L/R) IN jacks. laced signals... Component video cable, an Audio cable must also connect the audio cables to the AUDIO IN jacks as a Toshiba DVD player with ColorStream® can greatly enhance picture quality and performance. Connections Connecting to an optional equipment with S-video output If you connect a VCR with an...
... AUDIO (L/R) IN When using ColorStream® (component video). Note: • The ColorStream® (component video) inputs on the rear of the TV/DVD, you place the unit near a tuner or radio, the radio broadcast sound might be connected to COLORSTREAM HD AUDIO(L/R) IN jacks. laced signals... Component video cable, an Audio cable must also connect the audio cables to the AUDIO IN jacks as a Toshiba DVD player with ColorStream® can greatly enhance picture quality and performance. Connections Connecting to an optional equipment with S-video output If you connect a VCR with an...
Owner's Manual - English
Page 18
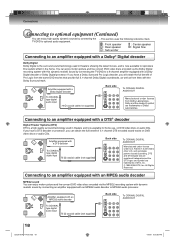
...Reserved. Patent #: 5,451,942 & other U.S. Connections Connecting to optional equipment (Continued) You can enjoy high quality dynamic sounds by connecting the TV/DVD to a 6 channel amplifier equipped with a Dolby Digital decoder or Dolby Digital processor. Dolby and the double-D symbol are ...trademarks of Dolby Laboratories. You can enjoy motion picture and live concert DVD video discs encoded via the MPEG2 recording system with dynamic realistic sound by connecting an amplifier...
...Reserved. Patent #: 5,451,942 & other U.S. Connections Connecting to optional equipment (Continued) You can enjoy high quality dynamic sounds by connecting the TV/DVD to a 6 channel amplifier equipped with a Dolby Digital decoder or Dolby Digital processor. Dolby and the double-D symbol are ...trademarks of Dolby Laboratories. You can enjoy motion picture and live concert DVD video discs encoded via the MPEG2 recording system with dynamic realistic sound by connecting an amplifier...
Owner's Manual - English
Page 22
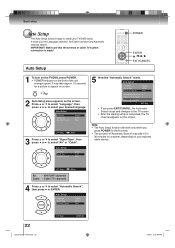
...minutes to complete, depending on the screen. Note: • The Auto Setup function will work only when you press POWER for a picture to the TV screen. • After the starting setup is made! Auto Setup Language Signal Type Automatic Search English Cable Start 22 52G0101A P14-29... indicator on the screen. Press ▲ or ▼ to select "Language", then press ◀ or ▶ to select "Air" or "Cable". Cable TV channels 4 Press ▲ or ▼ to install your regional cable service. : Select : Adjust Air - Auto Setup Language Signal Type Automatic Search English Cable ...
...minutes to complete, depending on the screen. Note: • The Auto Setup function will work only when you press POWER for a picture to the TV screen. • After the starting setup is made! Auto Setup Language Signal Type Automatic Search English Cable Start 22 52G0101A P14-29... indicator on the screen. Press ▲ or ▼ to select "Language", then press ◀ or ▶ to select "Air" or "Cable". Cable TV channels 4 Press ▲ or ▼ to install your regional cable service. : Select : Adjust Air - Auto Setup Language Signal Type Automatic Search English Cable ...

Owner's Manual - English
Page 23
... other menu options. Setup Closed Caption Language Video Label Auto Shut Off Aspect TOSHIBA Logo Light Reset >> English >> Off On On >> : Select : Adjust 5 Press EXIT/CANCEL to return to select "Language". Note: • If no buttons are pressed for a picture to appear on screen. 4 Press ◀ or ▶ to select ... DVD section also has its own menu 63 . 52G0101A P14-29.indd 23 23 1/5/09 3:03:00 PM Basic setup Setting the language This TV/DVD can display the on the front of the unit changes green. Setting the language POWER MENU ENTER / / / EXIT/CANCEL 1 To turn on...
... other menu options. Setup Closed Caption Language Video Label Auto Shut Off Aspect TOSHIBA Logo Light Reset >> English >> Off On On >> : Select : Adjust 5 Press EXIT/CANCEL to return to select "Language". Note: • If no buttons are pressed for a picture to appear on screen. 4 Press ◀ or ▶ to select ... DVD section also has its own menu 63 . 52G0101A P14-29.indd 23 23 1/5/09 3:03:00 PM Basic setup Setting the language This TV/DVD can display the on the front of the unit changes green. Setting the language POWER MENU ENTER / / / EXIT/CANCEL 1 To turn on...

Owner's Manual - English
Page 24
...up or down to the next channel set the Signal Type option to the Air mode. Main Menu Picture Audio Channel Lock Setup : Select ENTER:Set 1 Press MENU in your area. The TV menu screen will appear. Auto Ch Memory Signal Type Automatic Search Air Start 2 Press ▲ or... then press ▶ or ENTER. Air/Cable selection (digital channel only) Automatic search ENTER / / / EXIT/CANCEL MENU 1 Press MENU in the TV mode. Main Menu Picture Audio Channel Lock Setup : Select ENTER:Set 2 Press ▲ or ▼ to select "Channel", then press ▶ or ENTER. Basic setup To...
...up or down to the next channel set the Signal Type option to the Air mode. Main Menu Picture Audio Channel Lock Setup : Select ENTER:Set 1 Press MENU in your area. The TV menu screen will appear. Auto Ch Memory Signal Type Automatic Search Air Start 2 Press ▲ or... then press ▶ or ENTER. Air/Cable selection (digital channel only) Automatic search ENTER / / / EXIT/CANCEL MENU 1 Press MENU in the TV mode. Main Menu Picture Audio Channel Lock Setup : Select ENTER:Set 2 Press ▲ or ▼ to select "Channel", then press ▶ or ENTER. Basic setup To...
Owner's Manual - English
Page 25
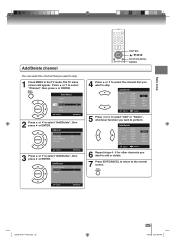
The TV menu screen will appear. Add/Delete Adding Channel >> Add/Delete >> Clear All >> ENTER / / / EXIT/CANCEL MENU 4 Press ▲ or ▼ to select the channel that ... ENTER. Press ▲ or ▼ to select "Add/Delete", then press ▶ or ENTER. Main Menu Picture Audio Channel Lock Setup : Select ENTER:Set 2 Press ▲ or ▼ to skip. 1 Press MENU in the TV mode. Add/Delete CH 2 3 3-001 3-002 4 Signal Analog Analog Digital Digital Analog Delete Add Delete Add Delete...
The TV menu screen will appear. Add/Delete Adding Channel >> Add/Delete >> Clear All >> ENTER / / / EXIT/CANCEL MENU 4 Press ▲ or ▼ to select the channel that ... ENTER. Press ▲ or ▼ to select "Add/Delete", then press ▶ or ENTER. Main Menu Picture Audio Channel Lock Setup : Select ENTER:Set 2 Press ▲ or ▼ to skip. 1 Press MENU in the TV mode. Add/Delete CH 2 3 3-001 3-002 4 Signal Analog Analog Digital Digital Analog Delete Add Delete Add Delete...

Owner's Manual - English
Page 26
...Clear All ENTER / / EXIT/CANCEL MENU If you find a new channel unregistered, you can add the new channel into the channel memory. Main Menu Picture Audio Channel Lock Setup : Select ENTER:Set 3 Press ▲ or ▼ to select "Clear All", then press ▶ or ENTER. The ... All >> : Select ENTER:Set 4 Press EXIT/CANCEL to return to the normal screen. The TV menu screen will appear. Press ▲ or ▼ to select "Add/Delete", then press ▶ or ENTER. Main Menu Picture Audio Channel Lock Setup : Select ENTER:Set 2 Press ▲ or ▼ to select "...
...Clear All ENTER / / EXIT/CANCEL MENU If you find a new channel unregistered, you can add the new channel into the channel memory. Main Menu Picture Audio Channel Lock Setup : Select ENTER:Set 3 Press ▲ or ▼ to select "Clear All", then press ▶ or ENTER. The ... All >> : Select ENTER:Set 4 Press EXIT/CANCEL to return to the normal screen. The TV menu screen will appear. Press ▲ or ▼ to select "Add/Delete", then press ▶ or ENTER. Main Menu Picture Audio Channel Lock Setup : Select ENTER:Set 2 Press ▲ or ▼ to select "...
Owner's Manual - English
Page 27
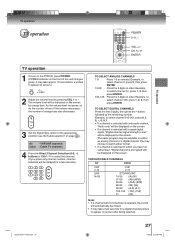
...TV operation TV operation 1 To turn on the TV/DVD, press POWER. (POWER indicator on either format. • If a channel is selected to appear on the screen. Example, to the appropriate position (see "Air/Cable selection" on the screen by orange bars. The same program may take approx. 10 seconds for a picture...be displayed on screen.) 2 Adjust the volume level by the remaining number. The volume level will be indicated on page 24 ). Cable TV channels 4 Press the Direct Channel Selection (0-9, -) buttons or CH / to select the channel. (If you have not subscribed, "...
...TV operation TV operation 1 To turn on the TV/DVD, press POWER. (POWER indicator on either format. • If a channel is selected to appear on the screen. Example, to the appropriate position (see "Air/Cable selection" on the screen by orange bars. The same program may take approx. 10 seconds for a picture...be displayed on screen.) 2 Adjust the volume level by the remaining number. The volume level will be indicated on page 24 ). Cable TV channels 4 Press the Direct Channel Selection (0-9, -) buttons or CH / to select the channel. (If you have not subscribed, "...
Owner's Manual - English
Page 28
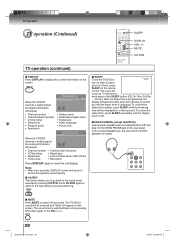
...if preset) • V-Chip rating • Signal type • Sleep timer • Audio information (Stereo, SAP or Mono) • Picture size • Resolution Press DISPLAY again to Sleep Timer 0h 10m turn off the sound. After the sleep time is operating. If you connect ...Broadcast program name • Signal type • Audio language • Picture size 14 Analog Cable Sleep Timer Off When the TV/DVD receives a analog signal, the analog information Mono Full 480i will return to normal TV-operation automatically. ■ CH RTN This button allows you were watching...
...if preset) • V-Chip rating • Signal type • Sleep timer • Audio information (Stereo, SAP or Mono) • Picture size • Resolution Press DISPLAY again to Sleep Timer 0h 10m turn off the sound. After the sleep time is operating. If you connect ...Broadcast program name • Signal type • Audio language • Picture size 14 Analog Cable Sleep Timer Off When the TV/DVD receives a analog signal, the analog information Mono Full 480i will return to normal TV-operation automatically. ■ CH RTN This button allows you were watching...
Owner's Manual - English
Page 29
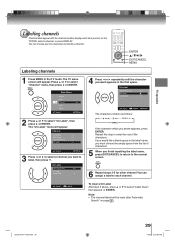
Main Menu Picture Audio Channel Lock Setup : Select ENTER:Set 2 Press ▲ or ▼ to select "Channel" menu, then press ▶ or ENTER. Press ▲ or ▼ to ...; repeatedly until the character you finish inputting the label name, press EXIT/CANCEL to return to the normal screen. 6 Repeat steps 3-5 for other channel. The TV menu screen will appear. ENTER / / / EXIT/CANCEL MENU Labeling channels 1 Press MENU in the first space. The "Ch Label" menu will appear. Ch Label Channel...
Main Menu Picture Audio Channel Lock Setup : Select ENTER:Set 2 Press ▲ or ▼ to select "Channel" menu, then press ▶ or ENTER. Press ▲ or ▼ to ...; repeatedly until the character you finish inputting the label name, press EXIT/CANCEL to return to the normal screen. 6 Repeat steps 3-5 for other channel. The TV menu screen will appear. ENTER / / / EXIT/CANCEL MENU Labeling channels 1 Press MENU in the first space. The "Ch Label" menu will appear. Ch Label Channel...
Owner's Manual - English
Page 30
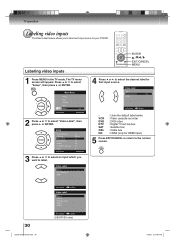
... DVD DTV SAT CBL HD : Uses the default label name : Video cassette recorder : DVD video : Digital TV set-top box : Satellite box : Cable box : HDMI (only for that input source. Main Menu Picture Audio Channel Lock Setup : Select ENTER:Set 2 Press ▲ or ▼ to select "Setup", then ... Setup Closed Caption Language Video Label Auto Shut Off Aspect TOSHIBA Logo Light Reset : Select >> English >> Off On On >> ENTER:Set 3 Press ▲ or ▼ to select an input which you to label each input source for your TV/DVD. Press ▲ or ▼ to select "Video...
... DVD DTV SAT CBL HD : Uses the default label name : Video cassette recorder : DVD video : Digital TV set-top box : Satellite box : Cable box : HDMI (only for that input source. Main Menu Picture Audio Channel Lock Setup : Select ENTER:Set 2 Press ▲ or ▼ to select "Setup", then ... Setup Closed Caption Language Video Label Auto Shut Off Aspect TOSHIBA Logo Light Reset : Select >> English >> Off On On >> ENTER:Set 3 Press ▲ or ▼ to select an input which you to label each input source for your TV/DVD. Press ▲ or ▼ to select "Video...
Owner's Manual - English
Page 31
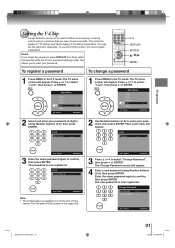
...Menu Picture Audio Channel Lock Setup : Select ENTER:Set 1 Press MENU in the TV mode. Lock Confirm Password ---- [0-9] : Select ENTER:Set Note: • The V-Chip feature is now registered. The Change Password screen will appear. Setting the V-Chip An age limitation can be set this data is transmitted. The TV ...ENTER:Set 52G0101A P30-36.indd 31 31 1/5/09 3:04:03 PM You may set to restrict children from viewing or hearing violent scenes or pictures that you to select "Lock", then press ▶ or ENTER. To use the V-Chip function, you forget the password, press DISPLAY four...
...Menu Picture Audio Channel Lock Setup : Select ENTER:Set 1 Press MENU in the TV mode. Lock Confirm Password ---- [0-9] : Select ENTER:Set Note: • The V-Chip feature is now registered. The Change Password screen will appear. Setting the V-Chip An age limitation can be set this data is transmitted. The TV ...ENTER:Set 52G0101A P30-36.indd 31 31 1/5/09 3:04:03 PM You may set to restrict children from viewing or hearing violent scenes or pictures that you to select "Lock", then press ▶ or ENTER. To use the V-Chip function, you forget the password, press DISPLAY four...
Owner's Manual - English
Page 32
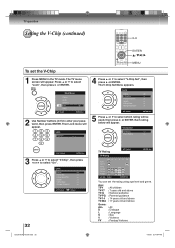
...select which rating will appear. Lock Password ---- 4 Press ▲ or ▼ to select "Lock", then press ▶ or ENTER. Age: TV-Y TV-Y7 TV-G TV-PG TV-14 TV-MA : All children : 7 years old and above : General audience : Parental guidance : 14 years old and above : 17 years old and above...or ▼ to select "V-Chip Set", then press ▶ or ENTER. Each rating below will be used, then press ▶ or ENTER. Main Menu Picture Audio Channel Lock Setup : Select ENTER:Set 2 Use Number buttons (0-9) to select "On" . Lock V-Chip On V-Chip Set >> V-Chip Set (DTV)...
...select which rating will appear. Lock Password ---- 4 Press ▲ or ▼ to select "Lock", then press ▶ or ENTER. Age: TV-Y TV-Y7 TV-G TV-PG TV-14 TV-MA : All children : 7 years old and above : General audience : Parental guidance : 14 years old and above : 17 years old and above...or ▼ to select "V-Chip Set", then press ▶ or ENTER. Each rating below will be used, then press ▶ or ENTER. Main Menu Picture Audio Channel Lock Setup : Select ENTER:Set 2 Use Number buttons (0-9) to select "On" . Lock V-Chip On V-Chip Set >> V-Chip Set (DTV)...
Owner's Manual - English
Page 33
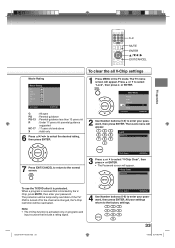
...05 PM Press ▲ or ▼ to select the desired rating, then press ENTER. Note: • The V-Chip function is protected. Main Menu Picture Audio Channel Lock Setup : Select ENTER:Set 2 Use Number buttons (0-9) to select "V-Chip Clear", then press ▶ or ENTER. • The ...Password screen will be reactivated. To use the TV/DVD after it is activated only on programs and input sources that is changed, the V-Chip restriction will appear. Lock Password ---- 7 Press EXIT/...
...05 PM Press ▲ or ▼ to select the desired rating, then press ENTER. Note: • The V-Chip function is protected. Main Menu Picture Audio Channel Lock Setup : Select ENTER:Set 2 Use Number buttons (0-9) to select "V-Chip Clear", then press ▶ or ENTER. • The ...Password screen will be reactivated. To use the TV/DVD after it is activated only on programs and input sources that is changed, the V-Chip restriction will appear. Lock Password ---- 7 Press EXIT/...
Owner's Manual - English
Page 34
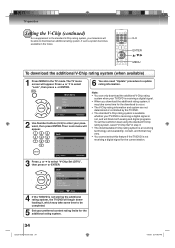
.... • The standard V-Chip rating system is available whether your TV/DVD is not receiving a digital signal for the additional rating system. 34 52G0101A P30-36.indd 34 1/5/09 3:04:06 PM Main Menu Picture Audio Channel Lock Setup : Select ENTER:Set 2 Use Number buttons (0-9) to update ...rating information. Then Lock menu will appear. Note: • You can only download the additional V-Chip rating system when your TV/DVD is receiving a digital signal. •...
.... • The standard V-Chip rating system is available whether your TV/DVD is not receiving a digital signal for the additional rating system. 34 52G0101A P30-36.indd 34 1/5/09 3:04:06 PM Main Menu Picture Audio Channel Lock Setup : Select ENTER:Set 2 Use Number buttons (0-9) to update ...rating information. Then Lock menu will appear. Note: • You can only download the additional V-Chip rating system when your TV/DVD is receiving a digital signal. •...
Owner's Manual - English
Page 35
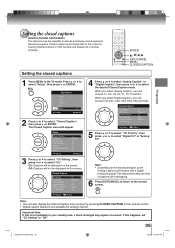
..."Digital Caption", you can choose C1, C2, C3, C4, T1, T2, T3 and T4. TV operation Setting the closed captions 1 Press MENU in the TV mode. Setup Closed Caption Language Video Label Auto Shut Off Aspect TOSHIBA Logo Light Reset : Select >> English >> Off On On >> ENTER:Set 3 Press ▲ ...• You can choose from CS1, CS2, CS3, CS4, CS5 and CS6. The Closed Caption menu will not be displayed on -screen. Main Menu Picture Audio Channel Lock Setup : Select ENTER:Set 2 Press ▲ or ▼ to select "Setup", then press ▶ or ENTER. Closed Caption CC...
..."Digital Caption", you can choose C1, C2, C3, C4, T1, T2, T3 and T4. TV operation Setting the closed captions 1 Press MENU in the TV mode. Setup Closed Caption Language Video Label Auto Shut Off Aspect TOSHIBA Logo Light Reset : Select >> English >> Off On On >> ENTER:Set 3 Press ▲ ...• You can choose from CS1, CS2, CS3, CS4, CS5 and CS6. The Closed Caption menu will not be displayed on -screen. Main Menu Picture Audio Channel Lock Setup : Select ENTER:Set 2 Press ▲ or ▼ to select "Setup", then press ▶ or ENTER. Closed Caption CC...


