Printable Spec Sheet
Page 2
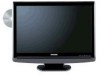
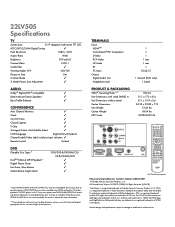
...18.04 lbs 022265001516 for illustrative purposes http://www.tacp.toshiba.com Customer Solutions: 800.631.3811 © Toshiba America Consumer Products, L.L.C. 82 Totowa Road, Wayne, NJ 07470 (2008). 22LV505 Specifications TV Screen Size 21.9" diagonal widescreen TFT LCD ATSC/NTSC/QAM Digital Tuning ✓ Pixel Resolution 1680...Label/Video Label w/direct input selection ✓ Remote Control Unified DVD Playable Disc Types* DivX®/WMA & MP3 Playback* Digital Picture Zoom Fast Scan, Slow-Motion Multi-Camera Angle Select DVD/DVD-R/DVD-RW/CD/ CD-R/CD-RW/VCD *Some DVD-R/DVD-RW...
...18.04 lbs 022265001516 for illustrative purposes http://www.tacp.toshiba.com Customer Solutions: 800.631.3811 © Toshiba America Consumer Products, L.L.C. 82 Totowa Road, Wayne, NJ 07470 (2008). 22LV505 Specifications TV Screen Size 21.9" diagonal widescreen TFT LCD ATSC/NTSC/QAM Digital Tuning ✓ Pixel Resolution 1680...Label/Video Label w/direct input selection ✓ Remote Control Unified DVD Playable Disc Types* DivX®/WMA & MP3 Playback* Digital Picture Zoom Fast Scan, Slow-Motion Multi-Camera Angle Select DVD/DVD-R/DVD-RW/CD/ CD-R/CD-RW/VCD *Some DVD-R/DVD-RW...
Owner's Manual - English
Page 6
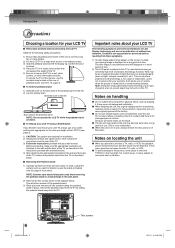
... not visible when the picture is not in use volatile liquids, such as insecticide, near a TV, radio, or VCR, the playback picture may become warm after image (ghost) may be used when removing the pedestal stand to avoid damage to wall mount your LCD TV The following safety precautions... and/or other immovable structure. therefore, Toshiba is not a sign of the surface. This will disappear in a short period of time. 2) The LCD panel contained in the diagram below . ■ Removing the Pedestal Stand 1) Carefully lay the front of the LCD TV (see item 19, page 4). ■...
... not visible when the picture is not in use volatile liquids, such as insecticide, near a TV, radio, or VCR, the playback picture may become warm after image (ghost) may be used when removing the pedestal stand to avoid damage to wall mount your LCD TV The following safety precautions... and/or other immovable structure. therefore, Toshiba is not a sign of the surface. This will disappear in a short period of time. 2) The LCD panel contained in the diagram below . ■ Removing the Pedestal Stand 1) Carefully lay the front of the LCD TV (see item 19, page 4). ■...

Owner's Manual - English
Page 7
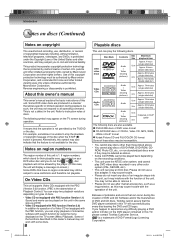
...into chapters. Wipe the disc from an air conditioner directly hits the unit. Introduction Prcautions (Continued)/Notes on discs Notes on the disc cause picture and sound deterioration. When you use the unit in a room in places subject to a warm area. On cleaning discs Fingerprints and dust... on moisture condensation Moisture condensation damages the unit. Leaving the TV connected to discs. When you use the unit in a humid area. ■ Never use any moisture. Do not use the unit when ...
...into chapters. Wipe the disc from an air conditioner directly hits the unit. Introduction Prcautions (Continued)/Notes on discs Notes on the disc cause picture and sound deterioration. When you use the unit in a room in places subject to a warm area. On cleaning discs Fingerprints and dust... on moisture condensation Moisture condensation damages the unit. Leaving the TV connected to discs. When you use the unit in a humid area. ■ Never use any moisture. Do not use the unit when ...
Owner's Manual - English
Page 8
... not be played on region numbers The region number of DVD and CD discs, Toshiba cannot assure that can play DVD video discs recorded in this TV, please contact Toshiba Customer Service. It may also indicate that allows specific or limited operation during operation. You may still be.... 74 minutes (single sided disc) 8 cm Approx. 20 minutes (single sided disc) DivX® Audio + Video (moving pictures) 12 cm It depends on the TV screen (Menu Playback). This product incorporates copyright protection technology that have no region code label may not be able to stop the...
... not be played on region numbers The region number of DVD and CD discs, Toshiba cannot assure that can play DVD video discs recorded in this TV, please contact Toshiba Customer Service. It may also indicate that allows specific or limited operation during operation. You may still be.... 74 minutes (single sided disc) 8 cm Approx. 20 minutes (single sided disc) DivX® Audio + Video (moving pictures) 12 cm It depends on the TV screen (Menu Playback). This product incorporates copyright protection technology that have no region code label may not be able to stop the...
Owner's Manual - English
Page 9
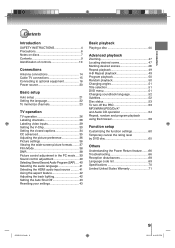
...;cation of controls 10 Connections Antenna connections 14 Cable TV connections 15 Connecting to optional equipment 16 Power source 20 Basic setup Auto setup 21 Setting the language 22 To memorize channels 23 TV operation TV operation 26 Labeling channels 28 Labeling video inputs 29 Setting... the V-Chip 30 Setting the closed captions 34 CC advanced 35 Adjusting the picture preference 36 Picture settings 36 Viewing the wide-screen picture formats........ 37...
...;cation of controls 10 Connections Antenna connections 14 Cable TV connections 15 Connecting to optional equipment 16 Power source 20 Basic setup Auto setup 21 Setting the language 22 To memorize channels 23 TV operation TV operation 26 Labeling channels 28 Labeling video inputs 29 Setting... the V-Chip 30 Setting the closed captions 34 CC advanced 35 Adjusting the picture preference 36 Picture settings 36 Viewing the wide-screen picture formats........ 37...
Owner's Manual - English
Page 17
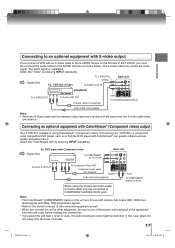
... the same time, the S-video cable takes precedence. Connecting your TV/DVD to COMPONENT AUDIO(L/R) IN jacks. DVD player with ColorStream® can greatly enhance picture quality and performance. The audio signal is capable of the TV/DVD, you must be connected to a component video compatible DVD ....1.9 4:45:00 PM laced signals and 480p, 720p progressive signals. • Refer to the ownerʼs manual of the connected equipment as a Toshiba DVD player with Component video : Signal flow To COMPONENT (Y, PB, PR) IN Back side To Audio (L/R) OUT To Component Video OUT...
... the same time, the S-video cable takes precedence. Connecting your TV/DVD to COMPONENT AUDIO(L/R) IN jacks. DVD player with ColorStream® can greatly enhance picture quality and performance. The audio signal is capable of the TV/DVD, you must be connected to a component video compatible DVD ....1.9 4:45:00 PM laced signals and 480p, 720p progressive signals. • Refer to the ownerʼs manual of the connected equipment as a Toshiba DVD player with Component video : Signal flow To COMPONENT (Y, PB, PR) IN Back side To Audio (L/R) OUT To Component Video OUT...
Owner's Manual - English
Page 18
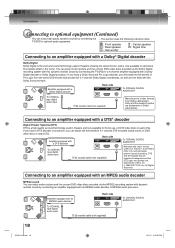
...; 1996-2007 DTS, Inc. Connecting to an amplifier equipped with an MPEG audio decoder MPEG2 sound You can enjoy motion picture and live concert DVD video discs encoded via the MPEG2 recording system with dynamic realistic sound by connecting an amplifier equipped with... sound tracks on DVD video discs or audio CDs. Connections Connecting to optional equipment (Continued) You can enjoy high quality dynamic sounds by connecting the TV/DVD to optional audio equipment. * This section uses the following reference mark. : Front speaker : Rear speaker : Sub woofer : Center speaker :...
...; 1996-2007 DTS, Inc. Connecting to an amplifier equipped with an MPEG audio decoder MPEG2 sound You can enjoy motion picture and live concert DVD video discs encoded via the MPEG2 recording system with dynamic realistic sound by connecting an amplifier equipped with... sound tracks on DVD video discs or audio CDs. Connections Connecting to optional equipment (Continued) You can enjoy high quality dynamic sounds by connecting the TV/DVD to optional audio equipment. * This section uses the following reference mark. : Front speaker : Rear speaker : Sub woofer : Center speaker :...
Owner's Manual - English
Page 21
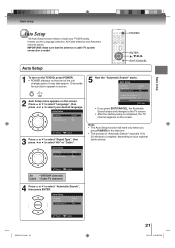
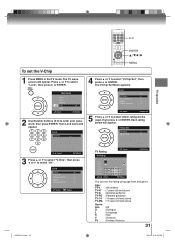
...: Adjust 21 08.1.9 4:45:05 PM Press ▲ or ▼ to select "Language", then press ◀ or ▶ to select your TV/DVD easily. Auto Setup Language Signal Type Automatic Search English Air Start 5 Now the "Automatic Search" starts. VHF/UHF channels Cable - Auto Setup Language.... Note: • The Auto Setup function will work only when you press POWER for a picture to appear on screen. 2 Auto Setup menu appears on your regional cable service. : Select : Adjust Air - Cable TV channels 4 Press ▲ or ▼ to select "Air" or "Cable". Basic setup ...
...: Adjust 21 08.1.9 4:45:05 PM Press ▲ or ▼ to select "Language", then press ◀ or ▶ to select your TV/DVD easily. Auto Setup Language Signal Type Automatic Search English Air Start 5 Now the "Automatic Search" starts. VHF/UHF channels Cable - Auto Setup Language.... Note: • The Auto Setup function will work only when you press POWER for a picture to appear on screen. 2 Auto Setup menu appears on your regional cable service. : Select : Adjust Air - Cable TV channels 4 Press ▲ or ▼ to select "Air" or "Cable". Basic setup ...
Owner's Manual - English
Page 22
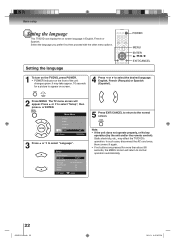
...French (Français) or Spanish (Español). 2 Press MENU. Main Menu Picture Audio Channel Lock Setup : Select ENTER:Set 3 Press ▲ or ▼ to normal operation automatically. 22 J50S0101A.indb 22 08.1.9 4:45:06 PM Setting the language POWER MENU ENTER / / / EXIT/CANCEL... 1 To turn on the TV/DVD, press POWER. • POWER indicator on screen language in English, French or Spanish. The TV menu screen will return to ...
...French (Français) or Spanish (Español). 2 Press MENU. Main Menu Picture Audio Channel Lock Setup : Select ENTER:Set 3 Press ▲ or ▼ to normal operation automatically. 22 J50S0101A.indb 22 08.1.9 4:45:06 PM Setting the language POWER MENU ENTER / / / EXIT/CANCEL... 1 To turn on the TV/DVD, press POWER. • POWER indicator on screen language in English, French or Spanish. The TV menu screen will return to ...

Owner's Manual - English
Page 23
...available in your area. When shipped from the factory, this TV/DVD with a channel memory feature which allows channels to skip up or down to the next channel set the Tuning Band menu option to select "Signal Type". Main Menu Picture Audio Channel Lock Setup : Select ENTER:Set 1 Press ...MENU in the TV mode. Channel Add/Delete >> Auto Ch Memory >> Ch Label >> 2 Press ▲ or ▼ to select "Air" or...
...available in your area. When shipped from the factory, this TV/DVD with a channel memory feature which allows channels to skip up or down to the next channel set the Tuning Band menu option to select "Signal Type". Main Menu Picture Audio Channel Lock Setup : Select ENTER:Set 1 Press ...MENU in the TV mode. Channel Add/Delete >> Auto Ch Memory >> Ch Label >> 2 Press ▲ or ▼ to select "Air" or...

Owner's Manual - English
Page 24
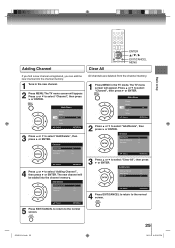
...Add Delete Add Delete : Select : Adjust 5 Press ◀ or ▶ to select "Add" or "Delete", whichever function you want to skip. The TV menu screen will appear. Press ▲ or ▼ to select "Add/Delete", then press ▶ or ENTER. Channel Add/Delete >> Auto Ch Memory >>...Continued) Add/Delete channel You can select the channel that you want to perform. Main Menu Picture Audio Channel Lock Setup : Select ENTER:Set 2 Press ▲ or ▼ to skip. 1 Press MENU in the TV mode. Add/Delete CH 2 3 3-001 3-002 4 Signal Analog Analog Digital Digital Analog ...
...Add Delete Add Delete : Select : Adjust 5 Press ◀ or ▶ to select "Add" or "Delete", whichever function you want to skip. The TV menu screen will appear. Press ▲ or ▼ to select "Add/Delete", then press ▶ or ENTER. Channel Add/Delete >> Auto Ch Memory >>...Continued) Add/Delete channel You can select the channel that you want to perform. Main Menu Picture Audio Channel Lock Setup : Select ENTER:Set 2 Press ▲ or ▼ to skip. 1 Press MENU in the TV mode. Add/Delete CH 2 3 3-001 3-002 4 Signal Analog Analog Digital Digital Analog ...
Owner's Manual - English
Page 25
.../ / EXIT/CANCEL MENU If you find a new channel unregistered, you can add the new channel into the channel memory. The TV menu screen will appear. Main Menu Picture Audio Channel Lock Setup : Select ENTER:Set 3 Press ▲ or ▼ to the normal screen. The new channel will be... added into the channel memory. 1 Tune in the TV mode. All channels are deleted from the channel memory. 1 Press MENU in the ...
.../ / EXIT/CANCEL MENU If you find a new channel unregistered, you can add the new channel into the channel memory. The TV menu screen will appear. Main Menu Picture Audio Channel Lock Setup : Select ENTER:Set 3 Press ▲ or ▼ to the normal screen. The new channel will be... added into the channel memory. 1 Tune in the TV mode. All channels are deleted from the channel memory. 1 Press MENU in the ...
Owner's Manual - English
Page 26
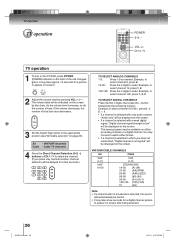
..., press 1, 2. 100-125: Press the 3 digits in order. You may take approx. 10 seconds for a digital channel picture to appear on screen after being selected. 26 J50S0101A.indb 26 08.1.9 4:45:12 PM Cable TV channels 4 Press the Direct Channel Selection (0-9, -) buttons or CH / to watch either an analog channel or a digital...
..., press 1, 2. 100-125: Press the 3 digits in order. You may take approx. 10 seconds for a digital channel picture to appear on screen after being selected. 26 J50S0101A.indb 26 08.1.9 4:45:12 PM Cable TV channels 4 Press the Direct Channel Selection (0-9, -) buttons or CH / to watch either an analog channel or a digital...
Owner's Manual - English
Page 27
...Full 1080i • Station name • Broadcast program name • Signal type • Audio language • Picture size • Clock 14 Analog Cable Sleep Timer Off When the TV/DVD receives a analog signal, the analog information Full 480i will appear on the front panel. The... TV/DVD's sound will be silenced and "Mute" will appear. • Channel number • V-Chip rating • Sleep timer • Picture size • Channel label (if preset) • Signal type • Audio ...
...Full 1080i • Station name • Broadcast program name • Signal type • Audio language • Picture size • Clock 14 Analog Cable Sleep Timer Off When the TV/DVD receives a analog signal, the analog information Full 480i will appear on the front panel. The... TV/DVD's sound will be silenced and "Mute" will appear. • Channel number • V-Chip rating • Sleep timer • Picture size • Channel label (if preset) • Signal type • Audio ...
Owner's Manual - English
Page 28
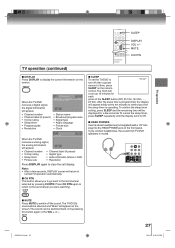
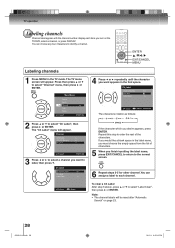
You can assign a label to each time you turn on page 23. 28 J50S0101A.indb 28 08.1.9 4:45:14 PM Main Menu Picture Audio Channel Lock Setup : Select ENTER:Set 2 Press ▲ or ▼ to select "Channel" menu, then press ▶ or ENTER. Ch Label Channel ...>> Auto Ch Memory >> Ch Label >> : Select ENTER:Set 3 Press ◀ or ▶ to select a channel you want to label, then press ▼. The TV menu screen will appear. Ch Label Channel Number Ch Label Label Clear 15-1 >> 4 Press ◀ or ▶ repeatedly until the character you want appears in...
You can assign a label to each time you turn on page 23. 28 J50S0101A.indb 28 08.1.9 4:45:14 PM Main Menu Picture Audio Channel Lock Setup : Select ENTER:Set 2 Press ▲ or ▼ to select "Channel" menu, then press ▶ or ENTER. Ch Label Channel ...>> Auto Ch Memory >> Ch Label >> : Select ENTER:Set 3 Press ◀ or ▶ to select a channel you want to label, then press ▼. The TV menu screen will appear. Ch Label Channel Number Ch Label Label Clear 15-1 >> 4 Press ◀ or ▶ repeatedly until the character you want appears in...

Owner's Manual - English
Page 29
Press ▲ or ▼ to select "Video Label", then press ▶ or ENTER. Main Menu Picture Audio Channel Lock Setup : Select ENTER:Set 2 Press ▲ or ▼ to select "Setup", then press ▶ or ENTER. Video Label Video - ... / / / EXIT/CANCEL MENU 4 Press ◀ or ▶ to label each input source for that input source. ColorStream HD SAT HDMI - : Select : Adjust - HDMI - TV operation Labeling video inputs The Video Label feature allows you want to the normal screen. : Select : Adjust J50S0101A.indb 29 29 08.1.9 4:45:16 PM...
Press ▲ or ▼ to select "Video Label", then press ▶ or ENTER. Main Menu Picture Audio Channel Lock Setup : Select ENTER:Set 2 Press ▲ or ▼ to select "Setup", then press ▶ or ENTER. Video Label Video - ... / / / EXIT/CANCEL MENU 4 Press ◀ or ▶ to label each input source for that input source. ColorStream HD SAT HDMI - : Select : Adjust - HDMI - TV operation Labeling video inputs The Video Label feature allows you want to the normal screen. : Select : Adjust J50S0101A.indb 29 29 08.1.9 4:45:16 PM...
Owner's Manual - English
Page 30
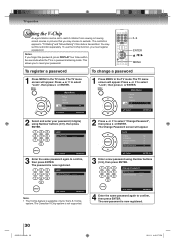
... Setting the V-Chip An age limitation can be set to restrict children from viewing or hearing violent scenes or pictures that you may set this data is transmitted. The TV menu screen will appear. Lock V-Chip On V-Chip Set >> V-Chip Set (DTV) >> Update >> Change...Password >> [0-9] : Select ENTER:Set 3 Enter the same password again to select "Change Password", then press ▶ or ENTER. The TV menu screen will appear. Main Menu Picture Audio Channel Lock Setup : Select ENTER:Set 2 Select and enter your password. 0-9 ENTER / / MENU To register a password To ...
... Setting the V-Chip An age limitation can be set to restrict children from viewing or hearing violent scenes or pictures that you may set this data is transmitted. The TV menu screen will appear. Lock V-Chip On V-Chip Set >> V-Chip Set (DTV) >> Update >> Change...Password >> [0-9] : Select ENTER:Set 3 Enter the same password again to select "Change Password", then press ▶ or ENTER. The TV menu screen will appear. Main Menu Picture Audio Channel Lock Setup : Select ENTER:Set 2 Select and enter your password. 0-9 ENTER / / MENU To register a password To ...
Owner's Manual - English
Page 31
... : All D : Dialogue L : Language S : Sex V : Violence FV : Fantasy Violence 31 08.1.9 4:45:19 PM Main Menu Picture Audio Channel Lock Setup : Select ENTER:Set 2 Use Number buttons (0-9) to select "Lock", then press ▶ or ENTER. The TV menu screen will appear. Then Lock menu will appear. Each rating below will be used, then...
... : All D : Dialogue L : Language S : Sex V : Violence FV : Fantasy Violence 31 08.1.9 4:45:19 PM Main Menu Picture Audio Channel Lock Setup : Select ENTER:Set 2 Use Number buttons (0-9) to select "Lock", then press ▶ or ENTER. The TV menu screen will appear. Then Lock menu will appear. Each rating below will be used, then...

Owner's Manual - English
Page 33
...Chip On V-Chip Set >> V-Chip Set (DTV) >> Update >> Change Password >> : Select : Adjust 4 If the TV/DVD is not receiving a digital signal for the additional rating system. Main Menu Picture Audio Channel Lock Setup : Select ENTER:Set 2 Use Number buttons (0-9) to select "V-Chip Set (DTV)", then press ▶...technology, and availability, content, and format may vary. • You cannot select this feature if the TV/DVD is not storing the additional rating system, the TV/DVD will begin downloading it may take some time to be able to download an additional rating system, ...
...Chip On V-Chip Set >> V-Chip Set (DTV) >> Update >> Change Password >> : Select : Adjust 4 If the TV/DVD is not receiving a digital signal for the additional rating system. Main Menu Picture Audio Channel Lock Setup : Select ENTER:Set 2 Use Number buttons (0-9) to select "V-Chip Set (DTV)", then press ▶...technology, and availability, content, and format may vary. • You cannot select this feature if the TV/DVD is not storing the additional rating system, the TV/DVD will begin downloading it may take some time to be able to download an additional rating system, ...
Owner's Manual - English
Page 34
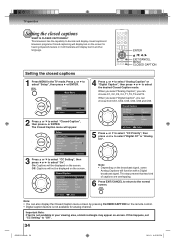
... the closed captions 1 Press MENU in the TV mode. When you select "Analog Caption", you can choose from CS1...ENTER. Note: • Depending on -screen. The Closed Caption menu will not be displayed on the screen. Main Menu Picture Audio Channel Lock Setup : Select ENTER:Set 2 Press ▲ or ▼ to select "Digital CC" or "Analog... or ▼ to select "CC Setting", then press ◀ or ▶ to "Off". 34 J50S0101A.indb 34 08.1.9 4:45:22 PM This television has the capability to the normal screen. : Select : Adjust Note: • You can choose C1, C2, C3...
... the closed captions 1 Press MENU in the TV mode. When you select "Analog Caption", you can choose from CS1...ENTER. Note: • Depending on -screen. The Closed Caption menu will not be displayed on the screen. Main Menu Picture Audio Channel Lock Setup : Select ENTER:Set 2 Press ▲ or ▼ to select "Digital CC" or "Analog... or ▼ to select "CC Setting", then press ◀ or ▶ to "Off". 34 J50S0101A.indb 34 08.1.9 4:45:22 PM This television has the capability to the normal screen. : Select : Adjust Note: • You can choose C1, C2, C3...


