
User Manual
Page 1
Voyage™ 200 Graphing Calculator 1
Voyage™ 200 Graphing Calculator 1

User Manual
Page 2
...equipment generates, uses, and can try to correct the interference by any other party. Voyage™ 200 Graphing Calculator Graphing Calculator 2 Important Information Texas Instruments makes no warranty, either express or implied, including but not limited to radio communications. USA FCC Information Concerning ...separation between the equipment and receiver. • Connect the equipment into an outlet on an "as-is no event shall Texas Instruments be liable for special, collateral, incidental, or consequential damages in connection with or arising out of the purchase or use of...
...equipment generates, uses, and can try to correct the interference by any other party. Voyage™ 200 Graphing Calculator Graphing Calculator 2 Important Information Texas Instruments makes no warranty, either express or implied, including but not limited to radio communications. USA FCC Information Concerning ...separation between the equipment and receiver. • Connect the equipment into an outlet on an "as-is no event shall Texas Instruments be liable for special, collateral, incidental, or consequential damages in connection with or arising out of the purchase or use of...

User Manual
Page 3
Caution: Any changes or modifications to this equipment not expressly approved by Texas Instruments may void your authority to operate the equipment. © 2005 Texas Instruments Incorporated Windows and Macintosh are trademarks of their respective owners. Voyage™ 200 Graphing Calculator Graphing Calculator 3 • Consult the dealer or an experienced radio/television technician for help.
Caution: Any changes or modifications to this equipment not expressly approved by Texas Instruments may void your authority to operate the equipment. © 2005 Texas Instruments Incorporated Windows and Macintosh are trademarks of their respective owners. Voyage™ 200 Graphing Calculator Graphing Calculator 3 • Consult the dealer or an experienced radio/television technician for help.

User Manual
Page 4
Turning on the calculator. instead of the calculator. 2. Note: If your product and insert them in the battery compartment. 3. To avoid losing Apps, do not remove the batteries during initialization. (You can re-... (+ and -) diagram in the battery compartment. The backup battery is already installed, and the AAA batteries are provided with your calculator initializes the preinstalled Apps, a progress bar will appear with the calculator, press ´. The Apps desktop appears. Unwrap the four AAA batteries provided with the product. 1. The cover should snap into...
Turning on the calculator. instead of the calculator. 2. Note: If your product and insert them in the battery compartment. 3. To avoid losing Apps, do not remove the batteries during initialization. (You can re-... (+ and -) diagram in the battery compartment. The backup battery is already installed, and the AAA batteries are provided with your calculator initializes the preinstalled Apps, a progress bar will appear with the calculator, press ´. The Apps desktop appears. Unwrap the four AAA batteries provided with the product. 1. The cover should snap into...

User Manual
Page 5
...; Select and edit categories of Apps. • View all of the Apps installed on the Apps desktop as icons organized in categories for operating your calculator. • View the full name of the highlighted App. • View and edit the time and date. • Check status line information. • View split...
...; Select and edit categories of Apps. • View all of the Apps installed on the Apps desktop as icons organized in categories for operating your calculator. • View the full name of the highlighted App. • View and edit the time and date. • Check status line information. • View split...
User Manual
Page 7
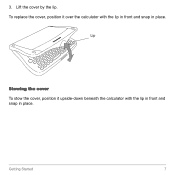
Lip Stowing the cover To stow the cover, position it over the calculator with the lip in front and snap in place. Lift the cover by the lip. To replace the cover, position it upside-down beneath the calculator with the lip in front and snap in place. Getting Started 7 3.
Lip Stowing the cover To stow the cover, position it over the calculator with the lip in front and snap in place. Lift the cover by the lip. To replace the cover, position it upside-down beneath the calculator with the lip in front and snap in place. Getting Started 7 3.
User Manual
Page 8
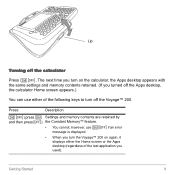
... 2 ® if an error message is displayed. • When you turn off the Voyage™ 200. Getting Started 8 Lip Turning off the Apps desktop, the calculator Home screen appears.) You can use either the Home screen or the Apps desktop (regardless of the following keys to turn the Voyage™ 200...
... 2 ® if an error message is displayed. • When you turn off the Voyage™ 200. Getting Started 8 Lip Turning off the Apps desktop, the calculator Home screen appears.) You can use either the Home screen or the Apps desktop (regardless of the following keys to turn the Voyage™ 200...
User Manual
Page 9
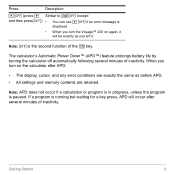
.... Getting Started 9 Note: ® is paused. When you turn the Voyage™ 200 on the calculator after several minutes of inactivity. The calculator's Automatic Power Down™ (APD™) feature prolongs battery life by turning the calculator off automatically following several minutes of inactivity. If a program is running but waiting for a key press...
.... Getting Started 9 Note: ® is paused. When you turn the Voyage™ 200 on the calculator after several minutes of inactivity. The calculator's Automatic Power Down™ (APD™) feature prolongs battery life by turning the calculator off automatically following several minutes of inactivity. If a program is running but waiting for a key press...
User Manual
Page 15
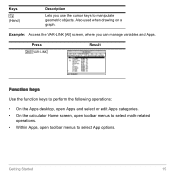
Getting Started 15 Keys 1 (Hand) Description Lets you can manage variables and Apps. Press 2° Result Function keys Use the function keys to perform the following operations: • On the Apps desktop, open Apps and select or edit Apps categories. • On the calculator Home screen, open toolbar menus to select math-related operations. • Within Apps, open toolbar menus to manipulate geometric objects. Also used when drawing on a graph. Example: Access the VAR-LINK [All] screen, where you use the cursor keys to select App options.
Getting Started 15 Keys 1 (Hand) Description Lets you can manage variables and Apps. Press 2° Result Function keys Use the function keys to perform the following operations: • On the Apps desktop, open Apps and select or edit Apps categories. • On the calculator Home screen, open toolbar menus to select math-related operations. • Within Apps, open toolbar menus to manipulate geometric objects. Also used when drawing on a graph. Example: Access the VAR-LINK [All] screen, where you use the cursor keys to select App options.
User Manual
Page 17
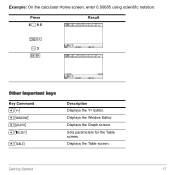
Getting Started 17 Displays the Graph screen. Displays the Table screen. Press 6¶85 Result 2^ ?3 ¸ Other important keys Key Command 8# 8$ 8% 8& 8' Description Displays the Y= Editor. Displays the Window Editor. Sets parameters for the Table screen. Example: On the calculator Home screen, enter 0.00685 using scientific notation.
Getting Started 17 Displays the Graph screen. Displays the Table screen. Press 6¶85 Result 2^ ?3 ¸ Other important keys Key Command 8# 8$ 8% 8& 8' Description Displays the Y= Editor. Displays the Window Editor. Sets parameters for the Table screen. Example: On the calculator Home screen, enter 0.00685 using scientific notation.

User Manual
Page 19
Getting Started 19 Deletes the character to the right of the active App. • With the Apps desktop off, displays the calculator Home screen. Displays the MEMORY screen. Displays the CHAR menu, which lets you select Greek letters, international accented characters, and other special characters.. • In ...
Getting Started 19 Deletes the character to the right of the active App. • With the Apps desktop off, displays the calculator Home screen. Displays the MEMORY screen. Displays the CHAR menu, which lets you select Greek letters, international accented characters, and other special characters.. • In ...
User Manual
Page 23
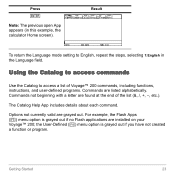
Getting Started 23 Using the Catalog to access commands Use the Catalog to English, repeat the steps, selecting 1:English in this example, the calculator Home screen). For example, the Flash Apps ( ...) menu option is grayed out if you have not created a function or program. Commands not beginning with a letter ...
Getting Started 23 Using the Catalog to access commands Use the Catalog to English, repeat the steps, selecting 1:English in this example, the calculator Home screen). For example, the Flash Apps ( ...) menu option is grayed out if you have not created a function or program. Commands not beginning with a letter ...
User Manual
Page 24
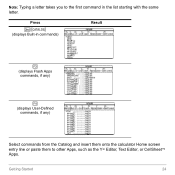
Note: Typing a letter takes you to other Apps, such as the Y= Editor, Text Editor, or CellSheet Apps. Getting Started 24 Press 2E (displays Built-in commands) Result ... (displays Flash Apps commands, if any) † (displays User-Defined commands, if any) Select commands from the Catalog and insert them onto the calculator Home screen entry line or paste them to the first command in the list starting with the same letter.
Note: Typing a letter takes you to other Apps, such as the Y= Editor, Text Editor, or CellSheet Apps. Getting Started 24 Press 2E (displays Built-in commands) Result ... (displays Flash Apps commands, if any) † (displays User-Defined commands, if any) Select commands from the Catalog and insert them onto the calculator Home screen entry line or paste them to the first command in the list starting with the same letter.
User Manual
Page 25
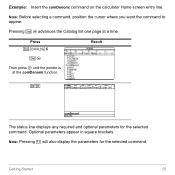
Getting Started 25 Pressing 2 D advances the Catalog list one page at the comDenom( function. ¸ The status line displays any required and optional parameters for the selected command. Optional parameters appear in square brackets. Note: Pressing ƒ will also display the parameters for the selected command. Press 2E C Result 2D Then press D until the pointer is at a time. Example: Insert the comDenom( command on the calculator Home screen entry line. Note: Before selecting a command, position the cursor where you want the command to appear.
Getting Started 25 Pressing 2 D advances the Catalog list one page at the comDenom( function. ¸ The status line displays any required and optional parameters for the selected command. Optional parameters appear in square brackets. Note: Pressing ƒ will also display the parameters for the selected command. Press 2E C Result 2D Then press D until the pointer is at a time. Example: Insert the comDenom( command on the calculator Home screen entry line. Note: Before selecting a command, position the cursor where you want the command to appear.
User Manual
Page 26
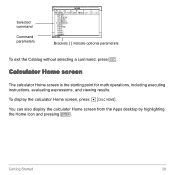
You can also display the calculator Home screen from the Apps desktop by highlighting the Home icon and pressing ¸. Getting Started 26 Calculator Home screen The calculator Home screen is the starting point for math operations, including executing instructions, evaluating expressions, and viewing results. Selected command Command parameters Brackets [ ] indicate optional parameters To exit the Catalog without selecting a command, press N. To display the calculator Home screen, press: ¹ ".
You can also display the calculator Home screen from the Apps desktop by highlighting the Home icon and pressing ¸. Getting Started 26 Calculator Home screen The calculator Home screen is the starting point for math operations, including executing instructions, evaluating expressions, and viewing results. Selected command Command parameters Brackets [ ] indicate optional parameters To exit the Catalog without selecting a command, press N. To display the calculator Home screen, press: ¹ ".
User Manual
Page 27
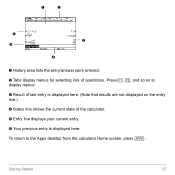
To return to display menus. Ì Result of last entry is displayed here. (Note that results are not displayed on to the Apps desktop from the calculator Home screen, press O. Getting Started 27 Press ƒ, „, and so on the entry line.) Í Status line shows the current state of operations. Ê Ë Ï Ì Î Í Ê History area lists the entry/answer pairs entered. Ë Tabs display menus for selecting lists of the calculator. Î Entry line displays your current entry. Ï Your previous entry is displayed here.
To return to display menus. Ì Result of last entry is displayed here. (Note that results are not displayed on to the Apps desktop from the calculator Home screen, press O. Getting Started 27 Press ƒ, „, and so on the entry line.) Í Status line shows the current state of operations. Ê Ë Ï Ì Î Í Ê History area lists the entry/answer pairs entered. Ë Tabs display menus for selecting lists of the calculator. Î Entry line displays your current entry. Ï Your previous entry is displayed here.
User Manual
Page 28
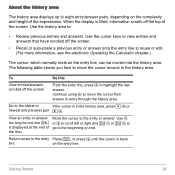
... line (8 is filled, information scrolls off the screen From the entry line, press C to reuse or edit. (For more information, see the electronic Operating the Calculator chapter.) The cursor, which normally rests on the entry line, can be moved into the history area. Getting Started 28
... line (8 is filled, information scrolls off the screen From the entry line, press C to reuse or edit. (For more information, see the electronic Operating the Calculator chapter.) The cursor, which normally rests on the entry line, can be moved into the history area. Getting Started 28
User Manual
Page 29
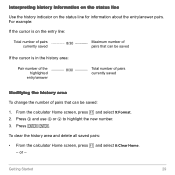
... history area To change the number of pairs that can be saved: 1. To clear the history area and delete all saved pairs: • From the calculator Home screen, press ƒ and select 8:Clear Home. - From the...
... history area To change the number of pairs that can be saved: 1. To clear the history area and delete all saved pairs: • From the calculator Home screen, press ƒ and select 8:Clear Home. - From the...
User Manual
Page 30
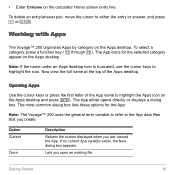
... the screen displayed when you open an existing file. Getting Started 30 Working with Apps The Voyage™ 200 organizes Apps by category on the calculator Home screen entry line. Lets you last viewed the App. The most common dialog box lists these options for the selected category appear on the...
... the screen displayed when you open an existing file. Getting Started 30 Working with Apps The Voyage™ 200 organizes Apps by category on the calculator Home screen entry line. Lets you last viewed the App. The most common dialog box lists these options for the selected category appear on the...
User Manual
Page 39
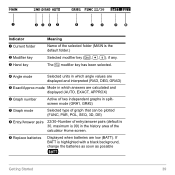
...; Î Ï ÐÑ ÒÓ Indicator Ê Current folder Ë Modifier key Ì Hand key Meaning Name of the calculator Home screen. Ò Replace batteries Displayed when batteries are calculated and displayed (AUTO, EXACT, APPROX) Ï Graph number Active of two independent graphs in splitscreen mode (GR#1, GR#2) Ð Graph mode...
...; Î Ï ÐÑ ÒÓ Indicator Ê Current folder Ë Modifier key Ì Hand key Meaning Name of the calculator Home screen. Ò Replace batteries Displayed when batteries are calculated and displayed (AUTO, EXACT, APPROX) Ï Graph number Active of two independent graphs in splitscreen mode (GR#1, GR#2) Ð Graph mode...


