
User Guide
Page 5
Connecting the Router 6 2.1 System Requirements 6 2.2 Installation Environment Requirements 6 2.3 Connecting the Router 6 Chapter 3. Configuring the Router 16 4.1 Login ...16 4.2 Status ...16 4.3 Quick Setup...17 4.4 QSS...18 4.5 Network ...24 4.5.1 LAN...24 4.5.2 WAN ...25 4.5.3 MAC Clone ...34 4.6 Wireless ...35 ... Guide 10 Chapter 4. Introduction...2 1.1 Overview of the Router 2 1.2 Conventions ...2 1.3 Main Features ...3 1.4 Panel Layout ...3 1.4.1 The Front Panel 3 1.4.2 The Rear Panel 4 Chapter 2. TL-WR940N Wireless N Router CONTENTS Package Contents ...1 Chapter 1.
Connecting the Router 6 2.1 System Requirements 6 2.2 Installation Environment Requirements 6 2.3 Connecting the Router 6 Chapter 3. Configuring the Router 16 4.1 Login ...16 4.2 Status ...16 4.3 Quick Setup...17 4.4 QSS...18 4.5 Network ...24 4.5.1 LAN...24 4.5.2 WAN ...25 4.5.3 MAC Clone ...34 4.6 Wireless ...35 ... Guide 10 Chapter 4. Introduction...2 1.1 Overview of the Router 2 1.2 Conventions ...2 1.3 Main Features ...3 1.4 Panel Layout ...3 1.4.1 The Front Panel 3 1.4.2 The Rear Panel 4 Chapter 2. TL-WR940N Wireless N Router CONTENTS Package Contents ...1 Chapter 1.
User Guide
Page 17
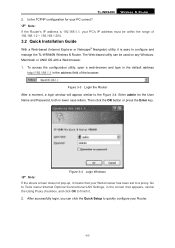
...: Figure 3-4 Login Windows If the above screen does not pop-up, it means that appears, cancel the Using Proxy checkbox, and click OK to the Figure 3-4. Enter admin for your PC correct? ) Note: If the Router's IP address is easy to configure and manage the TL-WR940N Wireless N Router.... The Web-based utility can click the Quick Setup to a proxy. Go to Tools menu>Internet Options>Connections>LAN Settings, in lower case letters. Figure 3-3 Login the Router After a moment, a login window will appear, similar to finish it...
...: Figure 3-4 Login Windows If the above screen does not pop-up, it means that appears, cancel the Using Proxy checkbox, and click OK to the Figure 3-4. Enter admin for your PC correct? ) Note: If the Router's IP address is easy to configure and manage the TL-WR940N Wireless N Router.... The Web-based utility can click the Quick Setup to a proxy. Go to Tools menu>Internet Options>Connections>LAN Settings, in lower case letters. Figure 3-3 Login the Router After a moment, a login window will appear, similar to finish it...
User Guide
Page 23
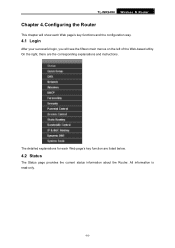
On the right, there are listed below. 4.2 Status The Status page provides the current status information about the Router. All information is read-only. -16- The detailed explanations for each Web page's key functions and the configuration way. 4.1 Login After your successful login, you will show each Web page's key function are the corresponding explanations and instructions. TL-WR940N Wireless N Router Chapter 4. Configuring the Router This chapter will see the fifteen main menus on the left of the Web-based utility.
On the right, there are listed below. 4.2 Status The Status page provides the current status information about the Router. All information is read-only. -16- The detailed explanations for each Web page's key functions and the configuration way. 4.1 Login After your successful login, you will show each Web page's key function are the corresponding explanations and instructions. TL-WR940N Wireless N Router Chapter 4. Configuring the Router This chapter will see the fifteen main menus on the left of the Web-based utility.

User Guide
Page 32
... the size of your ISP, including IP -25- You can 't be changed. ¾ IP Address - The physical address of the WAN on the screen below. 1. TL-WR940N Wireless N Router ¾ MAC Address - Dynamic IP This page displays the WAN IP parameters assigned dynamically by your Router or reset it in the same... the LAN. If you set is not in dotted-decimal notation (factory default: 192.168.1.1). ¾ Subnet Mask - Normally use the new IP Address to login the Router. 2. Enter the IP address of the network.
... the size of your ISP, including IP -25- You can 't be changed. ¾ IP Address - The physical address of the WAN on the screen below. 1. TL-WR940N Wireless N Router ¾ MAC Address - Dynamic IP This page displays the WAN IP parameters assigned dynamically by your Router or reset it in the same... the LAN. If you set is not in dotted-decimal notation (factory default: 192.168.1.1). ¾ Subnet Mask - Normally use the new IP Address to login the Router. 2. Enter the IP address of the network.
User Guide
Page 36
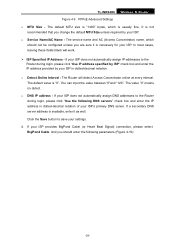
... by your ISP. You can input the value between "0"and "120". If your ISP does not automatically assign DNS addresses to the Router during login, please click "Use the following parameters (Figure 4-10): -29- If your settings. 4. And you change the default MTU Size unless required ..., enter it is "0". If a secondary DNS server address is not recommended that you should not be configured unless you are sure it as well. TL-WR940N Wireless N Router Figure 4-9 PPPoE Advanced Settings ¾ MTU Size - The default MTU size is "1480" bytes, which should enter the following DNS...
... by your ISP. You can input the value between "0"and "120". If your ISP does not automatically assign DNS addresses to the Router during login, please click "Use the following parameters (Figure 4-10): -29- If your settings. 4. And you change the default MTU Size unless required ..., enter it is "0". If a secondary DNS server address is not recommended that you should not be configured unless you are sure it as well. TL-WR940N Wireless N Router Figure 4-9 PPPoE Advanced Settings ¾ MTU Size - The default MTU size is "1480" bytes, which should enter the following DNS...

User Guide
Page 84
Click the Login button to log in to log out of the DDNS service connection is displayed here. Type the Password for your DDNS account. 3. Click Logout to ... will appear as shown in Figure 4-66. Figure 4-66 Comexe.cn DDNS Settings To set up for DDNS, follow these instructions: 1. 4.15.1 Comexe.cn DDNS TL-WR940N Wireless N Router If the dynamic DNS Service Provider you select is www.dyndns.org, the page will appear as shown in Figure 4-67. -77-
Click the Login button to log in to log out of the DDNS service connection is displayed here. Type the Password for your DDNS account. 3. Click Logout to ... will appear as shown in Figure 4-66. Figure 4-66 Comexe.cn DDNS Settings To set up for DDNS, follow these instructions: 1. 4.15.1 Comexe.cn DDNS TL-WR940N Wireless N Router If the dynamic DNS Service Provider you select is www.dyndns.org, the page will appear as shown in Figure 4-67. -77-

User Guide
Page 85
Click the Login button to log in to logout of the DDNS service connection is www.no-ip.com, the page will appear as shown in Figure 4-68.. -... provider here. 4. Type the Password for DDNS, follow these instructions: 1. Type the Domain Name you select is displayed here. Click Logout to the DDNS service. TL-WR940N Wireless N Router Figure 4-67 Dyndns.org DDNS Settings To set up for your DDNS account. 2. Type the User Name for your DDNS account. 3.
Click the Login button to log in to logout of the DDNS service connection is www.no-ip.com, the page will appear as shown in Figure 4-68.. -... provider here. 4. Type the Password for DDNS, follow these instructions: 1. Type the Domain Name you select is displayed here. Click Logout to the DDNS service. TL-WR940N Wireless N Router Figure 4-67 Dyndns.org DDNS Settings To set up for your DDNS account. 2. Type the User Name for your DDNS account. 3.

User Guide
Page 86
.... 2. Type the Password for your DDNS account. 3. Connection Status - The status of the DDNS service connection is displayed here. Click the Login button to log out the DDNS service. 4.16 System Tools Figure 4-69 The System Tools menu Choose menu "System Tools", and you received ... Domain Name you can see the submenus under the main menu: Time Settings, Diagnostic, Firmware Upgrade, Factory Defaults, Backup & Restore, Reboot, -79- TL-WR940N Wireless N Router Figure 4-68 No-ip.com DDNS Settings To set up for DDNS, follow these instructions: 1. Click Logout to log in the DDNS service...
.... 2. Type the Password for your DDNS account. 3. Connection Status - The status of the DDNS service connection is displayed here. Click the Login button to log out the DDNS service. 4.16 System Tools Figure 4-69 The System Tools menu Choose menu "System Tools", and you received ... Domain Name you can see the submenus under the main menu: Time Settings, Diagnostic, Firmware Upgrade, Factory Defaults, Backup & Restore, Reboot, -79- TL-WR940N Wireless N Router Figure 4-68 No-ip.com DDNS Settings To set up for DDNS, follow these instructions: 1. Click Logout to log in the DDNS service...
User Guide
Page 87
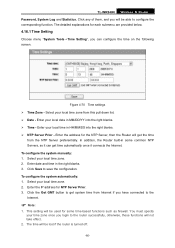
...: 1. Enter the address for each submenu are provided below. 4.16.1 Time Setting Choose menu "System Tools→Time Setting", you login to configure the corresponding function. Click the Get GMT button to get time automatically once it can configure the time on the following screen...functions will be used for NTP Server Prior. 3. Figure 4-70 Time settings ¾ Time Zone - The time will not take effect. 2. TL-WR940N Wireless N Router Password, System Log and Statistics. Click any of them, and you have connected to save the configuration. Enter your local time ...
...: 1. Enter the address for each submenu are provided below. 4.16.1 Time Setting Choose menu "System Tools→Time Setting", you login to configure the corresponding function. Click the Get GMT button to get time automatically once it can configure the time on the following screen...functions will be used for NTP Server Prior. 3. Figure 4-70 Time settings ¾ Time Zone - The time will not take effect. 2. TL-WR940N Wireless N Router Password, System Log and Statistics. Click any of them, and you have connected to save the configuration. Enter your local time ...
User Guide
Page 97
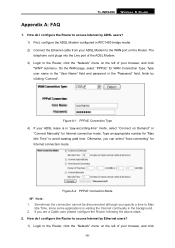
...mode. Otherwise, you are a Cable user, please configure the Router following the above steps. 2. Type an appropriate number for WAN Connection Type. TL-WR940N Wireless N Router Appendix A: FAQ 1. Type user name in the "User Name" field and password in the background. 2. How do I configure... the Ethernet cable from your browser, and click "WAN" submenu. How do I configure the Router to access Internet by Ethernet users? 1) Login to the WAN port on Demand" or "Connect Manually" for Internet connection mode. Figure A-1 PPPoE Connection Type 4) If your browser, and click...
...mode. Otherwise, you are a Cable user, please configure the Router following the above steps. 2. Type an appropriate number for WAN Connection Type. TL-WR940N Wireless N Router Appendix A: FAQ 1. Type user name in the "User Name" field and password in the background. 2. How do I configure... the Ethernet cable from your browser, and click "WAN" submenu. How do I configure the Router to access Internet by Ethernet users? 1) Login to the WAN port on Demand" or "Connect Manually" for Internet connection mode. Figure A-1 PPPoE Connection Type 4) If your browser, and click...

User Guide
Page 98
... Servers" page, click Add New.... TL-WR940N Wireless N Router "WAN" submenu. On the "MAC Clone" page, if your PC's MAC address is enabled. 3) How to configure Virtual Server: Log in the "WAN MAC Address" field. Figure A-3 MAC Clone 3. If your ISP requires MAC register, login to Enable and Save. Then on ...the "Add or Modify a Virtual Server Entry" page, enter "1720" for the "Service Port" blank, and your IP address for the "IP Address" blank, taking 192.168.1.169 for an example, remember to the Router and click the "Network" menu link on ...
... Servers" page, click Add New.... TL-WR940N Wireless N Router "WAN" submenu. On the "MAC Clone" page, if your PC's MAC address is enabled. 3) How to configure Virtual Server: Log in the "WAN MAC Address" field. Figure A-3 MAC Clone 3. If your ISP requires MAC register, login to Enable and Save. Then on ...the "Add or Modify a Virtual Server Entry" page, enter "1720" for the "Service Port" blank, and your IP address for the "IP Address" blank, taking 192.168.1.169 for an example, remember to the Router and click the "Network" menu link on ...


