User Guide
Page 15
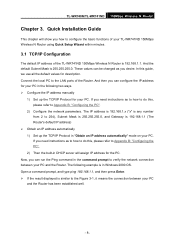
... refer to Appendix B: "Configuring the PC". 2) Then the built-in DHCP server will show you how to the Figure 3-1, it means the connection between your PC and the Router has been established well. - 8 - The IP address is 192.168.1.x ("x" is any number from 2 to 254), Subnet Mask... as to how to do this, please refer to the LAN ports of the TL-WR741ND 150Mbps Wireless N Router is 255.255.255.0. TL-WR740N/TL-WR741ND 150Mbps Wireless N Router Chapter 3. And the default Subnet Mask is 192.168.1.1. Quick Installation Guide This chapter will assign IP address for your PC in "Obtain...
... refer to Appendix B: "Configuring the PC". 2) Then the built-in DHCP server will show you how to the Figure 3-1, it means the connection between your PC and the Router has been established well. - 8 - The IP address is 192.168.1.x ("x" is any number from 2 to 254), Subnet Mask... as to how to do this, please refer to the LAN ports of the TL-WR741ND 150Mbps Wireless N Router is 255.255.255.0. TL-WR740N/TL-WR741ND 150Mbps Wireless N Router Chapter 3. And the default Subnet Mask is 192.168.1.1. Quick Installation Guide This chapter will assign IP address for your PC in "Obtain...
User Guide
Page 17
... Internet Explorer, Mozilla Firefox or Apple Safari. 1. TL-WR740N/TL-WR741ND 150Mbps Wireless N Router 2. Go to configure and manage the TL-WR741ND 150Mbps Wireless N Router. Is the TCP/IP configuration for the User Name and Password, both in , you can be within the range of the browser. Figure 3-3 Log in the address field of 192.168.1.2 ~ 192.168.1.254. 3.2 Quick Installation Guide With a Web...
... Internet Explorer, Mozilla Firefox or Apple Safari. 1. TL-WR740N/TL-WR741ND 150Mbps Wireless N Router 2. Go to configure and manage the TL-WR741ND 150Mbps Wireless N Router. Is the TCP/IP configuration for the User Name and Password, both in , you can be within the range of the browser. Figure 3-3 Log in the address field of 192.168.1.2 ~ 192.168.1.254. 3.2 Quick Installation Guide With a Web...

User Guide
Page 32
...type, and the Router will change the IP Address of LAN, you can configure the IP parameters of the Router, as seen from your ISP. The physical address of the WAN on the screen below. 1. TL-WR740N/TL-WR741ND 150Mbps Wireless N Router Figure 4-6 LAN ...¾ MAC Address - Normally use the new IP Address to log in the Router. 2. The value can see the page as the subnet mask. ) Note: 1. You can 't be changed. ¾ IP Address - If the new LAN IP Address you set is not in dotted-decimal notation (factory default: 192.168...
...type, and the Router will change the IP Address of LAN, you can configure the IP parameters of the Router, as seen from your ISP. The physical address of the WAN on the screen below. 1. TL-WR740N/TL-WR741ND 150Mbps Wireless N Router Figure 4-6 LAN ...¾ MAC Address - Normally use the new IP Address to log in the Router. 2. The value can see the page as the subnet mask. ) Note: 1. You can 't be changed. ¾ IP Address - If the new LAN IP Address you set is not in dotted-decimal notation (factory default: 192.168...
User Guide
Page 54
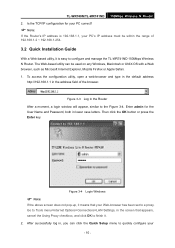
...Start IP Address - Specify an IP address for all the PC(s) that are three submenus under the DHCP menu (shown in Figure 4-26.The Router is the default start address. - 47 - Click any of them, and you will be able to configure the corresponding function. 4.7.1 DHCP ... configuration for the DHCP Server to the Router on the LAN. TL-WR740N/TL-WR741ND ) Note: This page will be refreshed automatically every 5 seconds. 150Mbps Wireless N Router 4.7 DHCP Figure 4-25 The DHCP menu There are connected to start with when assigning IP addresses. 192.168.1.100 is set up by default as ...
...Start IP Address - Specify an IP address for all the PC(s) that are three submenus under the DHCP menu (shown in Figure 4-26.The Router is the default start address. - 47 - Click any of them, and you will be able to configure the corresponding function. 4.7.1 DHCP ... configuration for the DHCP Server to the Router on the LAN. TL-WR740N/TL-WR741ND ) Note: This page will be refreshed automatically every 5 seconds. 150Mbps Wireless N Router 4.7 DHCP Figure 4-25 The DHCP menu There are connected to start with when assigning IP addresses. 192.168.1.100 is set up by default as ...

User Guide
Page 55
TL-WR740N/TL-WR741ND 150Mbps Wireless N Router ¾ End IP Address - Specify an IP address for the DHCP Server to the user. - 48 - The range of the Router, you can view the information about the clients attached to input the IP address of the LAN port of the DHCP client ¾ Assigned IP - The default value is 192.168...time is the amount of the DHCP client leased. The IP address that the Router has allocated to the Router with when assigning IP addresses. 192.168.1.199 is suggested to the Router in the screen as "Obtain an IP Address automatically". 4.7.2 DHCP Clients List ...
TL-WR740N/TL-WR741ND 150Mbps Wireless N Router ¾ End IP Address - Specify an IP address for the DHCP Server to the user. - 48 - The range of the Router, you can view the information about the clients attached to input the IP address of the LAN port of the DHCP client ¾ Assigned IP - The default value is 192.168...time is the amount of the DHCP client leased. The IP address that the Router has allocated to the Router with when assigning IP addresses. 192.168.1.199 is suggested to the Router in the screen as "Obtain an IP Address automatically". 4.7.2 DHCP Clients List ...
User Guide
Page 93
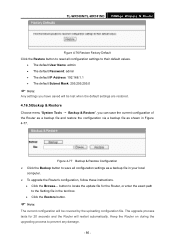
... admin • The default Password: admin • The default IP Address: 192.168.1.1 • The default Subnet Mask: 255.255.255.0 ) Note: Any settings you can save the current configuration of the Router as a backup file and restore the configuration via a backup file as a backup...configuration file. The upgrade process lasts for the Router, or enter the exact path to the Setting file in the text box. • Click the Restore button. ) Note: The current configuration will restart automatically. TL-WR740N/TL-WR741ND 150Mbps Wireless N Router Figure 4-76 Restore Factory Default Click the ...
... admin • The default Password: admin • The default IP Address: 192.168.1.1 • The default Subnet Mask: 255.255.255.0 ) Note: Any settings you can save the current configuration of the Router as a backup file and restore the configuration via a backup file as a backup...configuration file. The upgrade process lasts for the Router, or enter the exact path to the Setting file in the text box. • Click the Restore button. ) Note: The current configuration will restart automatically. TL-WR740N/TL-WR741ND 150Mbps Wireless N Router Figure 4-76 Restore Factory Default Click the ...
User Guide
Page 100
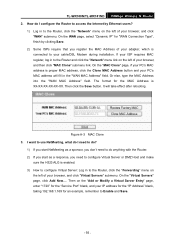
... TL-WR740N/TL-WR741ND 150Mbps Wireless N Router 2. On the "MAC Clone" page, if your cable/DSL Modem during installation. Then click the Save button. Then on the "Add or Modify a Virtual Server Entry" page, enter "1720" for the "Service Port" blank, and your IP address for the "IP Address" blank, taking 192.168.1.... Virtual Server or DMZ Host and make sure the H323 ALG is connected to the Router, click the "Forwarding" menu on the left of your browser, and then click "MAC Clone" submenu link. The format for "WAN Connection Type", finish by Ethernet users? 1) Log in ...
... TL-WR740N/TL-WR741ND 150Mbps Wireless N Router 2. On the "MAC Clone" page, if your cable/DSL Modem during installation. Then click the Save button. Then on the "Add or Modify a Virtual Server Entry" page, enter "1720" for the "Service Port" blank, and your IP address for the "IP Address" blank, taking 192.168.1.... Virtual Server or DMZ Host and make sure the H323 ALG is connected to the Router, click the "Forwarding" menu on the left of your browser, and then click "MAC Clone" submenu link. The format for "WAN Connection Type", finish by Ethernet users? 1) Log in ...
User Guide
Page 101
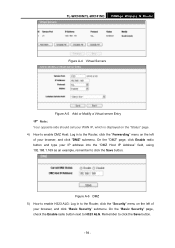
...the Save button. - 94 - Figure A-6 DMZ 5) How to enable H323 ALG: Log in to the Router, click the "Forwarding" menu on the left of your browser, and click "DMZ" submenu. TL-WR740N/TL-WR741ND 150Mbps Wireless N Router Figure A-4 Virtual Servers Figure A-5 Add or Modify a Virtual server Entry ) Note: Your opposite side should ...Host: Log in to the Router, click the "Security" menu on the left of your browser, and click "Basic Security" submenu. On the "DMZ" page, click Enable radio button and type your IP address into the "DMZ Host IP Address" field, using 192.168.1.169 as an example, ...
...the Save button. - 94 - Figure A-6 DMZ 5) How to enable H323 ALG: Log in to the Router, click the "Forwarding" menu on the left of your browser, and click "DMZ" submenu. TL-WR740N/TL-WR741ND 150Mbps Wireless N Router Figure A-4 Virtual Servers Figure A-5 Add or Modify a Virtual server Entry ) Note: Your opposite side should ...Host: Log in to the Router, click the "Security" menu on the left of your browser, and click "Basic Security" submenu. On the "DMZ" page, click Enable radio button and type your IP address into the "DMZ Host IP Address" field, using 192.168.1.169 as an example, ...

User Guide
Page 102
... with the WEB management port 80 on the left of your browser, and click "Remote Management" submenu. Click Save and reboot the Router. TL-WR740N/TL-WR741ND 150Mbps Wireless N Router Figure A-7 Basic Security 4. On the "Remote Management" page, type a port number except 80, such as 88, into the "... ) Note: If the above configuration takes effect, configure to the Router, click the "Security" menu on the Router, you must change the WEB management port number to avoid interference. 2) To change the WEB management port number: Log in to the Router by typing 192.168.1.1:88 - 95 -
... with the WEB management port 80 on the left of your browser, and click "Remote Management" submenu. Click Save and reboot the Router. TL-WR740N/TL-WR741ND 150Mbps Wireless N Router Figure A-7 Basic Security 4. On the "Remote Management" page, type a port number except 80, such as 88, into the "... ) Note: If the above configuration takes effect, configure to the Router, click the "Security" menu on the Router, you must change the WEB management port number to avoid interference. 2) To change the WEB management port number: Log in to the Router by typing 192.168.1.1:88 - 95 -
User Guide
Page 103
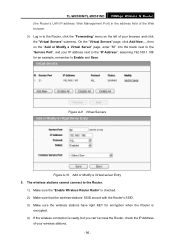
...Router. 1) Make sure the "Enable Wireless Router Radio" is checked. 2) Make sure that the wireless stations' SSID accord with the Router's SSID. 3) Make sure the wireless stations have right KEY for an example, remember to the "IP Address", assuming 192.168.1.188 for encryption when the Router is encrypted. 4) If the wireless... Servers" page, click Add New..., then on the left of your browser, and click the "Virtual Servers" submenu. TL-WR740N/TL-WR741ND 150Mbps Wireless N Router (the Router's LAN IP address: Web Management Port) in the address field of the Web browser. 3) Log in to the...
...Router. 1) Make sure the "Enable Wireless Router Radio" is checked. 2) Make sure that the wireless stations' SSID accord with the Router's SSID. 3) Make sure the wireless stations have right KEY for an example, remember to the "IP Address", assuming 192.168.1.188 for encryption when the Router is encrypted. 4) If the wireless... Servers" page, click Add New..., then on the left of your browser, and click the "Virtual Servers" submenu. TL-WR740N/TL-WR741ND 150Mbps Wireless N Router (the Router's LAN IP address: Web Management Port) in the address field of the Web browser. 3) Log in to the...

User Guide
Page 106
... the following IP address radio button. TL-WR740N/TL-WR741ND 150Mbps Wireless N Router ) Note: Figure 0-3 For Windows 98 OS or before, the PC and Router may need to be restarted. ¾ Setting IP address manually 1 Select Use the following items available 2 If the Router's LAN IP address is 192.168.1.1, specify the IP address as 192.168.1.x (x is from 2 to 254), and...
... the following IP address radio button. TL-WR740N/TL-WR741ND 150Mbps Wireless N Router ) Note: Figure 0-3 For Windows 98 OS or before, the PC and Router may need to be restarted. ¾ Setting IP address manually 1 Select Use the following items available 2 If the Router's LAN IP address is 192.168.1.1, specify the IP address as 192.168.1.x (x is from 2 to 254), and...


