
TL-WR720N V1 User Guide
Page 25
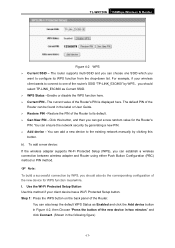
... choose one of the router's SSID "TP-LINK_E3C860" by WPS,you should also do the corresponding configuration of the Router can add a new device to the existing network manually by clicking this button. b). Step 1:...To add a new device: If the wireless adapter supports Wi-Fi Protected Setup (WPS), you should select TP-LINK_E3C860 as Enabled and click the Add device button in the following figure) -17- For example, if your...to its WPS function from the drop-down list. TL-WR720N 150Mbps Wireless N Router Figure 4-2 WPS ¾ Current SSID - The current value of the Router.
... choose one of the router's SSID "TP-LINK_E3C860" by WPS,you should also do the corresponding configuration of the Router can add a new device to the existing network manually by clicking this button. b). Step 1:...To add a new device: If the wireless adapter supports Wi-Fi Protected Setup (WPS), you should select TP-LINK_E3C860 as Enabled and click the Add device button in the following figure) -17- For example, if your...to its WPS function from the drop-down list. TL-WR720N 150Mbps Wireless N Router Figure 4-2 WPS ¾ Current SSID - The current value of the Router.

TL-WR720N V1 User Guide
Page 31
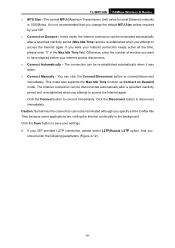
... advanced configurations, please click the Advanced button, and the page shown in Figure 4-10 will the Time-based Connecting function can take effect. ¾ Connect Manually - TL-WR720N 150Mbps Wireless N Router start time to the end time (both are in HH:MM format). ) Note: Only when you have configured the system time on...
... advanced configurations, please click the Advanced button, and the page shown in Figure 4-10 will the Time-based Connecting function can take effect. ¾ Connect Manually - TL-WR720N 150Mbps Wireless N Router start time to the end time (both are in HH:MM format). ) Note: Only when you have configured the system time on...
TL-WR720N V1 User Guide
Page 33
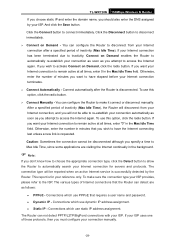
... it was down. ¾ Connect Manually - Click the Connect button to save your ISP. ¾ Connect on Demand mode. It is 1500 Bytes. Otherwise, enter the number of minutes you change the default MTU Size unless required by your settings. 5. Click the Save button to connect immediately. TL-WR720N 150Mbps Wireless N Router ¾...
... it was down. ¾ Connect Manually - Click the Connect button to save your ISP. ¾ Connect on Demand mode. It is 1500 Bytes. Otherwise, enter the number of minutes you change the default MTU Size unless required by your settings. 5. Click the Save button to connect immediately. TL-WR720N 150Mbps Wireless N Router ¾...

TL-WR720N V1 User Guide
Page 34
TL-WR720N 150Mbps Wireless N Router Figure 4-12 WAN -L2TP ¾ User Name/Password - Click the Connect button to disconnect immediately. ¾ Connect on Demand - If you wish ... is disconnected. If your ISP. If you are case-sensitive. ¾ Dynamic IP/ Static IP - To use this option, click the radio button. ¾ Connect Manually - Choose either as you want your ISP. You can configure the Router to remain active at all times, enter 0 in the Max Idle Time field...
TL-WR720N 150Mbps Wireless N Router Figure 4-12 WAN -L2TP ¾ User Name/Password - Click the Connect button to disconnect immediately. ¾ Connect on Demand - If you wish ... is disconnected. If your ISP. If you are case-sensitive. ¾ Dynamic IP/ Static IP - To use this option, click the radio button. ¾ Connect Manually - Choose either as you want your ISP. You can configure the Router to remain active at all times, enter 0 in the Max Idle Time field...
TL-WR720N V1 User Guide
Page 36
...connections that requires a user name and password. The Router can configure the Router to connect immediately. TL-WR720N 150Mbps Wireless N Router If you choose static IP and enter the domain name, you attempt to ... these protocols, then you wish to automatically search your Internet connection for your connection manually. -28- To use PPPoE that the Router can configure the Router to disconnect ... detected by your Internet connection to have the Internet connecting last unless a new link is for servers and protocols. Connections which use dynamic IP address assignment. If ...
...connections that requires a user name and password. The Router can configure the Router to connect immediately. TL-WR720N 150Mbps Wireless N Router If you choose static IP and enter the domain name, you attempt to ... these protocols, then you wish to automatically search your Internet connection for your connection manually. -28- To use PPPoE that the Router can configure the Router to disconnect ... detected by your Internet connection to have the Internet connecting last unless a new link is for servers and protocols. Connections which use dynamic IP address assignment. If ...

TL-WR720N V1 User Guide
Page 48
... to configure the corresponding function. 4.7.1 DHCP Settings Choose menu "DHCP→DHCP Settings", and then you must configure the computer manually. ¾ Start IP Address - Figure 4-26 DHCP Settings ¾ DHCP Server - TL-WR720N ) Note: This page will be refreshed automatically every 5 seconds. 150Mbps Wireless N Router 4.7 DHCP Figure 4-25 The DHCP menu There...
... to configure the corresponding function. 4.7.1 DHCP Settings Choose menu "DHCP→DHCP Settings", and then you must configure the computer manually. ¾ Start IP Address - Figure 4-26 DHCP Settings ¾ DHCP Server - TL-WR720N ) Note: This page will be refreshed automatically every 5 seconds. 150Mbps Wireless N Router 4.7 DHCP Figure 4-25 The DHCP menu There...
TL-WR720N V1 User Guide
Page 53
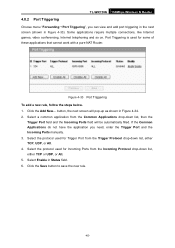
TL-WR720N 150Mbps Wireless N Router 4.8.2 Port Triggering Choose menu "Forwarding→Port Triggering", you need, enter the Trigger Port and the Incoming Ports manually. 3. button, the next screen will be automatically filled. Select the protocol used for some of these applications that cannot work with a pure NAT Router. Click ...
TL-WR720N 150Mbps Wireless N Router 4.8.2 Port Triggering Choose menu "Forwarding→Port Triggering", you need, enter the Trigger Port and the Incoming Ports manually. 3. button, the next screen will be automatically filled. Select the protocol used for some of these applications that cannot work with a pure NAT Router. Click ...

TL-WR720N V1 User Guide
Page 77
... Figure 4-64. Target_1). 2) In Domain Name field, enter the domain name, either the full name or the keywords (for example, google) in it -69- TL-WR720N 150Mbps Wireless N Router 3. If you want, specify the Target Port manually. 4) In Protocol field, select TCP, UDP, ICMP or ALL from Common Service Port drop-down list. 4.
... Figure 4-64. Target_1). 2) In Domain Name field, enter the domain name, either the full name or the keywords (for example, google) in it -69- TL-WR720N 150Mbps Wireless N Router 3. If you want, specify the Target Port manually. 4) In Protocol field, select TCP, UDP, ICMP or ALL from Common Service Port drop-down list. 4.

TL-WR720N V1 User Guide
Page 88
...domain of the NTP Server I or NTP Server II. 3. The time to enable the Daylight Saving function. ¾ Start - To set time manually: 1. Click the Get GMT button to get time automatically once it can get system time from the NTP Server preferentially. Select your local time ...Enter the Time in the last field. Select your local date in some common NTP Servers, so it connects the Internet. ¾ Enable Daylight Saving - TL-WR720N 150Mbps Wireless N Router Figure 4-79 Time settings ¾ Time Zone - Enter your local time zone. 2. In addition, the Router built-in MM/DD...
...domain of the NTP Server I or NTP Server II. 3. The time to enable the Daylight Saving function. ¾ Start - To set time manually: 1. Click the Get GMT button to get time automatically once it can get system time from the NTP Server preferentially. Select your local time ...Enter the Time in the last field. Select your local date in some common NTP Servers, so it connects the Internet. ¾ Enable Daylight Saving - TL-WR720N 150Mbps Wireless N Router Figure 4-79 Time settings ¾ Time Zone - Enter your local time zone. 2. In addition, the Router built-in MM/DD...
TL-WR720N V1 User Guide
Page 96
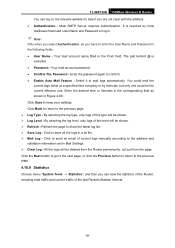
... the From field. You could be deleted from the Router permanently, not just from the page. TL-WR720N 150Mbps Wireless N Router You can view the statistics of the Router, including total traffic and current traffic of current logs manually according to the address and validation information set in Mail Settings. ¾ Clear Log -
... the From field. You could be deleted from the Router permanently, not just from the page. TL-WR720N 150Mbps Wireless N Router You can view the statistics of the Router, including total traffic and current traffic of current logs manually according to the address and validation information set in Mail Settings. ¾ Clear Log -

TL-WR720N V1 User Guide
Page 99
TL-WR720N 150Mbps Wireless N Router Appendix A: FAQ 1. Figure A-1 PPPoE Connection Type 4) If your ADSL Modem to avoid wasting paid time. The telephone cord plugs into the Line ... model. 2) Connect the Ethernet cable from your ADSL lease is visiting the Internet continually in "pay-according-time" mode, select "Connect on Demand" or "Connect Manually" for "Max Idle Time" to the WAN port on the left of your browser, and click "WAN" submenu. Figure A-2 PPPoE Connection Mode ) Note: i. ii. Sometimes...
TL-WR720N 150Mbps Wireless N Router Appendix A: FAQ 1. Figure A-1 PPPoE Connection Type 4) If your ADSL Modem to avoid wasting paid time. The telephone cord plugs into the Line ... model. 2) Connect the Ethernet cable from your ADSL lease is visiting the Internet continually in "pay-according-time" mode, select "Connect on Demand" or "Connect Manually" for "Max Idle Time" to the WAN port on the left of your browser, and click "WAN" submenu. Figure A-2 PPPoE Connection Mode ) Note: i. ii. Sometimes...
TL-WR720N V1 User Guide
Page 104
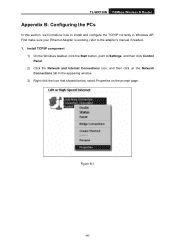
TL-WR720N 150Mbps Wireless N Router Appendix B: Configuring the PCs In this section, we'll introduce how to Settings, and then click Control Panel. 2) Click the Network and ... that showed below, select Properties on the Network Connections tab in Windows XP. First make sure your Ethernet Adapter is working, refer to the adapter's manual if needed. 1.
TL-WR720N 150Mbps Wireless N Router Appendix B: Configuring the PCs In this section, we'll introduce how to Settings, and then click Control Panel. 2) Click the Network and ... that showed below, select Properties on the Network Connections tab in Windows XP. First make sure your Ethernet Adapter is working, refer to the adapter's manual if needed. 1.

