
User Guide
Page 7
....cn DDNS 62 4.13 System Tools ...63 4.13.1 Time ...64 4.13.2 Firmware ...65 4.13.3 Factory Defaults...66 4.13.4 Backup & Restore 66 4.13.5 Reboot ...67 4.13.6 Password ...67 4.13.7 Syslog ...68 4.13.8 Remote Management 69 4.13.9 Statistics ...69 Appendix A: FAQ...72 Appendix B: Configuring the PCs 77 Appendix C: Specifications 81 Appendix D: Glossary 82
....cn DDNS 62 4.13 System Tools ...63 4.13.1 Time ...64 4.13.2 Firmware ...65 4.13.3 Factory Defaults...66 4.13.4 Backup & Restore 66 4.13.5 Reboot ...67 4.13.6 Password ...67 4.13.7 Syslog ...68 4.13.8 Remote Management 69 4.13.9 Statistics ...69 Appendix A: FAQ...72 Appendix B: Configuring the PCs 77 Appendix C: Specifications 81 Appendix D: Glossary 82

User Guide
Page 17
.... If the User Name and Password are correct, you can be 192.168.1.1. 3.2 Quick Installation Guide With a Web-based (Internet Explorer or Netscape® Navigator) utility, it means that shown in lower case letters. Connect to configure and manage the TL-WR542G 54Mbps Wireless Router. Enter admin ...for the User Name and Password, both in Figure 3-4. Then click the OK button or press the Enter key. Please click the Quick Setup link on any Windows, Macintosh or UNIX OS with a ...
.... If the User Name and Password are correct, you can be 192.168.1.1. 3.2 Quick Installation Guide With a Web-based (Internet Explorer or Netscape® Navigator) utility, it means that shown in lower case letters. Connect to configure and manage the TL-WR542G 54Mbps Wireless Router. Enter admin ...for the User Name and Password, both in Figure 3-4. Then click the OK button or press the Enter key. Please click the Quick Setup link on any Windows, Macintosh or UNIX OS with a ...

User Guide
Page 18
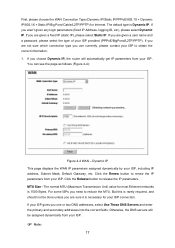
... Quick Setup Click Next, and then Choose WAN Connection Type page will appear, shown in Figure 3-8: 11 PPPoE ¾ Account Name and Password - These fields are case sensitive. If you choose "PPPoE", you have difficulty with your ISP. If you will automatically receive the IP parameters... three popular ways to connect to enter any parameters. Click Next to enter the necessary network parameters. Enter the Account Name and Password provided by your ISP. If you choose "Dynamic IP", the router will see this process, please contact your ISP without needing to Internet....
... Quick Setup Click Next, and then Choose WAN Connection Type page will appear, shown in Figure 3-8: 11 PPPoE ¾ Account Name and Password - These fields are case sensitive. If you choose "PPPoE", you have difficulty with your ISP. If you will automatically receive the IP parameters... three popular ways to connect to enter any parameters. Click Next to enter the necessary network parameters. Enter the Account Name and Password provided by your ISP. If you choose "Dynamic IP", the router will see this process, please contact your ISP without needing to Internet....
User Guide
Page 24
... IP, the router will be done unless you are given a fixed IP (static IP), please select Static IP. If you are given a user name and a password, please select the type of your ISP gives you need to obtain the correct information. 1. Click the Renew button to release the IP parameters. The...
... IP, the router will be done unless you are given a fixed IP (static IP), please select Static IP. If you are given a user name and a password, please select the type of your ISP gives you need to obtain the correct information. 1. Click the Renew button to release the IP parameters. The...
User Guide
Page 26
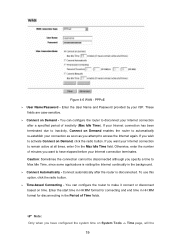
... again. You can configure the router to remain active at all times, enter 0 in the background. ¾ Connect Automatically - Figure 4-6 WAN - PPPoE ¾ User Name/Password - To use this option, click the radio button. ¾ Time-based Connecting - Enter the User Name and...
... again. You can configure the router to remain active at all times, enter 0 in the background. ¾ Connect Automatically - Figure 4-6 WAN - PPPoE ¾ User Name/Password - To use this option, click the radio button. ¾ Time-based Connecting - Enter the User Name and...

User Guide
Page 28
... well. If a secondary DNS server address is available, enter it means, do not detect. ¾ DNS IP address - Enter the password for 802.1X authentication provided by your ISP ¾ Password - If the value is 0, you can input the value between seconds. If you choose 802.1X + Dynamic IP, you know that...
... well. If a secondary DNS server address is available, enter it means, do not detect. ¾ DNS IP address - Enter the password for 802.1X authentication provided by your ISP ¾ Password - If the value is 0, you can input the value between seconds. If you choose 802.1X + Dynamic IP, you know that...

User Guide
Page 29
... + Static IP, you should enter the follow parameters(Figure 4-9) : Figure 4-9 802.1X + Static IP Settings ¾ User Name - Enter the password for 802.1X authentication provided by your ISP ¾ Password - Click Logout to start 802.1X authentication. Enter the user name for 802.1X authentication provided by your ISP. Enter the...
... + Static IP, you should enter the follow parameters(Figure 4-9) : Figure 4-9 802.1X + Static IP Settings ¾ User Name - Enter the password for 802.1X authentication provided by your ISP ¾ Password - Click Logout to start 802.1X authentication. Enter the user name for 802.1X authentication provided by your ISP. Enter the...
User Guide
Page 30
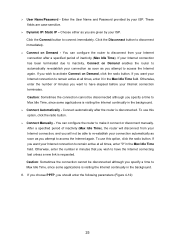
Enter the User Name and Password provided by your Internet connection after a specified period of minutes you want your Internet connection terminates. These fields are visiting the Internet continually in the ... disconnected although you attempt to remain active at all times, enter 0 in the Max Idle Time field. Figure 4-10 Big Pond Settings ¾ User Name/Password - nsw.bigpond.net.au VIC / TAS / WA / SA / NT - qld.bigpond.net.au ¾ Connect on Demand, click the radio button. If you wish to...
Enter the User Name and Password provided by your Internet connection after a specified period of minutes you want your Internet connection terminates. These fields are visiting the Internet continually in the ... disconnected although you attempt to remain active at all times, enter 0 in the Max Idle Time field. Figure 4-10 Big Pond Settings ¾ User Name/Password - nsw.bigpond.net.au VIC / TAS / WA / SA / NT - qld.bigpond.net.au ¾ Connect on Demand, click the radio button. If you wish to...
User Guide
Page 32
.... If you wish to make it connect or disconnect manually. If you want to have the Internet connecting last unless a new link is visiting the Internet continually in the Max Idle Time field. Caution: Sometimes the connection cannot be able to Max Idle Time,... Connect automatically after a specified period of minutes you are case-sensitive. ¾ Dynamic IP/ Static IP - Enter the User Name and Password provided by your Internet connection after the router is visiting the Internet continually in the background. ¾ Connect Automatically - These fields are given...
.... If you wish to make it connect or disconnect manually. If you want to have the Internet connecting last unless a new link is visiting the Internet continually in the Max Idle Time field. Caution: Sometimes the connection cannot be able to Max Idle Time,... Connect automatically after a specified period of minutes you are case-sensitive. ¾ Dynamic IP/ Static IP - Enter the User Name and Password provided by your Internet connection after the router is visiting the Internet continually in the background. ¾ Connect Automatically - These fields are given...

User Guide
Page 33
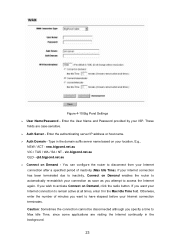
... to connect immediately. And click the Save button. You can configure the router to access the Internet again. Figure 4-12 PPTP Settings ¾ User Name/Password - If your Internet connection has been terminated due to inactivity, Connect on Demand enables the router to automatically re-establish your connection as soon as...
... to connect immediately. And click the Save button. You can configure the router to access the Internet again. Figure 4-12 PPTP Settings ¾ User Name/Password - If your Internet connection has been terminated due to inactivity, Connect on Demand enables the router to automatically re-establish your connection as soon as...
User Guide
Page 40
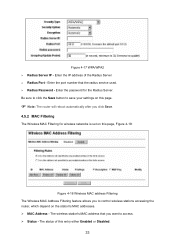
... the station's MAC addresses. ¾ MAC Address - The wireless station's MAC address that the radius service used. ¾ Radius Password - The status of the Radius Server ¾ Radius Port - Enter the password for wireless networks is set on this entry either Enabled or Disabled. 33 Enter the port number that you to...
... the station's MAC addresses. ¾ MAC Address - The wireless station's MAC address that the radius service used. ¾ Radius Password - The status of the Radius Server ¾ Radius Port - Enter the password for wireless networks is set on this entry either Enabled or Disabled. 33 Enter the port number that you to...

User Guide
Page 67
... address binding. • Configure - The Dynamic DNS client service provider will give you are hosting your selected dynamic DNS Service Provider is useful when you a password or key. • MAC Address - Click the Load All button to load all the current items, available after enable. Enabled or Disabled of the item...
... address binding. • Configure - The Dynamic DNS client service provider will give you are hosting your selected dynamic DNS Service Provider is useful when you a password or key. • MAC Address - Click the Load All button to load all the current items, available after enable. Enabled or Disabled of the item...

User Guide
Page 68
Click Logout to the DDNS service. ¾ Connection Status -The status of the DDNS service. 4.12.2 Oray.net DDNS If your DDNS account. 3. Type the Password for your selected dynamic DNS Service Provider is displayed here. Click the Login button to login to logout of the DDNS service connection is www.oray.net, the page will appear as shown in Figure 4-52: 61 Type the domain names your DDNS account. 4. Type the User Name for your dynamic DNS service provider gave. 2. Figure 4-51 Dyndns.org DDNS Settings To set up for DDNS, follow these instructions: 1.
Click Logout to the DDNS service. ¾ Connection Status -The status of the DDNS service. 4.12.2 Oray.net DDNS If your DDNS account. 3. Type the Password for your selected dynamic DNS Service Provider is displayed here. Click the Login button to login to logout of the DDNS service connection is www.oray.net, the page will appear as shown in Figure 4-52: 61 Type the domain names your DDNS account. 4. Type the User Name for your dynamic DNS service provider gave. 2. Figure 4-51 Dyndns.org DDNS Settings To set up for DDNS, follow these instructions: 1.

User Guide
Page 69
The domain names are displayed here. The status of the DDNS service connection is www.comexe.cn, the page will appear as shown in Figure 4-53: 62 Type the User Name for DDNS, follow these instructions: 1. Figure 4-52 Oray.net DDNS Settings To set up for your DDNS account. 2. Click the Login button to logout the DDNS service. 4.12.3 Comexe.cn DDNS If your DDNS account. 3. Type the Password for your selected dynamic DNS Service Provider is displayed here. ¾ Domain Name - Click Logout to login the DDNS service. ¾ Connection Status -
The domain names are displayed here. The status of the DDNS service connection is www.comexe.cn, the page will appear as shown in Figure 4-53: 62 Type the User Name for DDNS, follow these instructions: 1. Figure 4-52 Oray.net DDNS Settings To set up for your DDNS account. 2. Click the Login button to logout the DDNS service. 4.12.3 Comexe.cn DDNS If your DDNS account. 3. Type the Password for your selected dynamic DNS Service Provider is displayed here. ¾ Domain Name - Click Logout to login the DDNS service. ¾ Connection Status -

User Guide
Page 70
Figure 4-53 Comexe.cn DDNS Settings To set up for your DDNS account. 4. Click the Login button to login to logout of the DDNS service connection is displayed here. Click Logout to the DDNS service. ¾ Connection Status -The status of the DDNS service. 4.13 System Tools Figure 4-54 The System Tools menu 63 Type the domain names your DDNS account. 3. Type the User Name for your dynamic DNS service provider gave. 2. Type the Password for DDNS, follow these instructions: 1.
Figure 4-53 Comexe.cn DDNS Settings To set up for your DDNS account. 4. Click the Login button to login to logout of the DDNS service connection is displayed here. Click Logout to the DDNS service. ¾ Connection Status -The status of the DDNS service. 4.13 System Tools Figure 4-54 The System Tools menu 63 Type the domain names your DDNS account. 3. Type the User Name for your dynamic DNS service provider gave. 2. Type the Password for DDNS, follow these instructions: 1.

User Guide
Page 71
... blanks. Select using Daylight saving time, please follow the steps below : 1. Enter date and time in Figure 4-54): Time, Firmware, Factory Defaults, Backup & Restore, Reboot, Password, Syslog, Remote Management and Statistics. Click any of them, and you have connected to configure the corresponding function. Enter your local date in HH/MM...
... blanks. Select using Daylight saving time, please follow the steps below : 1. Enter date and time in Figure 4-54): Time, Firmware, Factory Defaults, Backup & Restore, Reboot, Password, Syslog, Remote Management and Statistics. Click any of them, and you have connected to configure the corresponding function. Enter your local date in HH/MM...

User Guide
Page 73
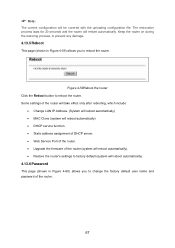
... Restore Configuration ¾ Click the Backup button to save all configuration settings to their default values. • The default User Name: admin • The default Password: admin • The default IP Address: 192.168.1.1 • The default Subnet Mask: 255.255.255.0 ) Note: Any settings you have saved will reboot after...
... Restore Configuration ¾ Click the Backup button to save all configuration settings to their default values. • The default User Name: admin • The default Password: admin • The default IP Address: 192.168.1.1 • The default Subnet Mask: 255.255.255.0 ) Note: Any settings you have saved will reboot after...
User Guide
Page 74
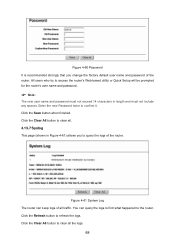
The restoration process lasts for 20 seconds and the router will reboot automatically). 4.13.6 Password This page (shown in Figure 4-59) allows you to change the factory default user name and password of the router (system will reboot automatically). • Restore the router's settings to factory default (system will restart automatically. Some settings...
The restoration process lasts for 20 seconds and the router will reboot automatically). 4.13.6 Password This page (shown in Figure 4-59) allows you to change the factory default user name and password of the router (system will reboot automatically). • Restore the router's settings to factory default (system will restart automatically. Some settings...
User Guide
Page 75
... spaces. Click the Clear All button to access the router's Web-based utility or Quick Setup will be prompted for the router's user name and password. ) Note: The new user name and password must not exceed 14 characters in Figure 4-61) allows you change the factory default user name and... password of the router. Figure 4-60 Password It is recommended strongly that you to query the logs of all traffic. You can keep logs of the router. Click the Save button when ...
... spaces. Click the Clear All button to access the router's Web-based utility or Quick Setup will be prompted for the router's user name and password. ) Note: The new user name and password must not exceed 14 characters in Figure 4-61) allows you change the factory default user name and... password of the router. Figure 4-60 Password It is recommended strongly that you to query the logs of all traffic. You can keep logs of the router. Click the Save button when ...
User Guide
Page 76
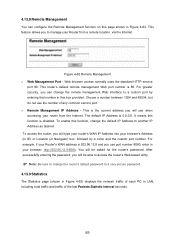
... (in IE) or Location (in your router from a remote location, via the Internet. This feature allows you will be asked for the router's password. Figure 4-62 Remote Management ¾ Web Management Port - For greater security, you use port number 8080, enter in Navigator) box, followed by ...entering that number in this function, change the router's default password to another IP Address as desired. This is 202.96.12.8 and you can configure the Remote Management function on this function is disabled....
... (in IE) or Location (in your router from a remote location, via the Internet. This feature allows you will be asked for the router's password. Figure 4-62 Remote Management ¾ Web Management Port - For greater security, you use port number 8080, enter in Navigator) box, followed by ...entering that number in this function, change the router's default password to another IP Address as desired. This is 202.96.12.8 and you can configure the Remote Management function on this function is disabled....


