
User Guide
Page 6
... Product 2 Features ...2 LED Status ...3 Chapter 2 2.1 2.2 Installation Guide 4 Hardware Installation 4 Software Installation 4 2.2.1 Overview 4 2.2.2 For Windows XP 4 2.2.3 For Windows Vista 9 2.2.4 For Windows 7 13 Chapter 3 3.1 3.2 3.3 Configuration Guide 17 For Windows XP 17 3.1.1 Current Status 17 3.1.2 Profile Management 19 3.1.3 Diagnostics 27 For Windows Vista 29 For Windows 7 31 Chapter 4 4.1 4.2 QSS Configuration 34 PBC (Push Button Configuration) method 35 PIN method...
... Product 2 Features ...2 LED Status ...3 Chapter 2 2.1 2.2 Installation Guide 4 Hardware Installation 4 Software Installation 4 2.2.1 Overview 4 2.2.2 For Windows XP 4 2.2.3 For Windows Vista 9 2.2.4 For Windows 7 13 Chapter 3 3.1 3.2 3.3 Configuration Guide 17 For Windows XP 17 3.1.1 Current Status 17 3.1.2 Profile Management 19 3.1.3 Diagnostics 27 For Windows Vista 29 For Windows 7 31 Chapter 4 4.1 4.2 QSS Configuration 34 PBC (Push Button Configuration) method 35 PIN method...

User Guide
Page 8
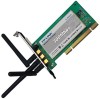
.... the TP-LINK Wireless Client Utility helps you step-by-step through the installation process; The adapter supports WEP, WPA and WPA2 encryption to 300Mbps for maximum throughput, supports automatically adjust to lower speeds due to distance or other wireless (802.11b) products. With the 802.11n technology, higher throughput improvements using MIMO (multiple input, multiple output antennas), the TL-WN951N...
.... the TP-LINK Wireless Client Utility helps you step-by-step through the installation process; The adapter supports WEP, WPA and WPA2 encryption to 300Mbps for maximum throughput, supports automatically adjust to lower speeds due to distance or other wireless (802.11b) products. With the 802.11n technology, higher throughput improvements using MIMO (multiple input, multiple output antennas), the TL-WN951N...

User Guide
Page 10
... for instructions if needed. 3. Insert the Resource CD into the PCI slot. Remove your PC's chassis with your computer manufacturer for Windows 2000, XP, Vista and Windows 7. To continue, select the TL-WN951N.There will install the TP-LINK Wireless Client Utility (TWCU) and drivers. Figure 2-1 4 Once the adapter is firmly in place, secure its pins are touching the...
... for instructions if needed. 3. Insert the Resource CD into the PCI slot. Remove your PC's chassis with your computer manufacturer for Windows 2000, XP, Vista and Windows 7. To continue, select the TL-WN951N.There will install the TP-LINK Wireless Client Utility (TWCU) and drivers. Figure 2-1 4 Once the adapter is firmly in place, secure its pins are touching the...

User Guide
Page 14
Click Continue Anyway to continue installation. 8 Figure 2-9 2) In Windows 2000, the warning screen is shown below (Figure 2-10), and please select Yes to continue the Installation. TL-WN951N 300Mbps Wireless N PCI Adapter Figure 2-8 ) Note: 1) For Windows XP, the Setup Wizard will notify you of how to proceed with the operating system. Our drivers have been tested thoroughly, and are able to work with the installation during these steps (shown in Figure 2-9).
Click Continue Anyway to continue installation. 8 Figure 2-9 2) In Windows 2000, the warning screen is shown below (Figure 2-10), and please select Yes to continue the Installation. TL-WN951N 300Mbps Wireless N PCI Adapter Figure 2-8 ) Note: 1) For Windows XP, the Setup Wizard will notify you of how to proceed with the operating system. Our drivers have been tested thoroughly, and are able to work with the installation during these steps (shown in Figure 2-9).
User Guide
Page 15
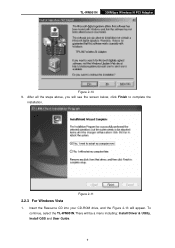
To continue, select the TL-WN951N.There will see the screen below, click Finish to complete the installation. After all the steps above, you will be a menu including: Install Driver & Utility, Install QSS and User Guide. 9 Figure 2-11 2.2.3 For Windows Vista 1. TL-WN951N 300Mbps Wireless N PCI Adapter Figure 2-10 9. Insert the Resource CD into your CD-ROM drive, and the Figure 2-13 will appear.
To continue, select the TL-WN951N.There will see the screen below, click Finish to complete the installation. After all the steps above, you will be a menu including: Install Driver & Utility, Install QSS and User Guide. 9 Figure 2-11 2.2.3 For Windows Vista 1. TL-WN951N 300Mbps Wireless N PCI Adapter Figure 2-10 9. Insert the Resource CD into your CD-ROM drive, and the Figure 2-13 will appear.
User Guide
Page 18
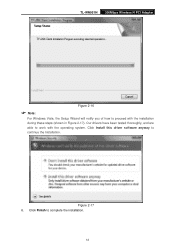
Click Finish to proceed with the operating system. Figure 2-17 6. TL-WN951N 300Mbps Wireless N PCI Adapter Figure 2-16 ) Note: For Windows Vista, the Setup Wizard will notify you of how to complete the installation. 12 Our drivers have been tested thoroughly, and are able to continue the Installation. Click Install this driver software anyway to work with the installation during these steps (shown in Figure 2-17).
Click Finish to proceed with the operating system. Figure 2-17 6. TL-WN951N 300Mbps Wireless N PCI Adapter Figure 2-16 ) Note: For Windows Vista, the Setup Wizard will notify you of how to complete the installation. 12 Our drivers have been tested thoroughly, and are able to continue the Installation. Click Install this driver software anyway to work with the installation during these steps (shown in Figure 2-17).
User Guide
Page 19
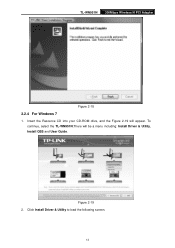
Figure 2-19 2. Click Install Driver & Utility to load the following screen. 13 TL-WN951N 300Mbps Wireless N PCI Adapter Figure 2-18 2.2.4 For Windows 7 1. Insert the Resource CD into your CD-ROM drive, and the Figure 2-19 will be a menu including: Install Driver & Utility, Install QSS and User Guide. To continue, select the TL-WN951N.There will appear.
Figure 2-19 2. Click Install Driver & Utility to load the following screen. 13 TL-WN951N 300Mbps Wireless N PCI Adapter Figure 2-18 2.2.4 For Windows 7 1. Insert the Resource CD into your CD-ROM drive, and the Figure 2-19 will be a menu including: Install Driver & Utility, Install QSS and User Guide. To continue, select the TL-WN951N.There will appear.
User Guide
Page 21
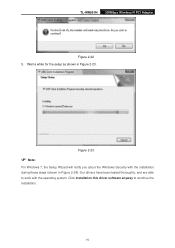
Wait a while for the setup as shown in Figure 2-24). Click Installation this driver software anyway to work with the installation during these steps (shown in Figure 2-23. Figure 2-23 ) Note: For Windows 7, the Setup Wizard will notify you about the Windows Security with the operating system. Our drivers have been tested thoroughly, and are able to continue the installation. 15 TL-WN951N 300Mbps Wireless N PCI Adapter Figure 2-22 5.
Wait a while for the setup as shown in Figure 2-24). Click Installation this driver software anyway to work with the installation during these steps (shown in Figure 2-23. Figure 2-23 ) Note: For Windows 7, the Setup Wizard will notify you about the Windows Security with the operating system. Our drivers have been tested thoroughly, and are able to continue the installation. 15 TL-WN951N 300Mbps Wireless N PCI Adapter Figure 2-22 5.

User Guide
Page 23
... the received signal strength indication (RSSI). Double-click the icon and the TWCU will appear in your Wireless Local Area Network (WLAN) and use the data security encryption features. TL-WN951N 300Mbps Wireless N PCI Adapter Chapter 3 Configuration Guide 3.1 For Windows XP TP-LINK TL-WN951N can also run . If the icon is green, there is good signal strength and the RSSI...
... the received signal strength indication (RSSI). Double-click the icon and the TWCU will appear in your Wireless Local Area Network (WLAN) and use the data security encryption features. TL-WN951N 300Mbps Wireless N PCI Adapter Chapter 3 Configuration Guide 3.1 For Windows XP TP-LINK TL-WN951N can also run . If the icon is green, there is good signal strength and the RSSI...
User Guide
Page 27
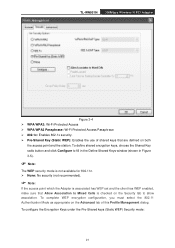
... Encryption Keys under the Pre-Shared keys (Static WEP) Security mode: 21 TL-WN951N 300Mbps Wireless N PCI Adapter Figure 3-4 ¾ WPA/WPA2: Wi-Fi Protected Access ¾ WPA/WPA2 Passphrase: Wi-Fi Protected Access Passphrase ¾ 802.1x: Enables 802.1x security. ¾ Pre-Shared Key (Static WEP): Enables the use ... click Configure to fill in the Define Shared Keys window (shown in Figure 3-5). ) Note: The WEP security mode is not available for 802.11n. ¾ None: No security (not recommended). ) Note: If the access point which the Adapter is associated has WEP set and the client has WEP...
... Encryption Keys under the Pre-Shared keys (Static WEP) Security mode: 21 TL-WN951N 300Mbps Wireless N PCI Adapter Figure 3-4 ¾ WPA/WPA2: Wi-Fi Protected Access ¾ WPA/WPA2 Passphrase: Wi-Fi Protected Access Passphrase ¾ 802.1x: Enables 802.1x security. ¾ Pre-Shared Key (Static WEP): Enables the use ... click Configure to fill in the Define Shared Keys window (shown in Figure 3-5). ) Note: The WEP security mode is not available for 802.11n. ¾ None: No security (not recommended). ) Note: If the access point which the Adapter is associated has WEP set and the client has WEP...

User Guide
Page 31
Click Activate. 300Mbps Wireless N PCI Adapter 3.1.2.4. Figure 3-8 3.1.2.5. Highlight the profile name. 4. TL-WN951N 2. Click Save. The profile should then be exported to export. 2. Import a Profile 1. Click Open, the imported profile will then appear below . 2. ... screen (shown in the Profiles List. 25 From the Profile Management screen (shown in the Profiles List. 3. Click Export..., the Export Profile window will then appear in Figure 3-2), highlight the profile to the specified location. Browse to . 4. Select the profile name required in Figure 3-2), click...
Click Activate. 300Mbps Wireless N PCI Adapter 3.1.2.4. Figure 3-8 3.1.2.5. Highlight the profile name. 4. TL-WN951N 2. Click Save. The profile should then be exported to export. 2. Import a Profile 1. Click Open, the imported profile will then appear below . 2. ... screen (shown in the Profiles List. 25 From the Profile Management screen (shown in the Profiles List. 3. Click Export..., the Export Profile window will then appear in Figure 3-2), highlight the profile to the specified location. Browse to . 4. Select the profile name required in Figure 3-2), click...

User Guide
Page 32
...profile exists for that network, the Profile Management window will appear below. 2. Click Scan on the Profile Management screen (shown in the Profile name and click OK to the network. Figure 3-10 3.1.2.7. TL-WN951N 300Mbps Wireless N PCI Adapter Figure 3-9 3.1.2.6. To add a new profile ...into the Auto Selected 26 Fill in Figure 3-2), the Available Infrastructure and Ad Hoc Networks window will open the General tab screen. Auto Profile ...
...profile exists for that network, the Profile Management window will appear below. 2. Click Scan on the Profile Management screen (shown in the Profile name and click OK to the network. Figure 3-10 3.1.2.7. TL-WN951N 300Mbps Wireless N PCI Adapter Figure 3-9 3.1.2.6. To add a new profile ...into the Auto Selected 26 Fill in Figure 3-2), the Available Infrastructure and Ad Hoc Networks window will open the General tab screen. Auto Profile ...
User Guide
Page 33
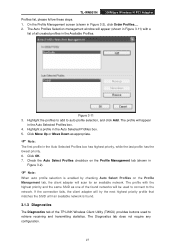
The Auto Profiles Selection management window will appear in the Auto Selected Profiles box. 5. Highlight the profiles to add to the network. Click OK. 7. The Diagnostics tab does not require any ... tab of all created profiles in the Auto Selected Profiles box has highest priority, while the last profile has the lowest priority. 6. TL-WN951N 300Mbps Wireless N PCI Adapter Profiles list, please follow these steps. 1. The profile with a list of the TP-LINK Wireless Client Utility (TWCU) provides buttons used to connect to auto profile selection, and click Add.
The Auto Profiles Selection management window will appear in the Auto Selected Profiles box. 5. Highlight the profiles to add to the network. Click OK. 7. The Diagnostics tab does not require any ... tab of all created profiles in the Auto Selected Profiles box has highest priority, while the last profile has the lowest priority. 6. TL-WN951N 300Mbps Wireless N PCI Adapter Profiles list, please follow these steps. 1. The profile with a list of the TP-LINK Wireless Client Utility (TWCU) provides buttons used to connect to auto profile selection, and click Add.

User Guide
Page 35
Figure 3-14 Icon means the connection has been established. Right-click the icon in your system tray, then click Connect to a network. 29 Icon connection. To establish a connection, please follow the steps below. means there is no 1. TL-WN951N 300Mbps Wireless N PCI Adapter Figure 3-13 3.2 For Windows Vista After the Adapter's driver has been installed, Windows Vista will display a wireless Network Connection message like this one.
Figure 3-14 Icon means the connection has been established. Right-click the icon in your system tray, then click Connect to a network. 29 Icon connection. To establish a connection, please follow the steps below. means there is no 1. TL-WN951N 300Mbps Wireless N PCI Adapter Figure 3-13 3.2 For Windows Vista After the Adapter's driver has been installed, Windows Vista will display a wireless Network Connection message like this one.
User Guide
Page 37
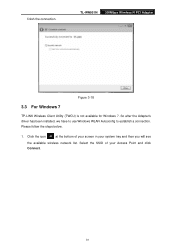
Click the icon at the bottom of your system tray and then you will see the available wireless network list. So after the Adapter's driver has been installed, we have to use Windows WLAN Autoconfig to establish a connection. Please follow the steps below. 1. Select the SSID of your screen in your Access Point and click Connect. 31 TL-WN951N 300Mbps Wireless N PCI Adapter Figure 3-18 3.3 For Windows 7 TP-LINK Wireless Client Utility (TWCU) is not available for Windows 7. finish the connection.
Click the icon at the bottom of your system tray and then you will see the available wireless network list. So after the Adapter's driver has been installed, we have to use Windows WLAN Autoconfig to establish a connection. Please follow the steps below. 1. Select the SSID of your screen in your Access Point and click Connect. 31 TL-WN951N 300Mbps Wireless N PCI Adapter Figure 3-18 3.3 For Windows 7 TP-LINK Wireless Client Utility (TWCU) is not available for Windows 7. finish the connection.

User Guide
Page 46
...32℉~104℉) Storage Temp. -40℃~ 70℃ (-40℉~158℉) Humidity 10% ~ 95% RH, Non-condensing 40 Windows 2000, XP, Vista and Windows 7 300Mbps (Maximal) 27/54/81/108/162/216/243/270Mbps 13.5/27/40.5/54/81/108/121.5/135Mbps 13/26/39/52/78... 6.5/13/19.5/26/39/52/58.5/65Mbps 1/2/5.5/11Mbps (Auto Rate Sensing) 11b:CCK,QPSK,BPSK; 11g:OFDM; 11n: QPSK,BPSK,16-QAM,64-QAM CSMA/CA with ACK WPA/WPA2; 64/128/152-bit WEP; TL-WN951N 300Mbps Wireless N PCI Adapter Appendix A: Specifications Normal Interface Standards Operating System Throughput Radio Data Rate Modulation ...
...32℉~104℉) Storage Temp. -40℃~ 70℃ (-40℉~158℉) Humidity 10% ~ 95% RH, Non-condensing 40 Windows 2000, XP, Vista and Windows 7 300Mbps (Maximal) 27/54/81/108/162/216/243/270Mbps 13.5/27/40.5/54/81/108/121.5/135Mbps 13/26/39/52/78... 6.5/13/19.5/26/39/52/58.5/65Mbps 1/2/5.5/11Mbps (Auto Rate Sensing) 11b:CCK,QPSK,BPSK; 11g:OFDM; 11n: QPSK,BPSK,16-QAM,64-QAM CSMA/CA with ACK WPA/WPA2; 64/128/152-bit WEP; TL-WN951N 300Mbps Wireless N PCI Adapter Appendix A: Specifications Normal Interface Standards Operating System Throughput Radio Data Rate Modulation ...


