
User Guide
Page 6
... Product 2 Features ...2 LED Status ...3 Chapter 2 2.1 2.2 Installation Guide 4 Hardware Installation 4 Software Installation 4 2.2.1 Overview 4 2.2.2 For Windows XP 4 2.2.3 For Windows Vista 9 2.2.4 For Windows 7 13 Chapter 3 3.1 3.2 3.3 Configuration Guide 17 For Windows XP 17 3.1.1 Current Status 17 3.1.2 Profile Management 19 3.1.3 Diagnostics 27 For Windows Vista 29 For Windows 7 31 Chapter 4 4.1 4.2 QSS Configuration 34 PBC (Push Button Configuration) method 35 PIN method...
... Product 2 Features ...2 LED Status ...3 Chapter 2 2.1 2.2 Installation Guide 4 Hardware Installation 4 Software Installation 4 2.2.1 Overview 4 2.2.2 For Windows XP 4 2.2.3 For Windows Vista 9 2.2.4 For Windows 7 13 Chapter 3 3.1 3.2 3.3 Configuration Guide 17 For Windows XP 17 3.1.1 Current Status 17 3.1.2 Profile Management 19 3.1.3 Diagnostics 27 For Windows Vista 29 For Windows 7 31 Chapter 4 4.1 4.2 QSS Configuration 34 PBC (Push Button Configuration) method 35 PIN method...

User Guide
Page 8
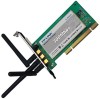
... TL-WN951N 300Mbps Wireless N PCI Adapter! 1.1 Overview of up to distance or other wireless (802.11b) products. The adapter supports WEP, WPA and WPA2 encryption to configure and provides monitoring information ¾ Supports Windows 2000, Windows XP, Windows Vista, Windows 7 ¾ Built-in three internal antennas which are listed in Infrastructure mode ¾ Ease to prevent outside intrusion and protect your notebook. TL-WN951N 300Mbps Wireless N PCI Adapter...
... TL-WN951N 300Mbps Wireless N PCI Adapter! 1.1 Overview of up to distance or other wireless (802.11b) products. The adapter supports WEP, WPA and WPA2 encryption to configure and provides monitoring information ¾ Supports Windows 2000, Windows XP, Windows Vista, Windows 7 ¾ Built-in three internal antennas which are listed in Infrastructure mode ¾ Ease to prevent outside intrusion and protect your notebook. TL-WN951N 300Mbps Wireless N PCI Adapter...

User Guide
Page 10
...the CD-ROM. 2.2.2 For Windows XP 1. Make sure that all of the PC. Once the adapter is firmly in place, secure its pins are touching the slot's contacts. TL-WN951N 300Mbps Wireless N PCI Adapter Chapter 2 Installation Guide 2.1 Hardware Installation To install the adapter, follow these steps listed below... procedure for instructions if needed. 3. Insert the Resource CD into the PCI slot. To continue, select the TL-WN951N.There will install the TP-LINK Wireless Client Utility (TWCU) and drivers. Slide the PCI Adapter into your CD-ROM drive, and the Figure 2-1 will guide you ...
...the CD-ROM. 2.2.2 For Windows XP 1. Make sure that all of the PC. Once the adapter is firmly in place, secure its pins are touching the slot's contacts. TL-WN951N 300Mbps Wireless N PCI Adapter Chapter 2 Installation Guide 2.1 Hardware Installation To install the adapter, follow these steps listed below... procedure for instructions if needed. 3. Insert the Resource CD into the PCI slot. To continue, select the TL-WN951N.There will install the TP-LINK Wireless Client Utility (TWCU) and drivers. Slide the PCI Adapter into your CD-ROM drive, and the Figure 2-1 will guide you ...

User Guide
Page 14
Our drivers have been tested thoroughly, and are able to continue installation. 8 Figure 2-9 2) In Windows 2000, the warning screen is shown below (Figure 2-10), and please select Yes to work with the installation during these steps (shown in Figure 2-9). Click Continue Anyway to proceed with the operating system. TL-WN951N 300Mbps Wireless N PCI Adapter Figure 2-8 ) Note: 1) For Windows XP, the Setup Wizard will notify you of how to continue the Installation.
Our drivers have been tested thoroughly, and are able to continue installation. 8 Figure 2-9 2) In Windows 2000, the warning screen is shown below (Figure 2-10), and please select Yes to work with the installation during these steps (shown in Figure 2-9). Click Continue Anyway to proceed with the operating system. TL-WN951N 300Mbps Wireless N PCI Adapter Figure 2-8 ) Note: 1) For Windows XP, the Setup Wizard will notify you of how to continue the Installation.
User Guide
Page 15
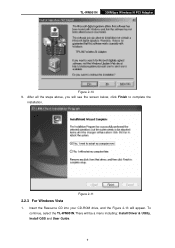
Insert the Resource CD into your CD-ROM drive, and the Figure 2-13 will be a menu including: Install Driver & Utility, Install QSS and User Guide. 9 TL-WN951N 300Mbps Wireless N PCI Adapter Figure 2-10 9. Figure 2-11 2.2.3 For Windows Vista 1. To continue, select the TL-WN951N.There will appear. After all the steps above, you will see the screen below, click Finish to complete the installation.
Insert the Resource CD into your CD-ROM drive, and the Figure 2-13 will be a menu including: Install Driver & Utility, Install QSS and User Guide. 9 TL-WN951N 300Mbps Wireless N PCI Adapter Figure 2-10 9. Figure 2-11 2.2.3 For Windows Vista 1. To continue, select the TL-WN951N.There will appear. After all the steps above, you will see the screen below, click Finish to complete the installation.
User Guide
Page 18
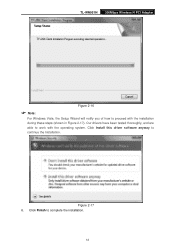
Click Finish to work with the installation during these steps (shown in Figure 2-17). Our drivers have been tested thoroughly, and are able to complete the installation. 12 TL-WN951N 300Mbps Wireless N PCI Adapter Figure 2-16 ) Note: For Windows Vista, the Setup Wizard will notify you of how to continue the Installation. Figure 2-17 6. Click Install this driver software anyway to proceed with the operating system.
Click Finish to work with the installation during these steps (shown in Figure 2-17). Our drivers have been tested thoroughly, and are able to complete the installation. 12 TL-WN951N 300Mbps Wireless N PCI Adapter Figure 2-16 ) Note: For Windows Vista, the Setup Wizard will notify you of how to continue the Installation. Figure 2-17 6. Click Install this driver software anyway to proceed with the operating system.
User Guide
Page 19
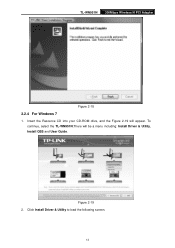
TL-WN951N 300Mbps Wireless N PCI Adapter Figure 2-18 2.2.4 For Windows 7 1. Click Install Driver & Utility to load the following screen. 13 Insert the Resource CD into your CD-ROM drive, and the Figure 2-19 will be a menu including: Install Driver & Utility, Install QSS and User Guide. Figure 2-19 2. To continue, select the TL-WN951N.There will appear.
TL-WN951N 300Mbps Wireless N PCI Adapter Figure 2-18 2.2.4 For Windows 7 1. Click Install Driver & Utility to load the following screen. 13 Insert the Resource CD into your CD-ROM drive, and the Figure 2-19 will be a menu including: Install Driver & Utility, Install QSS and User Guide. Figure 2-19 2. To continue, select the TL-WN951N.There will appear.
User Guide
Page 21
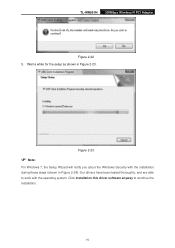
Our drivers have been tested thoroughly, and are able to continue the installation. 15 Click Installation this driver software anyway to work with the installation during these steps (shown in Figure 2-23. TL-WN951N 300Mbps Wireless N PCI Adapter Figure 2-22 5. Figure 2-23 ) Note: For Windows 7, the Setup Wizard will notify you about the Windows Security with the operating system. Wait a while for the setup as shown in Figure 2-24).
Our drivers have been tested thoroughly, and are able to continue the installation. 15 Click Installation this driver software anyway to work with the installation during these steps (shown in Figure 2-23. TL-WN951N 300Mbps Wireless N PCI Adapter Figure 2-22 5. Figure 2-23 ) Note: For Windows 7, the Setup Wizard will notify you about the Windows Security with the operating system. Wait a while for the setup as shown in Figure 2-24).

User Guide
Page 23
After Installing the Adapter, the Adapter's tray icon will run the utility by TP-LINK Wireless Client Utility (TWCU). It appears at the bottom of the screen, and shows the signal strength using color and the received signal strength ... is between 5dB and 10dB. If the icon is yellow, there is poor signal strength and the RSSI is more than 5dB. TL-WN951N 300Mbps Wireless N PCI Adapter Chapter 3 Configuration Guide 3.1 For Windows XP TP-LINK TL-WN951N can also run . This chapter describes how to : ¾ Display current status information ¾ Edit and add configuration profiles ¾...
After Installing the Adapter, the Adapter's tray icon will run the utility by TP-LINK Wireless Client Utility (TWCU). It appears at the bottom of the screen, and shows the signal strength using color and the received signal strength ... is between 5dB and 10dB. If the icon is yellow, there is poor signal strength and the RSSI is more than 5dB. TL-WN951N 300Mbps Wireless N PCI Adapter Chapter 3 Configuration Guide 3.1 For Windows XP TP-LINK TL-WN951N can also run . This chapter describes how to : ¾ Display current status information ¾ Edit and add configuration profiles ¾...
User Guide
Page 27
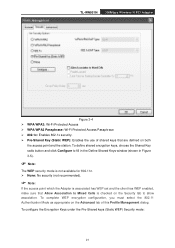
...-Shared keys (Static WEP) Security mode: 21 To complete WEP encryption configuration, you must select the 802.11 Authentication Mode as appropriate on both the access point and the station. TL-WN951N 300Mbps Wireless N PCI Adapter Figure 3-4 ¾ WPA/WPA2: Wi-Fi Protected Access ¾ WPA/WPA2 Passphrase: Wi-Fi ... click Configure to fill in the Define Shared Keys window (shown in Figure 3-5). ) Note: The WEP security mode is not available for 802.11n. ¾ None: No security (not recommended). ) Note: If the access point which the Adapter is checked on the Security tab to Mixed Cells ...
...-Shared keys (Static WEP) Security mode: 21 To complete WEP encryption configuration, you must select the 802.11 Authentication Mode as appropriate on both the access point and the station. TL-WN951N 300Mbps Wireless N PCI Adapter Figure 3-4 ¾ WPA/WPA2: Wi-Fi Protected Access ¾ WPA/WPA2 Passphrase: Wi-Fi ... click Configure to fill in the Define Shared Keys window (shown in Figure 3-5). ) Note: The WEP security mode is not available for 802.11n. ¾ None: No security (not recommended). ) Note: If the access point which the Adapter is checked on the Security tab to Mixed Cells ...

User Guide
Page 31
...window will appear below . 3. Then the Import Profile will then appear below . 2. Browse the directory to export the profile to the specified location. Figure 3-8 3.1.2.5. From the Profile Management screen (shown in the Profiles List. 25 From the Profile Management screen (shown in the Profiles List. 3. TL-WN951N... 2. Select the profile name required in Figure 3-2), click Import.... Click Activate. 300Mbps Wireless N PCI Adapter 3.1.2.4. Export a Profile 1. Browse to export. 2.
...window will appear below . 3. Then the Import Profile will then appear below . 2. Browse the directory to export the profile to the specified location. Figure 3-8 3.1.2.5. From the Profile Management screen (shown in the Profiles List. 25 From the Profile Management screen (shown in the Profiles List. 3. TL-WN951N... 2. Select the profile name required in Figure 3-2), click Import.... Click Activate. 300Mbps Wireless N PCI Adapter 3.1.2.4. Export a Profile 1. Browse to export. 2.

User Guide
Page 32
Click Refresh to an available network. Fill in Figure 3-2), the Available Infrastructure and Ad Hoc Networks window will open the General tab screen. To add a new profile into the Auto Selected 26 Figure 3-10 3.1.2.7. Click... feature allows the adapter to automatically select a profile from the list of profiles and use it to connect to create the configuration profile for that network. Scan Available Networks 1. TL-WN951N 300Mbps Wireless N PCI Adapter Figure 3-9 3.1.2.6. If no configuration profile exists for that network, the Profile Management window will appear below...
Click Refresh to an available network. Fill in Figure 3-2), the Available Infrastructure and Ad Hoc Networks window will open the General tab screen. To add a new profile into the Auto Selected 26 Figure 3-10 3.1.2.7. Click... feature allows the adapter to automatically select a profile from the list of profiles and use it to connect to create the configuration profile for that network. Scan Available Networks 1. TL-WN951N 300Mbps Wireless N PCI Adapter Figure 3-9 3.1.2.6. If no configuration profile exists for that network, the Profile Management window will appear below...
User Guide
Page 33
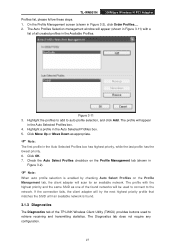
The Auto Profiles Selection management window will try the next highest priority profile that matches the SSID until an available network is enabled by checking Auto Select Profiles on the Profile Management tab, the client adapter will appear in the Auto Selected Profiles ... 2. The Diagnostics tab does not require any configuration. 27 The profile with a list of the TP-LINK Wireless Client Utility (TWCU) provides buttons used to connect to the network. TL-WN951N 300Mbps Wireless N PCI Adapter Profiles list, please follow these steps. 1. Click OK. 7. Click Move Up or Move Down as...
The Auto Profiles Selection management window will try the next highest priority profile that matches the SSID until an available network is enabled by checking Auto Select Profiles on the Profile Management tab, the client adapter will appear in the Auto Selected Profiles ... 2. The Diagnostics tab does not require any configuration. 27 The profile with a list of the TP-LINK Wireless Client Utility (TWCU) provides buttons used to connect to the network. TL-WN951N 300Mbps Wireless N PCI Adapter Profiles list, please follow these steps. 1. Click OK. 7. Click Move Up or Move Down as...

User Guide
Page 35
means there is no 1. Icon connection. Figure 3-14 Icon means the connection has been established. Right-click the icon in your system tray, then click Connect to a network. 29 To establish a connection, please follow the steps below. TL-WN951N 300Mbps Wireless N PCI Adapter Figure 3-13 3.2 For Windows Vista After the Adapter's driver has been installed, Windows Vista will display a wireless Network Connection message like this one.
means there is no 1. Icon connection. Figure 3-14 Icon means the connection has been established. Right-click the icon in your system tray, then click Connect to a network. 29 To establish a connection, please follow the steps below. TL-WN951N 300Mbps Wireless N PCI Adapter Figure 3-13 3.2 For Windows Vista After the Adapter's driver has been installed, Windows Vista will display a wireless Network Connection message like this one.
User Guide
Page 37
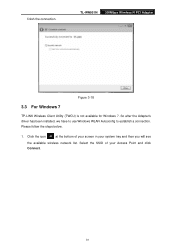
Please follow the steps below. 1. TL-WN951N 300Mbps Wireless N PCI Adapter Figure 3-18 3.3 For Windows 7 TP-LINK Wireless Client Utility (TWCU) is not available for Windows 7. Select the SSID of your screen in your Access Point and click Connect. 31 So after the Adapter's driver has been installed, we have to use Windows WLAN Autoconfig to establish a connection. finish the connection. Click the icon at the bottom of your system tray and then you will see the available wireless network list.
Please follow the steps below. 1. TL-WN951N 300Mbps Wireless N PCI Adapter Figure 3-18 3.3 For Windows 7 TP-LINK Wireless Client Utility (TWCU) is not available for Windows 7. Select the SSID of your screen in your Access Point and click Connect. 31 So after the Adapter's driver has been installed, we have to use Windows WLAN Autoconfig to establish a connection. finish the connection. Click the icon at the bottom of your system tray and then you will see the available wireless network list.

User Guide
Page 46
...40 IEEE802.11g; TL-WN951N 300Mbps Wireless N PCI Adapter Appendix A: Specifications Normal Interface Standards Operating System Throughput Radio Data Rate Modulation Media Access Protocol Data Security Frequency Spread Spectrum Safety & Emissions 32 bit PCI Interface IEEE802.11n; Windows 2000, XP, Vista and Windows 7 300Mbps (Maximal)... 27/54/81/108/162/216/243/270Mbps 13.5/27/40.5/54/81/108/121.5/135Mbps 13/26/39/52/78/104/117/130Mbps 6.5/13/19.5/26/39/52/58.5/65Mbps 1/2/5.5/11Mbps (Auto Rate Sensing) 11b...
...40 IEEE802.11g; TL-WN951N 300Mbps Wireless N PCI Adapter Appendix A: Specifications Normal Interface Standards Operating System Throughput Radio Data Rate Modulation Media Access Protocol Data Security Frequency Spread Spectrum Safety & Emissions 32 bit PCI Interface IEEE802.11n; Windows 2000, XP, Vista and Windows 7 300Mbps (Maximal)... 27/54/81/108/162/216/243/270Mbps 13.5/27/40.5/54/81/108/121.5/135Mbps 13/26/39/52/78/104/117/130Mbps 6.5/13/19.5/26/39/52/58.5/65Mbps 1/2/5.5/11Mbps (Auto Rate Sensing) 11b...


