User Guide
Page 16
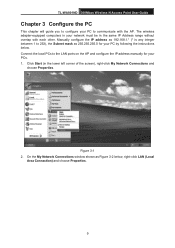
TL-WA801ND 300Mbps Wireless N Access Point User Guide Chapter 3 Configure the PC This chapter will guide you to configure your ...Start (in your PC by following the instructions below , right-click LAN (Local Area Connection) and choose Properties. 9 Manually configure the IP address as 192.168.1.* (* is any integer between 1 to the LAN ports on the AP and configure the IP... address manually for your network must be in the same IP Address range without overlap with the AP. Connect the local PCs ...
TL-WA801ND 300Mbps Wireless N Access Point User Guide Chapter 3 Configure the PC This chapter will guide you to configure your ...Start (in your PC by following the instructions below , right-click LAN (Local Area Connection) and choose Properties. 9 Manually configure the IP address as 192.168.1.* (* is any integer between 1 to the LAN ports on the AP and configure the IP... address manually for your network must be in the same IP Address range without overlap with the AP. Connect the local PCs ...
User Guide
Page 18
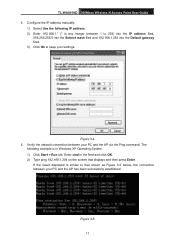
... Enter. Configure the IP address manually. 1) Select Use the following example is in the filed and click OK. 2) Type ping 192.168.1.254 on the screen that shown as Figure 3-5 below, the connection between your PC and the AP has been successfully established. Figure 3-4 5. Figure 3-5 11 TL-WA801ND 300Mbps Wireless N Access Point User...
... Enter. Configure the IP address manually. 1) Select Use the following example is in the filed and click OK. 2) Type ping 192.168.1.254 on the screen that shown as Figure 3-5 below, the connection between your PC and the AP has been successfully established. Figure 3-4 5. Figure 3-5 11 TL-WA801ND 300Mbps Wireless N Access Point User...
User Guide
Page 22
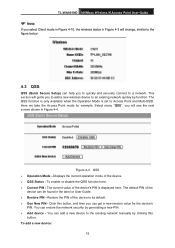
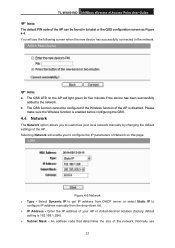
...of the device can ensure the network security by function. You can be found in Figure 4-4. You can add a new device to the existing network manually by clicking this button, and then you can help you to quickly and securely connect to a network. Figure 4-4 QSS ¾ Operation Mode - ...15 The QSS function is only available when the Operation Mode is displayed here. To enable or disable the QSS function here. ¾ Current PIN - TL-WA801ND 300Mbps Wireless N Access Point User Guide ) Note: If you select Client mode in Figure 4-10, the wireless status in Figure 4-3 will guide you ...
...of the device can ensure the network security by function. You can be found in Figure 4-4. You can add a new device to the existing network manually by clicking this button, and then you can help you to quickly and securely connect to a network. Figure 4-4 QSS ¾ Operation Mode - ...15 The QSS function is only available when the Operation Mode is displayed here. To enable or disable the QSS function here. ¾ Current PIN - TL-WA801ND 300Mbps Wireless N Access Point User Guide ) Note: If you select Client mode in Figure 4-10, the wireless status in Figure 4-3 will guide you ...
User Guide
Page 28
... the IP parameters of Network on the AP will light green for five minutes if the device has been successfully added to configure IP address manually from DHCP server or select Static IP to the network. You will enable you to the network. ) Note: a. Selecting Network will see the...customize your AP in its label or the QSS configuration screen as Figure 4-4. Enter the IP address of your local network manually by changing the default settings of the AP. TL-WA801ND 300Mbps Wireless N Access Point User Guide ) Note: The default PIN code of the AP can be configured if the ...
... the IP parameters of Network on the AP will light green for five minutes if the device has been successfully added to configure IP address manually from DHCP server or select Static IP to the network. You will enable you to the network. ) Note: a. Selecting Network will see the...customize your AP in its label or the QSS configuration screen as Figure 4-4. Enter the IP address of your local network manually by changing the default settings of the AP. TL-WA801ND 300Mbps Wireless N Access Point User Guide ) Note: The default PIN code of the AP can be configured if the ...
User Guide
Page 56
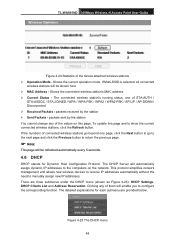
...stands for each submenu are three submenus under the DHCP menu (shown as Figure 4-25): DHCP Settings, DHCP Clients List and Address Reservation. TL-WA801ND 300Mbps Wireless N Access Point User Guide Figure 4-24 Statistics of them will be shown here ¾ MAC Address - Shows the current operation... Multi-SSID is selected, all connected wireless stations will automatically assign dynamic IP addresses to the computers on this page and to manually assign new IP addresses. packets received by the station You cannot change any of the device attached wireless stations ¾ Operation ...
...stands for each submenu are three submenus under the DHCP menu (shown as Figure 4-25): DHCP Settings, DHCP Clients List and Address Reservation. TL-WA801ND 300Mbps Wireless N Access Point User Guide Figure 4-24 Statistics of them will be shown here ¾ MAC Address - Shows the current operation... Multi-SSID is selected, all connected wireless stations will automatically assign dynamic IP addresses to the computers on this page and to manually assign new IP addresses. packets received by the station You cannot change any of the device attached wireless stations ¾ Operation ...
User Guide
Page 57
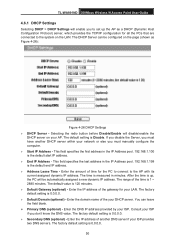
TL-WA801ND 300Mbps Wireless N Access Point User Guide 4.6.1 DHCP Settings Selecting DHCP > DHCP Settings will enable you to the AP with its current assigned dynamic IP address. ... up the AP as Figure 4-26): Figure 4-26 DHCP Settings ¾ DHCP Server - Enter the DNS IP address provided by your ISP if you must manually configure the computer. ¾ Start IP Address - The range of the your LAN. Enter the amount of time for all the PCs that are connected...
TL-WA801ND 300Mbps Wireless N Access Point User Guide 4.6.1 DHCP Settings Selecting DHCP > DHCP Settings will enable you to the AP with its current assigned dynamic IP address. ... up the AP as Figure 4-26): Figure 4-26 DHCP Settings ¾ DHCP Server - Enter the DNS IP address provided by your ISP if you must manually configure the computer. ¾ Start IP Address - The range of the your LAN. Enter the amount of time for all the PCs that are connected...

