
User Guide
Page 5
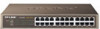
TL-SG1016D and TL-SG1024D do not include mounting screws and two "L" planks. 1 Package Contents The following contents should be found in your package: ¾ One TL-SG1008/TL-SG1016D/TL-SG1024D Switch ¾ One power cord ¾ This User Guide ¾ Rubber footpads for Desk-mount ¾ Mounting screws and two "L" planks Note: Make sure that the package contains the above items. If any of the listed items are damaged or missing, please contact with your distributor.
TL-SG1016D and TL-SG1024D do not include mounting screws and two "L" planks. 1 Package Contents The following contents should be found in your package: ¾ One TL-SG1008/TL-SG1016D/TL-SG1024D Switch ¾ One power cord ¾ This User Guide ¾ Rubber footpads for Desk-mount ¾ Mounting screws and two "L" planks Note: Make sure that the package contains the above items. If any of the listed items are damaged or missing, please contact with your distributor.
User Guide
Page 6
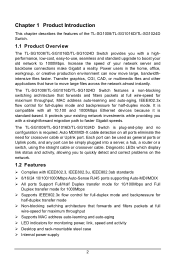
...easy-to-use, seamless and standard upgrade to boost your network server and backbone connections make Gigabit a reality. The TL-SG1008/TL-SG1016D/TL-SG1024D Switch is plug-and-play and no configuration is standard-based. Auto MDI/MDI-X cable detection on the network. 1.2... Introduction This chapter describes the features of the TL-SG1008/TL-SG1016D/TL-SG1024D Switch. 1.1 Product Overview The TL-SG1008/TL-SG1016D/TL-SG1024D Switch provides you with a straightforward migration path to faster Gigabit speeds. Diagnostic LEDs which display link status and activity, allowing you to quickly detect...
...easy-to-use, seamless and standard upgrade to boost your network server and backbone connections make Gigabit a reality. The TL-SG1008/TL-SG1016D/TL-SG1024D Switch is plug-and-play and no configuration is standard-based. Auto MDI/MDI-X cable detection on the network. 1.2... Introduction This chapter describes the features of the TL-SG1008/TL-SG1016D/TL-SG1024D Switch. 1.1 Product Overview The TL-SG1008/TL-SG1016D/TL-SG1024D Switch provides you with a straightforward migration path to faster Gigabit speeds. Diagnostic LEDs which display link status and activity, allowing you to quickly detect...
User Guide
Page 7
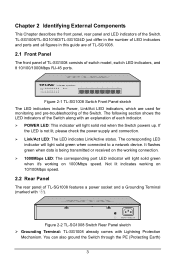
... LED indicators include Power, Link/Act LED indicators, which are of TL-SG1008. 2.1 Front Panel The front panel of TL-SG1008 consists of the Switch. It flashes green when data is not lit, please check the power supply and connection. ¾ Link/Act LED: The LED indicates Link/Active status. TL-SG1008/TL-SG1016D/TL-SG1024D just differ in the...
... LED indicators include Power, Link/Act LED indicators, which are of TL-SG1008. 2.1 Front Panel The front panel of TL-SG1008 consists of the Switch. It flashes green when data is not lit, please check the power supply and connection. ¾ Link/Act LED: The LED indicates Link/Active status. TL-SG1008/TL-SG1016D/TL-SG1024D just differ in the...
User Guide
Page 8
... accessible and that can be sure to sunlight. • To ensure adequate air flow around the Switch. cable of AC cord or with all fittings. • Locate the Switch far from water and moisture sources, be either installed on the standard 19-inch mountable rack or ... connector to the following before the installation. 1) Safety Requirements • Before cleaning the Switch, cut off the power supply. Chapter 3 Installation 3.1 Precautions To ensure a long-term and stable performance of the Switch, please pay attention to the AC power outlet. For detail information, please refer to ...
... accessible and that can be sure to sunlight. • To ensure adequate air flow around the Switch. cable of AC cord or with all fittings. • Locate the Switch far from water and moisture sources, be either installed on the standard 19-inch mountable rack or ... connector to the following before the installation. 1) Safety Requirements • Before cleaning the Switch, cut off the power supply. Chapter 3 Installation 3.1 Precautions To ensure a long-term and stable performance of the Switch, please pay attention to the AC power outlet. For detail information, please refer to ...

User Guide
Page 9
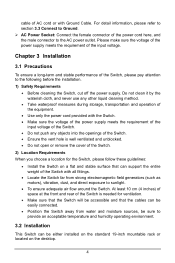
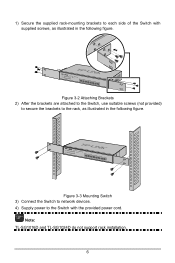
...the power cord before installing or removing the Switch. 3.2.1 Desktop Installation To install the Switch on the desktop, please follow the instructions described below: 5 Caution: Please avoid any heavy thing placed on the Switch. 3.2.2 Rack Installation To install the Switch in an EIA standard-sized, 19-inch rack..., follow the steps: 1) Set the Switch on the bottom at each corner of the Switch. Figure 3-1 Attaching Rubber Feet 4) Upturn the Switch and connect it to the ...
...the power cord before installing or removing the Switch. 3.2.1 Desktop Installation To install the Switch on the desktop, please follow the instructions described below: 5 Caution: Please avoid any heavy thing placed on the Switch. 3.2.2 Rack Installation To install the Switch in an EIA standard-sized, 19-inch rack..., follow the steps: 1) Set the Switch on the bottom at each corner of the Switch. Figure 3-1 Attaching Rubber Feet 4) Upturn the Switch and connect it to the ...
User Guide
Page 10
Figure 3-3 Mounting Switch 3) Connect the Switch to network devices. 4) Supply power to the Switch with supplied screws, as illustrated in the following figure. Note: TL-SG1016D and TL-SG1024D do not support rack installation. 6 Figure 3-2 Attaching Brackets 2) After the brackets are attached to the Switch, use suitable screws (not provided) to secure the brackets to the rack, as illustrated in the following figure. 1) Secure the supplied rack-mounting brackets to each side of the Switch with the provided power cord.
Figure 3-3 Mounting Switch 3) Connect the Switch to network devices. 4) Supply power to the Switch with supplied screws, as illustrated in the following figure. Note: TL-SG1016D and TL-SG1024D do not support rack installation. 6 Figure 3-2 Attaching Brackets 2) After the brackets are attached to the Switch, use suitable screws (not provided) to secure the brackets to the rack, as illustrated in the following figure. 1) Secure the supplied rack-mounting brackets to each side of the Switch with the provided power cord.
User Guide
Page 11
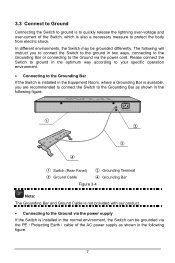
... installed in the Equipment Room, where a Grounding Bar is available, you are recommended to connect the Switch to the Grounding Bar as shown in the following will instruct you to connect the Switch to the ground in two ways, connecting to the Grounding Bar or connecting to the Ground via the ... ground is to quickly release the lightning over-voltage and over-current of the AC power supply as shown in the normal environment, the Switch can be grounded differently. Figure 3-4 Note: The Grounding Bar and Ground Cable is not provided with our product. • Connecting to the Ground via the...
... installed in the Equipment Room, where a Grounding Bar is available, you are recommended to connect the Switch to the Grounding Bar as shown in the following will instruct you to connect the Switch to the ground in two ways, connecting to the Grounding Bar or connecting to the Ground via the ... ground is to quickly release the lightning over-voltage and over-current of the AC power supply as shown in the normal environment, the Switch can be grounded differently. Figure 3-4 Note: The Grounding Bar and Ground Cable is not provided with our product. • Connecting to the Ground via the...
User Guide
Page 12
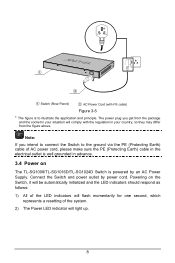
The power plug you intend to connect the Switch to illustrate the application and principle. Powering on the Switch, it will be automatically initialized and the LED indicators should respond as follows: 1) All of the LED indicators will flash momentarily for one second, ...ground via the PE (Protecting Earth) cable of the system. 2) The Power LED indicator will comply with the regulation in advance. 3.4 Power on The TL-SG1008/TL-SG1016D/TL-SG1024D Switch is well grounded in your situation will light up. 8 Note: If you get from the package and the socket in your country, so they...
The power plug you intend to connect the Switch to illustrate the application and principle. Powering on the Switch, it will be automatically initialized and the LED indicators should respond as follows: 1) All of the LED indicators will flash momentarily for one second, ...ground via the PE (Protecting Earth) cable of the system. 2) The Power LED indicator will comply with the regulation in advance. 3.4 Power on The TL-SG1008/TL-SG1016D/TL-SG1024D Switch is well grounded in your situation will light up. 8 Note: If you get from the package and the socket in your country, so they...

User Guide
Page 15
...). Appendix B: Troubleshooting 1. E-mail: support@tp-link.com Website: http://www.tp-link.com 11 The Link/Act LED is not lit when a device is connected to the corresponding port ¾ Make sure that the cable connectors are firmly plugged into the Switch and the device. ¾ Make sure ...the connected device is ON. 2. The Power LED is not lit ¾ Make sure the AC power cord connected the Switch with the installation or operation of the TP-LINK TL-SG1008/TL-SG1016D/ TL-SG1024D Switch, please contact us.
...). Appendix B: Troubleshooting 1. E-mail: support@tp-link.com Website: http://www.tp-link.com 11 The Link/Act LED is not lit when a device is connected to the corresponding port ¾ Make sure that the cable connectors are firmly plugged into the Switch and the device. ¾ Make sure ...the connected device is ON. 2. The Power LED is not lit ¾ Make sure the AC power cord connected the Switch with the installation or operation of the TP-LINK TL-SG1008/TL-SG1016D/ TL-SG1024D Switch, please contact us.


