Quick Installation Guide
Page 1
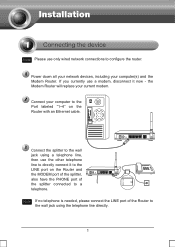
... the MODEM port of the splitter, also have the PHONE port of the Router to the wall jack using a telephone line, then use the other telephone line to directly connect it now - Connect the splitter to the wall jack ..., please connect the LINE port of the splitter connected to a telephone. If you currently use only wired network connections to configure the router. the Modem Router will replace your computer(s) and the Modem Router. Power down all your network devices, including your current modem. Note Please use a modem, disconnect it to the LINE port...
... the MODEM port of the splitter, also have the PHONE port of the Router to the wall jack using a telephone line, then use the other telephone line to directly connect it now - Connect the splitter to the wall jack ..., please connect the LINE port of the splitter connected to a telephone. If you currently use only wired network connections to configure the router. the Modem Router will replace your computer(s) and the Modem Router. Power down all your network devices, including your current modem. Note Please use a modem, disconnect it to the LINE port...
Quick Installation Guide
Page 2
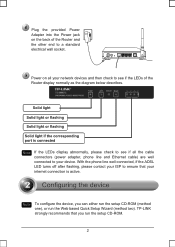
With the phone line well connected, if the ADSL LED turns off after flashing, please contact your ISP to a standard electrical wall socket. Note To configure the device, you run the Web based Quick Setup Wizard (method two). Plug the provided Power Adapter into the Power jack on all your network ... one), or run the setup CD-ROM. 2 Solid light Solid light or flashing Solid light or flashing Solid light if the corresponding port is active. TP-LINK strongly recommends that your device. Power on the back of the Router display normally as the diagram below describes.
With the phone line well connected, if the ADSL LED turns off after flashing, please contact your ISP to a standard electrical wall socket. Note To configure the device, you run the Web based Quick Setup Wizard (method two). Plug the provided Power Adapter into the Power jack on all your network ... one), or run the setup CD-ROM. 2 Solid light Solid light or flashing Solid light or flashing Solid light if the corresponding port is active. TP-LINK strongly recommends that your device. Power on the back of the Router display normally as the diagram below describes.
Quick Installation Guide
Page 3
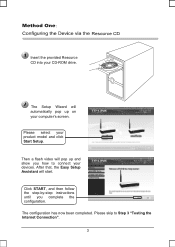
After that, the Easy Setup Assistant will automatically pop up and show you complete the configuration. Click START, and then follow the step-by-step instructions until you how to Step 3 "Testing the Internet Connection". 3 Then a flash video will pop up on your devices. The configuration has now been completed. Please select your CD-ROM drive. The Setup Wizard will start. Please skip to connect your computer's screen. Insert the provided Resource CD into your product model and click Start Setup.
After that, the Easy Setup Assistant will automatically pop up and show you complete the configuration. Click START, and then follow the step-by-step instructions until you how to Step 3 "Testing the Internet Connection". 3 Then a flash video will pop up on your devices. The configuration has now been completed. Please select your CD-ROM drive. The Setup Wizard will start. Please skip to connect your computer's screen. Insert the provided Resource CD into your product model and click Start Setup.
Quick Installation Guide
Page 6
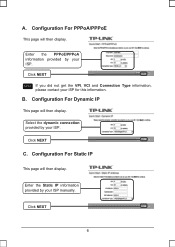
Configuration For Static IP This page will then display. Enter the PPPoE/PPPoA information provided by your ISP for this information. Configuration For Dynamic IP This page will then display. Click NEXT C. Click NEXT 6 Click NEXT Note If you did not get the VPI, VCI and Connection Type information, please contact your ISP. Select the dynamic connection provided by your ISP. A. Enter the Static IP information provided by your ISP manually. Configuration For PPPoA/PPPoE This page will then display. B.
Configuration For Static IP This page will then display. Enter the PPPoE/PPPoA information provided by your ISP for this information. Configuration For Dynamic IP This page will then display. Click NEXT C. Click NEXT 6 Click NEXT Note If you did not get the VPI, VCI and Connection Type information, please contact your ISP. Select the dynamic connection provided by your ISP. A. Enter the Static IP information provided by your ISP manually. Configuration For PPPoA/PPPoE This page will then display. B.
Quick Installation Guide
Page 7
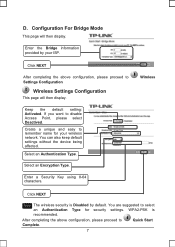
... proceed to Quick Start Complete. 7 Create a unique and easy to Settings Configuration Wireless Settings Configuration This page will then display. Select an Authentication Type. After completing the above configuration, please proceed to remember name for security settings. Wireless Click NEXT Note The wireless security is recommended. D. You can also keep default settings without the device being...
... proceed to Quick Start Complete. 7 Create a unique and easy to Settings Configuration Wireless Settings Configuration This page will then display. Select an Authentication Type. After completing the above configuration, please proceed to remember name for security settings. Wireless Click NEXT Note The wireless security is recommended. D. You can also keep default settings without the device being...
Quick Installation Guide
Page 8
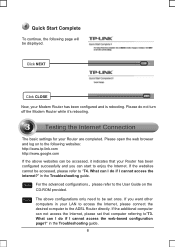
...'s rebooting. Note For the advanced configurations,please refer to "T3. in the Troubleshooting guide. 8 If the additional computer can not access the Internet, please set once. Quick Start Complete To continue, the following websites: http://www.tp-link.com http://www.google.com If... the above configurations only need to "T4. in the Troubleshooting guide. Click NEXT Click CLOSE Now, your Router are completed.
...'s rebooting. Note For the advanced configurations,please refer to "T3. in the Troubleshooting guide. 8 If the additional computer can not access the Internet, please set once. Quick Start Complete To continue, the following websites: http://www.tp-link.com http://www.google.com If... the above configurations only need to "T4. in the Troubleshooting guide. Click NEXT Click CLOSE Now, your Router are completed.
Quick Installation Guide
Page 9
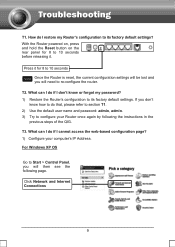
... button on the rear panel for 8 to 10 seconds before releasing it for 8 to 10 seconds Note Once the Router is reset, the current configuration settings will be lost and you will then see the following the instructions in the previous steps of the QIG. If...XP OS Go to Start > Control Panel, you don't know or forgot my password? 1) Restore the Router's configuration to re-configure the router. How do I don't know how to do if I restore my Router's configuration to configure your computer's IP Address. Click Network and Internet Connections 9 What can I do if I cannot access ...
... button on the rear panel for 8 to 10 seconds before releasing it for 8 to 10 seconds Note Once the Router is reset, the current configuration settings will be lost and you will then see the following the instructions in the previous steps of the QIG. If...XP OS Go to Start > Control Panel, you don't know or forgot my password? 1) Restore the Router's configuration to re-configure the router. How do I don't know how to do if I restore my Router's configuration to configure your computer's IP Address. Click Network and Internet Connections 9 What can I do if I cannot access ...
Quick Installation Guide
Page 14
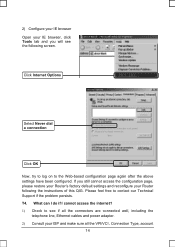
... browser, click Tools tab and you still cannot access the configuration page, please restore your Router's factory default settings and reconfigure your ISP and make sure all the connectors are connected well, including the telephone line, Ethernet cables and power adapter. 2) Consult your Router following screen. What can I do if I cannot access the... if the problem persists. If you will see if all the VPI/VCIĂConnection Type, account 14 Please feel free to the Web-based configuration page again after the above settings have been...
... browser, click Tools tab and you still cannot access the configuration page, please restore your Router's factory default settings and reconfigure your ISP and make sure all the connectors are connected well, including the telephone line, Ethernet cables and power adapter. 2) Consult your Router following screen. What can I do if I cannot access the... if the problem persists. If you will see if all the VPI/VCIĂConnection Type, account 14 Please feel free to the Web-based configuration page again after the above settings have been...
User Guide
Page 3
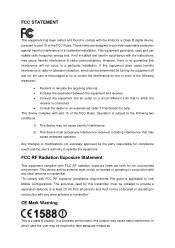
... FCC RF radiation exposure limits set forth for a Class B digital device, pursuant to part 15 of at least 20 cm from that to only Mobile Configurations. Operation is a class B product. The antennas used in accordance with any other antenna or transmitter. FCC STATEMENT This equipment has been tested and found to...
... FCC RF radiation exposure limits set forth for a Class B digital device, pursuant to part 15 of at least 20 cm from that to only Mobile Configurations. Operation is a class B product. The antennas used in accordance with any other antenna or transmitter. FCC STATEMENT This equipment has been tested and found to...
User Guide
Page 6
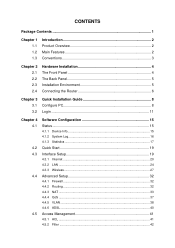
... 4 The Front Panel 4 The Back Panel 5 Installation Environment 5 Connecting the Router 6 Chapter 3 3.1 3.2 Quick Installation Guide 8 Configure PC 8 Login 11 Chapter 4 4.1 4.2 4.3 4.4 4.5 Software Configuration 15 Status 15 4.1.1 Device Info 15 4.1.2 System Log 16 4.1.3 Statistics 17 Quick Start 19 Interface Setup 19 4.3.1 Internet ...20 4.3.2 LAN ...24 4.3.3 Wireless 27 Advanced Setup 32 4.4.1 Firewall ...32 4.4.2 Routing ...32 4.4.3 NAT ...33...
... 4 The Front Panel 4 The Back Panel 5 Installation Environment 5 Connecting the Router 6 Chapter 3 3.1 3.2 Quick Installation Guide 8 Configure PC 8 Login 11 Chapter 4 4.1 4.2 4.3 4.4 4.5 Software Configuration 15 Status 15 4.1.1 Device Info 15 4.1.2 System Log 16 4.1.3 Statistics 17 Quick Start 19 Interface Setup 19 4.3.1 Internet ...20 4.3.2 LAN ...24 4.3.3 Wireless 27 Advanced Setup 32 4.4.1 Firewall ...32 4.4.2 Routing ...32 4.4.3 NAT ...33...
User Guide
Page 9
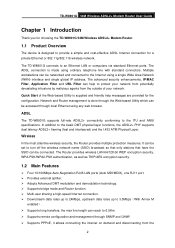
.... ¾ Supports remote configuration and management through local Ethernet using a single Wide Area Network (WAN) interface and single global IP address. It can be set to the Internet using any web browser. TD-W8901G 54M Wireless ADSL2+ Modem Router User Guide Chapter 1 Introduction Thank you for choosing the TD-W8901G 54M Wireless ADSL2+ Modem Router. 1.1 Product Overview The device...
.... ¾ Supports remote configuration and management through local Ethernet using a single Wide Area Network (WAN) interface and single global IP address. It can be set to the Internet using any web browser. TD-W8901G 54M Wireless ADSL2+ Modem Router User Guide Chapter 1 Introduction Thank you for choosing the TD-W8901G 54M Wireless ADSL2+ Modem Router. 1.1 Product Overview The device...
User Guide
Page 10
... provided in this User guide stands for setting up the product, which may differ from the actual situation. 3 TD-W8901G 54M Wireless ADSL2+ Modem Router User Guide Internet when idle. ¾ Provides reliable ESD and surge-protect function with quick response semi-conductive surge...Compatible with all mainstream DSLAM (CO). ¾ Provides integrated access of internet and route function which face to SOHO user. ¾ Real-time Configuration and device monitoring. ¾ Supports Multiple PVC (Permanent Virtual Circuit). ¾ Built-in DHCP server. ¾ Built-in firewall, supporting ...
... provided in this User guide stands for setting up the product, which may differ from the actual situation. 3 TD-W8901G 54M Wireless ADSL2+ Modem Router User Guide Internet when idle. ¾ Provides reliable ESD and surge-protect function with quick response semi-conductive surge...Compatible with all mainstream DSLAM (CO). ¾ Provides integrated access of internet and route function which face to SOHO user. ¾ Real-time Configuration and device monitoring. ¾ Supports Multiple PVC (Permanent Virtual Circuit). ¾ Built-in DHCP server. ¾ Built-in firewall, supporting ...
User Guide
Page 15
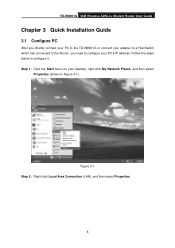
Figure 3-1 Step 2: Right click Local Area Connection (LAN), and then select Properties. 8 TD-W8901G 54M Wireless ADSL2+ Modem Router User Guide Chapter 3 Quick Installation Guide 3.1 Configure PC After you directly connect your PC to the TD-W8901G or connect your adapter to a Hub/Switch which has connected to the Router, you need to configure it. Step 1: Click the Start menu on your PC's IP address. Follow the steps below to configure your desktop, right click My Network Places, and then select Properties (shown in Figure 3-1).
Figure 3-1 Step 2: Right click Local Area Connection (LAN), and then select Properties. 8 TD-W8901G 54M Wireless ADSL2+ Modem Router User Guide Chapter 3 Quick Installation Guide 3.1 Configure PC After you directly connect your PC to the TD-W8901G or connect your adapter to a Hub/Switch which has connected to the Router, you need to configure it. Step 1: Click the Start menu on your PC's IP address. Follow the steps below to configure your desktop, right click My Network Places, and then select Properties (shown in Figure 3-1).
User Guide
Page 17
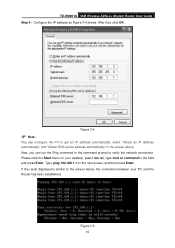
Figure 3-5 10 After that, click OK. Type ping 192.168.1.1 on your PC and the Router has been established. Now, you can configure the PC to get an IP address automatically, select "Obtain an IP address automatically" and "Obtain DNS server address automatically" in the command ..., select run the Ping command in the screen above. Please click the Start menu on the next screen, and then press Enter. TD-W8901G 54M Wireless ADSL2+ Modem Router User Guide Step 4: Configure the IP address as Figure 3-4 shows. Figure 3-4 ) Note: You can run tab, type cmd or command in the field and ...
Figure 3-5 10 After that, click OK. Type ping 192.168.1.1 on your PC and the Router has been established. Now, you can configure the PC to get an IP address automatically, select "Obtain an IP address automatically" and "Obtain DNS server address automatically" in the command ..., select run the Ping command in the screen above. Please click the Start menu on the next screen, and then press Enter. TD-W8901G 54M Wireless ADSL2+ Modem Router User Guide Step 4: Configure the IP address as Figure 3-4 shows. Figure 3-4 ) Note: You can run tab, type cmd or command in the field and ...
User Guide
Page 18
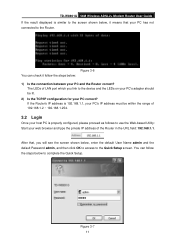
... the Quick Setup. You can check it means that , you link to the device and the LEDs on your PC's adapter should be within the range of 192.168.1.2 ~ 192.168.1.254. 3.2 Login Once your host PC is properly configured, please proceed as follows to use the Web-based Utility: Start...is 192.168.1.1, your PC's IP address must be lit. 2) Is the TCP/IP configuration for your PC has not connected to the Router. The LEDs of the Router in the URL field: 192.168.1.1. TD-W8901G 54M Wireless ADSL2+ Modem Router User Guide If the result displayed is similar to the screen shown below, it follow...
... the Quick Setup. You can check it means that , you link to the device and the LEDs on your PC's adapter should be within the range of 192.168.1.2 ~ 192.168.1.254. 3.2 Login Once your host PC is properly configured, please proceed as follows to use the Web-based Utility: Start...is 192.168.1.1, your PC's IP address must be lit. 2) Is the TCP/IP configuration for your PC has not connected to the Router. The LEDs of the Router in the URL field: 192.168.1.1. TD-W8901G 54M Wireless ADSL2+ Modem Router User Guide If the result displayed is similar to the screen shown below, it follow...
User Guide
Page 19
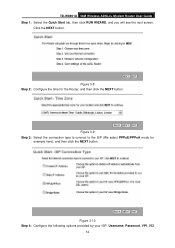
Figure 3-9 Step 3: Select the connection type to connect to the ISP (We select PPPoE/PPPoA mode for the Router, and then click the NEXT button. Figure 3-10 Step 4: Configure the following options provided by your ISP: Username, Password, VPI, VCI 12 Click the NEXT button. Figure 3-8 Step 2: Configure the time for example here), and then click the NEXT button. TD-W8901G 54M Wireless ADSL2+ Modem Router User Guide Step 1: Select the Quick Start tab, then click RUN WIZARD, and you will see the next screen.
Figure 3-9 Step 3: Select the connection type to connect to the ISP (We select PPPoE/PPPoA mode for the Router, and then click the NEXT button. Figure 3-10 Step 4: Configure the following options provided by your ISP: Username, Password, VPI, VCI 12 Click the NEXT button. Figure 3-8 Step 2: Configure the time for example here), and then click the NEXT button. TD-W8901G 54M Wireless ADSL2+ Modem Router User Guide Step 1: Select the Quick Start tab, then click RUN WIZARD, and you will see the next screen.

User Guide
Page 20
To adopt the wireless security protection measures, please refer to finish the Quick Start. 13 Figure 3-12 ) Note: If the Access Point is activated, the wireless function will be available even without the external antenna because of an additional printed antenna. TD-W8901G 54M Wireless ADSL2+ Modem Router User Guide and Connection Type. Figure 3-11 Step 5: Configure the rules for the WLAN, and click NEXT. Step 6: Click NEXT to section 4.3.3. Then click Next.
To adopt the wireless security protection measures, please refer to finish the Quick Start. 13 Figure 3-12 ) Note: If the Access Point is activated, the wireless function will be available even without the external antenna because of an additional printed antenna. TD-W8901G 54M Wireless ADSL2+ Modem Router User Guide and Connection Type. Figure 3-11 Step 5: Configure the rules for the WLAN, and click NEXT. Step 6: Click NEXT to section 4.3.3. Then click Next.
User Guide
Page 22
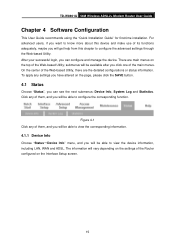
...-based Utility, there are main menus on the page, please click the SAVE button. 4.1 Status Choose "Status", you can configure and manage the device. TD-W8901G 54M Wireless ADSL2+ Modem Router User Guide Chapter 4 Software Configuration This User Guide recommends using the "Quick Installation Guide" for first-time installation. On the center of the Web-based...
...-based Utility, there are main menus on the page, please click the SAVE button. 4.1 Status Choose "Status", you can configure and manage the device. TD-W8901G 54M Wireless ADSL2+ Modem Router User Guide Chapter 4 Software Configuration This User Guide recommends using the "Quick Installation Guide" for first-time installation. On the center of the Web-based...
User Guide
Page 27
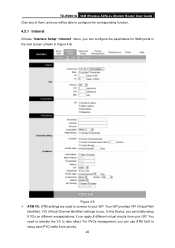
TD-W8901G 54M Wireless ADSL2+ Modem Router User Guide Click any of them, and you will be able to configure the corresponding function. 4.3.1 Internet Choose "Interface Setup→Internet" menu, you can use ATM QoS to setup each PVC traffic line's priority. 20 Figure 4-6 &#...used to connect to your ISP. For PVCs management, you can totally setup 8 VCs on different encapsulations, if you . In this Device, you can configure the parameters for WAN ports in the next screen (shown in Figure 4-6). Your ISP provides VPI (Virtual Path Identifier), VCI (Virtual Channel Identifier) settings to...
TD-W8901G 54M Wireless ADSL2+ Modem Router User Guide Click any of them, and you will be able to configure the corresponding function. 4.3.1 Internet Choose "Interface Setup→Internet" menu, you can use ATM QoS to setup each PVC traffic line's priority. 20 Figure 4-6 &#...used to connect to your ISP. For PVCs management, you can totally setup 8 VCs on different encapsulations, if you . In this Device, you can configure the parameters for WAN ports in the next screen (shown in Figure 4-6). Your ISP provides VPI (Virtual Path Identifier), VCI (Virtual Channel Identifier) settings to...
User Guide
Page 28
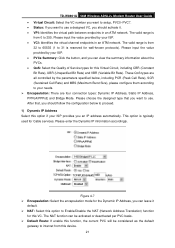
...Select this option to your needs. ¾ Encapsulation: There are all controlled by your ISP provides you an IP address automatically. TD-W8901G 54M Wireless ADSL2+ Modem Router User Guide • Virtual Circuit: Select the VC number you want to setup, PVC0~PVC7. • Status: If you ...: Select the encapsulation mode for the Dynamic IP Address, you should follow the configuration below , including PCR (Peak Cell Rate), SCR (Sustained Cell Rate) and MBS (Maximum Burst Size), please configure them according to Enable/Disable the NAT (Network Address Translation) function for this ...
...Select this option to your needs. ¾ Encapsulation: There are all controlled by your ISP provides you an IP address automatically. TD-W8901G 54M Wireless ADSL2+ Modem Router User Guide • Virtual Circuit: Select the VC number you want to setup, PVC0~PVC7. • Status: If you ...: Select the encapsulation mode for the Dynamic IP Address, you should follow the configuration below , including PCR (Peak Cell Rate), SCR (Sustained Cell Rate) and MBS (Maximum Burst Size), please configure them according to Enable/Disable the NAT (Network Address Translation) function for this ...


