Quick Installation Guide
Page 1
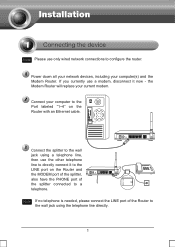
... have the PHONE port of the Router to the wall jack using a telephone line, then use only wired network connections to configure the router. Note If no telephone is needed, please connect the LINE port of the splitter connected to a telephone. Note Please use the other telephone line to directly connect it now - the Modem Router will replace your computer(s) and the Modem Router. Power down all your network devices, including your...
... have the PHONE port of the Router to the wall jack using a telephone line, then use only wired network connections to configure the router. Note If no telephone is needed, please connect the LINE port of the splitter connected to a telephone. Note Please use the other telephone line to directly connect it now - the Modem Router will replace your computer(s) and the Modem Router. Power down all your network devices, including your...
Quick Installation Guide
Page 7
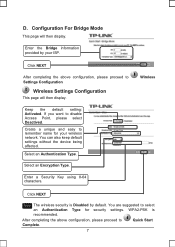
... default setting: Activated. If you want to Quick Start Complete. 7 WPA2-PSK is Disabled by your wireless network. After completing the above configuration, please proceed to Settings Configuration Wireless Settings Configuration This page will then display. Wireless Click NEXT Note The wireless security is recommended. You are suggested to remember name for security settings. D. Create a unique and easy to select an Authentication Type for your ISP. Select an Authentication Type. Select an Encryption Type. Enter a Security Key using...
... default setting: Activated. If you want to Quick Start Complete. 7 WPA2-PSK is Disabled by your wireless network. After completing the above configuration, please proceed to Settings Configuration Wireless Settings Configuration This page will then display. Wireless Click NEXT Note The wireless security is recommended. You are suggested to remember name for security settings. D. Create a unique and easy to select an Authentication Type for your ISP. Select an Authentication Type. Select an Encryption Type. Enter a Security Key using...
Quick Installation Guide
Page 9
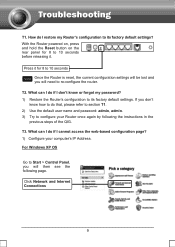
... I cannot access the web-based configuration page? 1) Configure your Router once again by following page. Press it . Click Network and Internet Connections 9 If you don't know or forgot my password? 1) Restore the Router's configuration to configure your computer's IP Address. T3. How do that, please refer to section T1. 2) Use the default user name and password: admin, admin. 3) Try to its factory default settings? For Windows XP OS Go to re-configure the router. With the Router powered on...
... I cannot access the web-based configuration page? 1) Configure your Router once again by following page. Press it . Click Network and Internet Connections 9 If you don't know or forgot my password? 1) Restore the Router's configuration to configure your computer's IP Address. T3. How do that, please refer to section T1. 2) Use the default user name and password: admin, admin. 3) Try to its factory default settings? For Windows XP OS Go to re-configure the router. With the Router powered on...
Quick Installation Guide
Page 14
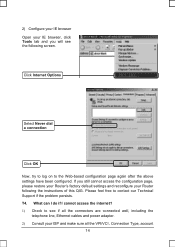
... still cannot access the configuration page, please restore your Router's factory default settings and reconfigure your ISP and make sure all the VPI/VCIĂConnection Type, account 14 Please feel free to the Web-based configuration page again after the above settings have been configured. Click Internet Options Select Never dial a connection Click OK Now, try to log on to contact our Technical Support if the problem persists. If...
... still cannot access the configuration page, please restore your Router's factory default settings and reconfigure your ISP and make sure all the VPI/VCIĂConnection Type, account 14 Please feel free to the Web-based configuration page again after the above settings have been configured. Click Internet Options Select Never dial a connection Click OK Now, try to log on to contact our Technical Support if the problem persists. If...
Quick Installation Guide
Page 15
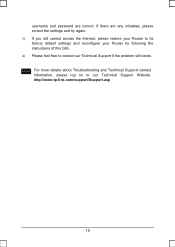
Note For more details about Troubleshooting and Technical Support contact information, please log on to contact our Technical Support if the problem still exists. If there are correct. username and password are any mistakes, please correct the settings and try again. 3) If you still cannot access the Internet, please restore your Router to its factory default settings and reconfigure your Router by following the instructions of this QIG. 4) Please feel free to our Technical Support Website: http://www.tp-link.com/support/Support.asp 15
Note For more details about Troubleshooting and Technical Support contact information, please log on to contact our Technical Support if the problem still exists. If there are correct. username and password are any mistakes, please correct the settings and try again. 3) If you still cannot access the Internet, please restore your Router to its factory default settings and reconfigure your Router by following the instructions of this QIG. 4) Please feel free to our Technical Support Website: http://www.tp-link.com/support/Support.asp 15
User Guide
Page 9
... connection is made using a single Wide Area Network (WAN) interface and single global IP address. Network and Router management is done through the Web-based Utility which can be networked and connected to the Internet using ordinary telephone line with standard connectors. It can be set to turn off the wireless network name (SSID) broadcast so that only stations that have the SSID can be accessed through SNMP and CWMP. ¾ Supports PPPoE, it allows connecting...
... connection is made using a single Wide Area Network (WAN) interface and single global IP address. Network and Router management is done through the Web-based Utility which can be networked and connected to the Internet using ordinary telephone line with standard connectors. It can be set to turn off the wireless network name (SSID) broadcast so that only stations that have the SSID can be accessed through SNMP and CWMP. ¾ Supports PPPoE, it allows connecting...
User Guide
Page 10
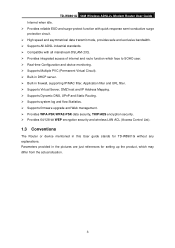
...Built-in DHCP server. ¾ Built-in firewall, supporting IP/MAC filter, Application filter and URL filter. ¾ Supports Virtual Server, DMZ host and IP Address Mapping. ¾ Supports Dynamic DNS, UPnP and Static Routing. ¾ Supports system log and flow Statistics. ¾ Supports firmware upgrade and Web management. ¾ Provides WPA-PSK/WPA2-PSK data security, TKIP/AES encryption security. ¾ Provides 64/128-bit WEP encryption security and wireless LAN ACL (Access Control List). 1.3 Conventions The Router or device mentioned in this User guide stands for TD-W8901G without any...
...Built-in DHCP server. ¾ Built-in firewall, supporting IP/MAC filter, Application filter and URL filter. ¾ Supports Virtual Server, DMZ host and IP Address Mapping. ¾ Supports Dynamic DNS, UPnP and Static Routing. ¾ Supports system log and flow Statistics. ¾ Supports firmware upgrade and Web management. ¾ Provides WPA-PSK/WPA2-PSK data security, TKIP/AES encryption security. ¾ Provides 64/128-bit WEP encryption security and wireless LAN ACL (Access Control List). 1.3 Conventions The Router or device mentioned in this User guide stands for TD-W8901G without any...

User Guide
Page 11
.... Power is linked down. There is a successful connection on . Flash The ADSL negotiation is disabled. WLAN Flash There is being transmitted. Off The wireless function is in progress. There is no connection on the corresponding 1-4 (LAN) port or the Off connection is no activity. A successful PPP connection has been built. Off Internet On There is abnormal. 4 TD-W8901G 54M Wireless ADSL2+ Modem Router User Guide Chapter 2 Hardware Installation 2.1 The Front Panel Figure 2-1 The LEDs...
.... Power is linked down. There is a successful connection on . Flash The ADSL negotiation is disabled. WLAN Flash There is being transmitted. Off The wireless function is in progress. There is no connection on the corresponding 1-4 (LAN) port or the Off connection is no activity. A successful PPP connection has been built. Off Internet On There is abnormal. 4 TD-W8901G 54M Wireless ADSL2+ Modem Router User Guide Chapter 2 Hardware Installation 2.1 The Front Panel Figure 2-1 The LEDs...
User Guide
Page 12
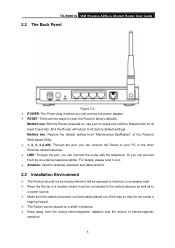
TD-W8901G 54M Wireless ADSL2+ Modem Router User Guide 2.2 The Back Panel Figure 2-2 ¾ POWER: The Power plug is where you will connect the power adapter. ¾ RESET: There are safely placed out of the way so they do not create a tripping hazard. ¾ The Router can be placed on , use a pin to press and hold the Reset button for wireless operation and data transmit. 2.3 Installation Environment ¾ The Product should...
TD-W8901G 54M Wireless ADSL2+ Modem Router User Guide 2.2 The Back Panel Figure 2-2 ¾ POWER: The Power plug is where you will connect the power adapter. ¾ RESET: There are safely placed out of the way so they do not create a tripping hazard. ¾ The Router can be placed on , use a pin to press and hold the Reset button for wireless operation and data transmit. 2.3 Installation Environment ¾ The Product should...
User Guide
Page 13
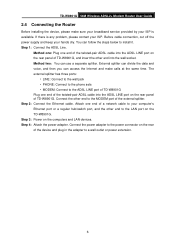
... a network cable to your computer's Ethernet port or a regular hub/switch port, and the other end to install it. Step 3: Power on the rear panel of the external splitter. Step 4: Attach the power adapter. You can use a separate splitter. Method two:You can follow the steps below to the LAN port on the rear of the device and plug in the adapter to the MODEM port of TD-W8901G...
... a network cable to your computer's Ethernet port or a regular hub/switch port, and the other end to install it. Step 3: Power on the rear panel of the external splitter. Step 4: Attach the power adapter. You can use a separate splitter. Method two:You can follow the steps below to the LAN port on the rear of the device and plug in the adapter to the MODEM port of TD-W8901G...
User Guide
Page 17
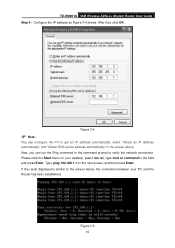
TD-W8901G 54M Wireless ADSL2+ Modem Router User Guide Step 4: Configure the IP address as Figure 3-4 shows. Please click the Start menu on the next screen, and then press Enter. Figure 3-5 10 After that, click OK. Type ping 192.168.1.1 on your PC and the Router has been established. Figure 3-4 ) Note: You can run tab, type cmd or command in the field and press Enter. Now, you can...
TD-W8901G 54M Wireless ADSL2+ Modem Router User Guide Step 4: Configure the IP address as Figure 3-4 shows. Please click the Start menu on the next screen, and then press Enter. Figure 3-5 10 After that, click OK. Type ping 192.168.1.1 on your PC and the Router has been established. Figure 3-4 ) Note: You can run tab, type cmd or command in the field and press Enter. Now, you can...
User Guide
Page 18
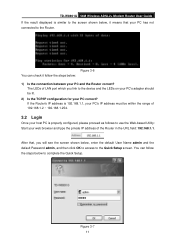
... TD-W8901G 54M Wireless ADSL2+ Modem Router User Guide If the result displayed is properly configured, please proceed as follows to use the Web-based Utility: Start your web browser and type the private IP address of the Router in the URL field: 192.168.1.1. Figure 3-6 You can follow the steps below to the Quick Setup screen. You can check it means that , you link to the device and the LEDs on...
... TD-W8901G 54M Wireless ADSL2+ Modem Router User Guide If the result displayed is properly configured, please proceed as follows to use the Web-based Utility: Start your web browser and type the private IP address of the Router in the URL field: 192.168.1.1. Figure 3-6 You can follow the steps below to the Quick Setup screen. You can check it means that , you link to the device and the LEDs on...
User Guide
Page 22
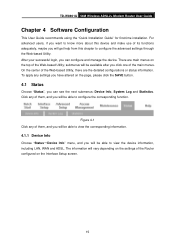
... after you can see the next submenus: Device Info, System Log and Statistics. Figure 4-1 Click any of the Web-based Utility, there are main menus on the Interface Setup screen. 15 TD-W8901G 54M Wireless ADSL2+ Modem Router User Guide Chapter 4 Software Configuration This User Guide recommends using the "Quick Installation Guide" for first-time installation. On the center of them , and you can configure and manage the device. For advanced users, if you want to know more...
... after you can see the next submenus: Device Info, System Log and Statistics. Figure 4-1 Click any of the Web-based Utility, there are main menus on the Interface Setup screen. 15 TD-W8901G 54M Wireless ADSL2+ Modem Router User Guide Chapter 4 Software Configuration This User Guide recommends using the "Quick Installation Guide" for first-time installation. On the center of them , and you can configure and manage the device. For advanced users, if you want to know more...
User Guide
Page 31
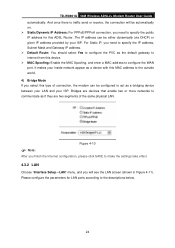
... this device. ¾ MAC Spoofing: Enable the MAC Spoofing, and enter a MAC address to internet from this ADSL Router. Figure 4-10 ) Note: After you finish the Internet configuration, please click SAVE to make the settings take effect. 4.3.2 LAN Choose "Interface Setup→LAN" menu, and you need to specify the public IP address for LAN ports according to the outside world. 4) Bridge Mode If you select this type of the same physical LAN. TD-W8901G 54M Wireless ADSL2+ Modem Router User Guide automatically...
... this device. ¾ MAC Spoofing: Enable the MAC Spoofing, and enter a MAC address to internet from this ADSL Router. Figure 4-10 ) Note: After you finish the Internet configuration, please click SAVE to make the settings take effect. 4.3.2 LAN Choose "Interface Setup→LAN" menu, and you need to specify the public IP address for LAN ports according to the outside world. 4) Bridge Mode If you select this type of the same physical LAN. TD-W8901G 54M Wireless ADSL2+ Modem Router User Guide automatically...
User Guide
Page 36
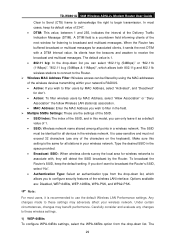
... these wireless settings. 1) WEP-64Bits To configure WPA-64Bits settings, select the WPA-64Bits option from the drop-down list, which allows both 802.11g and 802.11b wireless stations to connect to the Router. ¾ Wireless MAC Address Filter: Wireless access can only leave it as a default value of 1. • SSID: Wireless network name shared among all points in the space provided. • Broadcast SSID: When wireless clients survey the local area for wireless networks to configure security features...
... these wireless settings. 1) WEP-64Bits To configure WPA-64Bits settings, select the WPA-64Bits option from the drop-down list, which allows both 802.11g and 802.11b wireless stations to connect to the Router. ¾ Wireless MAC Address Filter: Wireless access can only leave it as a default value of 1. • SSID: Wireless network name shared among all points in the space provided. • Broadcast SSID: When wireless clients survey the local area for wireless networks to configure security features...
User Guide
Page 49
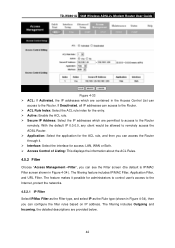
... are contained in Figure 4-34), then you can access to the Router. TD-W8901G 54M Wireless ADSL2+ Modem Router User Guide Figure 4-33 ¾ ACL: If Activated, the IP addresses which are permitted to access to the Router remotely. The filtering feature includes IP/MAC Filter, Application Filter, and URL Filter. With the default IP 0.0.0.0, any client would be allowed to remotely access the ADSL Router. ¾ Application: Select the application for the ACL...
... are contained in Figure 4-34), then you can access to the Router. TD-W8901G 54M Wireless ADSL2+ Modem Router User Guide Figure 4-33 ¾ ACL: If Activated, the IP addresses which are permitted to access to the Router remotely. The filtering feature includes IP/MAC Filter, Application Filter, and URL Filter. With the default IP 0.0.0.0, any client would be allowed to remotely access the ADSL Router. ¾ Application: Select the application for the ACL...

Troubleshooting Guide
Page 1
TP-LINK TD-W8901G Wireless Modem Router Advanced Troubleshooting Guide Released on 2009.09.25 Version 1.0
TP-LINK TD-W8901G Wireless Modem Router Advanced Troubleshooting Guide Released on 2009.09.25 Version 1.0
Troubleshooting Guide
Page 6
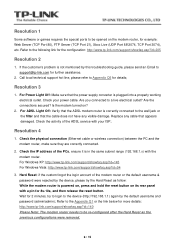
... modem router is powered on, press and hold the reset button on the modem router, for example: Web Server (TCP Port 80), FTP Server (TCP Port 21), Xbox Live (UDP Port 88\3074, TCP Port 3074), etc. If the customer's problem is correctly connected to the device (http://192.168.1.1) again by this troubleshooting guide, please send an Email to a live electrical outlet? Check your ISP; Are you connected to support@tp-link...
... modem router is powered on, press and hold the reset button on the modem router, for example: Web Server (TCP Port 80), FTP Server (TCP Port 21), Xbox Live (UDP Port 88\3074, TCP Port 3074), etc. If the customer's problem is correctly connected to the device (http://192.168.1.1) again by this troubleshooting guide, please send an Email to a live electrical outlet? Check your ISP; Are you connected to support@tp-link...
Troubleshooting Guide
Page 9
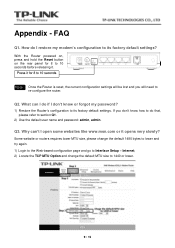
... routers requires lower MTU size, please change the default MTU size to Interface Setup - With the Router powered on, press and hold the Reset button on the rear panel for 8 to 10 seconds Note Once the Router is reset, the current configuration settings will need to 10 seconds before releasing it for 8 to re-configure the router. What can 't I restore my modem's configuration to section Q1. 2) Use the default user name and password: admin, admin...
... routers requires lower MTU size, please change the default MTU size to Interface Setup - With the Router powered on, press and hold the Reset button on the rear panel for 8 to 10 seconds Note Once the Router is reset, the current configuration settings will need to 10 seconds before releasing it for 8 to re-configure the router. What can 't I restore my modem's configuration to section Q1. 2) Use the default user name and password: admin, admin...
Troubleshooting Guide
Page 15
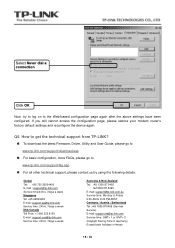
... & New Zealand Tel: AU 1300 87 5465 NZ 0800 87 5465 E-mail: support@tp-link.com.au Service time: Monday to Friday 9:00 AM to the Web-based configuration page again after the above settings have been configured. If you still cannot access the configuration page, please restore your modem router's factory default settings and reconfigure the device again. Q5. Select Never dial a connection Click OK Now, try to log on...
... & New Zealand Tel: AU 1300 87 5465 NZ 0800 87 5465 E-mail: support@tp-link.com.au Service time: Monday to Friday 9:00 AM to the Web-based configuration page again after the above settings have been configured. If you still cannot access the configuration page, please restore your modem router's factory default settings and reconfigure the device again. Q5. Select Never dial a connection Click OK Now, try to log on...


