
Operating Instructions
Page 2
... Picture Menu 24 Advanced Picture Menu 30 Screen Menu 31 Setup Menu 33 Function Menu 35 Items Locked by Settings Lock 37 Installation Menu 38 Information Menu 41 About the Preset Memory .......... 41 Using Network Features Displaying the Control Window of the Unit with a Web Browser ........ 42 Operating the Control Window ........ 43 Switching the Page 43 Setting the Access Limitation ....43 Confirming the Information Regarding the Unit 44 Error Handling Troubleshooting 45 Warning Indicators 48 Message Lists 49 Others Updating the Software...
... Picture Menu 24 Advanced Picture Menu 30 Screen Menu 31 Setup Menu 33 Function Menu 35 Items Locked by Settings Lock 37 Installation Menu 38 Information Menu 41 About the Preset Memory .......... 41 Using Network Features Displaying the Control Window of the Unit with a Web Browser ........ 42 Operating the Control Window ........ 43 Switching the Page 43 Setting the Access Limitation ....43 Confirming the Information Regarding the Unit 44 Error Handling Troubleshooting 45 Warning Indicators 48 Message Lists 49 Others Updating the Software...

Operating Instructions
Page 13
... with an HDMI cable is set your computer. Notes • Use a Premium High Speed HDMI cable. Set your computer to output the signal to both computer's display and this equipment, the picture of the projector (page 42) via a Web browser and enable the desired control protocol. 13 When you set at the same position. • If the picture from equipment connected to the computer's operating instructions supplied with the...
... with an HDMI cable is set your computer. Notes • Use a Premium High Speed HDMI cable. Set your computer to output the signal to both computer's display and this equipment, the picture of the projector (page 42) via a Web browser and enable the desired control protocol. 13 When you set at the same position. • If the picture from equipment connected to the computer's operating instructions supplied with the...

Operating Instructions
Page 14
... the AC power cord. The power is flashing. Example: To view the picture from which to display images. A message "POWER OFF?" Note Never disconnect the AC power cord while the indicator is turned off completely, and you want to project. Press the INPUT button to switch between input terminals in green and the fan continues to run to "Off" on the Setup menu, the input palette does not appear. Tip When "Status" is set to reduce...
... the AC power cord. The power is flashing. Example: To view the picture from which to display images. A message "POWER OFF?" Note Never disconnect the AC power cord while the indicator is turned off completely, and you want to project. Press the INPUT button to switch between input terminals in green and the fan continues to run to "Off" on the Setup menu, the input palette does not appear. Tip When "Status" is set to reduce...

Operating Instructions
Page 15
... details on the 3D glasses. 3 Turn toward the screen. Adjusting/Setting the 3D functions You can enjoy powerful 3D video images, such as a wireless LAN (IEEE802.11 b/g/ n) or a microwave with the 3D glasses. 2 Put on how to use Misoperation may occur if: • The viewing position is too far from a distance greater than the communication range or install the unit outside the communication...
... details on the 3D glasses. 3 Turn toward the screen. Adjusting/Setting the 3D functions You can enjoy powerful 3D video images, such as a wireless LAN (IEEE802.11 b/g/ n) or a microwave with the 3D glasses. 2 Put on how to use Misoperation may occur if: • The viewing position is too far from a distance greater than the communication range or install the unit outside the communication...
Operating Instructions
Page 17
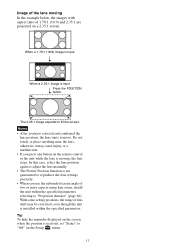
... reminder displayed on a 2.35:1 screen. The 2.35:1 image expands to "Projection distance" (page 66). When a 1.78:1 (16:9) image is input When a 2.35:1 image is not guaranteed to reproduce the lens settings precisely. • When you press any button on the Setup menu. 17 Image of the lens moving , the lens stops. In this case, select the lens position again or adjust the lens manually. • The Picture Position function is input Press...
... reminder displayed on a 2.35:1 screen. The 2.35:1 image expands to "Projection distance" (page 66). When a 1.78:1 (16:9) image is input When a 2.35:1 image is not guaranteed to reproduce the lens settings precisely. • When you press any button on the Setup menu. 17 Image of the lens moving , the lens stops. In this case, select the lens position again or adjust the lens manually. • The Picture Position function is input Press...
Operating Instructions
Page 24
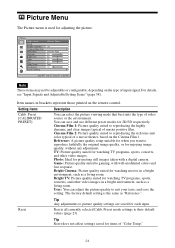
... the remote control. TV: Picture quality suited for items of "Color Temp." 24 Bright Cinema: Picture quality suited for enjoying image quality, without any adjustment. Preset mode settings to suit your taste, and save and use different preset modes for projecting still images taken with well-modulated colors and fast response. User: You can adjust the picture quality to their default values (page 23). Setting items Calib. Reset Tip Any adjustments to...
... the remote control. TV: Picture quality suited for items of "Color Temp." 24 Bright Cinema: Picture quality suited for enjoying image quality, without any adjustment. Preset mode settings to suit your taste, and save and use different preset modes for projecting still images taken with well-modulated colors and fast response. User: You can adjust the picture quality to their default values (page 23). Setting items Calib. Reset Tip Any adjustments to...
Operating Instructions
Page 33
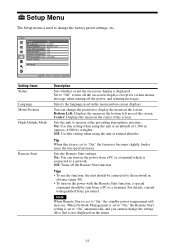
Off: Turns off the power, and warning messages. For details, consult with the Remote Start function, a special command should be sent from a PC or a terminal which is connected to a network. Selects the language used to change the position to display the menu on the bottom left area of the screen. Sets the unit to operate at an altitude of 1,500 m (approx. 4,900 ft) or higher. Tips •...
Off: Turns off the power, and warning messages. For details, consult with the Remote Start function, a special command should be sent from a PC or a terminal which is connected to a network. Selects the language used to change the position to display the menu on the bottom left area of the screen. Sets the unit to operate at an altitude of 1,500 m (approx. 4,900 ft) or higher. Tips •...

Operating Instructions
Page 34
... "Lamp Timer" in the Information menu is turned off automatically and the projector goes into standby mode. When replacing the lamps, set to "On," the power consumption increases. Note When Network Management is set to their factory preset values. All settings are initialized to "On," the network function is not continuously connected to the network and continuously communicating with the projector control equipment. Setting items Network Management Power Saving Lamp Setting All Reset Description On: Set when connected...
... "Lamp Timer" in the Information menu is turned off automatically and the projector goes into standby mode. When replacing the lamps, set to "On," the power consumption increases. Note When Network Management is set to their factory preset values. All settings are initialized to "On," the network function is not continuously connected to the network and continuously communicating with the projector control equipment. Setting items Network Management Power Saving Lamp Setting All Reset Description On: Set when connected...

Operating Instructions
Page 37
Items Locked by Settings Lock Group 1 Picture menu Reset Reality Creation Advanced Iris Dynamic HDR Enhancer Lamp Control Motionflow Contrast Brightness Color Hue Color Temp. Sharpness NR MPEG NR Smooth Gradation Film Mode Gamma Correction Color Correction Clear White x.v.Color HDR Color Space Input Lag Reduction Advanced Picture menu Auto Calibration Group 2 Setup menu Status Language Menu Position High Altitude Mode Remote Start Network Management Power Saving Lamp Setting Function menu Dynamic Range Test Pattern Installation menu Image Flip Lens Control Anamorphic Lens Trigger Select IR ...
Items Locked by Settings Lock Group 1 Picture menu Reset Reality Creation Advanced Iris Dynamic HDR Enhancer Lamp Control Motionflow Contrast Brightness Color Hue Color Temp. Sharpness NR MPEG NR Smooth Gradation Film Mode Gamma Correction Color Correction Clear White x.v.Color HDR Color Space Input Lag Reduction Advanced Picture menu Auto Calibration Group 2 Setup menu Status Language Menu Position High Altitude Mode Remote Start Network Management Power Saving Lamp Setting Function menu Dynamic Range Test Pattern Installation menu Image Flip Lens Control Anamorphic Lens Trigger Select IR ...

Operating Instructions
Page 41
... an optimum picture. When the input signal is compatible with 3D information are input, the type of screen may be hidden or displayed incorrectly. 41 About the Preset Memory This unit has default image data to adjust preset data for the signal from the preset memory to adjust it to the input signal. Information Menu The Information menu displays the model name, serial number, input signal type/format, software version and the cumulated hours of...
... an optimum picture. When the input signal is compatible with 3D information are input, the type of screen may be hidden or displayed incorrectly. 41 About the Preset Memory This unit has default image data to adjust preset data for the signal from the preset memory to adjust it to the input signal. Information Menu The Information menu displays the model name, serial number, input signal type/format, software version and the cumulated hours of...
Operating Instructions
Page 42
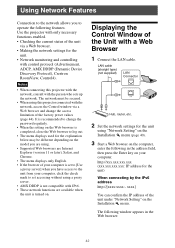
... Control window via a Web browser. • Making the network settings for the unit using "Network Setting" on the Installation menu (page 40). 3 Start a Web browser on the computer, enter the following in the Web browser: 42 The network must be different depending on the model you are using. • Supported Web browsers are available when the unit is turned on your computer. LAN cable (straight type) (not supplied) LAN...
... Control window via a Web browser. • Making the network settings for the unit using "Network Setting" on the Installation menu (page 40). 3 Start a Web browser on the computer, enter the following in the Web browser: 42 The network must be different depending on the model you are using. • Supported Web browsers are available when the unit is turned on your computer. LAN cable (straight type) (not supplied) LAN...
Operating Instructions
Page 45
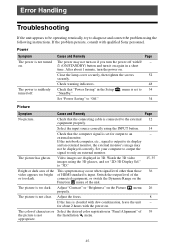
... Sony personnel. Close the lamp cover securely, then tighten the screws 52 securely. Check warning indicators. 48 Check that "Power Saving" in 3D. Adjust the focus. 8 If the lens is suddenly turned off with the power on . Error Handling Troubleshooting If the unit appears to be displayed correctly. After about 2 hours with ?/ - 1 (ON/STANDBY) button and turn it on the Picture menu 26 properly. Select the input source correctly using the INPUT button. 14 Check that the connecting cable is input. The picture...
... Sony personnel. Close the lamp cover securely, then tighten the screws 52 securely. Check warning indicators. 48 Check that "Power Saving" in 3D. Adjust the focus. 8 If the lens is suddenly turned off with the power on . Error Handling Troubleshooting If the unit appears to be displayed correctly. After about 2 hours with ?/ - 1 (ON/STANDBY) button and turn it on the Picture menu 26 properly. Select the input source correctly using the INPUT button. 14 Check that the connecting cable is input. The picture...
Operating Instructions
Page 46
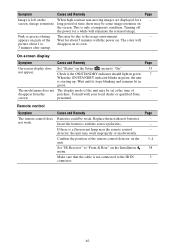
... remote control detector on the Installation menu. Check if the ON/STANDBY indicator should light in green. 7 When the ON/STANDBY indicator blinks in green. Wait until it stops blinking and remains lit in green, the unit is starting up. Insert the batteries with your local dealer or qualified Sony screen. Page - - - 3, 4 38 3 46 On-screen display Symptom Cause and Remedy Page On-screen display does Set "Status" on . The model name does not The display mode...
... remote control detector on the Installation menu. Check if the ON/STANDBY indicator should light in green. 7 When the ON/STANDBY indicator blinks in green. Wait until it stops blinking and remains lit in green, the unit is starting up. Insert the batteries with your local dealer or qualified Sony screen. Page - - - 3, 4 38 3 46 On-screen display Symptom Cause and Remedy Page On-screen display does Set "Status" on . The model name does not The display mode...

Operating Instructions
Page 50
... "Software License Information" supplied separately. 50 Download the update files from the original images, because this function converts the video images. • Note that the picture will provide a different look from the following Sony website: http://www.pro.sony.eu/ The website also explains how to install the update. About the simulated 3D feature • Use the simulated 3D function taking into a PC connected to...
... "Software License Information" supplied separately. 50 Download the update files from the original images, because this function converts the video images. • Note that the picture will provide a different look from the following Sony website: http://www.pro.sony.eu/ The website also explains how to install the update. About the simulated 3D feature • Use the simulated 3D function taking into a PC connected to...

Operating Instructions
Page 51
...-H280 Projector Lamp for the light source changes depending on the installation environment or use the lamp longer by avoiding turning the lamp off the fingerprints with a soft cloth. • Pay special attention to replacing the lamp when the unit is installed on a stable surface. 3 While pressing the part indicated in the lamp cover illustration, slide 1 and then open 2 the lamp cover. 4 Loosen the lamp door (inner cover) screw with a new one (not supplied) without...
...-H280 Projector Lamp for the light source changes depending on the installation environment or use the lamp longer by avoiding turning the lamp off the fingerprints with a soft cloth. • Pay special attention to replacing the lamp when the unit is installed on a stable surface. 3 While pressing the part indicated in the lamp cover illustration, slide 1 and then open 2 the lamp cover. 4 Loosen the lamp door (inner cover) screw with a new one (not supplied) without...
Operating Instructions
Page 55
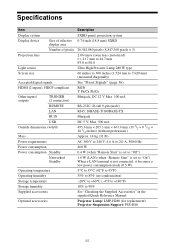
...Light source Screen size Accepted digital signals HDMI (2 inputs), HDCP compliant Other inputs/ outputs TRIGGER (2 connectors) REMOTE LAN IR IN USB Outside dimensions (w/h/d) Mass Power requirements Power consumption Power consumption Standby Networked Standby Operating temperature Operating humidity Storage temperature Storage humidity Supplied accessories Optional accessories Description SXRD panel, projection system 0.74-inch (18.8 mm) SXRD 26,542,080 pixels (8,847,360 pixels × 3) 2.06 times zoom lens (motorized) f = 21.7 mm to 44.7 mm F3.0 to F4.0 Ultra High Pressure Lamp...
...Light source Screen size Accepted digital signals HDMI (2 inputs), HDCP compliant Other inputs/ outputs TRIGGER (2 connectors) REMOTE LAN IR IN USB Outside dimensions (w/h/d) Mass Power requirements Power consumption Power consumption Standby Networked Standby Operating temperature Operating humidity Storage temperature Storage humidity Supplied accessories Optional accessories Description SXRD panel, projection system 0.74-inch (18.8 mm) SXRD 26,542,080 pixels (8,847,360 pixels × 3) 2.06 times zoom lens (motorized) f = 21.7 mm to 44.7 mm F3.0 to F4.0 Ultra High Pressure Lamp...
Startup Guide
Page 8
... may cause malfunction, be sure to project onto a screen, even if they will come in handy if you observe flickering or flashing, turn off the lighting in adjusting 8 GB temperature settings of the same model, the color reproduction among projectors may vary, since color balance may occur, causing picture degradation or damage to prevent unauthorized third parties from using high-precision technology. On repacking Save the...
... may cause malfunction, be sure to project onto a screen, even if they will come in handy if you observe flickering or flashing, turn off the lighting in adjusting 8 GB temperature settings of the same model, the color reproduction among projectors may vary, since color balance may occur, causing picture degradation or damage to prevent unauthorized third parties from using high-precision technology. On repacking Save the...

Startup Guide
Page 12
... Flashes in red. Wait until it stops blinking and remains lit in green for tens of the unit 3 Press the ?/1 (ON/STANDBY) button to control the unit while the indicator is blinking, but this is parallel to the screen. 2 After connecting the AC power cord to display the Lens Focus adjustment window (test pattern). Note After connecting the AC power cord to the unit, the ON/STANDBY indicator may not be able to turn...
... Flashes in red. Wait until it stops blinking and remains lit in green for tens of the unit 3 Press the ?/1 (ON/STANDBY) button to control the unit while the indicator is blinking, but this is parallel to the screen. 2 After connecting the AC power cord to display the Lens Focus adjustment window (test pattern). Note After connecting the AC power cord to the unit, the ON/STANDBY indicator may not be able to turn...
Startup Guide
Page 18
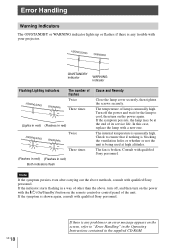
... red) Twice Three times (Flashes in red) (Flashes in the supplied CD-ROM. Turn off , and then turn on the power again. Check to "Error Handling" in the Operating Instructions contained in red) Both indicators flash Cause and Remedy Close the lamp cover securely, then tighten the screws securely. Error Handling Warning Indicators The ON/STANDBY or WARNING indicator lights up or flashes if there is any problem or an error message appears on the remote control or control panel of the unit. The fan...
... red) Twice Three times (Flashes in red) (Flashes in the supplied CD-ROM. Turn off , and then turn on the power again. Check to "Error Handling" in the Operating Instructions contained in red) Both indicators flash Cause and Remedy Close the lamp cover securely, then tighten the screws securely. Error Handling Warning Indicators The ON/STANDBY or WARNING indicator lights up or flashes if there is any problem or an error message appears on the remote control or control panel of the unit. The fan...

Startup Guide
Page 19
... which is turned off with a new one (not supplied) without delay. When the lamp dims, the color balance of the lamp used for the light source has a certain lifespan. appears on the ceiling, do not stand directly under the lamp cover. Tools you touch it, wipe off . Place the unit on the installation environment or use a specified projector lamp for the replacement. Maintenance The lamp used for the light source changes depending...
... which is turned off with a new one (not supplied) without delay. When the lamp dims, the color balance of the lamp used for the light source has a certain lifespan. appears on the ceiling, do not stand directly under the lamp cover. Tools you touch it, wipe off . Place the unit on the installation environment or use a specified projector lamp for the replacement. Maintenance The lamp used for the light source changes depending...


