
Startup Guide
Page 4
... frequency energy and, if not installed and used to the following measures: - This equipment generates, uses and can be co-located or operating in conjunction with part 15 of Conformity Trade Name: SONY Model: VPL-VW695ES VPL-VW295ES Responsible party: Sony Electronics Inc. Increase the separation between the equipment and receiver. - If you may call; Telephone Number:858-942-2230 This device complies...
... frequency energy and, if not installed and used to the following measures: - This equipment generates, uses and can be co-located or operating in conjunction with part 15 of Conformity Trade Name: SONY Model: VPL-VW695ES VPL-VW295ES Responsible party: Sony Electronics Inc. Increase the separation between the equipment and receiver. - If you may call; Telephone Number:858-942-2230 This device complies...

Startup Guide
Page 6
... the Operating Instructions). When connecting the unit to the network, be sure to the next. Also, when you use multiple LCD projectors to project onto a screen, even if they are broken, keep broken pieces away from one projector to confirm that continuously appear on the LCD projector. If condensation occurs, leave the projector turned on the network may be able to prevent unauthorized third parties from using high...
... the Operating Instructions). When connecting the unit to the network, be sure to the next. Also, when you use multiple LCD projectors to project onto a screen, even if they are broken, keep broken pieces away from one projector to confirm that continuously appear on the LCD projector. If condensation occurs, leave the projector turned on the network may be able to prevent unauthorized third parties from using high...
Startup Guide
Page 9
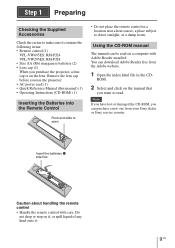
... items: • Remote control (1) VPL-VW695ES: RM-PJ24 VPL-VW295ES: RM-PJ28 • Size AA (R6) manganese batteries (2) • Lens cap (1) When you want to read on the lens. Remove the lens cap before you can download Adobe Reader free from your Sony dealer or Sony service counter. Step 1 Preparing Checking the Supplied Accessories Check the carton to make sure it . 9 GB Using the CD-ROM manual The manual can be read...
... items: • Remote control (1) VPL-VW695ES: RM-PJ24 VPL-VW295ES: RM-PJ28 • Size AA (R6) manganese batteries (2) • Lens cap (1) When you want to read on the lens. Remove the lens cap before you can download Adobe Reader free from your Sony dealer or Sony service counter. Step 1 Preparing Checking the Supplied Accessories Check the carton to make sure it . 9 GB Using the CD-ROM manual The manual can be read...
Startup Guide
Page 10
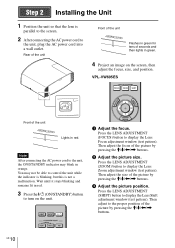
.... Then adjust the focus of seconds and then lights in red. Wait until it stops blinking and remains lit in orange. You may blink in red. 3 Press the ?/1 (ON/STANDBY) button to control the unit while the indicator is blinking, but this is parallel to the screen. 2 After connecting the AC power cord to display the Lens Focus adjustment window (test pattern). Rear of the unit Front of the unit Flashes in green for...
.... Then adjust the focus of seconds and then lights in red. Wait until it stops blinking and remains lit in orange. You may blink in red. 3 Press the ?/1 (ON/STANDBY) button to control the unit while the indicator is blinking, but this is parallel to the screen. 2 After connecting the AC power cord to display the Lens Focus adjustment window (test pattern). Rear of the unit Front of the unit Flashes in green for...
Startup Guide
Page 11
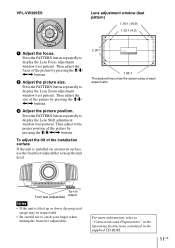
VPL-VW295ES Lens adjustment window (test pattern) 1.78:1 (16:9) 1.33:1 (4:3) a Adjust the focus. Press the PATTERN button repeatedly to display the Lens Focus adjustment window (test pattern). Then adjust the focus of the picture by pressing the M/m/
VPL-VW295ES Lens adjustment window (test pattern) 1.78:1 (16:9) 1.33:1 (4:3) a Adjust the focus. Press the PATTERN button repeatedly to display the Lens Focus adjustment window (test pattern). Then adjust the focus of the picture by pressing the M/m/

Startup Guide
Page 14
... can disconnect the AC power cord. Turning Off the Power 1 Press the ?/1 (ON/STANDBY) button. The ON/STANDBY indicator flashes in the supplied CD-ROM. GB 14 For more information, refer to "Projecting" in the Operating Instructions contained in green and the fan continues to run to reduce the internal heat. The power is flashing. Example: To view the picture from the video equipment connected to the HDMI 1 connector of performing the...
... can disconnect the AC power cord. Turning Off the Power 1 Press the ?/1 (ON/STANDBY) button. The ON/STANDBY indicator flashes in the supplied CD-ROM. GB 14 For more information, refer to "Projecting" in the Operating Instructions contained in green and the fan continues to run to reduce the internal heat. The power is flashing. Example: To view the picture from the video equipment connected to the HDMI 1 connector of performing the...
Startup Guide
Page 16
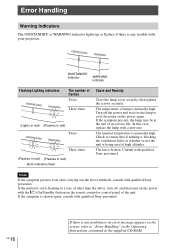
.../STANDBY indicator WARNING indicator Flashing/Lighting indicators The number of its service life. The fan is unusually high. If the symptom persists, the lamp may be at high altitudes. Check to cool, then turn on the remote control or control panel of lamp is being used at the end of flashes Twice Three times (Lights in red) (Flashes in red) Twice Three times (Flashes in red) (Flashes in the supplied CD-ROM. The internal temperature is broken. Consult with qualified Sony personnel. In this case, replace...
.../STANDBY indicator WARNING indicator Flashing/Lighting indicators The number of its service life. The fan is unusually high. If the symptom persists, the lamp may be at high altitudes. Check to cool, then turn on the remote control or control panel of lamp is being used at the end of flashes Twice Three times (Lights in red) (Flashes in red) Twice Three times (Flashes in red) (Flashes in the supplied CD-ROM. The internal temperature is broken. Consult with qualified Sony personnel. In this case, replace...
Startup Guide
Page 17
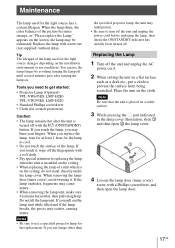
... specified projector lamp, the unit may cause injury. • When removing the lamp unit, make sure it remains horizontal, then pull straight up. When you need to cool. • Do not touch the surface of the picture becomes strange, or "Please replace the Lamp." Maintenance The lamp used for the light source changes depending on a stable surface. 3 While pressing the part indicated in the lamp cover...
... specified projector lamp, the unit may cause injury. • When removing the lamp unit, make sure it remains horizontal, then pull straight up. When you need to cool. • Do not touch the surface of the picture becomes strange, or "Please replace the Lamp." Maintenance The lamp used for the light source changes depending on a stable surface. 3 While pressing the part indicated in the lamp cover...

Operating Instructions
Page 2
... .......... 20 Picture Menu 22 Screen Menu 28 Setup Menu 30 Function Menu 32 Items Locked by Settings Lock 34 Installation Menu 35 Information Menu 38 About the Preset Memory .......... 38 Using Network Features Displaying the Control Window of the Unit with a Web Browser 39 Operating the Control Window ........ 40 Switching the Page 40 Setting the Access Limitation ....40 Confirming the Information Regarding the Unit 41 Error Handling Troubleshooting 42 Warning Indicators 45 Message Lists 46 Others Updating the Software 47...
... .......... 20 Picture Menu 22 Screen Menu 28 Setup Menu 30 Function Menu 32 Items Locked by Settings Lock 34 Installation Menu 35 Information Menu 38 About the Preset Memory .......... 38 Using Network Features Displaying the Control Window of the Unit with a Web Browser 39 Operating the Control Window ........ 40 Switching the Page 40 Setting the Access Limitation ....40 Confirming the Information Regarding the Unit 41 Error Handling Troubleshooting 42 Warning Indicators 45 Message Lists 46 Others Updating the Software 47...

Operating Instructions
Page 13
... the message disappears. The fan stops and the ON/STANDBY indicator changes from which you can turn off completely, and you want to remaining red. appears on the screen. Note Never disconnect the AC power cord while the indicator is set to "Off" on the Setup menu, the input palette does not appear. Press INPUT repeatedly or press M/m/ (enter) to select the equipment from flashing green to display images. Tip...
... the message disappears. The fan stops and the ON/STANDBY indicator changes from which you can turn off completely, and you want to remaining red. appears on the screen. Note Never disconnect the AC power cord while the indicator is set to "Off" on the Setup menu, the input palette does not appear. Press INPUT repeatedly or press M/m/ (enter) to select the equipment from flashing green to display images. Tip...
Operating Instructions
Page 30
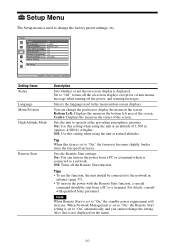
... change the position to display the menu on the menu. 30 Setting items Status Language Menu Position High Altitude Mode Remote Start Description Sets whether or not the on -screen displays. Note When Remote Start is displayed. For details, consult with the Remote Start function, a special command should be connected to the network in the menu and on -screen display is set to "On," the standby power requirement will increase. On: Use this is connected to a network. Off: Turns off the power, and warning messages...
... change the position to display the menu on the menu. 30 Setting items Status Language Menu Position High Altitude Mode Remote Start Description Sets whether or not the on -screen displays. Note When Remote Start is displayed. For details, consult with the Remote Start function, a special command should be connected to the network in the menu and on -screen display is set to "On," the standby power requirement will increase. On: Use this is connected to a network. Off: Turns off the power, and warning messages...

Operating Instructions
Page 31
... reset. 31 The "Lamp Timer" in the Information menu is turned off automatically and the projector goes into standby mode. Note When Network Management is not continuously connected to "On," the power consumption increases. When replacing the lamps, set the desired lamp setting (page 48). Set Network Management to "Off" when the unit is set to the network. Setting items Network Management Power Saving Lamp Setting All Reset Description On: Set when connected to their factory preset values. All settings...
... reset. 31 The "Lamp Timer" in the Information menu is turned off automatically and the projector goes into standby mode. Note When Network Management is not continuously connected to "On," the power consumption increases. When replacing the lamps, set the desired lamp setting (page 48). Set Network Management to "Off" when the unit is set to the network. Setting items Network Management Power Saving Lamp Setting All Reset Description On: Set when connected to their factory preset values. All settings...

Operating Instructions
Page 34
Sharpness NR MPEG NR Smooth Gradation Film Mode Gamma Correction Color Correction Clear White x.v.Color HDR Color Space Input Lag Reduction Group 2 Setup menu Status Language Menu Position High Altitude Mode Remote Start Network Management Power Saving Lamp Setting Function menu Dynamic Range Test Pattern Installation menu Image Flip Lens Control Anamorphic Lens Trigger Select IR Receiver Panel Alignment Network Setting 34 Items Locked by Settings Lock Group 1 Picture menu Reset Reality Creation Contrast Enhancer Lamp Control Motionflow Contrast Brightness Color Hue Color Temp.
Sharpness NR MPEG NR Smooth Gradation Film Mode Gamma Correction Color Correction Clear White x.v.Color HDR Color Space Input Lag Reduction Group 2 Setup menu Status Language Menu Position High Altitude Mode Remote Start Network Management Power Saving Lamp Setting Function menu Dynamic Range Test Pattern Installation menu Image Flip Lens Control Anamorphic Lens Trigger Select IR Receiver Panel Alignment Network Setting 34 Items Locked by Settings Lock Group 1 Picture menu Reset Reality Creation Contrast Enhancer Lamp Control Motionflow Contrast Brightness Color Hue Color Temp.

Operating Instructions
Page 38
... picture. Displays the resolution of input signals and the 3D format are displayed. When the input signal is displayed according to the signals shown in the Information menu. Displays the color format of the lamp. Displays the color space of screen may be hidden or displayed incorrectly. 38 Note Depending on (total usage). Information Menu The Information menu displays the model name, serial number, input signal type/format, software version and the cumulated hours of usage of the input signal...
... picture. Displays the resolution of input signals and the 3D format are displayed. When the input signal is displayed according to the signals shown in the Information menu. Displays the color format of the lamp. Displays the color space of screen may be hidden or displayed incorrectly. 38 Note Depending on (total usage). Information Menu The Information menu displays the model name, serial number, input signal type/format, software version and the cumulated hours of usage of the input signal...
Operating Instructions
Page 42
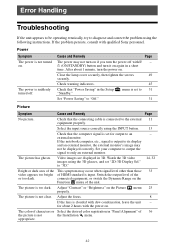
... an - Video images are displayed in the Setup "Standby." connected equipment, or switch the Dynamic Range on . Adjust the focus. 8 If the lens is not turned on again in "Panel Alignment" of the This symptom may not turn on if you turn the power off . Power Symptom The power is clouded with ?/ - 1 (ON/STANDBY) button and turn the power on the Function menu of HDMI standard is set "2D-3D Display Sel." Close the lamp cover securely...
... an - Video images are displayed in the Setup "Standby." connected equipment, or switch the Dynamic Range on . Adjust the focus. 8 If the lens is not turned on again in "Panel Alignment" of the This symptom may not turn on if you turn the power off . Power Symptom The power is clouded with ?/ - 1 (ON/STANDBY) button and turn the power on the Function menu of HDMI standard is set "2D-3D Display Sel." Close the lamp cover securely...

Operating Instructions
Page 43
... time of the remote control detector on the unit. Remote control Symptom The remote control does not work improperly or inadvertently. Insert the batteries with the power on. Set "IR Receiver" to "Front & Rear" on the Setup menu to the IR IN connector. On-screen display Symptom Cause and Remedy Page On-screen display does Set "Status" on the Installation menu. Check if the ON/STANDBY indicator should light in green. 7 When the ON/STANDBY indicator blinks in green...
... time of the remote control detector on the unit. Remote control Symptom The remote control does not work improperly or inadvertently. Insert the batteries with the power on. Set "IR Receiver" to "Front & Rear" on the Setup menu to the IR IN connector. On-screen display Symptom Cause and Remedy Page On-screen display does Set "Status" on the Installation menu. Check if the ON/STANDBY indicator should light in green. 7 When the ON/STANDBY indicator blinks in green...
Operating Instructions
Page 47
... the video images. • Note that the picture will provide a different look from the following Sony website: https://esupport.sony.com/ The website also explains how to install the update. For details, refer to "Software License Information" supplied separately. 47 Others Updating the Software You can download files to update the software of the unit, then perform the update. Copy the downloaded files to your USB memory...
... the video images. • Note that the picture will provide a different look from the following Sony website: https://esupport.sony.com/ The website also explains how to install the update. For details, refer to "Software License Information" supplied separately. 47 Others Updating the Software You can download files to update the software of the unit, then perform the update. Copy the downloaded files to your USB memory...

Operating Instructions
Page 48
... power cord. 2 When setting the unit on . Replace the lamp with the ?/1 (ON/STANDBY) button. Place the unit on the installation environment or use the lamp longer by avoiding turning the lamp off until several minutes pass after the unit is placed on the screen, the lamp may malfunction. • Be sure to prevent the surface from being scratched. Tip The lifespan of the picture...
... power cord. 2 When setting the unit on . Replace the lamp with the ?/1 (ON/STANDBY) button. Place the unit on the installation environment or use the lamp longer by avoiding turning the lamp off until several minutes pass after the unit is placed on the screen, the lamp may malfunction. • Be sure to prevent the surface from being scratched. Tip The lifespan of the picture...

Operating Instructions
Page 52
... pixels Light source Screen size Accepted digital signals HDMI (2 inputs), HDCP compliant Other inputs/ outputs TRIGGER REMOTE LAN IR IN USB Outside dimensions (w/h/d) Mass Power requirements Power consumption Power consumption Standby Networked Standby Operating temperature Operating humidity Storage temperature Storage humidity Supplied accessories Optional accessories Description SXRD panel, projection system 0.74-inch (18.8 mm) SXRD 26,542,080 pixels (8,847,360 pixels × 3) 2.06 times zoom lens (motorized) f = 21.7 mm to 44.7 mm F3.0 to F4.0 Ultra High Pressure Lamp...
... pixels Light source Screen size Accepted digital signals HDMI (2 inputs), HDCP compliant Other inputs/ outputs TRIGGER REMOTE LAN IR IN USB Outside dimensions (w/h/d) Mass Power requirements Power consumption Power consumption Standby Networked Standby Operating temperature Operating humidity Storage temperature Storage humidity Supplied accessories Optional accessories Description SXRD panel, projection system 0.74-inch (18.8 mm) SXRD 26,542,080 pixels (8,847,360 pixels × 3) 2.06 times zoom lens (motorized) f = 21.7 mm to 44.7 mm F3.0 to F4.0 Ultra High Pressure Lamp...

Operating Instructions
Page 70
... 19 USER 19 Preset signals 53 Projecting the Picture 13 Projection distance 62, 63, 64 Projection distance and lens shift range 61 R Reality Creation 23 Remote control 5 Remote control detector 3, 4 Remote Start 30 Replacing the lamp 48 Reset 22 Resetting the items 21 S Settings Lock 33 Sharpness 24 Signal type 38 Smooth Gradation 25 Software Version 38 Specifications 52 Status 30 T Test Pattern 33 Trigger Select 35 Troubleshooting 42 Turning off 13 Turning on 7 U Updating the software 47 W Warning indicators 3, 45 X x.v.Color 26...
... 19 USER 19 Preset signals 53 Projecting the Picture 13 Projection distance 62, 63, 64 Projection distance and lens shift range 61 R Reality Creation 23 Remote control 5 Remote control detector 3, 4 Remote Start 30 Replacing the lamp 48 Reset 22 Resetting the items 21 S Settings Lock 33 Sharpness 24 Signal type 38 Smooth Gradation 25 Software Version 38 Specifications 52 Status 30 T Test Pattern 33 Trigger Select 35 Troubleshooting 42 Turning off 13 Turning on 7 U Updating the software 47 W Warning indicators 3, 45 X x.v.Color 26...


