
Startup Guide
Page 41
... cleaning cloth. Never use multiple LCD projectors to project onto a screen, even if they are of time, the unit may deteriorate or the coating may be exposed to disconnect the AC power cord from rising, there may be some noise. On cleaning the projection window and the cabinet • Be sure to direct lighting or sunlight. You may break or will be removed with...
... cleaning cloth. Never use multiple LCD projectors to project onto a screen, even if they are of time, the unit may deteriorate or the coating may be exposed to disconnect the AC power cord from rising, there may be some noise. On cleaning the projection window and the cabinet • Be sure to direct lighting or sunlight. You may break or will be removed with...

Startup Guide
Page 43
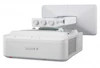
... Before using the remote commander, remove the insulation film. USB A-B cable (5m) (1) (1-846-133-11/ Sony) (VPL-SW535C/SW525C only) IFU-PN100M Interactive Pen Device (main) (1) (VPL-SW535C/SW525C only) IFU-PN100S Interactive Pen Device (sub) (1) (VPL-SW535C/SW525C only) Size AAA (R03) manganese batteries (4) (VPL-SW535C/SW525C only) AC power cord (1) Mini D-sub 15 pin cable (1.8 m) (1) (1-838938-11/Sony) (VPL-SW535/SX535 only) Projector Wall Mount (1) Quick Reference Manual (this manual) (1) Operating Instructions...
... Before using the remote commander, remove the insulation film. USB A-B cable (5m) (1) (1-846-133-11/ Sony) (VPL-SW535C/SW525C only) IFU-PN100M Interactive Pen Device (main) (1) (VPL-SW535C/SW525C only) IFU-PN100S Interactive Pen Device (sub) (1) (VPL-SW535C/SW525C only) Size AAA (R03) manganese batteries (4) (VPL-SW535C/SW525C only) AC power cord (1) Mini D-sub 15 pin cable (1.8 m) (1) (1-838938-11/Sony) (VPL-SW535/SX535 only) Projector Wall Mount (1) Quick Reference Manual (this manual) (1) Operating Instructions...

Startup Guide
Page 46
... to display the menu for switching input signal on the connected equipment. Projector 1 Wall outlet 46 2 Computer 5 VPL-SW535C/SW525C/ SW535/SW525 Input Video S-Video Input-A Input-B Sel Skip VPL-SX535 Input Video S-Video Input-A Input-B Sel Skip 1 Plug the AC power cord into the wall outlet. 2 Connect all equipment to the projector. 3 Press the ?/1 key to external display. Press the INPUT key repeatedly, or press the V/v key to select an image to be projected. 6 When projecting a computer image, switch your...
... to display the menu for switching input signal on the connected equipment. Projector 1 Wall outlet 46 2 Computer 5 VPL-SW535C/SW525C/ SW535/SW525 Input Video S-Video Input-A Input-B Sel Skip VPL-SX535 Input Video S-Video Input-A Input-B Sel Skip 1 Plug the AC power cord into the wall outlet. 2 Connect all equipment to the projector. 3 Press the ?/1 key to external display. Press the INPUT key repeatedly, or press the V/v key to select an image to be projected. 6 When projecting a computer image, switch your...
Startup Guide
Page 49
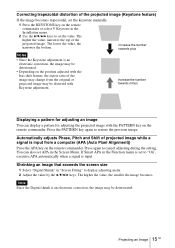
... projected image while a signal is input. Shrinking an image that exceeds the screen size 1 Select "Digital Shrink" in "Screen Fitting" to set the value. Projecting an Image 15 GB Note Since the Digital shrink is an electronic correction, the image may be distorted with Keystone adjustment. Correcting trapezoidal distortion of the projected image (Keystone feature) If the image becomes trapezoidal, set the keystone manually. 1 Press the KEYSTONE key on the remote commander or select V Keystone in the Installation menu. 2 Use...
... projected image while a signal is input. Shrinking an image that exceeds the screen size 1 Select "Digital Shrink" in "Screen Fitting" to set the value. Projecting an Image 15 GB Note Since the Digital shrink is an electronic correction, the image may be distorted with Keystone adjustment. Correcting trapezoidal distortion of the projected image (Keystone feature) If the image becomes trapezoidal, set the keystone manually. 1 Press the KEYSTONE key on the remote commander or select V Keystone in the Installation menu. 2 Use...

Startup Guide
Page 56
... in the top left to the projector. Performing Calibration (Position alignment) Use the supplied USB cable to connect the projector to align the pen position on the projection surface with the tip of the dot, otherwise positioning may offset the current calibration. Changing resolution or moving the projector may be offset. Touch the center of the screen. Operating with the Interactive Pen Device With...
... in the top left to the projector. Performing Calibration (Position alignment) Use the supplied USB cable to connect the projector to align the pen position on the projection surface with the tip of the dot, otherwise positioning may offset the current calibration. Changing resolution or moving the projector may be offset. Touch the center of the screen. Operating with the Interactive Pen Device With...

Startup Guide
Page 57
... qualified Sony personnel. LAMP/COVER indicator Status Meaning/Remedies Flashes in red Symptoms are indicated by number of flashes Meaning/Remedies The projector is in red Flashes twice Flashes six times Other number of flashes. In this case, replace the lamp with the table below . • Check if nothing is blocking the ventilation holes. • Check if the air filter is in accordance with the following . The projector's power is set correctly. Address the problem in the Installation menu is...
... qualified Sony personnel. LAMP/COVER indicator Status Meaning/Remedies Flashes in red Symptoms are indicated by number of flashes Meaning/Remedies The projector is in red Flashes twice Flashes six times Other number of flashes. In this case, replace the lamp with the table below . • Check if nothing is blocking the ventilation holes. • Check if the air filter is in accordance with the following . The projector's power is set correctly. Address the problem in the Installation menu is...

Startup Guide
Page 58
... a part of the lamp other than the designated location, you to cool sufficiently. • Do not allow any may burn your hands into the lamp replacement slot after turning off . Replacing the Lamp Replace the lamp with a new one if a message displayed on the projected image or the LAMP/ COVER indicator notifies you may cause electrical shock or fire. Use an LMP-E212 projector lamp (not supplied) for at least an hour after removing...
... a part of the lamp other than the designated location, you to cool sufficiently. • Do not allow any may burn your hands into the lamp replacement slot after turning off . Replacing the Lamp Replace the lamp with a new one if a message displayed on the projected image or the LAMP/ COVER indicator notifies you may cause electrical shock or fire. Use an LMP-E212 projector lamp (not supplied) for at least an hour after removing...

Startup Guide
Page 59
...). Tighten the 2 screws. Select "Lamp Timer Reset" on the projector. 7 Reset the lamp timer for notification of the next replacement time. Disposal of the used lamp For the customers in the USA Lamp in place. 3 Loosen the 2 screws on the lamp then pull out the lamp by its grab. 5 Close the lamp cover and tighten the 1 screw. Note Be sure to a wall outlet and turn on the Function menu then press...
...). Tighten the 2 screws. Select "Lamp Timer Reset" on the projector. 7 Reset the lamp timer for notification of the next replacement time. Disposal of the used lamp For the customers in the USA Lamp in place. 3 Loosen the 2 screws on the lamp then pull out the lamp by its grab. 5 Close the lamp cover and tighten the 1 screw. Note Be sure to a wall outlet and turn on the Function menu then press...

Operating Instructions
Page 2
... Information Menu 26 Network Using Network Features 27 Displaying the Control Window of the Projector with a Web Browser 27 Confirming the Information regarding the Projector 28 Operating the Projector from a Computer 28 Using the e-mail report Function 29 Interactive Function Using the Interactive Function .........31 Connecting a Computer with a USB Cable 32 For Windows 33 For Mac 37 Others Indicators 41 Messages List 42 Troubleshooting 43 Replacing the Lamp 45 Cleaning the Air Filter 47 Specifications 49 Projection Distance and Lens...
... Information Menu 26 Network Using Network Features 27 Displaying the Control Window of the Projector with a Web Browser 27 Confirming the Information regarding the Projector 28 Operating the Projector from a Computer 28 Using the e-mail report Function 29 Interactive Function Using the Interactive Function .........31 Connecting a Computer with a USB Cable 32 For Windows 33 For Mac 37 Others Indicators 41 Messages List 42 Troubleshooting 43 Replacing the Lamp 45 Cleaning the Air Filter 47 Specifications 49 Projection Distance and Lens...

Operating Instructions
Page 6
... remote commander and the remote control detector on the Connection/Power menu (page 23). Press again to restore the previous image. Lamp Mode: Low With No Input: Standby With Static Signal: Lamp Dimming Standby Mode: Low User: Sets each mode to 4 times. For details on ECO Mode settings, see "Lamp Mode", "With No Input", "With Static Signal" and "Standby Mode" on the projector. 6 Location and Function of the input signal. *2: Use this key when inputting a computer signal. Press the RESET key to restore the previous image. key Adjusts...
... remote commander and the remote control detector on the Connection/Power menu (page 23). Press again to restore the previous image. Lamp Mode: Low With No Input: Standby With Static Signal: Lamp Dimming Standby Mode: Low User: Sets each mode to 4 times. For details on ECO Mode settings, see "Lamp Mode", "With No Input", "With Static Signal" and "Standby Mode" on the projector. 6 Location and Function of the input signal. *2: Use this key when inputting a computer signal. Press the RESET key to restore the previous image. key Adjusts...

Operating Instructions
Page 21
... Start Up Image is displayed on the screen when the projector is input via the RGB input connector (INPUT A/INPUT B (VPL-SX535 only)). The audio output level will be output from the speaker. Off: Closed caption does not appear. Note *1: APA functions when a computer signal is powered on. On/Off: When set to mute the sound. Black/Blue: Selects the background color of the projector. When replacing the lamp, resets the lamp timer...
... Start Up Image is displayed on the screen when the projector is input via the RGB input connector (INPUT A/INPUT B (VPL-SX535 only)). The audio output level will be output from the speaker. Off: Closed caption does not appear. Note *1: APA functions when a computer signal is powered on. On/Off: When set to mute the sound. Black/Blue: Selects the background color of the projector. When replacing the lamp, resets the lamp timer...

Operating Instructions
Page 23
... Input. Adjustments and Settings Using a Menu The Connection/Power Menu The Connection/Power menu is used for setting for about 35 seconds later. When any key is pressed. Standard/Low: When set to a wall outlet. With Static Signal Standby Mode*2 Lamp Dimming: If an image does not change to approximately 30% of the Direct Power On setting. Manual: To specify the IP Address manually. The Connection/Power Menu 23 In Lamp Cutoff, the ON/STANDBY indicator lights in orange. (page 41) Standby*6: If no signal...
... Input. Adjustments and Settings Using a Menu The Connection/Power Menu The Connection/Power menu is used for setting for about 35 seconds later. When any key is pressed. Standard/Low: When set to a wall outlet. With Static Signal Standby Mode*2 Lamp Dimming: If an image does not change to approximately 30% of the Direct Power On setting. Manual: To specify the IP Address manually. The Connection/Power Menu 23 In Lamp Cutoff, the ON/STANDBY indicator lights in orange. (page 41) Standby*6: If no signal...

Operating Instructions
Page 41
... red Flashes in green Lights in green Lights in orange Flashes in red Flashes twice Flashes six times Other number of flashes Meaning/Remedies The projector is in Standby mode. • The projector is ready to a wall outlet again then turn on . In this case, replace the lamp with qualified Sony personnel. The projector is in abnormal status. Symptoms are indicated by number of flashes. The internal temperature is in With No Input (Lamp Cutoff). (page 23) The projector is unusually high. LAMP/COVER indicator Status...
... red Flashes in green Lights in green Lights in orange Flashes in red Flashes twice Flashes six times Other number of flashes Meaning/Remedies The projector is in Standby mode. • The projector is ready to a wall outlet again then turn on . In this case, replace the lamp with qualified Sony personnel. The projector is in abnormal status. Symptoms are indicated by number of flashes. The internal temperature is in With No Input (Lamp Cutoff). (page 23) The projector is unusually high. LAMP/COVER indicator Status...

Operating Instructions
Page 42
... the Installation menu is set correctly. Set "Input-A Signal Sel." message appears whenever you replace the lamp and reset the lamp timer. High Altitude Mode should be shut down soon. When not using the projector at high altitude. Invalid key was pressed and the projector will remain on the projected image, address the problem in accordance with a new one for signals supported by the projector. Change the output setting of range! Projector temperature is set. "Panel Key Lock" is set to the input signal. Lamp off the projector directly...
... the Installation menu is set correctly. Set "Input-A Signal Sel." message appears whenever you replace the lamp and reset the lamp timer. High Altitude Mode should be shut down soon. When not using the projector at high altitude. Invalid key was pressed and the projector will remain on the projected image, address the problem in accordance with a new one for signals supported by the projector. Change the output setting of range! Projector temperature is set. "Panel Key Lock" is set to the input signal. Lamp off the projector directly...

Operating Instructions
Page 43
... . power consumption. In this is displayed smaller /a portion of the projection 5, 14, angle. When video signal is not input, the lamp is not attached securely, the projector 45 cannot be judged correctly. If the lamp or lamp cover is dimmed to diagnose the problem, following the instructions below. The image is a trapezoid. Troubleshooting Before asking to have the projector repaired, try to reduce - When the "Panel Key Lock" is set...
... . power consumption. In this is displayed smaller /a portion of the projection 5, 14, angle. When video signal is not input, the lamp is not attached securely, the projector 45 cannot be judged correctly. If the lamp or lamp cover is dimmed to diagnose the problem, following the instructions below. The image is a trapezoid. Troubleshooting Before asking to have the projector repaired, try to reduce - When the "Panel Key Lock" is set...

Operating Instructions
Page 46
... the next replacement time. Tighten the 2 screws. If not, the projector cannot be regulated due to reset the lamp timer (page 21). Disposal of these materials may be turned on. 6 Connect the AC power cord to install the lamp securely as it is securely in this product contains mercury. Select "Lamp Timer Reset" on the lamp then pull out the lamp by its grab. 5 Close the lamp cover and tighten...
... the next replacement time. Tighten the 2 screws. If not, the projector cannot be regulated due to reset the lamp timer (page 21). Disposal of these materials may be turned on. 6 Connect the AC power cord to install the lamp securely as it is securely in this product contains mercury. Select "Lamp Timer Reset" on the lamp then pull out the lamp by its grab. 5 Close the lamp cover and tighten...
Operating Instructions
Page 51
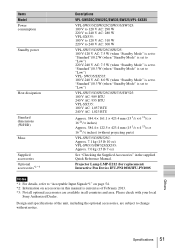
... V AC: 7.5 W (when "Standby Mode" is set to "Standard")/0.3 W (when "Standby Mode" is current as of the unit, including the optional accessories, are available in the supplied Quick Reference Manual. Design and specifications of February 2013. *3: Not all countries and area. Projector Lamp LMP-E212 (for replacement) Interactive Pen Device IFU-PN100M/IFU-PN100S Notes *1: For details, refer to "Acceptable Input Signals*1" on page...
... V AC: 7.5 W (when "Standby Mode" is set to "Standard")/0.3 W (when "Standby Mode" is current as of the unit, including the optional accessories, are available in the supplied Quick Reference Manual. Design and specifications of February 2013. *3: Not all countries and area. Projector Lamp LMP-E212 (for replacement) Interactive Pen Device IFU-PN100M/IFU-PN100S Notes *1: For details, refer to "Acceptable Input Signals*1" on page...
VPL-S Series Brochure
Page 2
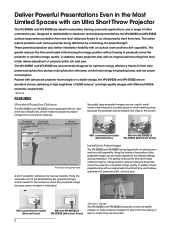
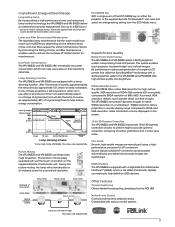
... the desired settings during installation. Packed with lamp control technology, long-lasting lamp, and low power consumption. A short projection distance has two key benefits. The VPL-SW535 and VPL-SX535 are approximate. Using this function, the position of fine-tuning the image position without having to the screen. This greatly reduces the time and hassle of the projected image can be easily adjusted to see the projected image because screen shadow...
... the desired settings during installation. Packed with lamp control technology, long-lasting lamp, and low power consumption. A short projection distance has two key benefits. The VPL-SW535 and VPL-SX535 are approximate. Using this function, the position of fine-tuning the image position without having to the screen. This greatly reduces the time and hassle of the projected image can be easily adjusted to see the projected image because screen shadow...
VPL-S Series Brochure
Page 3
... supplied Remote Commander™ unit, users can be easily operated with a lamp dimming function. WXGA/XGA Resolution The VPL-SX535 offers native XGA resolution for maintenance. ECO MODE Key With a single push of inorganic LCD panels that utilize the Sony BrightEra™ technology with a High-Definition Multimedia Interface™ (HDMI), which is hardly noticeable. After 10 seconds of a static signal being fed, the lamp dims by the NCI, USA Network and Control Controls...
... supplied Remote Commander™ unit, users can be easily operated with a lamp dimming function. WXGA/XGA Resolution The VPL-SX535 offers native XGA resolution for maintenance. ECO MODE Key With a single push of inorganic LCD panels that utilize the Sony BrightEra™ technology with a High-Definition Multimedia Interface™ (HDMI), which is hardly noticeable. After 10 seconds of a static signal being fed, the lamp dims by the NCI, USA Network and Control Controls...
VPL-S Series Brochure
Page 4
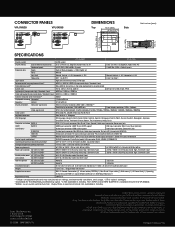
... Operating Instructions (CD-ROM) (1), Quick Reference Manual (1), Wall Mount Manual (1) LMP-E212 *1 Values are approximate and may vary based on settings, environmental conditions, and usage. *2 This value is prohibited. the Sony make.believe, BrightEra, and Remote Commander logos are the trademarks of pixels Projection lens Zoom Focus Lens shift Throw ratio Light source Recommended lamp replacement time*1 Filter cleaning cycle*1 Screen size Light output (Lamp mode: High / Standard / Low) Color light output (Lamp mode: High / Standard / Low) Contrast ratio (full white...
... Operating Instructions (CD-ROM) (1), Quick Reference Manual (1), Wall Mount Manual (1) LMP-E212 *1 Values are approximate and may vary based on settings, environmental conditions, and usage. *2 This value is prohibited. the Sony make.believe, BrightEra, and Remote Commander logos are the trademarks of pixels Projection lens Zoom Focus Lens shift Throw ratio Light source Recommended lamp replacement time*1 Filter cleaning cycle*1 Screen size Light output (Lamp mode: High / Standard / Low) Color light output (Lamp mode: High / Standard / Low) Contrast ratio (full white...


