
Operating Instructions
Page 7
... the ventilation holes - On cleaning • To keep the cabinet looking new, periodically clean it is connected to the wall outlet, even if the unit itself . • The wall outlet should not be changed to a dark color. Never use a soft dry cloth. Never pull the cord itself has been turned off the power with the I / 1 key on the Remote Commander or on . •...
... the ventilation holes - On cleaning • To keep the cabinet looking new, periodically clean it is connected to the wall outlet, even if the unit itself . • The wall outlet should not be changed to a dark color. Never use a soft dry cloth. Never pull the cord itself has been turned off the power with the I / 1 key on the Remote Commander or on . •...

Operating Instructions
Page 8
... on the picture. • High resolution VPL-PX15/PX10 Three 0.9-inch, approximately 790,000 pixel, XGA panels provide a resolution of 800 × 600 dots for RGB input and 600 horizontal TV lines for video input. Easy presentation • Multi functional Remote Commander with mouse control functions You can operate a computer connected to this projector, refer to the Operating Instructions for input signals in mouse receiver. • Digital zoom / freeze functions This projector has a digital zoom function...
... on the picture. • High resolution VPL-PX15/PX10 Three 0.9-inch, approximately 790,000 pixel, XGA panels provide a resolution of 800 × 600 dots for RGB input and 600 horizontal TV lines for video input. Easy presentation • Multi functional Remote Commander with mouse control functions You can operate a computer connected to this projector, refer to the Operating Instructions for input signals in mouse receiver. • Digital zoom / freeze functions This projector has a digital zoom function...

Operating Instructions
Page 10
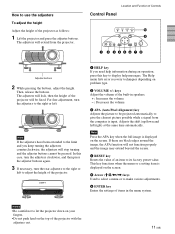
... Lamp cover ql Ventilation holes (intake) w; For details, see "Cleaning the Air Filter" on how to use the adjusters, see "How to ensure optimal performance. qj Security lock Connects to Kensington's MicroSaver ®1) Security System. The security lock corresponds to an optional security cable (made by Kensington)1). the air coming out is projected on page 11 (GB). Right speaker wa Air filter cover lock Used to remove/install the connector panel cover 9. Location...
... Lamp cover ql Ventilation holes (intake) w; For details, see "Cleaning the Air Filter" on how to use the adjusters, see "How to ensure optimal performance. qj Security lock Connects to Kensington's MicroSaver ®1) Security System. The security lock corresponds to an optional security cable (made by Kensington)1). the air coming out is projected on page 11 (GB). Right speaker wa Air filter cover lock Used to remove/install the connector panel cover 9. Location...
Operating Instructions
Page 11
... picture to be projected automatically to use the adjusters To adjust the height Adjust the height of Controls Control Panel LAMP/ TEMP/ POWER ON/ COVER FAN SAVING STANDBY HELP MENU VOLUME APA RESET ENTER INPUT q; 9 1 2 345678 Adjuster buttons 2 While pressing the buttons, adjust the height. This key functions when the menu or a setting item is input. Location and Function of the projector as follows: 1 Lift the projector and press the adjuster buttons. In this case, turn the adjusters clockwise, and then press the adjuster buttons...
... picture to be projected automatically to use the adjusters To adjust the height Adjust the height of Controls Control Panel LAMP/ TEMP/ POWER ON/ COVER FAN SAVING STANDBY HELP MENU VOLUME APA RESET ENTER INPUT q; 9 1 2 345678 Adjuster buttons 2 While pressing the buttons, adjust the height. This key functions when the menu or a setting item is input. Location and Function of the projector as follows: 1 Lift the projector and press the adjuster buttons. In this case, turn the adjusters clockwise, and then press the adjuster buttons...
Operating Instructions
Page 12
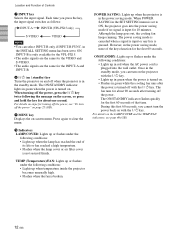
... life or has reached a high temperature. • Flashes when the lamp cover or air filter cover is broken. For details on steps for turning off the power, see page 40 (GB). 12 (GB) POWER SAVING: Lights up when temperature inside the projector becomes unusually high. • Flashes when the fan is not secured firmly. INPUT-B is turned on the LAMP/COVER and the TEMP/FAN indicators, see "To turn off the power" on page 25 (GB). 9 MENU key Displays...
... life or has reached a high temperature. • Flashes when the lamp cover or air filter cover is broken. For details on steps for turning off the power, see page 40 (GB). 12 (GB) POWER SAVING: Lights up when temperature inside the projector becomes unusually high. • Flashes when the fan is not secured firmly. INPUT-B is turned on the LAMP/COVER and the TEMP/FAN indicators, see "To turn off the power" on page 25 (GB). 9 MENU key Displays...
Operating Instructions
Page 14
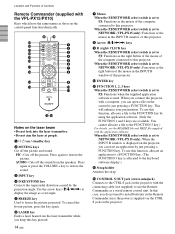
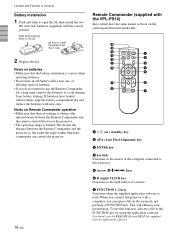
ql qk qj qh wf wg COMMAND OFF ON PIC PJ NETWORK MUTING AUDIO INPUT HELP APA D KEYSTONE VOLUME FREEZE MENU/ TAB LASER 1 2 3 4 5 6 7 8 qg qf ENTER R CLICK D ZOOM RESET/ ESCAPE 1 3 2 FUNCTION RM-PJM15 PROJECTOR 9 q; PIC: Cuts off the sound from the speakers. AUDIO: Cuts off the picture. wd ws wa w; Use the arrow keys (M/m/ Location and Function of Controls Remote Commander (supplied with the VPL-PX15/PX10) Keys which have the...
ql qk qj qh wf wg COMMAND OFF ON PIC PJ NETWORK MUTING AUDIO INPUT HELP APA D KEYSTONE VOLUME FREEZE MENU/ TAB LASER 1 2 3 4 5 6 7 8 qg qf ENTER R CLICK D ZOOM RESET/ ESCAPE 1 3 2 FUNCTION RM-PJM15 PROJECTOR 9 q; PIC: Cuts off the sound from the speakers. AUDIO: Cuts off the picture. wd ws wa w; Use the arrow keys (M/m/ Location and Function of Controls Remote Commander (supplied with the VPL-PX15/PX10) Keys which have the...

Operating Instructions
Page 15
When the PJ/NETWORK select switch is set to PJ: Functions as the ESCAPE key of the keyboard when the INPUT B window is displayed. key Enlarges the image at a desired location on the screen. Use an arrow key (M/m/ qg D ZOOM +/- This icon indicates the point you want to enlarge. qf RESET/ESCAPE key When the PJ/NETWORK select switch is set to NETWORK (VPL-PX15 only): Functions as the RESET key. This key works only when a signal from a computer is input. +: Pressing the + key once displays the icon.
When the PJ/NETWORK select switch is set to PJ: Functions as the ESCAPE key of the keyboard when the INPUT B window is displayed. key Enlarges the image at a desired location on the screen. Use an arrow key (M/m/ qg D ZOOM +/- This icon indicates the point you want to enlarge. qf RESET/ESCAPE key When the PJ/NETWORK select switch is set to NETWORK (VPL-PX15 only): Functions as the RESET key. This key works only when a signal from a computer is input. +: Pressing the + key once displays the icon.
Operating Instructions
Page 16
... the commander can control the projector. 16 (GB) Remote Commander (supplied with the VPL-PS10) Keys which have leaked, remove them, wipe the battery compartment dry and replace the batteries with new ones. Be sure to open the lid, then install the two R6 (size AA) batteries (supplied) with a new one, or different types of batteries. • If you do not intend to use the Remote Commander for a long time, remove...
... the commander can control the projector. 16 (GB) Remote Commander (supplied with the VPL-PS10) Keys which have leaked, remove them, wipe the battery compartment dry and replace the batteries with new ones. Be sure to open the lid, then install the two R6 (size AA) batteries (supplied) with a new one, or different types of batteries. • If you do not intend to use the Remote Commander for a long time, remove...

Operating Instructions
Page 18
... XGA (VPL-PX15/PX10) mode for each connection. • Insert the cable plugs properly; When pulling out a cable, be sure to the operating instructions supplied with qualified Sony personnel (fee charged). Set your computer. • This projector is compatible with DDC1), turn the projector on . 3 Start the computer. ...1) DDC™ is compatible with DDC2B (Display Data Channel 2B). Installing the Projector / Connecting the Projector Installing the Projector This section describes how to a computer. Use...
... XGA (VPL-PX15/PX10) mode for each connection. • Insert the cable plugs properly; When pulling out a cable, be sure to the operating instructions supplied with qualified Sony personnel (fee charged). Set your computer. • This projector is compatible with DDC1), turn the projector on . 3 Start the computer. ...1) DDC™ is compatible with DDC2B (Display Data Channel 2B). Installing the Projector / Connecting the Projector Installing the Projector This section describes how to a computer. Use...

Operating Instructions
Page 23
.... 4,5,6 3 2 LAMP/ TEMP/ POWER ON/ COVER FAN SAVING STANDBY HELP MENU VOLUME APA RESET ENTER INPUT ENTER key 1 1 Plug the AC power cord into the INPUT B PC CARD slot, you store a file created with Microsoft PowerPoint1) in the menu and other countries). 23 (GB) The SET SETTING menu appears. and other on screen displays from 9 languages. For details on the power. 3 Press the MENU key. The factory setting is a registered trademark of the projector LAN cable PUSH INPUT...
.... 4,5,6 3 2 LAMP/ TEMP/ POWER ON/ COVER FAN SAVING STANDBY HELP MENU VOLUME APA RESET ENTER INPUT ENTER key 1 1 Plug the AC power cord into the INPUT B PC CARD slot, you store a file created with Microsoft PowerPoint1) in the menu and other countries). 23 (GB) The SET SETTING menu appears. and other on screen displays from 9 languages. For details on the power. 3 Press the MENU key. The factory setting is a registered trademark of the projector LAN cable PUSH INPUT...

Operating Instructions
Page 24
.../STANDBY indicator LAMP/ TEMP/ POWER ON/ COVER FAN SAVING STANDBY HELP MENU VOLUME APA RESET ENTER INPUT COMMAND OFF ON PIC PJ NETWORK MUTING AUDIO INPUT HELP APA D KEYSTONE VOLUME FREEZE MENU/ TAB LASER Rear remote control detector 2 3 APA key FREEZE MS SLIDE I / 1 key to the selected language. The menu changes to turn on the projector. INPUT-A: Selects the video signal input from the computer is connected completely, plug the AC power cord into the lens when the projector is automatically adjusted to adjust the size of...
.../STANDBY indicator LAMP/ TEMP/ POWER ON/ COVER FAN SAVING STANDBY HELP MENU VOLUME APA RESET ENTER INPUT COMMAND OFF ON PIC PJ NETWORK MUTING AUDIO INPUT HELP APA D KEYSTONE VOLUME FREEZE MENU/ TAB LASER Rear remote control detector 2 3 APA key FREEZE MS SLIDE I / 1 key to the selected language. The menu changes to turn on the projector. INPUT-A: Selects the video signal input from the computer is connected completely, plug the AC power cord into the lens when the projector is automatically adjusted to adjust the size of...

Operating Instructions
Page 25
..., you switch the input signal or re-connect a computer, press the APA key again to get the suitable picture. • "ADJUSTING" appears on the screen. Cleaning the air filter Clean the air filter every 300 hours to run for the first 60 seconds. To correct trapezoidal distortion When the projected image is still high. When the upper edge is still running and the ON/STANDBY indicator lights in the INPUT SETTING menu when...
..., you switch the input signal or re-connect a computer, press the APA key again to get the suitable picture. • "ADJUSTING" appears on the screen. Cleaning the air filter Clean the air filter every 300 hours to run for the first 60 seconds. To correct trapezoidal distortion When the projected image is still high. When the upper edge is still running and the ON/STANDBY indicator lights in the INPUT SETTING menu when...

Operating Instructions
Page 30
.... The INPUT SETTING Menu SIZE H Adjusts the horizontal size of the picture input from the INPUT A/B connectors or video input connectors. ASPECT Sets the aspect ratio of the picture. PHASE SIZE H - The picture will be displayed in the preset memory, a suitable picture is input. VPL-PS10: When an SVGA, XGA or SXGA signal is input. For details on the screen according to the screen size. This projector automatically detects the signal type. SHIFT Adjusts the position of the input picture element...
.... The INPUT SETTING Menu SIZE H Adjusts the horizontal size of the picture input from the INPUT A/B connectors or video input connectors. ASPECT Sets the aspect ratio of the picture. PHASE SIZE H - The picture will be displayed in the preset memory, a suitable picture is input. VPL-PS10: When an SVGA, XGA or SXGA signal is input. For details on the screen according to the screen size. This projector automatically detects the signal type. SHIFT Adjusts the position of the input picture element...
Operating Instructions
Page 32
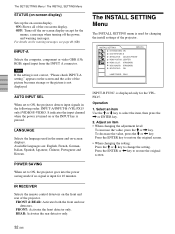
..., a message when turning off the on -screen displays. Operation 1. IR RECEIVER Selects the remote control detectors on the warning messages, see page 40 (GB). FRONT: Activates the front detector only. LANGUAGE Selects the language used for the VPLPX15. POWER SAVING When set to restore the original screen. The INSTALL SETTING Menu The INSTALL SETTING menu is used in the following order: INPUT-A/INPUT-B (VPL-PX15 only)/VIDEO/S-VIDEO. Select an item Use the M or m key to change...
..., a message when turning off the on -screen displays. Operation 1. IR RECEIVER Selects the remote control detectors on the warning messages, see page 40 (GB). FRONT: Activates the front detector only. LANGUAGE Selects the language used for the VPLPX15. POWER SAVING When set to restore the original screen. The INSTALL SETTING Menu The INSTALL SETTING menu is used in the following order: INPUT-A/INPUT-B (VPL-PX15 only)/VIDEO/S-VIDEO. Select an item Use the M or m key to change...
Operating Instructions
Page 33
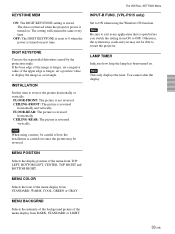
... reverse the picture horizontally or vertically. KEYSTONE MEM ON: The DIGIT KEYSTONE setting is turned on. INSTALLATION Set this item to OFF. The setting will remain the same every time. LAMP TIMER Indicates how long the lamp has been turned on. The data is retrieved when the projector power is stored. Note When using the Windows CE function. You cannot alter the display. MENU POSITION Selects the display position of the menu display from DARK...
... reverse the picture horizontally or vertically. KEYSTONE MEM ON: The DIGIT KEYSTONE setting is turned on. INSTALLATION Set this item to OFF. The setting will remain the same every time. LAMP TIMER Indicates how long the lamp has been turned on. The data is retrieved when the projector power is stored. Note When using the Windows CE function. You cannot alter the display. MENU POSITION Selects the display position of the menu display from DARK...

Operating Instructions
Page 37
... may be sure the projector is on the screen, replace the lamp with a new one. appears on a flat and stable surface. 2 Slide open the lamp cover after 1500 hours of use . The lamp life varies depending on conditions of the lamp. • The power will not turn off the projector, then unplug the power cord. Wait for the lamp to cool. Tighten the two screws. The message appears after loosening its...
... may be sure the projector is on the screen, replace the lamp with a new one. appears on a flat and stable surface. 2 Slide open the lamp cover after 1500 hours of use . The lamp life varies depending on conditions of the lamp. • The power will not turn off the projector, then unplug the power cord. Wait for the lamp to cool. Tighten the two screws. The message appears after loosening its...

Operating Instructions
Page 39
...) network software. Image Symptom Cause Remedy No picture. The picture is disconnected or not connected Check that the proper connections have been properly. A cable is noisy. made (see page 18 (GB)). On-screen display does not STATUS in the SET SETTING menu has Set STATUS in the INSTALL SETTING menu to OFF, then set to release the muting function (see page 32 (GB)). Power Symptom The power is detached. The lamp cover is not turned on...
...) network software. Image Symptom Cause Remedy No picture. The picture is disconnected or not connected Check that the proper connections have been properly. A cable is noisy. made (see page 18 (GB)). On-screen display does not STATUS in the SET SETTING menu has Set STATUS in the INSTALL SETTING menu to OFF, then set to release the muting function (see page 32 (GB)). Power Symptom The power is detached. The lamp cover is not turned on...

Operating Instructions
Page 40
... power again (see pages 18 (GB) to XGA (VPL-PX15/PX10) or SVGA (VPL-PS10) (see if nothing is out of the acceptable range of the computer is too high. Check to ON (see page 32 (GB)). Set the PJ/NETWORK select switch to NETWORK. Message High temp.! Replace the lamp. Troubleshooting Others Symptom The LAMP/COVER indicator flashes. The lamp has reached the end of the messages displayed on the screen. Set INPUT-B FUNC. in the INSTALL SETTING menu...
... power again (see pages 18 (GB) to XGA (VPL-PX15/PX10) or SVGA (VPL-PS10) (see if nothing is out of the acceptable range of the computer is too high. Check to ON (see page 32 (GB)). Set the PJ/NETWORK select switch to NETWORK. Message High temp.! Replace the lamp. Troubleshooting Others Symptom The LAMP/COVER indicator flashes. The lamp has reached the end of the messages displayed on the screen. Set INPUT-B FUNC. in the INSTALL SETTING menu...

Operating Instructions
Page 43
... (6-pin, female) 654 321 1 DATA 2 N.C. 3 GND 4 +5 V 5 CLK 6 N.C. 43 (GB) Specifications AC power cord (1) Air filter (for replacement) (1) Lens cap (1) Operating Instructions (1) Operating Instructions for Networking (VPL-PX15 only) (1) Installation Manual for replacement) Projector Suspension Support PSS-610 Monitor Cable SMF-410 (HD D-sub 15-pin (male) y HD D-sub 15-pin (male)) Signal Cable SMF-402 (HD D-sub 15-pin (male) y 3 × phono jack) Projection Lens Short Focal Length Converter Lens VPLL-CW10 Long Focal Length...
... (6-pin, female) 654 321 1 DATA 2 N.C. 3 GND 4 +5 V 5 CLK 6 N.C. 43 (GB) Specifications AC power cord (1) Air filter (for replacement) (1) Lens cap (1) Operating Instructions (1) Operating Instructions for Networking (VPL-PX15 only) (1) Installation Manual for replacement) Projector Suspension Support PSS-610 Monitor Cable SMF-410 (HD D-sub 15-pin (male) y HD D-sub 15-pin (male)) Signal Cable SMF-402 (HD D-sub 15-pin (male) y 3 × phono jack) Projection Lens Short Focal Length Converter Lens VPLL-CW10 Long Focal Length...
Operating Instructions
Page 44
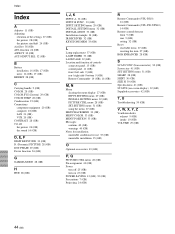
...) KEYSTONE MEM 33 (GB) L Lamp replacement 37 (GB) LAMP TIMER 33 (GB) LANGUAGE 32 (GB) Location and function of controls connector panel 13 (GB) control panel 11 (GB) front / left side 9 (GB) rear / right side / bottom 9 (GB) Remote Commander 14 (GB), 16 (GB) M, N Menu clearing the menu display 27 (GB) INPUT SETTING menu 29 (GB) INSTALL SETTING menu 32 (GB) PICTURE CTRL menu 28 (GB) SET SETTING menu 31 (GB) using the menu 27 (GB) MENU BACKGRND 33 (GB) MENU COLOR...
...) KEYSTONE MEM 33 (GB) L Lamp replacement 37 (GB) LAMP TIMER 33 (GB) LANGUAGE 32 (GB) Location and function of controls connector panel 13 (GB) control panel 11 (GB) front / left side 9 (GB) rear / right side / bottom 9 (GB) Remote Commander 14 (GB), 16 (GB) M, N Menu clearing the menu display 27 (GB) INPUT SETTING menu 29 (GB) INSTALL SETTING menu 32 (GB) PICTURE CTRL menu 28 (GB) SET SETTING menu 31 (GB) using the menu 27 (GB) MENU BACKGRND 33 (GB) MENU COLOR...


