
Operating Instructions
Page 2
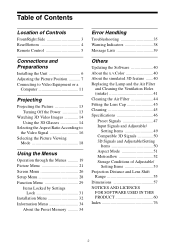
... 3D Video Images 14 Using the 3D Glasses 14 Selecting the Aspect Ratio According to the Video Signal 16 Selecting the Picture Viewing Mode 18 Using the Menus Operation through the Menus .......... 19 Picture Menu 21 Screen Menu 26 Setup Menu 28 Function Menu 29 Items Locked by Settings Lock 31 Installation Menu 32 Information Menu 34 About the Preset Memory .......... 34 Error Handling Troubleshooting 35 Warning Indicators 38 Message Lists 39 Others Updating the Software 40 About the x.v.Color 40...
... 3D Video Images 14 Using the 3D Glasses 14 Selecting the Aspect Ratio According to the Video Signal 16 Selecting the Picture Viewing Mode 18 Using the Menus Operation through the Menus .......... 19 Picture Menu 21 Screen Menu 26 Setup Menu 28 Function Menu 29 Items Locked by Settings Lock 31 Installation Menu 32 Information Menu 34 About the Preset Memory .......... 34 Error Handling Troubleshooting 35 Warning Indicators 38 Message Lists 39 Others Updating the Software 40 About the x.v.Color 40...

Operating Instructions
Page 7
...) and then lights in green. Tip The ?/1 (ON/STANDBY), INPUT, MENU, and M/m/ Remote control detector The ON/STANDBY indicator flashes in green, and then lights in green. 3 Display a test signal for performing adjustments. The ON/STANDBY indicator lights in red. 2 Press the ?/1 (ON/STANDBY) button to display the test signal. Lights in red and the unit goes into standby mode. Press the PATTERN button on the remote control to turn on the screen and then adjust the picture position. Adjusting the Picture Position Project an image on the unit...
...) and then lights in green. Tip The ?/1 (ON/STANDBY), INPUT, MENU, and M/m/ Remote control detector The ON/STANDBY indicator flashes in green, and then lights in green. 3 Display a test signal for performing adjustments. The ON/STANDBY indicator lights in red. 2 Press the ?/1 (ON/STANDBY) button to display the test signal. Lights in red and the unit goes into standby mode. Press the PATTERN button on the remote control to turn on the screen and then adjust the picture position. Adjusting the Picture Position Project an image on the unit...

Operating Instructions
Page 13
... the HDMI 1 HDMI 1 connector Equipment connected to the HDMI 2 HDMI 2 connector Tip When "Status" is set to "Off" on the Setup menu, the input palette does not appear. A message "POWER OFF?" appears on the screen. To view the picture from the equipment connected to the unit. The ON/STANDBY indicator flashes in green and the fan continues to run to switch between input terminals in sequence. You can disconnect the AC power cord. Press the INPUT button...
... the HDMI 1 HDMI 1 connector Equipment connected to the HDMI 2 HDMI 2 connector Tip When "Status" is set to "Off" on the Setup menu, the input palette does not appear. A message "POWER OFF?" appears on the screen. To view the picture from the equipment connected to the unit. The ON/STANDBY indicator flashes in green and the fan continues to run to switch between input terminals in sequence. You can disconnect the AC power cord. Press the INPUT button...
Operating Instructions
Page 14
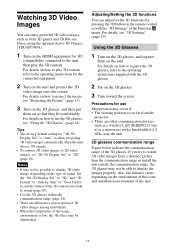
... adjust/set "2D-3D Display Sel." For details on how to "Side-by pressing the 3D button on the unit. For details, see "Projecting the Picture" (page 13). 3 Turn on the 3D glasses, and then put them on the remote control or with the 3D glasses. 2 Put on the unit and project the 3D video image onto the screen. Precautions for the connected equipment. 2 Turn...
... adjust/set "2D-3D Display Sel." For details on how to "Side-by pressing the 3D button on the unit. For details, see "Projecting the Picture" (page 13). 3 Turn on the 3D glasses, and then put them on the remote control or with the 3D glasses. 2 Put on the unit and project the 3D video image onto the screen. Precautions for the connected equipment. 2 Turn...

Operating Instructions
Page 21
... the remote control. Reference: A picture quality setup suitable for projecting still images taken with well-modulated colors and fast response. Resets all currently selected Calib. The factory default setting is used for each input. Reset Tip Any adjustments to gaming, with a digital camera. Game: Picture quality suited to picture quality settings are saved for adjusting the picture. Preset mode settings to reproducing the rich tone and color typical of video source or the environment. Picture Menu The Picture menu is...
... the remote control. Reference: A picture quality setup suitable for projecting still images taken with well-modulated colors and fast response. Resets all currently selected Calib. The factory default setting is used for each input. Reset Tip Any adjustments to gaming, with a digital camera. Game: Picture quality suited to picture quality settings are saved for adjusting the picture. Preset mode settings to reproducing the rich tone and color typical of video source or the environment. Picture Menu The Picture menu is...

Operating Instructions
Page 28
... When this setting when using the unit at the prevailing atmospheric pressure. When replacing the lamps, set to operate at normal altitudes. Sets the unit to "On," the fan noise becomes slightly louder since the fan speed increases. Setup Menu The Setup menu is displayed. Setting items Status Language Menu Position High Altitude Mode Power Saving Lamp Setting Description Sets whether or not the on the screen. On: Use this item is turned off the power, and warning messages.
... When this setting when using the unit at the prevailing atmospheric pressure. When replacing the lamps, set to operate at normal altitudes. Sets the unit to "On," the fan noise becomes slightly louder since the fan speed increases. Setup Menu The Setup menu is displayed. Setting items Status Language Menu Position High Altitude Mode Power Saving Lamp Setting Description Sets whether or not the on the screen. On: Use this item is turned off the power, and warning messages.

Operating Instructions
Page 31
Items Locked by Settings Lock Group 1 Picture menu Reset Reality Creation Contrast Enhancer Lamp Control Motionflow Contrast Brightness Color Hue Color Temp. Sharpness NR MPEG NR Smooth Gradation Film Mode Gamma Correction Color Correction Clear White x.v.Color Color Space Group 2 Setup menu Status Language Menu Position High Altitude Mode Lamp Setting Function menu Dynamic Range Installation menu Image Flip Panel Alignment 31
Items Locked by Settings Lock Group 1 Picture menu Reset Reality Creation Contrast Enhancer Lamp Control Motionflow Contrast Brightness Color Hue Color Temp. Sharpness NR MPEG NR Smooth Gradation Film Mode Gamma Correction Color Correction Clear White x.v.Color Color Space Group 2 Setup menu Status Language Menu Position High Altitude Mode Lamp Setting Function menu Dynamic Range Installation menu Image Flip Panel Alignment 31
Operating Instructions
Page 35
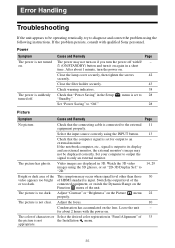
... desired color registration in a short time. The power is not turned on the lens. After about 2 hours with qualified Sony personnel. Watch the 3D video 14, 29 images using the following instructions. Select the input source correctly using the INPUT button. 13 Check that the connecting cable is not clear. Video images are displayed in the Setup "Standby." Switch the output level of 33 the picture is input. connected equipment, or switch the Dynamic Range on the Function menu of HDMI...
... desired color registration in a short time. The power is not turned on the lens. After about 2 hours with qualified Sony personnel. Watch the 3D video 14, 29 images using the following instructions. Select the input source correctly using the INPUT button. 13 Check that the connecting cable is not clear. Video images are displayed in the Setup "Standby." Switch the output level of 33 the picture is input. connected equipment, or switch the Dynamic Range on the Function menu of HDMI...

Operating Instructions
Page 36
... set at the time of - Check if the ON/STANDBY indicator should light in green. 7 When the ON/STANDBY indicator blinks in green, the unit is only a temporary condition. Insert the batteries with your local dealer or qualified Sony screen. Page - - - 3 3D video images Symptom Cause and Remedy The video image does not Check if the 3D glasses are compatible 3D signals. The 3D signals may be weak. When the viewing...
... set at the time of - Check if the ON/STANDBY indicator should light in green. 7 When the ON/STANDBY indicator blinks in green, the unit is only a temporary condition. Insert the batteries with your local dealer or qualified Sony screen. Page - - - 3 3D video images Symptom Cause and Remedy The video image does not Check if the 3D glasses are compatible 3D signals. The 3D signals may be weak. When the viewing...

Operating Instructions
Page 38
Consult with qualified Sony personnel. 38 The fan is unusually high. Flashing/Lighting indicators (Flashes in red) (Flashes in red) (Flashes in red) Both indicators flash WARNING indicator ON/STANDBY indicator The number of its service life. The temperature of lamp is broken. The internal temperature is unusually high. Check to cool, then turn on the power again. Close the filter holder securely (page 43). Note When a warning indicator other than the above starts flashing, and the symptom persists even after carrying out the...
Consult with qualified Sony personnel. 38 The fan is unusually high. Flashing/Lighting indicators (Flashes in red) (Flashes in red) (Flashes in red) Both indicators flash WARNING indicator ON/STANDBY indicator The number of its service life. The temperature of lamp is broken. The internal temperature is unusually high. Check to cool, then turn on the power again. Close the filter holder securely (page 43). Note When a warning indicator other than the above starts flashing, and the symptom persists even after carrying out the...

Operating Instructions
Page 39
.... Settings Lock enabled. "Settings Lock" is time to replace the lamp. Message Lists Warning messages Symptom Cause and Remedy Page High temp.! Lamp off after you finished? Check to clean the air filter. Input a signal that is time to ensure that nothing is switched to "On" in Turn off the power. - 1 min. Also, replace the air filter too. Restart cleaning the ventilation holes (intake). Check the lamp replacement process. Clean the air filter. 44 Note To clear this message, press any button either on the remote control...
.... Settings Lock enabled. "Settings Lock" is time to replace the lamp. Message Lists Warning messages Symptom Cause and Remedy Page High temp.! Lamp off after you finished? Check to clean the air filter. Input a signal that is time to ensure that nothing is switched to "On" in Turn off the power. - 1 min. Also, replace the air filter too. Restart cleaning the ventilation holes (intake). Check the lamp replacement process. Clean the air filter. 44 Note To clear this message, press any button either on the remote control...
Operating Instructions
Page 40
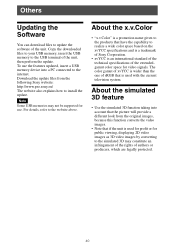
...; Use the simulated 3D function taking into account that the picture will provide a different look from the following Sony website: http://www.pro.sony.eu/ The website also explains how to install the update. Others Updating the Software You can download files to update the software of the unit, then perform the update. Note Some USB memories may not be supported for public viewing, displaying 2D video images as...
...; Use the simulated 3D function taking into account that the picture will provide a different look from the following Sony website: http://www.pro.sony.eu/ The website also explains how to install the update. Others Updating the Software You can download files to update the software of the unit, then perform the update. Note Some USB memories may not be supported for public viewing, displaying 2D video images as...

Operating Instructions
Page 41
... installation environment or use an LMP-H210 Projector Lamp for the light source changes depending on the ceiling. • When removing the lamp unit, make sure it , wipe off the fingerprints with a new one without delay. The air filter is turned off the projector and unplug the AC power cord. 2 When setting the projector on the screen, the lamp may become 41 Do not tilt the lamp unit. Replacing the Lamp and the Air Filter and Cleaning...
... installation environment or use an LMP-H210 Projector Lamp for the light source changes depending on the ceiling. • When removing the lamp unit, make sure it , wipe off the fingerprints with a new one without delay. The air filter is turned off the projector and unplug the AC power cord. 2 When setting the projector on the screen, the lamp may become 41 Do not tilt the lamp unit. Replacing the Lamp and the Air Filter and Cleaning...

Operating Instructions
Page 44
... let any button either on the environment or how the projector is crucial to attach and remove the air filter, see www.sony.com/ mercury Cleaning the Air Filter When "Please clean the filter." • The unit will not turn on unless the lamp cover are securely closed. • To clear a message displayed on the screen, press any dust fall into the projector. • Cleaning the air filter is used. 1,500 hours are...
... let any button either on the environment or how the projector is crucial to attach and remove the air filter, see www.sony.com/ mercury Cleaning the Air Filter When "Please clean the filter." • The unit will not turn on unless the lamp cover are securely closed. • To clear a message displayed on the screen, press any dust fall into the projector. • Cleaning the air filter is used. 1,500 hours are...
Operating Instructions
Page 46
Specifications Item Description Display system SXRD panel, 1 lens, projection system Display device Size of effective 0.61-inch (15.4 mm) SXRD panel display area Number of pixels 6,220,800 pixels (2,073,600 pixels × 3) Projection lens 1.6 times zoom lens (manual) f = 18.7 mm to 29.7 mm F2.52 to F3.02 Light source Ultra High Pressure Lamp 215 W type Screen size 40 inches to 300 inches (1,016 mm to 7,620 mm) (measured diagonally) Acceptable video signals 480...
Specifications Item Description Display system SXRD panel, 1 lens, projection system Display device Size of effective 0.61-inch (15.4 mm) SXRD panel display area Number of pixels 6,220,800 pixels (2,073,600 pixels × 3) Projection lens 1.6 times zoom lens (manual) f = 18.7 mm to 29.7 mm F2.52 to F3.02 Light source Ultra High Pressure Lamp 215 W type Screen size 40 inches to 300 inches (1,016 mm to 7,620 mm) (measured diagonally) Acceptable video signals 480...
Operating Instructions
Page 69
... JPEG GROUP SOFTWARE This software is based in part on the work of a textual message at program startup or in documentation (online or textual) provided with the package. For written permission, please contact [email protected]. 5. Redistribution and use as long as such any Windows specific code (or a derivative thereof) from this list of the OpenSSL Project. 6. All advertising...
... JPEG GROUP SOFTWARE This software is based in part on the work of a textual message at program startup or in documentation (online or textual) provided with the package. For written permission, please contact [email protected]. 5. Redistribution and use as long as such any Windows specific code (or a derivative thereof) from this list of the OpenSSL Project. 6. All advertising...

Operating Instructions
Page 77
... 18 USER 18 Preset signals 47 Projecting the Picture 13 Projection distance 56 Projection distance and lens shift range 55 R Reality Creation 22 Remote control 5 Remote control detector 3 Replacing the lamp 41 Reset 21 Resetting the items 20 S Settings Lock 30 Sharpness 23 Signal type 34 Smooth Gradation 23 Software Version 34 Specifications 46 Status 28 T Troubleshooting 35 Turning off 13 Turning on 7 U Updating the software 40 W Warning indicators 38 X x.v.Color 24, 40 Trademark Information • "PlayStation" is a registered trademark of HDMI...
... 18 USER 18 Preset signals 47 Projecting the Picture 13 Projection distance 56 Projection distance and lens shift range 55 R Reality Creation 22 Remote control 5 Remote control detector 3 Replacing the lamp 41 Reset 21 Resetting the items 20 S Settings Lock 30 Sharpness 23 Signal type 34 Smooth Gradation 23 Software Version 34 Specifications 46 Status 28 T Troubleshooting 35 Turning off 13 Turning on 7 U Updating the software 40 W Warning indicators 38 X x.v.Color 24, 40 Trademark Information • "PlayStation" is a registered trademark of HDMI...
Marketing Specifications
Page 1
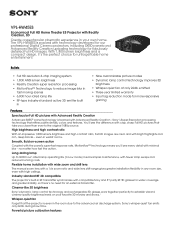
... to 6000 hour3 rated lamp operating life (in • Nine customizable picture modes • Dynamic lamp control technology improves 3D brightness • Whisper-quiet fan at only 22db emitted • Three-year limited warranty • Input lag reduction mode for fabulously detailed Full HD images. Sony's Super Resolution processing technology that refines subtle details, colors and textures. Bullets • Full HD resolution 3-chip imaging system • 1,800...
... to 6000 hour3 rated lamp operating life (in • Nine customizable picture modes • Dynamic lamp control technology improves 3D brightness • Whisper-quiet fan at only 22db emitted • Three-year limited warranty • Input lag reduction mode for fabulously detailed Full HD images. Sony's Super Resolution processing technology that refines subtle details, colors and textures. Bullets • Full HD resolution 3-chip imaging system • 1,800...

Marketing Specifications
Page 2
... for air intake/exhaust when installing. Three-year limited warranty All Sony Elevated Standard (ES) projectors enjoy three-year limited warranties. Specifications Display Display General General General Features General Features Inputs and Outputs Inputs and Outputs Installation Features Installation Features Operating Conditions Operating Conditions Optional Accessories Optional Accessories Other Power Screen Size LCD Panel Lens Acceptable Computer Signals Lamp Replacement Time (Recommended) HDMI™ Connection(s) IR Input(s) RS-232C Input(s) USB Focus Shift Shift Range Ultra Low Fan...
... for air intake/exhaust when installing. Three-year limited warranty All Sony Elevated Standard (ES) projectors enjoy three-year limited warranties. Specifications Display Display General General General Features General Features Inputs and Outputs Inputs and Outputs Installation Features Installation Features Operating Conditions Operating Conditions Optional Accessories Optional Accessories Other Power Screen Size LCD Panel Lens Acceptable Computer Signals Lamp Replacement Time (Recommended) HDMI™ Connection(s) IR Input(s) RS-232C Input(s) USB Focus Shift Shift Range Ultra Low Fan...
Limited Warranty
Page 1
... as batteries; or (xiv) any product where the factory-applied serial number has been altered or removed from sources other than Sony or a Sony authorized dealer (including non-authorized online auctions), or issues due to its intended uses, or otherwise follow the owners manual and safety instructions relating to the product's use of parts or supplies not sold "AS IS" or "WITH ALL FAULTS...
... as batteries; or (xiv) any product where the factory-applied serial number has been altered or removed from sources other than Sony or a Sony authorized dealer (including non-authorized online auctions), or issues due to its intended uses, or otherwise follow the owners manual and safety instructions relating to the product's use of parts or supplies not sold "AS IS" or "WITH ALL FAULTS...


