Startup Guide
Page 27
... battery in the fixed wiring, or connect the power plug to an easily accessible socket-outlet near fire. WARNING To reduce the risk of the above Power Cord / Appliance Connector / Plug, please consult a qualified service personnel. CAUTION - CAUTION About the LAN connector For safety, do not open the cabinet. English Before operating the unit, please read this manual thoroughly and retain...
... battery in the fixed wiring, or connect the power plug to an easily accessible socket-outlet near fire. WARNING To reduce the risk of the above Power Cord / Appliance Connector / Plug, please consult a qualified service personnel. CAUTION - CAUTION About the LAN connector For safety, do not open the cabinet. English Before operating the unit, please read this manual thoroughly and retain...

Startup Guide
Page 40
..., UNAVOIDABLE DATA LEAKS RESULTING FROM TRANSMISSION SPECIFICATIONS, OR SECURITY PROBLEMS OF ANY KIND. Depending on the operating environment, unauthorized third parties on for about two hours before use ; Stubborn stains may be removed with a soft cloth lightly dampened with qualified Sony personnel. About Lens Replacement Do not attach any lens other than the specified accessory lens sold separately. If, however, in adjusting temperature settings of...
..., UNAVOIDABLE DATA LEAKS RESULTING FROM TRANSMISSION SPECIFICATIONS, OR SECURITY PROBLEMS OF ANY KIND. Depending on the operating environment, unauthorized third parties on for about two hours before use ; Stubborn stains may be removed with a soft cloth lightly dampened with qualified Sony personnel. About Lens Replacement Do not attach any lens other than the specified accessory lens sold separately. If, however, in adjusting temperature settings of...

Startup Guide
Page 42
...-PJ30 Remote Commander (1) Size AA (R6) batteries (2) AC power cord (1) Plug holder (1) Terminal cover (1) Quick Reference Manual (this manual) (1) Operating Instructions (CD-ROM) (1) Connecting the AC Power Cord 1 Plug the AC power cord into your dealer or Sony service representative. Note If you damage or lose the CD-ROM, you want to drop the projection lens. Avoid touching the lens surface. 1 Turn off the projector and then unplug the AC power cord. 2 Replace the...
...-PJ30 Remote Commander (1) Size AA (R6) batteries (2) AC power cord (1) Plug holder (1) Terminal cover (1) Quick Reference Manual (this manual) (1) Operating Instructions (CD-ROM) (1) Connecting the AC Power Cord 1 Plug the AC power cord into your dealer or Sony service representative. Note If you damage or lose the CD-ROM, you want to drop the projection lens. Avoid touching the lens surface. 1 Turn off the projector and then unplug the AC power cord. 2 Replace the...

Startup Guide
Page 43
... place. 2 Remove the lens cover. The projection lens returns to the center position. 2 Turn off the projector and then unplug the AC power cord. 3 Remove the lens cover. 4 While pressing the slide switch, move the lever up to the center position. Caution When replacing the lens, your eyes may be damaged if a strong light accidentally gets into place. Then, while sliding the LENS COVER RELEASE buttons inward, insert the lens cover.
... place. 2 Remove the lens cover. The projection lens returns to the center position. 2 Turn off the projector and then unplug the AC power cord. 3 Remove the lens cover. 4 While pressing the slide switch, move the lever up to the center position. Caution When replacing the lens, your eyes may be damaged if a strong light accidentally gets into place. Then, while sliding the LENS COVER RELEASE buttons inward, insert the lens cover.
Startup Guide
Page 46
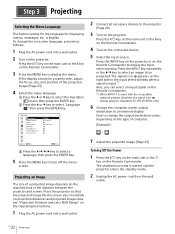
... on the right side in the input select window when a signal is input.*1 Also, you can select an input signal on the projector. For details on projection distances and projected image sizes, see "Projection Distance and Lens Shift Range" on the Operating Instructions. 1 Plug the AC power cord into a wall outlet. 2 Turn on the Remote Commander. *1: When INPUT F is input with the compatible optional adaptor attached, the signal icon always appears. (Available for displaying menus, messages, etc.
... on the right side in the input select window when a signal is input.*1 Also, you can select an input signal on the projector. For details on projection distances and projected image sizes, see "Projection Distance and Lens Shift Range" on the Operating Instructions. 1 Plug the AC power cord into a wall outlet. 2 Turn on the Remote Commander. *1: When INPUT F is input with the compatible optional adaptor attached, the signal icon always appears. (Available for displaying menus, messages, etc.

Startup Guide
Page 48
...the setting. The projector is ready for projection. (Lights (Off) in green) (Lights in (Off) orange) Other standby status The projector is in accordance with "Warning indication and remedies" (Page 25). Indicators You can check the projector status or abnormality by checking the lighting/flashing status of the ON/ STANDBY indicator and WARNING indicator on , or the software update is in With No Input (Light Cutoff), or Quick Reboot standby mode. 24 GB Indicators ON/STANDBY WARNING indicator indicator Status indication Indicator status Operating status Standby (Lights (Off) in red...
...the setting. The projector is ready for projection. (Lights (Off) in green) (Lights in (Off) orange) Other standby status The projector is in accordance with "Warning indication and remedies" (Page 25). Indicators You can check the projector status or abnormality by checking the lighting/flashing status of the ON/ STANDBY indicator and WARNING indicator on , or the software update is in With No Input (Light Cutoff), or Quick Reboot standby mode. 24 GB Indicators ON/STANDBY WARNING indicator indicator Status indication Indicator status Operating status Standby (Lights (Off) in red...

Startup Guide
Page 49
... air filter is no visible abnormality, unplug the AC power cord and make sure the ON/STANDBY indicator turns off , then plug the AC power cord into the wall outlet and turning on the projector. Then update the software again. The lens is abnormal. Warning indication and remedies Indicator status Number of flashes Twice (Lights (Flashes in red) in red) Three times Four times Six times (Flashes (Flashes in red) in the supplied CD-ROM. 25 Indicators GB If there is not installed...
... air filter is no visible abnormality, unplug the AC power cord and make sure the ON/STANDBY indicator turns off , then plug the AC power cord into the wall outlet and turning on the projector. Then update the software again. The lens is abnormal. Warning indication and remedies Indicator status Number of flashes Twice (Lights (Flashes in red) in red) Three times Four times Six times (Flashes (Flashes in red) in the supplied CD-ROM. 25 Indicators GB If there is not installed...

Operating Instructions
Page 2
...; Projectors on a Screen 20 Using Convenient Functions 21 Selecting the Stored Picture Settings (Picture Position Function) (Specified Lens Only 21 Enlarging a Part of the Image (Digital Zoom Function 22 Projecting Images with Two Pictures Simultaneously (Two-Picture Display Function 22 Adjustments and Settings Using a Menu Using a Menu 23 The Picture Menu 24 The Screen Menu 26 The Function Menu 28 The Operation Menu 29 The Connection/Power Menu 30 The Installation Menu 32 The Information Menu 35 Network Features Using Network Features 36 Displaying the Control Window...
...; Projectors on a Screen 20 Using Convenient Functions 21 Selecting the Stored Picture Settings (Picture Position Function) (Specified Lens Only 21 Enlarging a Part of the Image (Digital Zoom Function 22 Projecting Images with Two Pictures Simultaneously (Two-Picture Display Function 22 Adjustments and Settings Using a Menu Using a Menu 23 The Picture Menu 24 The Screen Menu 26 The Function Menu 28 The Operation Menu 29 The Connection/Power Menu 30 The Installation Menu 32 The Information Menu 35 Network Features Using Network Features 36 Displaying the Control Window...

Operating Instructions
Page 13
... the projection lens. Avoid touching the lens surface. 1 Turn off the projector and then unplug the AC power cord. 3 Remove the lens cover. 4 While pressing the slide switch, move the lever up to the limit, and pull the lens straight out. 5 Attach the lens cover. 13 Then, while sliding the LENS COVER RELEASE buttons inward, insert the lens cover. Before replacing the lens, turn off the projector, then unplug the AC power cord from...
... the projection lens. Avoid touching the lens surface. 1 Turn off the projector and then unplug the AC power cord. 3 Remove the lens cover. 4 While pressing the slide switch, move the lever up to the limit, and pull the lens straight out. 5 Attach the lens cover. 13 Then, while sliding the LENS COVER RELEASE buttons inward, insert the lens cover. Before replacing the lens, turn off the projector, then unplug the AC power cord from...

Operating Instructions
Page 16
... on the Remote Commander. *1: When INPUT F is started and the projector enters the standby mode. 2 Unplug the AC power cord from the wall outlet. 7 Adjust the projected image (page 17). 16 How to the projector (page 8). 3 Turn on the Remote Commander to be projected. For details on projection distances and projected image sizes, see "Projection Distance and Lens Shift Range" (page 57). 1 Plug the AC power cord into a wall outlet. 2 Connect all necessary devices to change the output destination...
... on the Remote Commander. *1: When INPUT F is started and the projector enters the standby mode. 2 Unplug the AC power cord from the wall outlet. 7 Adjust the projected image (page 17). 16 How to the projector (page 8). 3 Turn on the Remote Commander to be projected. For details on projection distances and projected image sizes, see "Projection Distance and Lens Shift Range" (page 57). 1 Plug the AC power cord into a wall outlet. 2 Connect all necessary devices to change the output destination...

Operating Instructions
Page 20
... guidance. Set "Picture Mode" of the multiple projectors to the same mode (Custom 1 to 3) (page 25). Input a pattern, etc., to "Multi Screen" (page 24). 4 Unify the color space. Set the color space of the multiple projectors to adjust the projected positions from Multiple Projectors on a Screen Notes Depending on the combination of adjustment values of the Screen Fitting setting items. In this case, reset all of the Installation menu, set up...
... guidance. Set "Picture Mode" of the multiple projectors to the same mode (Custom 1 to 3) (page 25). Input a pattern, etc., to "Multi Screen" (page 24). 4 Unify the color space. Set the color space of the multiple projectors to adjust the projected positions from Multiple Projectors on a Screen Notes Depending on the combination of adjustment values of the Screen Fitting setting items. In this case, reset all of the Installation menu, set up...
Operating Instructions
Page 29
... default password setting is set to "All," you with the MENU and ENTER keys. 4 Enter the password again to use the projector if you can adjusts the lens (focus, zoom, and lens shift) from the Remote commander or the projector. Off: Displays only the menus and warning messages. When set to authorized users by performing the following even when "Control Key Lock" is "ENTER, ENTER, ENTER, ENTER.") 3 Input a new password with the password. If you can control the projector...
... default password setting is set to "All," you with the MENU and ENTER keys. 4 Enter the password again to use the projector if you can adjusts the lens (focus, zoom, and lens shift) from the Remote commander or the projector. Off: Displays only the menus and warning messages. When set to authorized users by performing the following even when "Control Key Lock" is "ENTER, ENTER, ENTER, ENTER.") 3 Input a new password with the password. If you can control the projector...

Operating Instructions
Page 30
... higher in orange (page 45). In Light Cutoff, the ON/STANDBY indicator lights in Standby mode. While dimming the light, the message "Light Dimming" appears. The ON/STANDBY indicator lights in standby mode (page 45). 30 Setting items Description Network Setting IPv4 Setting *1 *3 IP Address Setup Auto(DHCP): The IP address is disturbed or not projected. Manual: To specify the IP Address manually. HDBaseT Settings LAN Setting via HDBaseT/LAN Port: You can select either via the LAN of the HDBaseT device connected to...
... higher in orange (page 45). In Light Cutoff, the ON/STANDBY indicator lights in Standby mode. While dimming the light, the message "Light Dimming" appears. The ON/STANDBY indicator lights in standby mode (page 45). 30 Setting items Description Network Setting IPv4 Setting *1 *3 IP Address Setup Auto(DHCP): The IP address is disturbed or not projected. Manual: To specify the IP Address manually. HDBaseT Settings LAN Setting via HDBaseT/LAN Port: You can select either via the LAN of the HDBaseT device connected to...

Operating Instructions
Page 31
...," the network and network control function cannot be set respectively. Setting the IP address when using a LAN via HDBaseT. Set "LAN Setting" to "via HDBaseT" in "HDBaseT Settings," then set the IP address in "Network Setting." Setting the IP address when using the LAN terminal. Set "LAN Setting" to "LAN Port" in "HDBaseT Settings," then set the IP address in "Network Setting." *4: If the image input setting of this unit manually after connecting to avoid entering standby mode when there is no input signal. *8: A change in...
...," the network and network control function cannot be set respectively. Setting the IP address when using a LAN via HDBaseT. Set "LAN Setting" to "via HDBaseT" in "HDBaseT Settings," then set the IP address in "Network Setting." Setting the IP address when using the LAN terminal. Set "LAN Setting" to "LAN Port" in "HDBaseT Settings," then set the IP address in "Network Setting." *4: If the image input setting of this unit manually after connecting to avoid entering standby mode when there is no input signal. *8: A change in...

Operating Instructions
Page 33
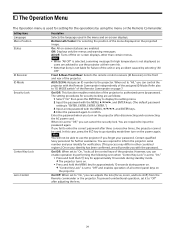
... higher. Pattern Color: Select "R/G" (Red and Green) or "R/G/B" (White, all colors) when the "Adjust Color" is "B" (Blue). Continuing to use to "On," "Adjust Color" and "Pattern Color" can be projected at an angle as shown below . Normally, filter cleaning is performed periodically and automatically when turning off the projector and cleans the air filter in color. Screen Aspect Blanking Panel Alignment 16:10/16:9/4:3: For switching the display area to suit to the installation method. Zone...
... higher. Pattern Color: Select "R/G" (Red and Green) or "R/G/B" (White, all colors) when the "Adjust Color" is "B" (Blue). Continuing to use to "On," "Adjust Color" and "Pattern Color" can be projected at an angle as shown below . Normally, filter cleaning is performed periodically and automatically when turning off the projector and cleans the air filter in color. Screen Aspect Blanking Panel Alignment 16:10/16:9/4:3: For switching the display area to suit to the installation method. Zone...
Operating Instructions
Page 36
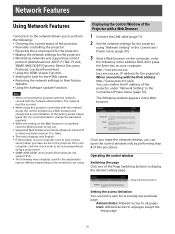
...; Restoring the network settings to their factory defaults. Using the Software Update Function. Page Switching buttons Setting the access limitation You can limit a user for the explanation may be secured. When using . It is recommended to change the access limitation of the factory preset values (page 36). The following menu displays used for accessing any particular page. Displaying the Control Window of the Projector with the IPv6 address http://[xxxx...
...; Restoring the network settings to their factory defaults. Using the Software Update Function. Page Switching buttons Setting the access limitation You can limit a user for the explanation may be secured. When using . It is recommended to change the access limitation of the factory preset values (page 36). The following menu displays used for accessing any particular page. Displaying the Control Window of the Projector with the IPv6 address http://[xxxx...
Operating Instructions
Page 42
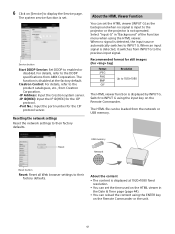
... input signal is disabled at 1920×1080 fixed resolution. You can set the time used on the Remote Commander or the unit. 42 Switch to their factory defaults. . Reset USB memory Network Reset button Reset: Reset all Web browser settings to INPUT G using the HTML viewer. About the HTML Viewer Function You can set . The function is detected, it switches from AMX Corporation. 6 Click on the Remote Commander. When no signal is not operated. The system service...
... input signal is disabled at 1920×1080 fixed resolution. You can set the time used on the Remote Commander or the unit. 42 Switch to their factory defaults. . Reset USB memory Network Reset button Reset: Reset all Web browser settings to INPUT G using the HTML viewer. About the HTML Viewer Function You can set . The function is detected, it switches from AMX Corporation. 6 Click on the Remote Commander. When no signal is not operated. The system service...
Operating Instructions
Page 44
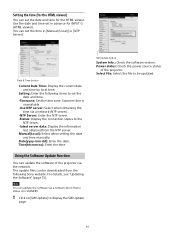
... viewer) You can set the date and time for INPUT G (HTML viewer). Manual(Local): Select when setting the date and time manually. Note You can update the software via a network when Power status is unavailable. -Use NTP server: Select when obtaining the time via the network. For details, see "Updating the Software" (page 51). SW Update button System Info.: Check the software version. Using the Software Update Function You can set the time in advance for...
... viewer) You can set the date and time for INPUT G (HTML viewer). Manual(Local): Select when setting the date and time manually. Note You can update the software via a network when Power status is unavailable. -Use NTP server: Select when obtaining the time via the network. For details, see "Updating the Software" (page 51). SW Update button System Info.: Check the software version. Using the Software Update Function You can set the time in advance for...
Operating Instructions
Page 48
... the factory default settings, select "Return" or "Reset" in the screen occurs. While performing the color calibration, the color calibration pattern is firmly connected. Edges of the image are output. If the problem still persists, consult with an input signal the projector displayed smaller./A part of the image may not be displayed correctly with qualified Sony personnel. Power Symptom The power is disabled (page 6, 28). Remedy Check if the AC power cord is displayed...
... the factory default settings, select "Return" or "Reset" in the screen occurs. While performing the color calibration, the color calibration pattern is firmly connected. Edges of the image are output. If the problem still persists, consult with an input signal the projector displayed smaller./A part of the image may not be displayed correctly with qualified Sony personnel. Power Symptom The power is disabled (page 6, 28). Remedy Check if the AC power cord is displayed...
Operating Instructions
Page 49
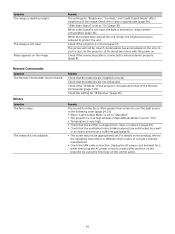
... The Remote Commander does not work. The network is appropriate (page 24). Check if the value is not available. Unplug the AC power cord and wait for about two hours with the power on the settings, refer to that the batteries are installed correctly. When video signal is not input, the light is set . Remedy The sound from the fan is often greater than normal to cool the light source...
... The Remote Commander does not work. The network is appropriate (page 24). Check if the value is not available. Unplug the AC power cord and wait for about two hours with the power on the settings, refer to that the batteries are installed correctly. When video signal is not input, the light is set . Remedy The sound from the fan is often greater than normal to cool the light source...


