
Users Guide
Page 4
...-232C cable to connect the projectors) • Network/LAN connector, LAN cable (when using this software. The [Start] menu appears. 2 Click [Control Panel] in the installer screen. This software is intended for the Windows Vista, Windows 7, and Windows 8 series. Note Be sure to perform installation. 1 Double-click the "PJS_Blending_vXXX.exe" file (XXX is the version number) downloaded from the website. For Windows XP 1 Click the [Start] button. If the [User Account Control] screen appears in Windows Vista, Windows 7, or Windows 8, click...
...-232C cable to connect the projectors) • Network/LAN connector, LAN cable (when using this software. The [Start] menu appears. 2 Click [Control Panel] in the installer screen. This software is intended for the Windows Vista, Windows 7, and Windows 8 series. Note Be sure to perform installation. 1 Double-click the "PJS_Blending_vXXX.exe" file (XXX is the version number) downloaded from the website. For Windows XP 1 Click the [Start] button. If the [User Account Control] screen appears in Windows Vista, Windows 7, or Windows 8, click...

Users Guide
Page 5
... Blending] tile. 4 Specify the number of the input signals. For Windows Vista and Windows 7 1 Click the [Start] button. Uninstallation starts. For Windows 8 1 Right-click [Start] in the [Blending] tab. The [Add/Remove Programs Properties] dialog box appears. 4 Select [Projector Station for Blending] from adjacent projectors blend properly. Uninstallation starts. Follow the instructions on the screen to complete uninstallation. Specify start the software using the lens zoom facilitates adjustment. 7 Configure the blend area...
... Blending] tile. 4 Specify the number of the input signals. For Windows Vista and Windows 7 1 Click the [Start] button. Uninstallation starts. For Windows 8 1 Right-click [Start] in the [Blending] tab. The [Add/Remove Programs Properties] dialog box appears. 4 Select [Projector Station for Blending] from adjacent projectors blend properly. Uninstallation starts. Follow the instructions on the screen to complete uninstallation. Specify start the software using the lens zoom facilitates adjustment. 7 Configure the blend area...

Operating Instructions
Page 2
... Projected image 13 Turning Off the Power 18 Adjustments and Settings Using a Menu Using a MENU 19 The Picture Menu 20 The Screen Menu 22 The Function Menu 26 The Operation Menu 27 The Connection/Power Menu .......... 28 The Installation Menu 29 The Information Menu 32 Network Using Network Features 33 Displaying the Control Window of the Projector with a Web Browser 33 Confirming the Information regarding the Projector 34 Operating the Projector from a Computer 35 Using the e-mail report Function 35 Others Indicators 37 Messages List 38 Troubleshooting...
... Projected image 13 Turning Off the Power 18 Adjustments and Settings Using a Menu Using a MENU 19 The Picture Menu 20 The Screen Menu 22 The Function Menu 26 The Operation Menu 27 The Connection/Power Menu .......... 28 The Installation Menu 29 The Information Menu 32 Network Using Network Features 33 Displaying the Control Window of the Projector with a Web Browser 33 Confirming the Information regarding the Projector 34 Operating the Projector from a Computer 35 Using the e-mail report Function 35 Others Indicators 37 Messages List 38 Troubleshooting...
Operating Instructions
Page 6
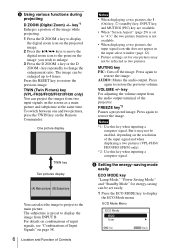
... the image to project to display the image from the audio output terminal of Input Signals" on the screen as two pictures. To switch between one pictures may not be reflected as a main picture and subpicture at the same time. Press again to change the enlargement ratio. Notes *1: Use this key when inputting a computer signal. e Using various functions during projecting D ZOOM (Digital Zoom) +/- MUTING key PIC: Cuts off the image. key For adjusting the...
... the image to project to display the image from the audio output terminal of Input Signals" on the screen as two pictures. To switch between one pictures may not be reflected as a main picture and subpicture at the same time. Press again to change the enlargement ratio. Notes *1: Use this key when inputting a computer signal. e Using various functions during projecting D ZOOM (Digital Zoom) +/- MUTING key PIC: Cuts off the image. key For adjusting the...

Operating Instructions
Page 7
... projector is supplied from the Remote Commander. i CONTROL S output terminal Connects to step 3). 3 Select "User" then press the b key. Lamp Mode: Standard Power Saving Mode: Standby Standby Mode: Low (go to the optimum energy-saving value. Overview 2 Press the V/v key or ECO MODE key to restore the previous image. If you desire (go to the CONTROL S input terminal on the Connection/Power menu. Location and Function of the Remote Commander. About Remote Commander operation • Direct the Remote Commander...
... projector is supplied from the Remote Commander. i CONTROL S output terminal Connects to step 3). 3 Select "User" then press the b key. Lamp Mode: Standard Power Saving Mode: Standby Standby Mode: Low (go to the optimum energy-saving value. Overview 2 Press the V/v key or ECO MODE key to restore the previous image. If you desire (go to the CONTROL S input terminal on the Connection/Power menu. Location and Function of the Remote Commander. About Remote Commander operation • Direct the Remote Commander...
Operating Instructions
Page 26
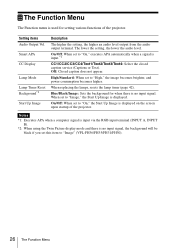
..., and power consumption becomes higher. High/Standard: When set to "On," the Start Up Image is displayed on the screen upon startup of the projector. Setting items Audio Output Vol. The lower the setting, the lower the audio level. Notes *1: Executes APA when a computer signal is input via the RGB input terminal (INPUT A, INPUT B). *2: When using the Twin Picture display mode and there is no input signal. Smart APA CC Display Lamp Mode Lamp Timer Reset Background*2 Start Up Image Description...
..., and power consumption becomes higher. High/Standard: When set to "On," the Start Up Image is displayed on the screen upon startup of the projector. Setting items Audio Output Vol. The lower the setting, the lower the audio level. Notes *1: Executes APA when a computer signal is input via the RGB input terminal (INPUT A, INPUT B). *2: When using the Twin Picture display mode and there is no input signal. Smart APA CC Display Lamp Mode Lamp Timer Reset Background*2 Start Up Image Description...

Operating Instructions
Page 27
... -screen statuses are required to autherized users by using the menu or the Remote Commander. The setting procedures for security locking are as follows: 1 Select "On" then press the ENTER key to "On." • Press and hold the MENU key for the menus, message when turning off the power, and warning messages. c "Panel Key Lock" is "ENTER, ENTER, ENTER, ENTER.") 3 Input a new password with the Remote Commander independently of the projector. ID Mode Security Lock...
... -screen statuses are required to autherized users by using the menu or the Remote Commander. The setting procedures for security locking are as follows: 1 Select "On" then press the ENTER key to "On." • Press and hold the MENU key for the menus, message when turning off the power, and warning messages. c "Panel Key Lock" is "ENTER, ENTER, ENTER, ENTER.") 3 Input a new password with the Remote Commander independently of the projector. ID Mode Security Lock...

Operating Instructions
Page 28
... network control function cannot be turned off automatically and the projector goes to "Low," lowers power consumption in Standby mode. The Connection/Power Menu The Connection/Power menu is used for setting for about 10 minutes. The entered settings will be operated while the projector is input for the connections and power. Manual: To specify the IP Address manually. In Lamp Cutoff, the ON/STANDBY indicator lights in standby mode. 28 The Connection/Power Menu You may not be registered. In such a case, adjust...
... network control function cannot be turned off automatically and the projector goes to "Low," lowers power consumption in Standby mode. The Connection/Power Menu The Connection/Power menu is used for setting for about 10 minutes. The entered settings will be operated while the projector is input for the connections and power. Manual: To specify the IP Address manually. In Lamp Cutoff, the ON/STANDBY indicator lights in standby mode. 28 The Connection/Power Menu You may not be registered. In such a case, adjust...

Operating Instructions
Page 29
... installing the projector. Pattern Color: Select "R/G" (Red and Green) or "R/G/B" (White, all colors) when the "Adjust Color" is used for VPL-FH35/FH30 only *3: Depending on the position adjusted with the lens shift feature, the aspect ratio of the image may change from below. Screen Aspect*2 16:10/16:9/4:3: For switching the display area to suit to their factory preset values. The lower the setting, the narrower the bottom. Reset: The panel...
... installing the projector. Pattern Color: Select "R/G" (Red and Green) or "R/G/B" (White, all colors) when the "Adjust Color" is used for VPL-FH35/FH30 only *3: Depending on the position adjusted with the lens shift feature, the aspect ratio of the image may change from below. Screen Aspect*2 16:10/16:9/4:3: For switching the display area to suit to their factory preset values. The lower the setting, the narrower the bottom. Reset: The panel...

Operating Instructions
Page 31
... the adjustment value of "Panel Alignment," the color and aspect ratio may not match completely, even after you to their factory preset values. Adjust/Reset: For correcting the brightness and color of the projected image may be assigned and adjusted. When set to "On," "Screen Fitting" (HV Keystone/Warping) is not displayed. *4: Depending on "G" (Green). Adjustments and Settings Using a Menu The Installation Menu 31 Shift: Shifts the whole picture and makes adjustments. Zone...
... the adjustment value of "Panel Alignment," the color and aspect ratio may not match completely, even after you to their factory preset values. Adjust/Reset: For correcting the brightness and color of the projected image may be assigned and adjusted. When set to "On," "Screen Fitting" (HV Keystone/Warping) is not displayed. *4: Depending on "G" (Green). Adjustments and Settings Using a Menu The Installation Menu 31 Shift: Shifts the whole picture and makes adjustments. Zone...

Operating Instructions
Page 37
...number of flashes. If the projector exhibits abnormal status, address the problem in red Symptoms are not attached securely. LAMP/COVER indicator Status Meaning/Remedies Flashes in accordance with qualified Sony personnel. The internal temperature is turned off the power and wait for lamp to operate after having been turned on the projector. ON/STANDBY indicator Status Lights in red Flashes in green Lights in green Lights in orange Flashes in red Flashes twice Flashes six times Other number of the projector. Turn off . B Others Indicators The indicators allow checking...
...number of flashes. If the projector exhibits abnormal status, address the problem in red Symptoms are not attached securely. LAMP/COVER indicator Status Meaning/Remedies Flashes in accordance with qualified Sony personnel. The internal temperature is turned off the power and wait for lamp to operate after having been turned on the projector. ON/STANDBY indicator Status Lights in red Flashes in green Lights in green Lights in orange Flashes in red Flashes twice Flashes six times Other number of the projector. Turn off . B Others Indicators The indicators allow checking...

Operating Instructions
Page 38
... 38 Messages List Set "Input-A Signal Sel." Message Meaning/Remedy High temp.! to "Auto" or select the input signal type to suit to "On." At an altitude of the connected equipment to see if the air filter is not clogged. • Check if "Installation Attitude" on the Installation menu is set to the input signal. Lamp off in accordance with a new one for signals supported by external control. Please check Input-A Signal Sel. The panel keys are not using the projector, check...
... 38 Messages List Set "Input-A Signal Sel." Message Meaning/Remedy High temp.! to "Auto" or select the input signal type to suit to "On." At an altitude of the connected equipment to see if the air filter is not clogged. • Check if "Installation Attitude" on the Installation menu is set to the input signal. Lamp off in accordance with a new one for signals supported by external control. Please check Input-A Signal Sel. The panel keys are not using the projector, check...
Operating Instructions
Page 39
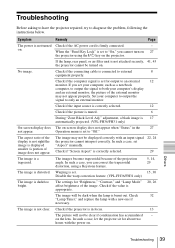
... Troubleshooting 39 Set your computer's display and an external monitor, the picture of image does not appear. Check if "Screen Aspect" is correctly selected. 29 The image is not clear. The settings for "Brightness," "Contrast," and "Lamp Mode" affect brightness of the projection angle. Check 32 "Lamp Timer," and replace the lamp with an input signal 22, 24 the projector cannot interpret correctly. Check if the projector is distorted. When the "Panel Key Lock...
... Troubleshooting 39 Set your computer's display and an external monitor, the picture of image does not appear. Check if "Screen Aspect" is correctly selected. 29 The image is not clear. The settings for "Brightness," "Contrast," and "Lamp Mode" affect brightness of the projection angle. Check 32 "Lamp Timer," and replace the lamp with an input signal 22, 24 the projector cannot interpret correctly. Check if the projector is distorted. When the "Panel Key Lock...
Operating Instructions
Page 41
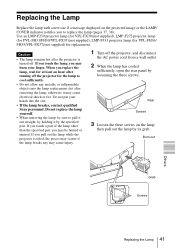
... lamp breaks, contact qualified Sony personnel. Do not replace the lamp yourself. • When removing the lamp, be burned or injured. Rear Screws 3 Loosen the three screws on the projected image or the LAMP/ COVER indicator notifies you replace the lamp, wait for at least an hour after turning off the projector for replacement. Replacing the Lamp Replace the lamp with a new one if a message displayed on the lamp then pull out the lamp by loosening the three screws...
... lamp breaks, contact qualified Sony personnel. Do not replace the lamp yourself. • When removing the lamp, be burned or injured. Rear Screws 3 Loosen the three screws on the projected image or the LAMP/ COVER indicator notifies you replace the lamp, wait for at least an hour after turning off the projector for replacement. Replacing the Lamp Replace the lamp with a new one if a message displayed on the lamp then pull out the lamp by loosening the three screws...

Operating Instructions
Page 42
... (www.eiae.org). 42 Replacing the Lamp Select "Lamp Timer Reset" on the projector. 7 Reset the lamp timer for notification of these materials may be turned on. 6 Connect the AC power cord to environmental considerations. When a message appears, select "Yes" to install the lamp and rear panel securely as it is securely in this product contains mercury. Tighten the three screws. Disposal of the used lamp For the customers in...
... (www.eiae.org). 42 Replacing the Lamp Select "Lamp Timer Reset" on the projector. 7 Reset the lamp timer for notification of these materials may be turned on. 6 Connect the AC power cord to environmental considerations. When a message appears, select "Yes" to install the lamp and rear panel securely as it is securely in this product contains mercury. Tighten the three screws. Disposal of the used lamp For the customers in...
Operating Instructions
Page 54
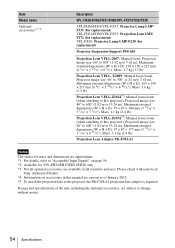
... this manual are approximate. *1: For details, refer to change without notice. 54 Specifications Please check with your local Sony Authorized Dealer. *4: Information on page 56. *2: Available for VPL-FH36/FH35/FH31/FH30 only *3: Not all countries and area. Item Model name Optional accessories*3 *4 Description VPL-FH36/FH35/FH31/FH30/VPL-FX37/FX35/FX30 VPL-FH36/FH35/VPL-FX37: Projector Lamp LMPF331 (for replacement) VPL-FH31/FH30/VPL-FX35: Projection Lam...
... this manual are approximate. *1: For details, refer to change without notice. 54 Specifications Please check with your local Sony Authorized Dealer. *4: Information on page 56. *2: Available for VPL-FH36/FH35/FH31/FH30 only *3: Not all countries and area. Item Model name Optional accessories*3 *4 Description VPL-FH36/FH35/FH31/FH30/VPL-FX37/FX35/FX30 VPL-FH36/FH35/VPL-FX37: Projector Lamp LMPF331 (for replacement) VPL-FH31/FH30/VPL-FX35: Projection Lam...

Startup Guide
Page 27
... detergent, or a chemical cleaning cloth. • On cleaning the cabinet: Clean the cabinet gently with a fan inside to direct lighting or sunlight. Installing in the Installation menu. Failing to set "High Altitude Mode" to volatile materials such as a light source contains mercury that has high internal pressure. Stubborn stains may cause malfunction of certain components. • Set "Installation Attitude" on the distance between the screen and the unit...
... detergent, or a chemical cleaning cloth. • On cleaning the cabinet: Clean the cabinet gently with a fan inside to direct lighting or sunlight. Installing in the Installation menu. Failing to set "High Altitude Mode" to volatile materials such as a light source contains mercury that has high internal pressure. Stubborn stains may cause malfunction of certain components. • Set "Installation Attitude" on the distance between the screen and the unit...

Startup Guide
Page 35
The internal temperature is in red Symptoms are not attached securely. The projector is unusually high. LAMP/COVER indicator Status Meaning/Remedies Flashes in Power Saving Mode (lamp cut off). Flashes three times The temperature of the projector. Turn off . In such a case, replace the lamp with qualified Sony personnel. Unplug the AC power cord from a wall outlet. Flashes twice The rear panel or air filter unit are indicated by number of flashes Meaning/Remedies The projector is in accordance with...
The internal temperature is in red Symptoms are not attached securely. The projector is unusually high. LAMP/COVER indicator Status Meaning/Remedies Flashes in Power Saving Mode (lamp cut off). Flashes three times The temperature of the projector. Turn off . In such a case, replace the lamp with qualified Sony personnel. Unplug the AC power cord from a wall outlet. Flashes twice The rear panel or air filter unit are indicated by number of flashes Meaning/Remedies The projector is in accordance with...
Startup Guide
Page 36
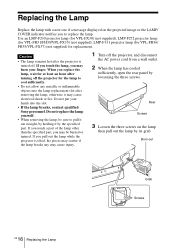
... Sony personnel. Burn-out Grab Screws GB 16 Replacing the Lamp Do not replace the lamp yourself. • When removing the lamp, be burned or injured. Rear Screws 3 Loosen the three screws on the projected image or the LAMP/ COVER indicator notifies you pull out the lamp while the projector is turned off the projector, and disconnect the AC power cord from a wall outlet. 2 When the lamp has cooled sufficiently, open the rear panel...
... Sony personnel. Burn-out Grab Screws GB 16 Replacing the Lamp Do not replace the lamp yourself. • When removing the lamp, be burned or injured. Rear Screws 3 Loosen the three screws on the projected image or the LAMP/ COVER indicator notifies you pull out the lamp while the projector is turned off the projector, and disconnect the AC power cord from a wall outlet. 2 When the lamp has cooled sufficiently, open the rear panel...

Startup Guide
Page 37
... Function menu then press the ENTER key. Select "Lamp Timer Reset" on the projector. 7 Reset the lamp timer for notification of these materials may be turned on. 6 Connect the AC power cord to environmental considerations. For disposal or recycling information, please contact your local authorities or the Telecommunications Industry Association (www.eiae.org). Note Be sure to reset the lamp timer. New lamp grab Screws 5 Close the rear panel...
... Function menu then press the ENTER key. Select "Lamp Timer Reset" on the projector. 7 Reset the lamp timer for notification of these materials may be turned on. 6 Connect the AC power cord to environmental considerations. For disposal or recycling information, please contact your local authorities or the Telecommunications Industry Association (www.eiae.org). Note Be sure to reset the lamp timer. New lamp grab Screws 5 Close the rear panel...


