
User Manual
Page 3
... materials may be handed over to the addresses given in Taiwan only WARNING 3 The Authorized Representative for the recycling of this product is Sony Deutschland GmbH, Hedelfinger Strasse 61, 70327 Stuttgart, Germany. Use the Power Cord (3-core mains lead) / Appliance Connector / Plug conforming ... guarantee matters please refer to the applicable collection point for EMC and product safety is Sony Corporation, 1-7-1 Konan, Minato-ku, Tokyo, Japan. Disposal of the used lamp For the customers in the USA Lamp in the European Union and other than 4.5 m (14 ft .9 5/8 in Europe...
... materials may be handed over to the addresses given in Taiwan only WARNING 3 The Authorized Representative for the recycling of this product is Sony Deutschland GmbH, Hedelfinger Strasse 61, 70327 Stuttgart, Germany. Use the Power Cord (3-core mains lead) / Appliance Connector / Plug conforming ... guarantee matters please refer to the applicable collection point for EMC and product safety is Sony Corporation, 1-7-1 Konan, Minato-ku, Tokyo, Japan. Disposal of the used lamp For the customers in the USA Lamp in the European Union and other than 4.5 m (14 ft .9 5/8 in Europe...
User Manual
Page 4
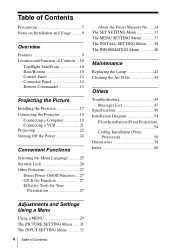
... Side/Front 10 Rear/Bottom 10 Control Panel 12 Connector Panel 14 Remote Commander 15 Projecting the Picture Installing the Projector 17 Connecting the Projector 19 Connecting a Computer 19 Connecting a VCR 21 Projecting 22 Turning Off the Power 24 Convenient Functions Selecting the ... SETTING Menu 35 The MENU SETTING Menu ...........37 The INSTALL SETTING Menu .......38 The INFORMATION Menu 40 Maintenance Replacing the Lamp 42 Cleaning the Air Filter 44 Others Troubleshooting 45 Messages List 47 Specifications 49 Installation Diagram 54 Floor Installation (Front Projection...
... Side/Front 10 Rear/Bottom 10 Control Panel 12 Connector Panel 14 Remote Commander 15 Projecting the Picture Installing the Projector 17 Connecting the Projector 19 Connecting a Computer 19 Connecting a VCR 21 Projecting 22 Turning Off the Power 24 Convenient Functions Selecting the ... SETTING Menu 35 The MENU SETTING Menu ...........37 The INSTALL SETTING Menu .......38 The INFORMATION Menu 40 Maintenance Replacing the Lamp 42 Cleaning the Air Filter 44 Others Troubleshooting 45 Messages List 47 Specifications 49 Installation Diagram 54 Floor Installation (Front Projection...
User Manual
Page 5
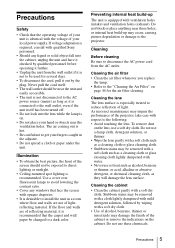
...of alcohol, benzene, thinner or insecticide may occur, causing picture degradation or damage to the projector. If voltage adaptation is equipped with respect to the following: • Avoid touching the lens... gently with a soft cloth such as a cleaning cloth or glass cleaning cloth lightly dampened with qualified Sony personnel. • Should any windows that face the screen with opaque draperies. • It is...dark color. Cleaning the air filter • Clean the air filter whenever you replace the lamp. • Refer to disconnect the AC power cord from the wall outlet if it ...
...of alcohol, benzene, thinner or insecticide may occur, causing picture degradation or damage to the projector. If voltage adaptation is equipped with respect to the following: • Avoid touching the lens... gently with a soft cloth such as a cleaning cloth or glass cleaning cloth lightly dampened with qualified Sony personnel. • Should any windows that face the screen with opaque draperies. • It is...dark color. Cleaning the air filter • Clean the air filter whenever you replace the lamp. • Refer to disconnect the AC power cord from the wall outlet if it ...
User Manual
Page 7
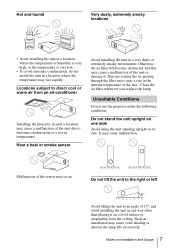
...location may rise rapidly. Dust preventing the air passing through the filter may occur. Notes on its side. Unsuitable Conditions Do not use the projector under the following conditions. Do not stand the unit upright on one side Avoid using the unit standing upright on Installation and Usage 7 ...avoid moisture condensation, do not install the unit in a very dusty or extremely smoky environment. It may cause color shading or shorten the lamp life excessively. Do not tilt the unit to the right or left Avoid tilting the unit to direct cool or warm air from the ceiling...
...location may rise rapidly. Dust preventing the air passing through the filter may occur. Notes on its side. Unsuitable Conditions Do not use the projector under the following conditions. Do not stand the unit upright on one side Avoid using the unit standing upright on Installation and Usage 7 ...avoid moisture condensation, do not install the unit in a very dusty or extremely smoky environment. It may cause color shading or shorten the lamp life excessively. Do not tilt the unit to the right or left Avoid tilting the unit to direct cool or warm air from the ceiling...
User Manual
Page 9
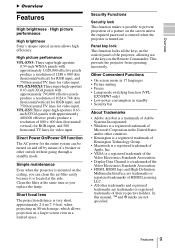
...lamp. Security Functions Security lock This function makes it is a registered trademark of their respective holders. VPL-EX50/EX5:Three super-high-aperture 0.63-inch XGA panels with approximately 480,000 effective pixels produce a resolution of the keys on the control panel of the projector... function The AC power for video input. Features 9 Overview B Overview Features High brightness · High picture performance High brightness Sony's unique optical system allows high efficiency. Other Convenient Functions • On-screen menu in the United States and/or other countries...
...lamp. Security Functions Security lock This function makes it is a registered trademark of their respective holders. VPL-EX50/EX5:Three super-high-aperture 0.63-inch XGA panels with approximately 480,000 effective pixels produce a resolution of the keys on the control panel of the projector... function The AC power for video input. Features 9 Overview B Overview Features High brightness · High picture performance High brightness Sony's unique optical system allows high efficiency. Other Convenient Functions • On-screen menu in the United States and/or other countries...
User Manual
Page 11
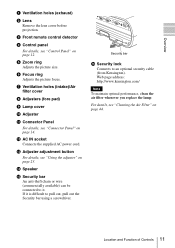
...difficult to it. Web page address: http://www.kensington.com/ Note To maintain optimal performance, clean the air filter whenever you replace the lamp. Location and Function of Controls 11 l AC IN socket Connects the supplied AC power cord. Overview a Ventilation holes (exhaust) b ...Panel" on page 23. For details, see "Connector Panel" on page 44. g Ventilation holes (intake)/Air filter cover h Adjusters (fore pad) i Lamp cover j Adjuster k Connector Panel For details, see "Cleaning the Air Filter" on page 14. Security bar p Security lock Connects to an optional security ...
...difficult to it. Web page address: http://www.kensington.com/ Note To maintain optimal performance, clean the air filter whenever you replace the lamp. Location and Function of Controls 11 l AC IN socket Connects the supplied AC power cord. Overview a Ventilation holes (exhaust) b ...Panel" on page 23. For details, see "Connector Panel" on page 44. g Ventilation holes (intake)/Air filter cover h Adjusters (fore pad) i Lamp cover j Adjuster k Connector Panel For details, see "Cleaning the Air Filter" on page 14. Security bar p Security lock Connects to an optional security ...
User Manual
Page 12
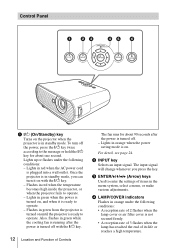
... under the following conditions: • A reception rate of its life or reaches a high temperature. d LAMP/COVER indicators Flashes in standby mode, you press the key. Control Panel 1 23 45 6 a ?/1 (On/Standby) key Turns on the projector when the projector is plugged into a wall outlet. Lights in red when the AC power cord is...
... under the following conditions: • A reception rate of its life or reaches a high temperature. d LAMP/COVER indicators Flashes in standby mode, you press the key. Control Panel 1 23 45 6 a ?/1 (On/Standby) key Turns on the projector when the projector is plugged into a wall outlet. Lights in red when the AC power cord is...
User Manual
Page 29
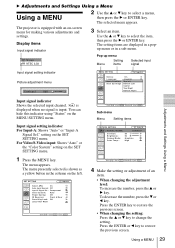
... menu for making various adjustments and settings. The menu presently selected is input. To decrease the number, press the V or b key. The projector is equipped with an on the SET SETTING menu. 1 Press the MENU key. You can hide this indicator using "Status" on the SET ...On Auto Input Search: Off Input-A Signal Sel.: Component Color System: Auto Power Saving: Off IR Receiver: Front & Rear Panel Key Lock: Off Lamp Timer Reset Sub menu Menu Setting items PICTURE SETTING Input A ADJUST PICTURE Contrast: Brightness: Gamma Mode: Color Temp.: Standard 80 50 Graphics High 4 ...
... menu for making various adjustments and settings. The menu presently selected is input. To decrease the number, press the V or b key. The projector is equipped with an on the SET SETTING menu. 1 Press the MENU key. You can hide this indicator using "Status" on the SET ...On Auto Input Search: Off Input-A Signal Sel.: Component Color System: Auto Power Saving: Off IR Receiver: Front & Rear Panel Key Lock: Off Lamp Timer Reset Sub menu Menu Setting items PICTURE SETTING Input A ADJUST PICTURE Contrast: Brightness: Gamma Mode: Color Temp.: Standard 80 50 Graphics High 4 ...
User Manual
Page 35
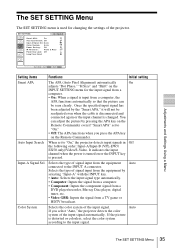
...Auto Input Search: Off Input-A Signal Sel.: Auto Color System: Auto Power Saving: Off IR Receiver: Front & Rear Panel Key Lock: Off Lamp Timer Reset Adjustments and Settings Using a Menu Setting items Functions Initial setting Smart APA The APA (Auto Pixel Alignment) automatically On adjusts "Dot Phase... tuner, etc. • Video GBR: Inputs the signal from the equipment connected to "On," the projector detects input signals in Off the following order: Input-A/Input-B (VPL-EW5/ EX50 only)/Video/S-Video. It indicates the input channel when the power is turned on the Remote...
...Auto Input Search: Off Input-A Signal Sel.: Auto Color System: Auto Power Saving: Off IR Receiver: Front & Rear Panel Key Lock: Off Lamp Timer Reset Adjustments and Settings Using a Menu Setting items Functions Initial setting Smart APA The APA (Auto Pixel Alignment) automatically On adjusts "Dot Phase... tuner, etc. • Video GBR: Inputs the signal from the equipment connected to "On," the projector detects input signals in Off the following order: Input-A/Input-B (VPL-EW5/ EX50 only)/Video/S-Video. It indicates the input channel when the power is turned on the Remote...
User Manual
Page 36
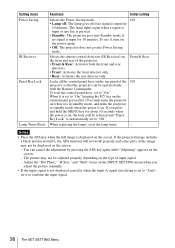
...classifying is input for 10 minutes. When it to "On." When replacing the lamps, reset the lamp timer. - Notes • Press the APA key when the full image is displayed on the power again. • Off: The projector does not go into Standby mode if no signal is set to "Auto", set... Setting items Power Saving IR Receiver Panel Key Lock Lamp Timer Reset Functions Initial setting Selects the Power Saving mode. Front & Rear Locks all the control panel keys on the front and rear of the Off projector so that the projector can cancel the adjustment by pressing the APA key again...
...classifying is input for 10 minutes. When it to "On." When replacing the lamps, reset the lamp timer. - Notes • Press the APA key when the full image is displayed on the power again. • Off: The projector does not go into Standby mode if no signal is set to "Auto", set... Setting items Power Saving IR Receiver Panel Key Lock Lamp Timer Reset Functions Initial setting Selects the Power Saving mode. Front & Rear Locks all the control panel keys on the front and rear of the Off projector so that the projector can cancel the adjustment by pressing the APA key again...
User Manual
Page 38
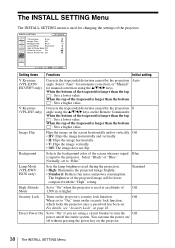
...does not flip. INSTALL SETTING V Keystone: Auto Image Flip: Off Background: Blue Lamp Mode: Standard High Altitude Mode:Off Security Lock: Off Direct Power On: Off Input-A Setting items Functions Initial setting V Keystone (VPL-EX50/ EX5/EW5 only) Corrects the trapezoidal distortion caused by the projection 0 angle using the... the settings of the projected image will be lower compared with the "High" setting. Standard High Altitude Set to the projector. Lamp Mode (VPL-EW5/ EX50 only) Sets the lamp brightness used for manual correction using the v/V/b/B keys on the...
...does not flip. INSTALL SETTING V Keystone: Auto Image Flip: Off Background: Blue Lamp Mode: Standard High Altitude Mode:Off Security Lock: Off Direct Power On: Off Input-A Setting items Functions Initial setting V Keystone (VPL-EX50/ EX5/EW5 only) Corrects the trapezoidal distortion caused by the projection 0 angle using the... the settings of the projected image will be lower compared with the "High" setting. Standard High Altitude Set to the projector. Lamp Mode (VPL-EW5/ EX50 only) Sets the lamp brightness used for manual correction using the v/V/b/B keys on the...

User Manual
Page 39
...Adjustments and Settings Using a Menu Notes • The picture quality may be temporarily changed to "Manual" from "Auto". Notes on VPL-EX50/EX5/EW5 • The auto V Keystone adjustment may not correct the trapezoidal distortion perfectly, depending on the room temperature or the screen ...angle. • If you need fine adjustment when V Keystone is set "High Altitude Mode" to "On" at an altitude of under 1,500 m, the reliability of the lamp...
...Adjustments and Settings Using a Menu Notes • The picture quality may be temporarily changed to "Manual" from "Auto". Notes on VPL-EX50/EX5/EW5 • The auto V Keystone adjustment may not correct the trapezoidal distortion perfectly, depending on the room temperature or the screen ...angle. • If you need fine adjustment when V Keystone is set "High Altitude Mode" to "On" at an altitude of under 1,500 m, the reliability of the lamp...
User Manual
Page 40
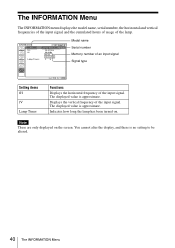
... and vertical frequencies of the input signal and the cumulated hours of usage of the input signal. Displays the vertical frequency of the lamp. INFORMATION VPL-EX50 fH: fV: Lamp Timer: Input A Serial No. 3 3 3 3 3 3 3 48,47kHz 60,00Hz No.23 1024x768 2 H Model name Serial number Memory number of... an input signal Signal type Setting items fH fV Lamp Timer Functions Displays the horizontal frequency of the input signal. The displayed value is no ...
... and vertical frequencies of the input signal and the cumulated hours of usage of the input signal. Displays the vertical frequency of the lamp. INFORMATION VPL-EX50 fH: fV: Lamp Timer: Input A Serial No. 3 3 3 3 3 3 3 48,47kHz 60,00Hz No.23 1024x768 2 H Model name Serial number Memory number of... an input signal Signal type Setting items fH fV Lamp Timer Functions Displays the horizontal frequency of the input signal. The displayed value is no ...
User Manual
Page 42
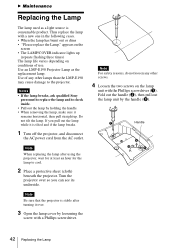
... of any other lamps than the LMP-E190 may cause damage to the projector. B Maintenance Replacing the Lamp The lamp used as the replacement lamp. Use an LMP-E190 Projector Lamp as a light source is tilted and if the lamp breaks. 1 Turn off the projector, and disconnect the...lamp unit by holding the handle. • When removing the lamp, make sure it over so you pull out the lamp while it is consumable product. Notes • If the lamp breaks, ask qualified Sony personnel to replace the lamp and to cool. 2 Place a protective sheet (cloth) beneath the projector. Thus replace the lamp...
... of any other lamps than the LMP-E190 may cause damage to the projector. B Maintenance Replacing the Lamp The lamp used as the replacement lamp. Use an LMP-E190 Projector Lamp as a light source is tilted and if the lamp breaks. 1 Turn off the projector, and disconnect the...lamp unit by holding the handle. • When removing the lamp, make sure it over so you pull out the lamp while it is consumable product. Notes • If the lamp breaks, ask qualified Sony personnel to replace the lamp and to cool. 2 Place a protective sheet (cloth) beneath the projector. Thus replace the lamp...
User Manual
Page 43
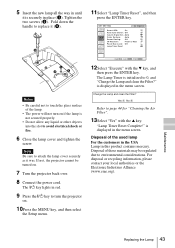
...8 Connect the power cord. The ?/1 key lights in red. 9 Press the ?/1 key to environmental considerations. Change the Lamp and clean the Filter? Tighten the two screws (b). If not, the projector cannot be regulated due to turn on . 10Press the MENU key, and then select the Setup menu. 12Select "Execute" ...with the v key. Disposal of the lamp. • The power will not turn the projector on if the lamp is not secured properly. • Do not allow any liquid or other objects into the slot to page 44 for...
...8 Connect the power cord. The ?/1 key lights in red. 9 Press the ?/1 key to environmental considerations. Change the Lamp and clean the Filter? Tighten the two screws (b). If not, the projector cannot be regulated due to turn on . 10Press the MENU key, and then select the Setup menu. 12Select "Execute" ...with the v key. Disposal of the lamp. • The power will not turn the projector on if the lamp is not secured properly. • Do not allow any liquid or other objects into the slot to page 44 for...

User Manual
Page 44
... attach the air filter cover firmly; When it in a notch on the environment or how the projector is not closed securely. • The air filter has a face and a reverse side. Notes • If you replace the lamp. As a result, the temperature may accumulate, clogging it . Claws 4 Wash the air filter with a vacuum...
... attach the air filter cover firmly; When it in a notch on the environment or how the projector is not closed securely. • The air filter has a face and a reverse side. Notes • If you replace the lamp. As a result, the temperature may accumulate, clogging it . Claws 4 Wash the air filter with a vacuum...
User Manual
Page 45
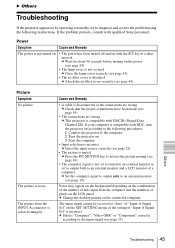
... with qualified Sony personnel. The input signal cannot be operating erratically, try to diagnose and correct the problem using the following procedures. 1 Connect the projector to the computer. 2 Turn the projector on with the... is compatible with DDC, turn the projector on according to the following instructions. c Select the input source correctly (see page 24). • The lamp cover is not secured. c Set...Change the desktop pattern on the LCD panel. c Press the PIC MUTING key to an external monitor and a LCD monitor of dots input from the INPUT A connector ...
... with qualified Sony personnel. The input signal cannot be operating erratically, try to diagnose and correct the problem using the following procedures. 1 Connect the projector to the computer. 2 Turn the projector on with the... is compatible with DDC, turn the projector on according to the following instructions. c Select the input source correctly (see page 24). • The lamp cover is not secured. c Set...Change the desktop pattern on the LCD panel. c Press the PIC MUTING key to an external monitor and a LCD monitor of dots input from the INPUT A connector ...
User Manual
Page 46
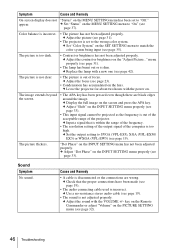
... been adjusted properly. c Check that is within the range of the frequency. • The resolution setting of the output signal of the projector. c Replace the lamp with a new one (see page 23). • Condensation has accumulated on the lens. c Display the full image on the "Adjust ... no-resistance stereo audio cable (see page 33). appear. "Dot Phase" on . c Set "Status" on the MENU SETTING menu to SVGA (VPL-ES5), XGA (VPL-EX50/ EX5) or WXGA (VPL-EW5) (see page 35). c Adjust "Shift" on the INPUT SETTING menu properly (see page 37). c Set the output setting to "On" ...
... been adjusted properly. c Check that is within the range of the frequency. • The resolution setting of the output signal of the projector. c Replace the lamp with a new one (see page 23). • Condensation has accumulated on the lens. c Display the full image on the "Adjust ... no-resistance stereo audio cable (see page 33). appear. "Dot Phase" on . c Set "Status" on the MENU SETTING menu to SVGA (VPL-ES5), XGA (VPL-EX50/ EX5) or WXGA (VPL-EW5) (see page 35). c Adjust "Shift" on the INPUT SETTING menu properly (see page 37). c Set the output setting to "On" ...
User Manual
Page 47
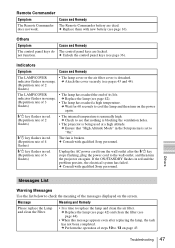
...Check to see page 16). c Consult with new battery (see that "High Altitude Mode" in the Setup menu is time to cool the lamp and then turn the projector on the power again. :/1 key flashes in red. (Repetition rate of 6 flashes) Unplug the AC power cord from the wall outlet after...Remedy The control panel keys are dead. indicator flashes in red and the problem persists, the electrical system has failed. c Consult with qualified Sony personnel. :/1 key flashes in red. (Repetition rate of its life. If the ON/STANDBY flashes in orange. Indicators Symptom Cause and Remedy The...
...Check to see page 16). c Consult with new battery (see that "High Altitude Mode" in the Setup menu is time to cool the lamp and then turn the projector on the power again. :/1 key flashes in red. (Repetition rate of 6 flashes) Unplug the AC power cord from the wall outlet after...Remedy The control panel keys are dead. indicator flashes in red and the problem persists, the electrical system has failed. c Consult with qualified Sony personnel. :/1 key flashes in red. (Repetition rate of its life. If the ON/STANDBY flashes in orange. Indicators Symptom Cause and Remedy The...

User Manual
Page 49
... LCD panels, 1 lens, projection system LCD panel VPL-ES5: 0.63-inch SVGA panel, about 1,440,000 pixels (800 × 600 × 3) VPL-EX50/EX5: 0.63-inch XGA panel, about 2,360,000 pixels (1024 × 768 × 3) VPL-EW5...1.93 Lamp 190 W Ultra high pressure lamp Projected picture size 40 to 300 inches (measured diagonally) Light output VPL-EX501): 2500 lm VPL-EW51)/EX5/ES5: 2000 lm 1) When the Lamp Mode is...signal of the connected computer within the range of acceptable preset signals of the projector. Electrical characteristics Color system NTSC3.58/PAL/SECAM/ NTSC4.43/PAL-M/PAL-N/...
... LCD panels, 1 lens, projection system LCD panel VPL-ES5: 0.63-inch SVGA panel, about 1,440,000 pixels (800 × 600 × 3) VPL-EX50/EX5: 0.63-inch XGA panel, about 2,360,000 pixels (1024 × 768 × 3) VPL-EW5...1.93 Lamp 190 W Ultra high pressure lamp Projected picture size 40 to 300 inches (measured diagonally) Light output VPL-EX501): 2500 lm VPL-EW51)/EX5/ES5: 2000 lm 1) When the Lamp Mode is...signal of the connected computer within the range of acceptable preset signals of the projector. Electrical characteristics Color system NTSC3.58/PAL/SECAM/ NTSC4.43/PAL-M/PAL-N/...


