User Manual
Page 15
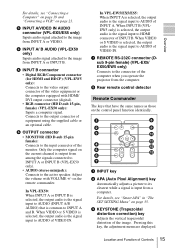
... to the output connector of the computer when you operate the projector from the computer. Connects to the image from INPUT A or VIDEO. Only the computer signal on page 21. g REMOTE RS-232C connector (Dsub 9-pin female) (VPL-EX5/ EX50/EW5 only) Connects to the image from INPUT A...to AUDIO (INPUT A/B AUDIO) that have the same names as those on the control panel function identically. 1 2 3 4 5 6 7 APA INPUT KEY STONE ENTER RESET PIC MUTING D ZOOM FREEZE MENU VOLUME 8 9 0 qa qs qd a INPUT key b APA (Auto Pixel Alignment) key Automatically adjusts a picture to its clearest while ...
... to the output connector of the computer when you operate the projector from the computer. Connects to the image from INPUT A or VIDEO. Only the computer signal on page 21. g REMOTE RS-232C connector (Dsub 9-pin female) (VPL-EX5/ EX50/EW5 only) Connects to the image from INPUT A...to AUDIO (INPUT A/B AUDIO) that have the same names as those on the control panel function identically. 1 2 3 4 5 6 7 APA INPUT KEY STONE ENTER RESET PIC MUTING D ZOOM FREEZE MENU VOLUME 8 9 0 qa qs qd a INPUT key b APA (Auto Pixel Alignment) key Automatically adjusts a picture to its clearest while ...

User Manual
Page 16
...the lithium battery • A button type lithium battery (CR2025) is , the wider the angle within which the commander can control the projector becomes. 16 Location and Function of children. • Should the battery be swallowed, immediately consult a doctor. The shorter the distance between ... keys (v/V/b/B) for adjustment. e PIC MUTING key Cuts off the picture. key Enlarges the image at a desired location on the screen. d RESET key Resets the value of the lithium battery holder by picking it, and pull out the holder from the lithium battery holder. h Infrared transmitter i ?/1...
...the lithium battery • A button type lithium battery (CR2025) is , the wider the angle within which the commander can control the projector becomes. 16 Location and Function of children. • Should the battery be swallowed, immediately consult a doctor. The shorter the distance between ... keys (v/V/b/B) for adjustment. e PIC MUTING key Cuts off the picture. key Enlarges the image at a desired location on the screen. d RESET key Resets the value of the lithium battery holder by picking it, and pull out the holder from the lithium battery holder. h Infrared transmitter i ?/1...
User Manual
Page 22
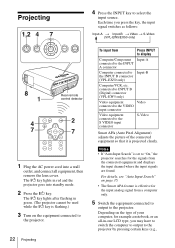
...cover. The ?/1 key lights after flashing in -one LCD type, you may have to switch the computer to output to Input-B the INPUT B connector (VPL-EX50 only) Computer/VCR, etc. Notes • ... are found. The ?/1 key lights in red and the projector goes into a wall outlet, and connect all -in green. (The projector cannot be used while the ?/1 key is projected clearly. ... signal switches as follows: Input-A t Input-B t Video t S-Video (VPL-EW5/EX50 only) Rear remote control detector APA INPUT KEY STONE ENTER RESET PIC MUTING D ZOOM FREEZE MENU VOLUME 1 Plug the AC power cord into...
...cover. The ?/1 key lights after flashing in -one LCD type, you may have to switch the computer to output to Input-B the INPUT B connector (VPL-EX50 only) Computer/VCR, etc. Notes • ... are found. The ?/1 key lights in red and the projector goes into a wall outlet, and connect all -in green. (The projector cannot be used while the ?/1 key is projected clearly. ... signal switches as follows: Input-A t Input-B t Video t S-Video (VPL-EW5/EX50 only) Rear remote control detector APA INPUT KEY STONE ENTER RESET PIC MUTING D ZOOM FREEZE MENU VOLUME 1 Plug the AC power cord into...
User Manual
Page 28
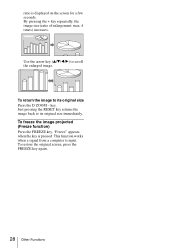
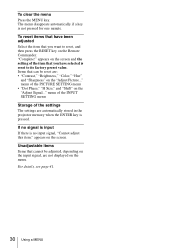
... its original size immediately. To freeze the image projected (Freeze function) Press the FREEZE key. "Freeze" appears when the key is input. Just pressing the RESET key returns the image back to its original size Press the D ZOOM - To return the image to scroll the enlarged image. This function works when...
... its original size immediately. To freeze the image projected (Freeze function) Press the FREEZE key. "Freeze" appears when the key is input. Just pressing the RESET key returns the image back to its original size Press the D ZOOM - To return the image to scroll the enlarged image. This function works when...
User Manual
Page 29
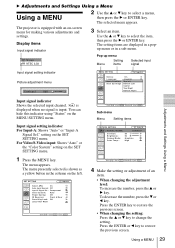
...presently selected is shown as a yellow button in a sub menu. To decrease the number, press the V or b key. Using a MENU 29 The projector is input. x is displayed when no signal is equipped with an on the SET SETTING menu. SET SETTING Input-A Smar t APA: On Auto Input ...Search: Off Input-A Signal Sel.: Component Color System: Auto Power Saving: Off IR Receiver: Front & Rear Panel Key Lock: Off Lamp Timer Reset Sub menu Menu Setting items PICTURE SETTING Input A ADJUST PICTURE Contrast: Brightness: Gamma Mode: Color Temp.: Standard 80 50 Graphics High 4 Make the ...
...presently selected is shown as a yellow button in a sub menu. To decrease the number, press the V or b key. Using a MENU 29 The projector is input. x is displayed when no signal is equipped with an on the SET SETTING menu. SET SETTING Input-A Smar t APA: On Auto Input ...Search: Off Input-A Signal Sel.: Component Color System: Auto Power Saving: Off IR Receiver: Front & Rear Panel Key Lock: Off Lamp Timer Reset Sub menu Menu Setting items PICTURE SETTING Input A ADJUST PICTURE Contrast: Brightness: Gamma Mode: Color Temp.: Standard 80 50 Graphics High 4 Make the ...
User Manual
Page 30
... on the input signal, are : • "Contrast," "Brightness," "Color," "Hue" and "Sharpness" on the Remote Commander. appears on the "Adjust Signal..." To reset items that have selected is no input signal, "Cannot adjust this item." "Complete!" menu of the PICTURE SETTING menu • "Dot Phase," "H Size," and "Shift... to its factory preset value. appears on the screen and the setting of the settings The settings are automatically stored in the projector memory when the ENTER key is not pressed for one minute. menu of the INPUT SETTING menu Storage of the item that cannot ...
... on the input signal, are : • "Contrast," "Brightness," "Color," "Hue" and "Sharpness" on the Remote Commander. appears on the "Adjust Signal..." To reset items that have selected is no input signal, "Cannot adjust this item." "Complete!" menu of the PICTURE SETTING menu • "Dot Phase," "H Size," and "Shift... to its factory preset value. appears on the screen and the setting of the settings The settings are automatically stored in the projector memory when the ENTER key is not pressed for one minute. menu of the INPUT SETTING menu Storage of the item that cannot ...
User Manual
Page 35
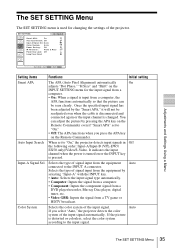
...computer. • On: When a signal is distorted or colorless, select the color system according to "On," the projector detects input signals in Off the following order: Input-A/Input-B (VPL-EW5/ EX50 only)/Video/S-Video. SET SETTING Input-A Smar t APA: On Auto Input Search: Off Input-A Signal ...Sel.: Auto Color System: Auto Power Saving: Off IR Receiver: Front & Rear Panel Key Lock: Off Lamp Timer Reset Adjustments and Settings Using a...
...computer. • On: When a signal is distorted or colorless, select the color system according to "On," the projector detects input signals in Off the following order: Input-A/Input-B (VPL-EW5/ EX50 only)/Video/S-Video. SET SETTING Input-A Smar t APA: On Auto Input Search: Off Input-A Signal ...Sel.: Auto Color System: Auto Power Saving: Off IR Receiver: Front & Rear Panel Key Lock: Off Lamp Timer Reset Adjustments and Settings Using a...
User Manual
Page 36
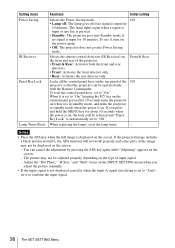
...set it , the APA function will be displayed on . When replacing the lamps, reset the lamp timer. - Front & Rear Locks all the control panel keys on , the lock will not work properly and some parts of the projector. • Front & Rear: Activates both the front and rear detectors. •...8226; Rear: Activates the rear detector only. Adjust the "Dot Phase," "H Size," and "Shift" items on the power again. • Off: The projector does not go into Standby mode if no signal is displayed on the screen. - Setting items Power Saving IR Receiver Panel Key Lock Lamp Timer...
...set it , the APA function will be displayed on . When replacing the lamps, reset the lamp timer. - Front & Rear Locks all the control panel keys on , the lock will not work properly and some parts of the projector. • Front & Rear: Activates both the front and rear detectors. •...8226; Rear: Activates the rear detector only. Adjust the "Dot Phase," "H Size," and "Shift" items on the power again. • Off: The projector does not go into Standby mode if no signal is displayed on the screen. - Setting items Power Saving IR Receiver Panel Key Lock Lamp Timer...
User Manual
Page 43
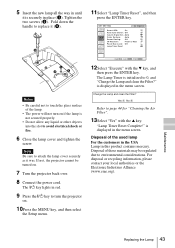
... key. Yes: No: Refer to attach the lamp cover securely as it was. Disposal of these materials may be turned on. 7 Turn the projector back over. 8 Connect the power cord. Fold down the handle to environmental considerations. is initialized to avoid electrical shock or fire. 6 Close the... liquid or other objects into the slot to 0, and "Change the Lamp and clean the Filter?" If not, the projector cannot be regulated due to replace it (c). 11Select "Lamp Timer Reset", and then press the ENTER key. Tighten the two screws (b). SET SETTING Input-A Smar t APA: On Auto Input...
... key. Yes: No: Refer to attach the lamp cover securely as it was. Disposal of these materials may be turned on. 7 Turn the projector back over. 8 Connect the power cord. Fold down the handle to environmental considerations. is initialized to avoid electrical shock or fire. 6 Close the... liquid or other objects into the slot to 0, and "Change the Lamp and clean the Filter?" If not, the projector cannot be regulated due to replace it (c). 11Select "Lamp Timer Reset", and then press the ENTER key. Tighten the two screws (b). SET SETTING Input-A Smar t APA: On Auto Input...
User Manual
Page 60
... Input-A Signal Sel 35 Installation 17 notes 6 unsuitable conditions 7 unsuitable installation 6 IR Receiver 36 L Lamp Mode 38 Lamp replacement 42 Lamp Timer 40 Lamp Timer Reset 36 Language 37 selecting the menu language 25 Lens 11 Location and function of controls connector panel 14 control panel 12 rear/bottom 10 Remote...
... Input-A Signal Sel 35 Installation 17 notes 6 unsuitable conditions 7 unsuitable installation 6 IR Receiver 36 L Lamp Mode 38 Lamp replacement 42 Lamp Timer 40 Lamp Timer Reset 36 Language 37 selecting the menu language 25 Lens 11 Location and function of controls connector panel 14 control panel 12 rear/bottom 10 Remote...
User Manual
Page 61
rear remote control detector 36 Reset resetting an item 30 RS-232C connector 51 S Screen size 17, 18 Security bar 11 Security Lock 26, 38 Security lock 11 Sharpness 31 Shift 33 Smart APA 35 Specifications 49 Start Up Image 37 Status 37 Supplied accessories 50 T Troubleshooting 45 V V Keystone 38 Volume 32 Index 61 Others
rear remote control detector 36 Reset resetting an item 30 RS-232C connector 51 S Screen size 17, 18 Security bar 11 Security Lock 26, 38 Security lock 11 Sharpness 31 Shift 33 Smart APA 35 Specifications 49 Start Up Image 37 Status 37 Supplied accessories 50 T Troubleshooting 45 V V Keystone 38 Volume 32 Index 61 Others

