User Manual
Page 4
... Side/Front 10 Rear/Bottom 10 Control Panel 12 Connector Panel 14 Remote Commander 15 Projecting the Picture Installing the Projector 17 Connecting the Projector 19 Connecting a Computer 19 Connecting a VCR 21 Projecting 22 Turning Off the Power 24 Convenient Functions Selecting the ...The SET SETTING Menu 35 The MENU SETTING Menu ...........37 The INSTALL SETTING Menu .......38 The INFORMATION Menu 40 Maintenance Replacing the Lamp 42 Cleaning the Air Filter 44 Others Troubleshooting 45 Messages List 47 Specifications 49 Installation Diagram 54 Floor Installation (Front ...
... Side/Front 10 Rear/Bottom 10 Control Panel 12 Connector Panel 14 Remote Commander 15 Projecting the Picture Installing the Projector 17 Connecting the Projector 19 Connecting a Computer 19 Connecting a VCR 21 Projecting 22 Turning Off the Power 24 Convenient Functions Selecting the ...The SET SETTING Menu 35 The MENU SETTING Menu ...........37 The INSTALL SETTING Menu .......38 The INFORMATION Menu 40 Maintenance Replacing the Lamp 42 Cleaning the Air Filter 44 Others Troubleshooting 45 Messages List 47 Specifications 49 Installation Diagram 54 Floor Installation (Front ...
User Manual
Page 5
...from the AC outlet. Cleaning the cabinet • Clean the cabinet gently with a soft dry cloth. If voltage adaptation is required, consult with qualified Sony personnel. • Should any windows that face the screen with opaque draperies. • It is desirable to direct lighting or sunlight. • ...the wall outlet, even if the unit itself . • The wall outlet should not be changed to the projector. Cleaning the air filter • Clean the air filter whenever you replace the lamp. • Refer to the "Cleaning the Air Filter" on page 44 for several days. • To ...
...from the AC outlet. Cleaning the cabinet • Clean the cabinet gently with a soft dry cloth. If voltage adaptation is required, consult with qualified Sony personnel. • Should any windows that face the screen with opaque draperies. • It is desirable to direct lighting or sunlight. • ...the wall outlet, even if the unit itself . • The wall outlet should not be changed to the projector. Cleaning the air filter • Clean the air filter whenever you replace the lamp. • Refer to the "Cleaning the Air Filter" on page 44 for several days. • To ...
User Manual
Page 7
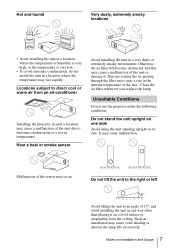
...an angle of the unit. Otherwise, the air filter will become obstructed, and this may cause malfunction. Unsuitable Conditions Do not use the projector under the following conditions. Malfunction of the sensor may cause a rise in the internal temperature of 15°, and avoid installing the unit...Near a heat or smoke sensor Avoid installing the unit in a very dusty or extremely smoky environment. Clean the air filter whenever you replace the lamp. Dust preventing the air passing through the filter may occur. Do not stand the unit upright on one side Avoid using the unit standing...
...an angle of the unit. Otherwise, the air filter will become obstructed, and this may cause malfunction. Unsuitable Conditions Do not use the projector under the following conditions. Malfunction of the sensor may cause a rise in the internal temperature of 15°, and avoid installing the unit...Near a heat or smoke sensor Avoid installing the unit in a very dusty or extremely smoky environment. Clean the air filter whenever you replace the lamp. Dust preventing the air passing through the filter may occur. Do not stand the unit upright on one side Avoid using the unit standing...
User Manual
Page 9
...Sony's unique optical system allows high efficiency. Short focal lens The projection distance is turned on and off by means of the Video Electronics Standards Association. • Display Data Channel is located at the same time as you replace the lamp. Features 9 VPL-EX50/EX5:Three super-high-aperture 0.63-inch XGA... panels with approximately 1,020,000 effective pixels produce a resolution of a picture on the screen unless the required password is entered when the projector is very short,...
...Sony's unique optical system allows high efficiency. Short focal lens The projection distance is turned on and off by means of the Video Electronics Standards Association. • Display Data Channel is located at the same time as you replace the lamp. Features 9 VPL-EX50/EX5:Three super-high-aperture 0.63-inch XGA... panels with approximately 1,020,000 effective pixels produce a resolution of a picture on the screen unless the required password is entered when the projector is very short,...
User Manual
Page 11
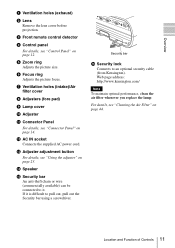
... details, see "Control Panel" on page 14. Web page address: http://www.kensington.com/ Note To maintain optimal performance, clean the air filter whenever you replace the lamp. Location and Function of Controls 11 c Front remote control detector d Control panel For details, see "Connector Panel" on page 12. If it . f Focus ring...
... details, see "Control Panel" on page 14. Web page address: http://www.kensington.com/ Note To maintain optimal performance, clean the air filter whenever you replace the lamp. Location and Function of Controls 11 c Front remote control detector d Control panel For details, see "Connector Panel" on page 12. If it . f Focus ring...
User Manual
Page 36
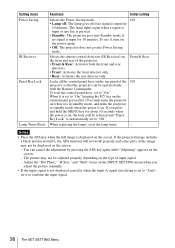
... correctly when the input A signal classifying is set to "Auto", set to standby mode when the power is on the screen. - When replacing the lamps, reset the lamp timer. - You can be adjusted properly depending on the screen. - To use it , the APA function will be displayed on the type...on when it to "On." Adjust the "Dot Phase," "H Size," and "Shift" items on , the lock will not work properly and some parts of the projector. • Front & Rear: Activates both the front and rear detectors. • Front: Activates the front detector only. • Rear: Activates the rear detector...
... correctly when the input A signal classifying is set to "Auto", set to standby mode when the power is on the screen. - When replacing the lamps, reset the lamp timer. - You can be adjusted properly depending on the screen. - To use it , the APA function will be displayed on the type...on when it to "On." Adjust the "Dot Phase," "H Size," and "Shift" items on , the lock will not work properly and some parts of the projector. • Front & Rear: Activates both the front and rear detectors. • Front: Activates the front detector only. • Rear: Activates the rear detector...
User Manual
Page 42
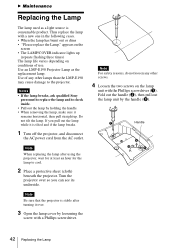
... the replacement lamp. Thus replace the lamp with the Phillips screwdriver (a). appears on the screen • The LAMP/COVER indicator lights up . Do not tilt the lamp. Use an LMP-E190 Projector Lamp as a light source is consumable product. If you can see its underside. Use of use. Notes • If the lamp breaks, ask qualified Sony personnel to replace the lamp...
... the replacement lamp. Thus replace the lamp with the Phillips screwdriver (a). appears on the screen • The LAMP/COVER indicator lights up . Do not tilt the lamp. Use an LMP-E190 Projector Lamp as a light source is consumable product. If you can see its underside. Use of use. Notes • If the lamp breaks, ask qualified Sony personnel to replace the lamp...
User Manual
Page 43
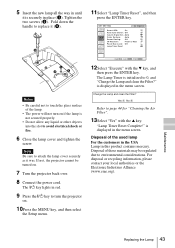
...projector cannot be regulated due to environmental considerations. is displayed in the menu screen. is displayed in the menu screen. 5 Insert the new lamp all the way in until it is initialized to 0, and "Change the Lamp and clean the Filter?" Fold down the handle to replace it was. The Lamp... Timer is securely in this product contains mercury. "Lamp Timer Reset Complete!" Maintenance Replacing the Lamp 43 Change the Lamp and clean the Filter? For disposal or ...
...projector cannot be regulated due to environmental considerations. is displayed in the menu screen. is displayed in the menu screen. 5 Insert the new lamp all the way in until it is initialized to 0, and "Change the Lamp and clean the Filter?" Fold down the handle to replace it was. The Lamp... Timer is securely in this product contains mercury. "Lamp Timer Reset Complete!" Maintenance Replacing the Lamp 43 Change the Lamp and clean the Filter? For disposal or ...

User Manual
Page 44
... Air Filter the power can not be cleaned whenever you neglect to clean the air filter will vary depending on the air filter cover and replace the cover. Remove the air filter, and then remove the dust with a vacuum cleaner, remove the air filter and wash it. 1 Turn the power off... into the each claws on the environment or how the projector is not closed securely. • The air filter has a face and a reverse side. Claws 4 Wash the air filter with a mild detergent solution and dry it . Notes • If you replace the lamp. When it becomes difficult to attach the air filter cover...
... Air Filter the power can not be cleaned whenever you neglect to clean the air filter will vary depending on the air filter cover and replace the cover. Remove the air filter, and then remove the dust with a vacuum cleaner, remove the air filter and wash it. 1 Turn the power off... into the each claws on the environment or how the projector is not closed securely. • The air filter has a face and a reverse side. Claws 4 Wash the air filter with a mild detergent solution and dry it . Notes • If you replace the lamp. When it becomes difficult to attach the air filter cover...
User Manual
Page 46
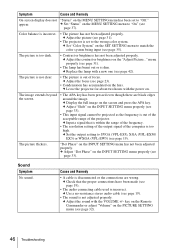
...or brightness on the INPUT SETTING menu properly (see page 42). The picture is not clear. • The picture is too high. c Leave the projector for about two hours with a new one (see page 33). c Input a signal that the proper connections have been made (see page 19). &#...Condensation has accumulated on the MENU SETTING menu has been set to SVGA (VPL-ES5), XGA (VPL-EX50/ EX5) or WXGA (VPL-EW5) (see page 19). • The sound is dim. c Use a no-resistance stereo audio cable (see page 19). c Replace the lamp with the power on. The image extends beyond the screen. • The...
...or brightness on the INPUT SETTING menu properly (see page 42). The picture is not clear. • The picture is too high. c Leave the projector for about two hours with a new one (see page 33). c Input a signal that the proper connections have been made (see page 19). &#...Condensation has accumulated on the MENU SETTING menu has been set to SVGA (VPL-ES5), XGA (VPL-EX50/ EX5) or WXGA (VPL-EW5) (see page 19). • The sound is dim. c Use a no-resistance stereo audio cable (see page 19). c Replace the lamp with the power on. The image extends beyond the screen. • The...
User Manual
Page 47
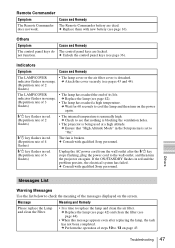
... system has failed. c Ensure that nothing is blocking the ventilation holes. • The projector is time to cool the lamp and then turn the projector on page 43 Troubleshooting 47 c Replace the lamp (see page 42) and clean the filter (see that "High Altitude Mode" in the... the control panel keys (see page 42). • The lamp has reached a high temperature. Message Meaning and Remedy Please replace the Lamp and clean the Filter. • It is being used at a high altitude. c Consult with qualified Sony personnel. :/1 key flashes in red. (Repetition rate of the...
... system has failed. c Ensure that nothing is blocking the ventilation holes. • The projector is time to cool the lamp and then turn the projector on page 43 Troubleshooting 47 c Replace the lamp (see page 42) and clean the filter (see that "High Altitude Mode" in the... the control panel keys (see page 42). • The lamp has reached a high temperature. Message Meaning and Remedy Please replace the Lamp and clean the Filter. • It is being used at a high altitude. c Consult with qualified Sony personnel. :/1 key flashes in red. (Repetition rate of the...

User Manual
Page 51
... Projector Lamp LMP-E190(for DDC 2 G/Y 10 GND 3 B/B-Y 11 GND 4 RESERVE 12 DDC/SDA 5 GND 13 HD 6 GND (R) 14 VD 7 GND (G) 15 DDC/SCL 8 GND (B) 1 NC 2 RXDA 3 TXDA 4 DTR 5 GND 6 NC 7 RTS 8 CTS 9 NC Others Specifications 51 For details, please consult your nearest Sony ... 15 DDC/SCL 8 GND (B) RS-232C connector (D-sub 9 pin, female) (VPL-EW5/EX50/EX5 only) 1 R/R-Y 9 Power supply input for replacement) Some of the items may not be available in some areas. SONY WILL NOT BE LIABLE FOR DAMAGES OF ANY KIND INCLUDING, BUT NOT LIMITED TO, COMPENSATION...
... Projector Lamp LMP-E190(for DDC 2 G/Y 10 GND 3 B/B-Y 11 GND 4 RESERVE 12 DDC/SDA 5 GND 13 HD 6 GND (R) 14 VD 7 GND (G) 15 DDC/SCL 8 GND (B) 1 NC 2 RXDA 3 TXDA 4 DTR 5 GND 6 NC 7 RTS 8 CTS 9 NC Others Specifications 51 For details, please consult your nearest Sony ... 15 DDC/SCL 8 GND (B) RS-232C connector (D-sub 9 pin, female) (VPL-EW5/EX50/EX5 only) 1 R/R-Y 9 Power supply input for replacement) Some of the items may not be available in some areas. SONY WILL NOT BE LIABLE FOR DAMAGES OF ANY KIND INCLUDING, BUT NOT LIMITED TO, COMPENSATION...
User Manual
Page 60
... Altitude Mode 38 Hue 31 I Image Flip 38 Input-A Signal Sel 35 Installation 17 notes 6 unsuitable conditions 7 unsuitable installation 6 IR Receiver 36 L Lamp Mode 38 Lamp replacement 42 Lamp Timer 40 Lamp Timer Reset 36 Language 37 selecting the menu language 25 Lens 11 Location and function of controls connector panel 14 control panel 12...
... Altitude Mode 38 Hue 31 I Image Flip 38 Input-A Signal Sel 35 Installation 17 notes 6 unsuitable conditions 7 unsuitable installation 6 IR Receiver 36 L Lamp Mode 38 Lamp replacement 42 Lamp Timer 40 Lamp Timer Reset 36 Language 37 selecting the menu language 25 Lens 11 Location and function of controls connector panel 14 control panel 12...


