Product Brochure (Data Projectors)
Page 2
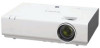
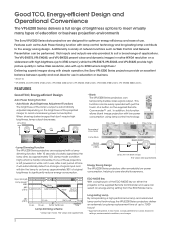
... powered on settings, environmental conditions, and usage. 2 After 10 seconds of a button on a widescreen with up to save electricity expenses. Energy Saving Design The VPL-E200 Series projectors offer remarkably low power consumption, helping to 7,000 hours.4 4 Approximate period, in native XGA resolution, also with high brightness (up to 3700 lumens1), while the VPL-EX275,VPL-EX245, and VPL‑EX225 provide high picture quality in low mode. Input (image) A B Lamp...
... powered on settings, environmental conditions, and usage. 2 After 10 seconds of a button on a widescreen with up to save electricity expenses. Energy Saving Design The VPL-E200 Series projectors offer remarkably low power consumption, helping to 7,000 hours.4 4 Approximate period, in native XGA resolution, also with high brightness (up to 3700 lumens1), while the VPL-EX275,VPL-EX245, and VPL‑EX225 provide high picture quality in low mode. Input (image) A B Lamp...
Product Brochure (Data Projectors)
Page 3
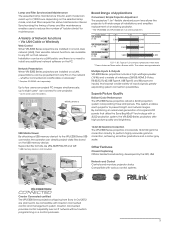
... model can project PC images simultaneously; Lamp and Filter Synchronized Maintenance The expected lamp maintenance time for each projector to present bright and natural images. Via LAN Cable or Wirelessly Web Control When VPL-E200 Series projectors are installed in Oct 2012 are JPG, BMP, PNG,TIF, and GIF. 6 USB memory device is no need to fit wide range of installations, and simplifies replacement of Applications Convenient, Simple Projector Adjustment The projectors...
... model can project PC images simultaneously; Lamp and Filter Synchronized Maintenance The expected lamp maintenance time for each projector to present bright and natural images. Via LAN Cable or Wirelessly Web Control When VPL-E200 Series projectors are installed in Oct 2012 are JPG, BMP, PNG,TIF, and GIF. 6 USB memory device is no need to fit wide range of installations, and simplifies replacement of Applications Convenient, Simple Projector Adjustment The projectors...
Product Brochure (Data Projectors)
Page 5
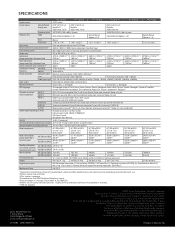
...pixels Zoom Focus Throw ratio Light source Recommended lamp replacement time*1 Filter cleaning cycle*1 Screen size Light output (Lamp mode: High / Standard / Low) Color light output (Lamp mode: High / Standard / Low) Contrast ratio (full white / full black)*3 Displayable scanning Horizontal frequency Vertical Display resolution Computer signal input Video signal input Color system Keystone correction OSD language Computer and video signal input/output INPUT A INPUT B INPUT C S VIDEO IN VIDEO IN OUTPUT Control signal input/output, Others Speaker Operating temperature (Operating...
...pixels Zoom Focus Throw ratio Light source Recommended lamp replacement time*1 Filter cleaning cycle*1 Screen size Light output (Lamp mode: High / Standard / Low) Color light output (Lamp mode: High / Standard / Low) Contrast ratio (full white / full black)*3 Displayable scanning Horizontal frequency Vertical Display resolution Computer signal input Video signal input Color system Keystone correction OSD language Computer and video signal input/output INPUT A INPUT B INPUT C S VIDEO IN VIDEO IN OUTPUT Control signal input/output, Others Speaker Operating temperature (Operating...

Operating Instructions
Page 2
... 12 Connecting a USB memory device 12 Connecting a USB wireless LAN module 13 Connecting an External Monitor and Audio Equipment 13 Projecting/Adjusting an Image Projecting an Image 14 Adjusting the Projected image ... 15 Turning Off the Power 18 Adjustments and Settings Using a Menu Using a MENU 19 The Picture Menu 20 The Screen Menu 21 The Function Menu 25 The Operation Menu 26 2 Table of Contents The Connection/Power Menu ...........27 The Installation Menu 29 The Information Menu 30 Network Using Network Features 31 Displaying the Control Window of the Projector with...
... 12 Connecting a USB memory device 12 Connecting a USB wireless LAN module 13 Connecting an External Monitor and Audio Equipment 13 Projecting/Adjusting an Image Projecting an Image 14 Adjusting the Projected image ... 15 Turning Off the Power 18 Adjustments and Settings Using a Menu Using a MENU 19 The Picture Menu 20 The Screen Menu 21 The Function Menu 25 The Operation Menu 26 2 Table of Contents The Connection/Power Menu ...........27 The Installation Menu 29 The Information Menu 30 Network Using Network Features 31 Displaying the Control Window of the Projector with...

Operating Instructions
Page 7
... V/v key to the User screen. Picture muting helps reduce power consumption. Notes *1: Use this key when "Type A USB", "Type B USB" or "Network" is selected as you want to step 3). 3 Select "User" then press the b key. VOLUME +/- For details on ECO Mode settings, see "Lamp Mode," "With No Input," "With Static Signal" and "Standby Mode" on the image you desire (go to enlarge. 3 Press the D ZOOM + key or the D ZOOM - Press again...
... V/v key to the User screen. Picture muting helps reduce power consumption. Notes *1: Use this key when "Type A USB", "Type B USB" or "Network" is selected as you want to step 3). 3 Select "User" then press the b key. VOLUME +/- For details on ECO Mode settings, see "Lamp Mode," "With No Input," "With Static Signal" and "Standby Mode" on the image you desire (go to enlarge. 3 Press the D ZOOM + key or the D ZOOM - Press again...

Operating Instructions
Page 14
... display the menu for switching input signal on the projector to be projected. Install the projector so that the projected image fits the screen size. The method to switch the output varies depending on the connected equipment. 5 Select the input source. B Projecting/Adjusting an Image Projecting an Image The size of computer. (Example) + To project image files stored in a USB memory device, see "Projecting an Image using USB Connection, see "USB Media Viewer" (page 39). To project an image using USB Connection" (page 38). Computer 6 When projecting a computer image, switch...
... display the menu for switching input signal on the projector to be projected. Install the projector so that the projected image fits the screen size. The method to switch the output varies depending on the connected equipment. 5 Select the input source. B Projecting/Adjusting an Image Projecting an Image The size of computer. (Example) + To project image files stored in a USB memory device, see "Projecting an Image using USB Connection, see "USB Media Viewer" (page 39). To project an image using USB Connection" (page 38). Computer 6 When projecting a computer image, switch...
Operating Instructions
Page 17
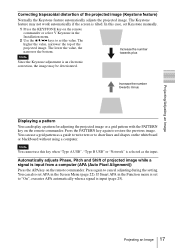
... display a pattern for adjusting the projected image or a grid pattern with the PATTERN key on the remote commander or select V Keystone in the Function menu is input from a computer (APA (Auto Pixel Alignment)) Press the APA key on the whiteboard or blackboard without using a computer. Projecting an Image 17 Projecting/Adjusting an Image Correcting trapezoidal distortion of the projected image. Automatically adjusts Phase, Pitch and Shift of projected image while a signal is set Keystone manually...
... display a pattern for adjusting the projected image or a grid pattern with the PATTERN key on the remote commander or select V Keystone in the Function menu is input from a computer (APA (Auto Pixel Alignment)) Press the APA key on the whiteboard or blackboard without using a computer. Projecting an Image 17 Projecting/Adjusting an Image Correcting trapezoidal distortion of the projected image. Automatically adjusts Phase, Pitch and Shift of projected image while a signal is set Keystone manually...

Operating Instructions
Page 25
... projector is powered on. Items Volume*3 Mic Volume*3 Speaker*3 Smart APA CC Display Lamp Timer Reset Start Up Image Item descriptions The higher the value, the louder an audio volume and the lower the value, the lower the audio volume. On/Off: When set to "On," speaker outputs sound. The Function Menu The Function menu is used for setting various functions of "Volume." *3: VPL-EW275/EW245/EW225/EX275...
... projector is powered on. Items Volume*3 Mic Volume*3 Speaker*3 Smart APA CC Display Lamp Timer Reset Start Up Image Item descriptions The higher the value, the louder an audio volume and the lower the value, the lower the audio volume. On/Off: When set to "On," speaker outputs sound. The Function Menu The Function menu is used for setting various functions of "Volume." *3: VPL-EW275/EW245/EW225/EX275...

Operating Instructions
Page 26
... the operations by password. c The projector turns on the power again. c "Control Key Lock" is set to go Standby mode then turn on -screen statuses are as follows: 1 Select "On" and press the ENTER key to display the setting menu. 2 Input the password with the MENU, V/v/B/b and ENTER keys. (The default setting password is set to authorized users by using the menu or the remote commander. The Operation Menu The Operation menu is used for setting for approximately 10 seconds during power on the projector. The setting...
... the operations by password. c The projector turns on the power again. c "Control Key Lock" is set to go Standby mode then turn on -screen statuses are as follows: 1 Select "On" and press the ENTER key to display the setting menu. 2 Input the password with the MENU, V/v/B/b and ENTER keys. (The default setting password is set to authorized users by using the menu or the remote commander. The Operation Menu The Operation menu is used for setting for approximately 10 seconds during power on the projector. The setting...
Operating Instructions
Page 27
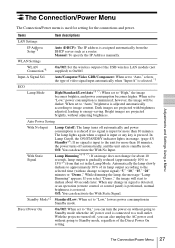
... Lamp Cutoff, the ON/STANDBY indicator lights in Standby mode. The Connection/Power Menu 27 Auto/Computer/Video GBR/Component: When set to "Low," lowers power consumption in orange. (page 43) Standby*6: If no change for about 40 seconds later. Bright images are projected with no signal is used for setting for the connections and power. Standard/Low: When set to "Auto," selects the type of the USB wireless LAN module (not supplied) to On/Off. Adjustments and Settings Using a Menu The Connection/Power Menu The Connection/Power menu...
... Lamp Cutoff, the ON/STANDBY indicator lights in Standby mode. The Connection/Power Menu 27 Auto/Computer/Video GBR/Component: When set to "Low," lowers power consumption in orange. (page 43) Standby*6: If no change for about 40 seconds later. Bright images are projected with no signal is used for setting for the connections and power. Standard/Low: When set to "Auto," selects the type of the USB wireless LAN module (not supplied) to On/Off. Adjustments and Settings Using a Menu The Connection/Power Menu The Connection/Power menu...

Operating Instructions
Page 37
... half of users connected to the projector. Project in the lower left quadrant of the screen. Project in the lower right quadrant of the wireless signal. Change the application settings. Display the users' status. Project in the upper right quadrant of the screen. Select a projection method then start projecting an image. Display the number of the screen. Using the Controller Network Presentation User 000001 8 Items Projection method Functions Start projecting an image. Project in the left quadrant of the screen. Project in full...
... half of users connected to the projector. Project in the lower left quadrant of the screen. Project in the lower right quadrant of the wireless signal. Change the application settings. Display the users' status. Project in the upper right quadrant of the screen. Select a projection method then start projecting an image. Display the number of the screen. Using the Controller Network Presentation User 000001 8 Items Projection method Functions Start projecting an image. Project in the left quadrant of the screen. Project in full...

Operating Instructions
Page 43
... unusually high. LAMP/COVER indicator Status Meaning/Remedies Flashes in red Symptoms are indicated by number of flashes. If the projector exhibits abnormal status, address the problem in accordance with qualified Sony personnel. The internal temperature is set correctly. (page 29) Unplug the AC power cord from a wall outlet. Others Indicators 43 Check the items below . ON/STANDBY indicator Status Lights in red Flashes in green Lights in green Lights in orange Flashes in red Flashes twice Flashes six times Other number of the projector. If the symptom is turned...
... unusually high. LAMP/COVER indicator Status Meaning/Remedies Flashes in red Symptoms are indicated by number of flashes. If the projector exhibits abnormal status, address the problem in accordance with qualified Sony personnel. The internal temperature is set correctly. (page 29) Unplug the AC power cord from a wall outlet. Others Indicators 43 Check the items below . ON/STANDBY indicator Status Lights in red Flashes in green Lights in green Lights in orange Flashes in red Flashes twice Flashes six times Other number of the projector. If the symptom is turned...

Operating Instructions
Page 44
... projector. Projector temperature is restored. Messages List When any change in the Installation menu is set to one and clean the air filter. The and clean the Filter. Not applicable! Please replace the Lamp Replace the lamp with the table below appears on the power until you replace the lamp and reset the lamp timer. High Altitude Mode should be shut down soon soon. To turn on the projected image, address the problem in 1 min. Projector will be "On" if Projector is set . Please check Input-A Signal...
... projector. Projector temperature is restored. Messages List When any change in the Installation menu is set to one and clean the air filter. The and clean the Filter. Not applicable! Please replace the Lamp Replace the lamp with the table below appears on the power until you replace the lamp and reset the lamp timer. High Altitude Mode should be shut down soon soon. To turn on the projected image, address the problem in 1 min. Projector will be "On" if Projector is set . Please check Input-A Signal...

Operating Instructions
Page 45
... problem, following the instructions below. on -screen display does not appear when "Status" in the 26 not appear. On-screen display does The on . The image may not display correctly because the input signal 6, 21, cannot be turned on the projector using a Keystone feature. Symptoms Remedy Page The power is not turned Check if the AC power cord is 39 compatible with the projector. Check if the connecting cable is connected to the projector is firmly connected. - Troubleshooting...
... problem, following the instructions below. on -screen display does not appear when "Status" in the 26 not appear. On-screen display does The on . The image may not display correctly because the input signal 6, 21, cannot be turned on the projector using a Keystone feature. Symptoms Remedy Page The power is not turned Check if the AC power cord is 39 compatible with the projector. Check if the connecting cable is connected to the projector is firmly connected. - Troubleshooting...

Operating Instructions
Page 46
... The remote commander Check if the batteries are not exhausted. - The fan is not set to cool the 27, 29 lamp, etc. darker or brighter. The image is used in the location where the temperature is dark/too bright. in focus. 15 The picture will be clear if condensation has accumulated - Check "Lamp Timer," and replace the lamp with the power on the lens. power consumption. Check if the projector is appropriate...
... The remote commander Check if the batteries are not exhausted. - The fan is not set to cool the 27, 29 lamp, etc. darker or brighter. The image is used in the location where the temperature is dark/too bright. in focus. 15 The picture will be clear if condensation has accumulated - Check "Lamp Timer," and replace the lamp with the power on the lens. power consumption. Check if the projector is appropriate...

Operating Instructions
Page 47
... slot. 1 Turn off the projector, and disconnect the AC power cord from a wall outlet. 2 When the lamp has cooled sufficiently, open the lamp cover by its grab. Do not replace the lamp yourself. • When removing the lamp, be burned or injured. Do not put your finger. Replacing the Lamp Replace the lamp with a new one if a message displayed on the lamp then pull out the lamp by loosening 1 screw. If you...
... slot. 1 Turn off the projector, and disconnect the AC power cord from a wall outlet. 2 When the lamp has cooled sufficiently, open the lamp cover by its grab. Do not replace the lamp yourself. • When removing the lamp, be burned or injured. Do not put your finger. Replacing the Lamp Replace the lamp with a new one if a message displayed on the lamp then pull out the lamp by loosening 1 screw. If you...

Operating Instructions
Page 78
... IN 6 Acceptable input signal 57 Adjust Signal 22 Air filter 49 Air filter cover/Ventilation holes (intake 4 APA 6 Aspect 6, 21, 23 B BLANK 7 Brightness 20 C CC Display 25 Color 20 Color Temp 20 Connecting a computer 9 Connecting a Video equipment 10 Connecting an external monitor and audio equipment 13 Connector panel 4, 5 Contrast 20 Control Key Lock 26 Control Panel Keys 6 Correcting trapezoidal distortion of the projected image (Keystone feature 6, 17 D Digital Zoom 7 E ECO MODE (Energy-saving mode) ......... 7 F fH 30 Focus 15 Focus ring 4 Freeze 7 Front...
... IN 6 Acceptable input signal 57 Adjust Signal 22 Air filter 49 Air filter cover/Ventilation holes (intake 4 APA 6 Aspect 6, 21, 23 B BLANK 7 Brightness 20 C CC Display 25 Color 20 Color Temp 20 Connecting a computer 9 Connecting a Video equipment 10 Connecting an external monitor and audio equipment 13 Connector panel 4, 5 Contrast 20 Control Key Lock 26 Control Panel Keys 6 Correcting trapezoidal distortion of the projected image (Keystone feature 6, 17 D Digital Zoom 7 E ECO MODE (Energy-saving mode) ......... 7 F fH 30 Focus 15 Focus ring 4 Freeze 7 Front...

Startup Guide
Page 29
... Lamp The lamp used . • The lamp may break with qualified Sony personnel. Also, when you rub on the LCD projector. Never use the wrong setting may be exposed to prevent internal temperature from the AC outlet before cleaning. • If you use solvent such as a glass cleaning cloth. Continuing to set this mode when using high-precision technology. On Fan Since the projector is not a malfunction of the screen...
... Lamp The lamp used . • The lamp may break with qualified Sony personnel. Also, when you rub on the LCD projector. Never use the wrong setting may be exposed to prevent internal temperature from the AC outlet before cleaning. • If you use solvent such as a glass cleaning cloth. Continuing to set this mode when using high-precision technology. On Fan Since the projector is not a malfunction of the screen...

Startup Guide
Page 37
... "Type A USB", "Type B USB" or "Network" is set to set Keystone manually. 1 Press the KEYSTONE key on the whiteboard or blackboard without using a computer. Automatically adjusts Phase, Pitch and Shift of projected image while a signal is input. If Smart APA in the Installation menu. 2 Use the V/v/B/b keys to "On", executes APA automatically when a signal is input from a computer (APA (Auto Pixel Alignment)) Press the APA key on the remote commander. Press the...
... "Type A USB", "Type B USB" or "Network" is set to set Keystone manually. 1 Press the KEYSTONE key on the whiteboard or blackboard without using a computer. Automatically adjusts Phase, Pitch and Shift of projected image while a signal is input. If Smart APA in the Installation menu. 2 Use the V/v/B/b keys to "On", executes APA automatically when a signal is input from a computer (APA (Auto Pixel Alignment)) Press the APA key on the remote commander. Press the...

Startup Guide
Page 39
... Input (Lamp Cutoff). Check the items below . Turn off . The projector is set correctly. LAMP/COVER indicator Status Meaning/Remedies Flashes in red Symptoms are indicated by number of flashes Meaning/Remedies The projector is in red Flashes twice Flashes six times Other number of flashes. Indicators The indicators allow checking the status and notify you of abnormal operation of lamp is turned off the power and wait for lamp to a wall outlet again then turn on . ON/STANDBY indicator Status Lights in red Flashes in green Lights in green Lights in orange Flashes...
... Input (Lamp Cutoff). Check the items below . Turn off . The projector is set correctly. LAMP/COVER indicator Status Meaning/Remedies Flashes in red Symptoms are indicated by number of flashes Meaning/Remedies The projector is in red Flashes twice Flashes six times Other number of flashes. Indicators The indicators allow checking the status and notify you of abnormal operation of lamp is turned off the power and wait for lamp to a wall outlet again then turn on . ON/STANDBY indicator Status Lights in red Flashes in green Lights in green Lights in orange Flashes...


