User Manual
Page 5
...Left Side 11 Rear/Right Side/Bottom 11 Control Panel 12 Connector Panel 13 Remote Commander 14 Projecting the Picture Installing the Projector 16 Connecting the Projector 17 Connecting with a Computer ......17 Connecting with a VCR 18 Connecting with a Monitor Equipment (VPL-CS7 only 19 Projecting 19 Turning Off the Power 21 Adjustments and Settings... 43 Messages List 46 Specifications 48 Index 52 Convenient Function Selecting the Menu Language ..........23 Security Lock 24 Other Functions 25 Off & Go Function (VPL-CS7 only 25 Effective Tools for Your Presentation 26 5
...Left Side 11 Rear/Right Side/Bottom 11 Control Panel 12 Connector Panel 13 Remote Commander 14 Projecting the Picture Installing the Projector 16 Connecting the Projector 17 Connecting with a Computer ......17 Connecting with a VCR 18 Connecting with a Monitor Equipment (VPL-CS7 only 19 Projecting 19 Turning Off the Power 21 Adjustments and Settings... 43 Messages List 46 Specifications 48 Index 52 Convenient Function Selecting the Menu Language ..........23 Security Lock 24 Other Functions 25 Off & Go Function (VPL-CS7 only 25 Effective Tools for Your Presentation 26 5
User Manual
Page 10
... portability • Light weight/small size/simple design This projector has been miniaturized to approx. 2.8 kg (6 lb 3 oz) (VPL-ES2)/ approx. 2.9 kg (6 lb 6 oz) (VPL-CS7) in your office. This enables you to move the projector to another location immediately after turning the power off . Security... unless the required password is entered when the projector is turned on the Remote Commander. Panel key lock This function locks all the operation keys on the control panel of the projector, allowing use Remote Commander The Remote Commander is equipped with various convenient keys, including...
... portability • Light weight/small size/simple design This projector has been miniaturized to approx. 2.8 kg (6 lb 3 oz) (VPL-ES2)/ approx. 2.9 kg (6 lb 6 oz) (VPL-CS7) in your office. This enables you to move the projector to another location immediately after turning the power off . Security... unless the required password is entered when the projector is turned on the Remote Commander. Panel key lock This function locks all the operation keys on the control panel of the projector, allowing use Remote Commander The Remote Commander is equipped with various convenient keys, including...
User Manual
Page 11
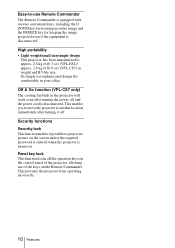
... saving mode. For details, see pages 34, 45. qa Focus ring Adjusts the picture focus. LAMP/COVER Lights up when temperature inside the projector becomes unusually high. - Flashes when the lamp cover is broken. Location and Function of the projected picture. 6 Ventilation holes (intake)/Lamp cover... Lights up or flashes under the following conditions: - For details, see "Cleaning the Air Filter" on . 3 Ventilation holes (exhaust) 4 Remote control detector 5 Adjuster (hind pad) Turn the adjuster to the right or left for minor tilt adjustment of Controls 11 Overview
... saving mode. For details, see pages 34, 45. qa Focus ring Adjusts the picture focus. LAMP/COVER Lights up when temperature inside the projector becomes unusually high. - Flashes when the lamp cover is broken. Location and Function of the projected picture. 6 Ventilation holes (intake)/Lamp cover... Lights up or flashes under the following conditions: - For details, see "Cleaning the Air Filter" on . 3 Ventilation holes (exhaust) 4 Remote control detector 5 Adjuster (hind pad) Turn the adjuster to the right or left for minor tilt adjustment of Controls 11 Overview
User Manual
Page 14
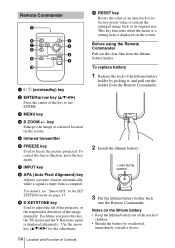
...SETTING menu on page 33. 9 D KEYSTONE key Used to its factory preset value or returns the enlarged image back to adjust the tilt of the projector, or the trapezoidal distortion of the image manually. RESET key Resets the value of an item back to its original size. Before using the... q; To replace battery 1 Release the lock of the lithium battery holder by picking it, and pull out the holder from the lithium battery holder. Remote Commander 1 I / 1 (on/standby) key 2 ENTER/arrow key (v/V/b/B) Press the center of the key to freeze the picture projected. Notes on the screen...
...SETTING menu on page 33. 9 D KEYSTONE key Used to its factory preset value or returns the enlarged image back to adjust the tilt of the projector, or the trapezoidal distortion of the image manually. RESET key Resets the value of an item back to its original size. Before using the... q; To replace battery 1 Release the lock of the lithium battery holder by picking it, and pull out the holder from the lithium battery holder. Remote Commander 1 I / 1 (on/standby) key 2 ENTER/arrow key (v/V/b/B) Press the center of the key to freeze the picture projected. Notes on the screen...
User Manual
Page 15
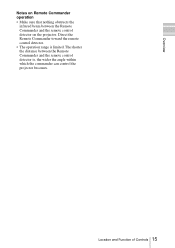
The shorter the distance between the Remote Commander and the remote control detector on the projector. Direct the Remote Commander toward the remote control detector. • The operation range is , the wider the angle within which the commander can control the projector becomes. Overview Notes on Remote Commander operation • Make sure that nothing obstructs the infrared beam between the Remote Commander and the remote control detector is limited. Location and Function of Controls 15
The shorter the distance between the Remote Commander and the remote control detector on the projector. Direct the Remote Commander toward the remote control detector. • The operation range is , the wider the angle within which the commander can control the projector becomes. Overview Notes on Remote Commander operation • Make sure that nothing obstructs the infrared beam between the Remote Commander and the remote control detector is limited. Location and Function of Controls 15
User Manual
Page 19
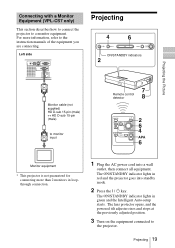
...position. 3 Turn on the equipment connected to a monitor equipment. Projecting the Picture Connecting with a Monitor Equipment (VPL-CS7 only) This section describes how to connect the projector to the projector. For more than 2 monitors in green and the Intelligent Auto-setup starts. Left side AUDIO VIDEO S VIDEO... cable (not supplied) HD D-sub 15-pin (male) ↔ HD D-sub 15-pin (male) to monitor input Remote control detector 8 Monitor equipment * This projector is not guaranteed for connecting more information, refer to the instruction manuals of the equipment you are connecting.
...position. 3 Turn on the equipment connected to a monitor equipment. Projecting the Picture Connecting with a Monitor Equipment (VPL-CS7 only) This section describes how to connect the projector to the projector. For more than 2 monitors in green and the Intelligent Auto-setup starts. Left side AUDIO VIDEO S VIDEO... cable (not supplied) HD D-sub 15-pin (male) ↔ HD D-sub 15-pin (male) to monitor input Remote control detector 8 Monitor equipment * This projector is not guaranteed for connecting more information, refer to the instruction manuals of the equipment you are connecting.
User Manual
Page 20
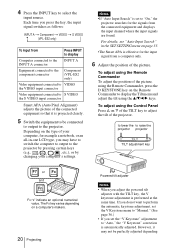
... in -one LCD type, you press the key, the input signal switches as follows: INPUT A t Component t VIDEO t S VIDEO (VPL-ES2 only) t To input from the connected equipment and displays the input channel where the input signals are found. To adjust using the Remote Commander To adjust...connected to the INPUT A INPUT A connector Equipment connected to the component connector Component (VPL-ES2 only) Video equipment connected to VIDEO the VIDEO input connector Video equipment connected to "On," the projector searches for the input signal from a computer only. 6 Adjust the position of your ...
... in -one LCD type, you press the key, the input signal switches as follows: INPUT A t Component t VIDEO t S VIDEO (VPL-ES2 only) t To input from the connected equipment and displays the input channel where the input signals are found. To adjust using the Remote Commander To adjust...connected to the INPUT A INPUT A connector Equipment connected to the component connector Component (VPL-ES2 only) Video equipment connected to VIDEO the VIDEO input connector Video equipment connected to "On," the projector searches for the input signal from a computer only. 6 Adjust the position of your ...

User Manual
Page 21
Projecting the Picture on the Remote Commander until the power turn off the power by holding the I / 1 key, or if you will not be occurred malfunction. 7 Turn the zoom ring to adjust the size of the projector with the v/V/v/B key. It may cause injury to your fingers. • Do ...Looking into the lens when projecting may be able to adjust the focus. Also, the ON/ STANDBY indicator flashes quickly for about 90 seconds (VPL-ES2) to let the projector down on the screen, and adjust the value with the powered tilt adjuster out. Turning Off the Power 1 Press the I / 1 key...
Projecting the Picture on the Remote Commander until the power turn off the power by holding the I / 1 key, or if you will not be occurred malfunction. 7 Turn the zoom ring to adjust the size of the projector with the v/V/v/B key. It may cause injury to your fingers. • Do ...Looking into the lens when projecting may be able to adjust the focus. Also, the ON/ STANDBY indicator flashes quickly for about 90 seconds (VPL-ES2) to let the projector down on the screen, and adjust the value with the powered tilt adjuster out. Turning Off the Power 1 Press the I / 1 key...
User Manual
Page 23
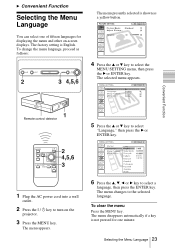
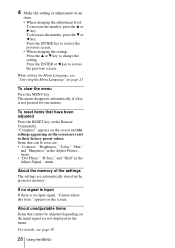
... can select one of fifteen languages for one minute. PICTURE SETTING Picture Mode: Standard Adjust Picture... The selected menu appears. : : : : Input A A Remote control detector 5 Press the v or V key to the selected language. The menu changes to select "Language," then press the B or ENTER key. The ...menu disappears automatically if a key is not pressed for displaying the menu and other on the projector. 3 Press the MENU key. To clear the menu Press the MENU key. To change the menu language, proceed as a yellow button. Selecting...
... can select one of fifteen languages for one minute. PICTURE SETTING Picture Mode: Standard Adjust Picture... The selected menu appears. : : : : Input A A Remote control detector 5 Press the v or V key to the selected language. The menu changes to select "Language," then press the B or ENTER key. The ...menu disappears automatically if a key is not pressed for displaying the menu and other on the projector. 3 Press the MENU key. To clear the menu Press the MENU key. To change the menu language, proceed as a yellow button. Selecting...

User Manual
Page 26
... enlarged image. By pressing the + key repeatedly, the image size increases (ratio of the image. To return the image back to the point on the Remote Commander. key. "Freeze" appears when the key is enlarged. Digital zoom icon 2 Move the icon to its original size immediately. To freeze the image projected...
... enlarged image. By pressing the + key repeatedly, the image size increases (ratio of the image. To return the image back to the point on the Remote Commander. key. "Freeze" appears when the key is enlarged. Digital zoom icon 2 Move the icon to its original size immediately. To freeze the image projected...
User Manual
Page 28
... a key is no signal is input If there is not pressed for one minute. Items that can be adjusted depending on the Remote Commander. About unadjustable items Items that have been adjusted Press the RESET key on the input signal are reset to their factory preset values... signal, "Cannot adjust this item." appears on the screen and the settings appearing on the screen. appears on the screen are not displayed in the projector memory. menu About the memory of the settings The settings are : • "Contrast," "Brightness," "Color," "Hue," and "Sharpness" in the Adjust Signal...
... a key is no signal is input If there is not pressed for one minute. Items that can be adjusted depending on the Remote Commander. About unadjustable items Items that have been adjusted Press the RESET key on the input signal are reset to their factory preset values... signal, "Cannot adjust this item." appears on the screen and the settings appearing on the screen. appears on the screen are not displayed in the projector memory. menu About the memory of the settings The settings are : • "Contrast," "Brightness," "Color," "Hue," and "Sharpness" in the Adjust Signal...
User Manual
Page 33
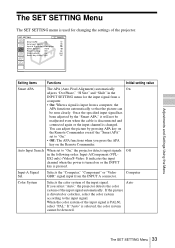
... even if the "Smart APA" set to the input signal. It indicates the input channel when the power is turned on the Remote Commander. The SET SETTING Menu The SET SETTING menu is PAL60, select "PAL." Selects the "Computer," "Component" or "Video GBR" signal input from a computer, the ... is changed. If you press the APA key on or the INPUT key is distorted or colorless, select the color system according to "On," the projector detects input signals Off in the INPUT SETTING menu for changing the settings of the input signal. If the picture is pressed. Auto The SET...
... even if the "Smart APA" set to the input signal. It indicates the input channel when the power is turned on the Remote Commander. The SET SETTING Menu The SET SETTING menu is PAL60, select "PAL." Selects the "Computer," "Component" or "Video GBR" signal input from a computer, the ... is changed. If you press the APA key on or the INPUT key is distorted or colorless, select the color system according to "On," the projector detects input signals Off in the INPUT SETTING menu for changing the settings of the input signal. If the picture is pressed. Auto The SET...
User Manual
Page 34
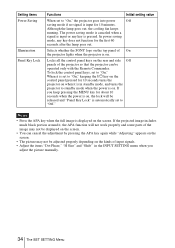
... set to "On," keeping the I/1 key on the control panel pressed for 10 seconds turns the projector on when it , the APA function will be operated only with the Remote Commander. The power saving mode is canceled when a signal is input for the first 60 seconds after the lamp goes...input or any key does not function for 10 minutes. Selects whether the SONY logo on the top panel of input signals. • Adjust the items "Dot Phase," "H Size" and "Shift" in standby mode, and turns the projector to "On." Seittng items Power Saving Illumination Panel Key Lock Functions Initial...
... set to "On," keeping the I/1 key on the control panel pressed for 10 seconds turns the projector on when it , the APA function will be operated only with the Remote Commander. The power saving mode is canceled when a signal is input for the first 60 seconds after the lamp goes...input or any key does not function for 10 minutes. Selects whether the SONY logo on the top panel of input signals. • Adjust the items "Dot Phase," "H Size" and "Shift" in standby mode, and turns the projector to "On." Seittng items Power Saving Illumination Panel Key Lock Functions Initial...
User Manual
Page 36
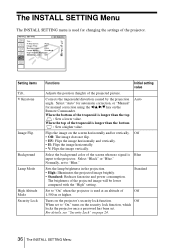
Normally, set to "On" when the projector is used for manual correction using the b/v/B/V key on the Remote Commander. Turns on the screen horizontally and/or vertically. The brightness of the projected picture. Corrects the trapezoidal distortion caused by the ... INSTALL SETTING Menu The INSTALL SETTING menu is used at an altitude of Off 1,500 m or higher. When the top of the projector. Auto Flips the image on the projector's security lock function. Off • Off: The image does not flip. • HV: Flips the image horizontally and vertically. &#...
Normally, set to "On" when the projector is used for manual correction using the b/v/B/V key on the Remote Commander. Turns on the screen horizontally and/or vertically. The brightness of the projected picture. Corrects the trapezoidal distortion caused by the ... INSTALL SETTING Menu The INSTALL SETTING menu is used at an altitude of Off 1,500 m or higher. When the top of the projector. Auto Flips the image on the projector's security lock function. Off • Off: The image does not flip. • HV: Flips the image horizontally and vertically. &#...
User Manual
Page 41
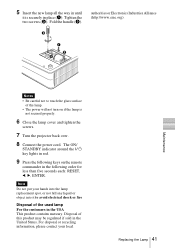
... fire Disposal of the used lamp For the customers in the United States. Disposal of the lamp. • The power will not turn on the remote commander in place (1). 5 Insert the new lamp all the way in until it to touch the glass surface of this product may be regulated if... it is securely in the following keys on if the lamp is not secured properly. 6 Close the lamp cover and tighten the screws. 7 Turn the projector back over. 8 Connect the power cord.
... fire Disposal of the used lamp For the customers in the United States. Disposal of the lamp. • The power will not turn on the remote commander in place (1). 5 Insert the new lamp all the way in until it to touch the glass surface of this product may be regulated if... it is securely in the following keys on if the lamp is not secured properly. 6 Close the lamp cover and tighten the screws. 7 Turn the projector back over. 8 Connect the power cord.
User Manual
Page 45
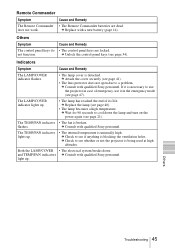
...is necessary to cool down . The LAMP/COVER indicator lights up . Remote Commander Symptom Cause and Remedy The Remote Commander • The Remote Commander batteries are locked. c Replace with qualified Sony personnel. Both the LAMP/COVER • The electrical system breaks down the... lamp and turn on the power again (see whether or not the projector is broken. c...
...is necessary to cool down . The LAMP/COVER indicator lights up . Remote Commander Symptom Cause and Remedy The Remote Commander • The Remote Commander batteries are locked. c Replace with qualified Sony personnel. Both the LAMP/COVER • The electrical system breaks down the... lamp and turn on the power again (see whether or not the projector is broken. c...
User Manual
Page 46
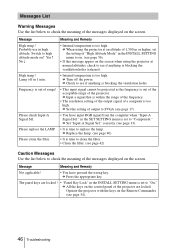
.... • It is too high. c Press the appropriate key. c When using the projector at normal altitudes, check to high altitude mode on the Remote Commander (see page 33). Operate the projector with the keys on ? Message Meaning and Remedy High temp.! High temp.! Messages List Warning... Probably use in 1 min. • Internal temperature is blocking the ventilation holes. Yes R No r • Internal temperature is time to SVGA (see if anything is blocking the ventilation holes (exhaust). in the INSTALL SETTING menu to on. (see page 36) • If this message...
.... • It is too high. c Press the appropriate key. c When using the projector at normal altitudes, check to high altitude mode on the Remote Commander (see page 33). Operate the projector with the keys on ? Message Meaning and Remedy High temp.! High temp.! Messages List Warning... Probably use in 1 min. • Internal temperature is blocking the ventilation holes. Yes R No r • Internal temperature is time to SVGA (see if anything is blocking the ventilation holes (exhaust). in the INSTALL SETTING menu to on. (see page 36) • If this message...

User Manual
Page 49
...Projector Lamp (for replacement) LMP-E180 (for VPL-CS7 only) LMP-E150 (for replacement) (1) Operating Instructions (CD-ROM) (1) Quick Reference Manual (1) Security Label (1) Design and specifications are subject to 90% Supplied accessories Remote Commander (1) Lithium battery CR2025 (1) HD D-sub 15 pin cable (2 m) (1) (1-791-992-21) Soft case (1) AC power cord (1) Air filter (for VPL-ES2... Others VD: Vertical sync input: 1-5 Vp-p high impedance, positive/ negative Y PB/CB PR/CR (VPL-ES2 only) Component phono plug sync/Y: 1 Vp-p ± 2 dB sync negative (75 ohms terminated) CB...
...Projector Lamp (for replacement) LMP-E180 (for VPL-CS7 only) LMP-E150 (for replacement) (1) Operating Instructions (CD-ROM) (1) Quick Reference Manual (1) Security Label (1) Design and specifications are subject to 90% Supplied accessories Remote Commander (1) Lithium battery CR2025 (1) HD D-sub 15 pin cable (2 m) (1) (1-791-992-21) Soft case (1) AC power cord (1) Air filter (for VPL-ES2... Others VD: Vertical sync input: 1-5 Vp-p high impedance, positive/ negative Y PB/CB PR/CR (VPL-ES2 only) Component phono plug sync/Y: 1 Vp-p ± 2 dB sync negative (75 ohms terminated) CB...

User Manual
Page 53
R Remote Commander 14 location and function of controls .........14 Remote control detector 11 Reset resettable items 28 resetting the item 28 S Scan Converter 31 Screen size 16, 48 Security Lock 36 Sharpness 29 Shift 31 Smart APA 33 Specifications 48 Status 35 Supplied accessories 49 T Tilt 36 Troubleshooting 43 V V Keystone 36 Volume 29 W Wide Mode 31 Index 53 Others
R Remote Commander 14 location and function of controls .........14 Remote control detector 11 Reset resettable items 28 resetting the item 28 S Scan Converter 31 Screen size 16, 48 Security Lock 36 Sharpness 29 Shift 31 Smart APA 33 Specifications 48 Status 35 Supplied accessories 49 T Tilt 36 Troubleshooting 43 V V Keystone 36 Volume 29 W Wide Mode 31 Index 53 Others


