User Manual
Page 5
... 13 Remote Commander 14 Projecting the Picture Installing the Projector 16 Connecting the Projector 17 Connecting with a Computer ......17 Connecting with a VCR 18 Connecting with a Monitor Equipment (VPL-CS7 only 19 Projecting 19 Turning Off the Power 21 Adjustments and Settings Using the Menu Using the MENU 27 The PICTURE SETTING Menu ..... 29 The INPUT SETTING Menu .......... 31 The SET SETTING Menu 33 The MENU SETTING Menu .......... 35 The INSTALL SETTING Menu ..... 36 The INFORMATION Menu 38 Maintenance Replacing the Lamp 40 Cleaning the Air Filter 42 Others Troubleshooting...
... 13 Remote Commander 14 Projecting the Picture Installing the Projector 16 Connecting the Projector 17 Connecting with a Computer ......17 Connecting with a VCR 18 Connecting with a Monitor Equipment (VPL-CS7 only 19 Projecting 19 Turning Off the Power 21 Adjustments and Settings Using the Menu Using the MENU 27 The PICTURE SETTING Menu ..... 29 The INPUT SETTING Menu .......... 31 The SET SETTING Menu 33 The MENU SETTING Menu .......... 35 The INSTALL SETTING Menu ..... 36 The INFORMATION Menu 38 Maintenance Replacing the Lamp 40 Cleaning the Air Filter 42 Others Troubleshooting...
User Manual
Page 6
...; To obtain the best picture, the front of the screen should be changed to direct lighting or sunlight. • Ceiling-mounted spot lighting is turned off the power with the I / 1 key, do not disconnect the unit from the wall outlet if it is desirable to install the projector in operation. To remove dust on the LCD data projector. Never pull the cord itself has been turned off. • Do...
...; To obtain the best picture, the front of the screen should be changed to direct lighting or sunlight. • Ceiling-mounted spot lighting is turned off the power with the I / 1 key, do not disconnect the unit from the wall outlet if it is desirable to install the projector in operation. To remove dust on the LCD data projector. Never pull the cord itself has been turned off. • Do...
User Manual
Page 9
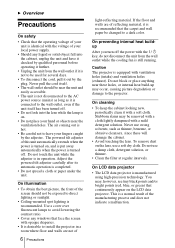
... external signal source just by choosing the mode suitable for projection. Features 9 The projector opens the lens protector, corrects the V Keystone, and sets optimum conditions for the type of input signals. Various picture modes (VPL-ES2 only) The best image can reproduce bright images at 1800 ANSI lumen, while the VPL-ES2 utilizes a 157 W UHP lamp, that can be projected by connecting the equipment with the supplied cable. ...* NTSC4.43 is the color system used frequently...
... external signal source just by choosing the mode suitable for projection. Features 9 The projector opens the lens protector, corrects the V Keystone, and sets optimum conditions for the type of input signals. Various picture modes (VPL-ES2 only) The best image can reproduce bright images at 1800 ANSI lumen, while the VPL-ES2 utilizes a 157 W UHP lamp, that can be projected by connecting the equipment with the supplied cable. ...* NTSC4.43 is the color system used frequently...
User Manual
Page 10
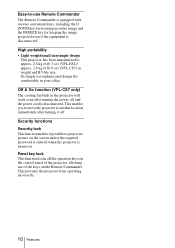
... operating incorrectly. 10 Features This enables you to move the projector to project no picture on the screen unless the required password is entered when the projector is disconnected. Off & Go function (VPL-CS7 only) The cooling fan built in on the image and the FREEZE key for zooming in the projector will work even after turning it possible to another location immediately after turning the power...
... operating incorrectly. 10 Features This enables you to move the projector to project no picture on the screen unless the required password is entered when the projector is disconnected. Off & Go function (VPL-CS7 only) The cooling fan built in on the image and the FREEZE key for zooming in the projector will work even after turning it possible to another location immediately after turning the power...
User Manual
Page 11
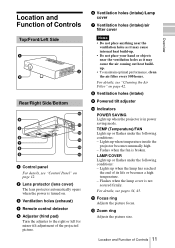
... 500 hours. qa Focus ring Adjusts the picture focus. TEMP (Temperature)/FAN Lights up when temperature inside the projector becomes unusually high. - qs Zoom ring Adjusts the picture size. For details, see "Cleaning the Air Filter" on . 3 Ventilation holes (exhaust) 4 Remote control detector 5 Adjuster (hind pad) Turn the adjuster to the right or left for minor tilt adjustment of its life or becomes a high temperature. - Location and Function of Controls 11 Overview Lights up or flashes under the following conditions: - Flashes when the lamp cover...
... 500 hours. qa Focus ring Adjusts the picture focus. TEMP (Temperature)/FAN Lights up when temperature inside the projector becomes unusually high. - qs Zoom ring Adjusts the picture size. For details, see "Cleaning the Air Filter" on . 3 Ventilation holes (exhaust) 4 Remote control detector 5 Adjuster (hind pad) Turn the adjuster to the right or left for minor tilt adjustment of its life or becomes a high temperature. - Location and Function of Controls 11 Overview Lights up or flashes under the following conditions: - Flashes when the lamp cover...
User Manual
Page 12
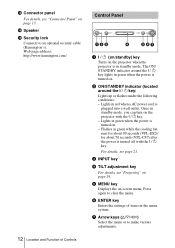
.../STANDBY indicator (located around the I / 1 key) Lights up or flashes under the following conditions: - Once in standby mode. The ON/ STANDBY indicator around the I / 1 key lights in the menu system. 7 Arrow keys (f/F/g/G) Select the menu or to an optional security cable (Kensington's). qf Speaker qg Security lock Connects to make various adjustments. qd Connector panel For details, see "Projecting" on page 19. 5 MENU key Displays the on-screen menu. Web page address: http...
.../STANDBY indicator (located around the I / 1 key) Lights up or flashes under the following conditions: - Once in standby mode. The ON/ STANDBY indicator around the I / 1 key lights in the menu system. 7 Arrow keys (f/F/g/G) Select the menu or to an optional security cable (Kensington's). qf Speaker qg Security lock Connects to make various adjustments. qd Connector panel For details, see "Projecting" on page 19. 5 MENU key Displays the on-screen menu. Web page address: http...
User Manual
Page 19
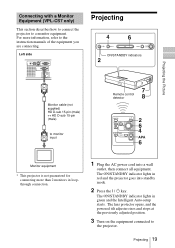
... equipment. Projecting 19 Left side AUDIO VIDEO S VIDEO INPUT A MONITOR OUT Projecting INPUT TILT MENU PUSH ENTER ON/STANDBY indicators Monitor cable (not supplied) HD D-sub 15-pin (male) ↔ HD D-sub 15-pin (male) to the projector. The ON/STANDBY indicator lights in red and the projector goes into a wall outlet, then connect all equipment. For more than 2 monitors in green and the Intelligent Auto-setup starts. Projecting the Picture Connecting with a Monitor Equipment (VPL-CS7...
... equipment. Projecting 19 Left side AUDIO VIDEO S VIDEO INPUT A MONITOR OUT Projecting INPUT TILT MENU PUSH ENTER ON/STANDBY indicators Monitor cable (not supplied) HD D-sub 15-pin (male) ↔ HD D-sub 15-pin (male) to the projector. The ON/STANDBY indicator lights in red and the projector goes into a wall outlet, then connect all equipment. For more than 2 monitors in green and the Intelligent Auto-setup starts. Projecting the Picture Connecting with a Monitor Equipment (VPL-CS7...
User Manual
Page 20
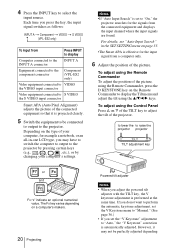
... the projector by pressing certain keys (e.g., / LCD VGA , / , etc.), or by changing your computer, for the signals from the connected equipment and displays the input channel where the input signals are found. To adjust using the Control Panel Press f on a computer's makers. 20 Projecting Powered tilt adjuster Notes • When you press the key, the input signal switches as follows: INPUT A t Component t VIDEO t S VIDEO (VPL-ES2 only) t To input from a computer only. 6 Adjust the position of the picture, using...
... the projector by pressing certain keys (e.g., / LCD VGA , / , etc.), or by changing your computer, for the signals from the connected equipment and displays the input channel where the input signals are found. To adjust using the Control Panel Press f on a computer's makers. 20 Projecting Powered tilt adjuster Notes • When you press the key, the input signal switches as follows: INPUT A t Component t VIDEO t S VIDEO (VPL-ES2 only) t To input from a computer only. 6 Adjust the position of the picture, using...

User Manual
Page 21
..., adjust it manually. Press the D KEYSTONE key on your eyes. Also, the ON/ STANDBY indicator flashes quickly for about 90 seconds (VPL-ES2) to light up again the ON/STANDBY indicator with the I / 1 key, or if you want to your fingers. • Do not push hard on the top of the picture. 8 Turn the focus ring to let the projector down on the Remote Commander until the power turn...
..., adjust it manually. Press the D KEYSTONE key on your eyes. Also, the ON/ STANDBY indicator flashes quickly for about 90 seconds (VPL-ES2) to light up again the ON/STANDBY indicator with the I / 1 key, or if you want to your fingers. • Do not push hard on the top of the picture. 8 Turn the focus ring to let the projector down on the Remote Commander until the power turn...
User Manual
Page 30
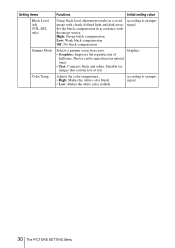
... Adjusts the color temperature. • High: Makes the white color bluish. • Low: Makes the white color reddish. High: Strong balck compensation Low: Weak black compensation Off: No black compensation according to an input signal 30 The PICTURE SETTING Menu Suitable for images that contain lots of halftones. Photos can be reproduced in a vivid image with the image source. Set the black compensation in accordance with clearly defined light and...
... Adjusts the color temperature. • High: Makes the white color bluish. • Low: Makes the white color reddish. High: Strong balck compensation Low: Weak black compensation Off: No black compensation according to an input signal 30 The PICTURE SETTING Menu Suitable for images that contain lots of halftones. Photos can be reproduced in a vivid image with the image source. Set the black compensation in accordance with clearly defined light and...
User Manual
Page 32
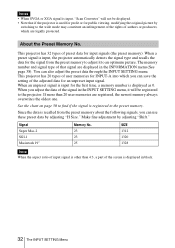
... data through the INPUT SETTING menu. Make fine adjustment by adjusting "H Size." You can use these preset data by adjusting "Shift." Since the data is other than 20 user memories are legally protected. When a preset signal is displayed in the INFORMATION menu (See page 38). If more than 4:3, a part of preset data for input signals (the preset memory). This projector has 32 types of the screen is input, the projector automatically detects the signal...
... data through the INPUT SETTING menu. Make fine adjustment by adjusting "H Size." You can use these preset data by adjusting "Shift." Since the data is other than 20 user memories are legally protected. When a preset signal is displayed in the INFORMATION menu (See page 38). If more than 4:3, a part of preset data for input signals (the preset memory). This projector has 32 types of the screen is input, the projector automatically detects the signal...
User Manual
Page 34
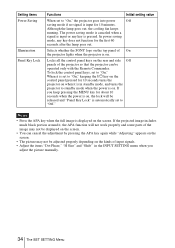
... a signal is in the INPUT SETTING menu when you keep pressing the MENU key for 10 seconds turns the projector on the screen. To lock the control panel keys, set to "On," the projector goes into power Off saving mode if no signal is on, the lock will not work properly and some parts of the image may not be displayed on the screen. • You can be operated only with the Remote Commander. Locks all the control panel...
... a signal is in the INPUT SETTING menu when you keep pressing the MENU key for 10 seconds turns the projector on the screen. To lock the control panel keys, set to "On," the projector goes into power Off saving mode if no signal is on, the lock will not work properly and some parts of the image may not be displayed on the screen. • You can be operated only with the Remote Commander. Locks all the control panel...
User Manual
Page 36
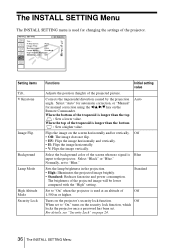
... Keystone: Auto Image Flip: Off Background: Blue Lamp Mode: Standard High Altitude Mode:Off Security Lock: Off Input-A Setting items Tilt... Auto Flips the image on page 24. 36 The INSTALL SETTING Menu V Keystone Image Flip Background Lamp Mode High Altitude Mode Security Lock Functions Initial setting value Adjusts the position (height) of the projected image will be lower compared with the "High" setting. Normally, set to "On," turns on the projector's security lock function. The brightness of the projected picture. For details, see "Security Lock" on the screen...
... Keystone: Auto Image Flip: Off Background: Blue Lamp Mode: Standard High Altitude Mode:Off Security Lock: Off Input-A Setting items Tilt... Auto Flips the image on page 24. 36 The INSTALL SETTING Menu V Keystone Image Flip Background Lamp Mode High Altitude Mode Security Lock Functions Initial setting value Adjusts the position (height) of the projected image will be lower compared with the "High" setting. Normally, set to "On," turns on the projector's security lock function. The brightness of the projected picture. For details, see "Security Lock" on the screen...
User Manual
Page 40
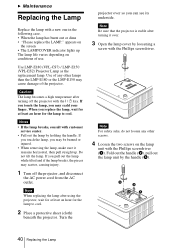
... AC power cord from the AC outlet. Turn the projector over . 3 Open the lamp cover by loosening a screw with a new one in the following case. • When the lamp has burnt out or dims • "Please replace the LAMP." Fold out the handle (2), pull out the lamp unit by holding the handle. Do not tilt the lamp. Use LMP-E180 (VPL-CS7) / LMP-E150 (VPL-ES2) Projector Lamp as the replacement lamp...
... AC power cord from the AC outlet. Turn the projector over . 3 Open the lamp cover by loosening a screw with a new one in the following case. • When the lamp has burnt out or dims • "Please replace the LAMP." Fold out the handle (2), pull out the lamp unit by holding the handle. Do not tilt the lamp. Use LMP-E180 (VPL-CS7) / LMP-E150 (VPL-ES2) Projector Lamp as the replacement lamp...
User Manual
Page 43
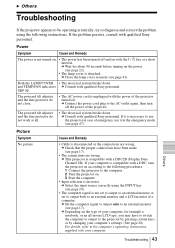
... with a DDC2B (Display Data Channel 2B). Troubleshooting 43 Others Both the LAMP/COVER • The electrical system breaks down . c Connect the power cord plug to the AC outlet again, then turn the projector on according to the following instructions. Picture Symptom No picture. c This projector is compatible with a DDC, turn off and on . 3 Start the computer. • Input selection is incorrect. The powered tilt adjuster and the lens protector do...
... with a DDC2B (Display Data Channel 2B). Troubleshooting 43 Others Both the LAMP/COVER • The electrical system breaks down . c Connect the power cord plug to the AC outlet again, then turn the projector on according to the following instructions. Picture Symptom No picture. c This projector is compatible with a DDC, turn off and on . 3 Start the computer. • Input selection is incorrect. The powered tilt adjuster and the lens protector do...
User Manual
Page 44
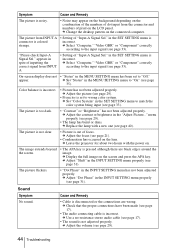
... not adjusted properly. c Use a no-resistance stereo audio cable (see page 17). • The audio connecting cable is incorrect. Color balance is incorrect. c Adjust the picture (see page 21). • Condensation has occurred on the lens. "Please check Input-A Signal Sel." c Adjust the contrast or brightness in the SET SETTING menu is connector is colored incorrect. c Change the desktop pattern on the LCD panel. c Adjust the focus (see page 29). • Projector is set to the input signal...
... not adjusted properly. c Use a no-resistance stereo audio cable (see page 17). • The audio connecting cable is incorrect. Color balance is incorrect. c Adjust the picture (see page 21). • Condensation has occurred on the lens. "Please check Input-A Signal Sel." c Adjust the contrast or brightness in the SET SETTING menu is connector is colored incorrect. c Change the desktop pattern on the LCD panel. c Adjust the focus (see page 29). • Projector is set to the input signal...
User Manual
Page 45
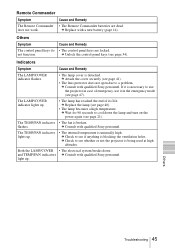
... the projector is broken. c Check to cool down . does not work. c Replace with qualified Sony personnel. flashes. c Replace the lamp (see page 40). • The lamp becomes a high temperature. The TEMP/FAN indicator • The fan is being used at high altitudes. Remote Commander Symptom Cause and Remedy The Remote Commander • The Remote Commander batteries are locked. c Consult with qualified Sony personnel. Cause and Remedy • The control panel keys are dead. The LAMP/COVER indicator lights up . and TEMP/FAN indicators c Consult...
... the projector is broken. c Check to cool down . does not work. c Replace with qualified Sony personnel. flashes. c Replace the lamp (see page 40). • The lamp becomes a high temperature. The TEMP/FAN indicator • The fan is being used at high altitudes. Remote Commander Symptom Cause and Remedy The Remote Commander • The Remote Commander batteries are locked. c Consult with qualified Sony personnel. Cause and Remedy • The control panel keys are dead. The LAMP/COVER indicator lights up . and TEMP/FAN indicators c Consult...
User Manual
Page 48
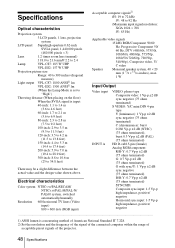
... value shown above. Specifications Optical characteristics Projection system 3 LCD panels, 1 lens, projection system LCD panel Superhigh-aperture 0.62-inch SVGA panel, 1,440,000 pixels (480,000 pixels × 3) Lens 1.2 times zoom lens (manual) f 18.0 to 21.6 mm/F 2.2 to 2.4 Lamp VPL-CS7: 185 W UHP VPL-ES2: 157 W UHP Projection picture size Range: 40 to 300 inches (diagonal measure) Light output VPL-CS7: 1800 ANSI1) lm VPL-ES2: 1500 ANSI1) lm (When the Lamp Mode is set to "High") Throwing distance (When placing...
... value shown above. Specifications Optical characteristics Projection system 3 LCD panels, 1 lens, projection system LCD panel Superhigh-aperture 0.62-inch SVGA panel, 1,440,000 pixels (480,000 pixels × 3) Lens 1.2 times zoom lens (manual) f 18.0 to 21.6 mm/F 2.2 to 2.4 Lamp VPL-CS7: 185 W UHP VPL-ES2: 157 W UHP Projection picture size Range: 40 to 300 inches (diagonal measure) Light output VPL-CS7: 1800 ANSI1) lm VPL-ES2: 1500 ANSI1) lm (When the Lamp Mode is set to "High") Throwing distance (When placing...

User Manual
Page 49
...°F) Storage humidity 10% to change without notice. Optional accessories Projector Lamp (for replacement) LMP-E180 (for VPL-CS7 only) LMP-E150 (for replacement) (1) Operating Instructions (CD-ROM) (1) Quick Reference Manual (1) Security Label (1) Design and specifications are subject to 90% Supplied accessories Remote Commander (1) Lithium battery CR2025 (1) HD D-sub 15 pin cable (2 m) (1) (1-791-992-21) Soft case (1) AC power cord (1) Air filter (for VPL-ES2 only) Signal Cable SMF-402 (HD D-sub...
...°F) Storage humidity 10% to change without notice. Optional accessories Projector Lamp (for replacement) LMP-E180 (for VPL-CS7 only) LMP-E150 (for replacement) (1) Operating Instructions (CD-ROM) (1) Quick Reference Manual (1) Security Label (1) Design and specifications are subject to 90% Supplied accessories Remote Commander (1) Lithium battery CR2025 (1) HD D-sub 15 pin cable (2 m) (1) (1-791-992-21) Soft case (1) AC power cord (1) Air filter (for VPL-ES2 only) Signal Cable SMF-402 (HD D-sub...
User Manual
Page 52
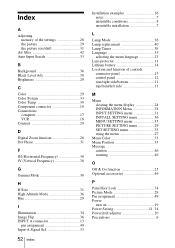
... 33 Color Temp 30 Component connector 18 Connections computer 17 VCR 18 Contrast 29 D Digital Zoom function 26 Dot Phase 31 F fH (Horizontal Frequency 38 fV (Vertical Frequency 38 G Gamma Mode 30 H H Size 31 High Altitude Mode 36 Hue 29 I Illumination 34 Image Flip 36 INPUT A connector 13 pin assignment 49 Input-A Signal Sel 33 52 Index Installation examples 16 notes 7 unsuitable conditions 8 unsuitable installation 7 L Lamp Mode 36 Lamp replacement 40 Lamp Timer...
... 33 Color Temp 30 Component connector 18 Connections computer 17 VCR 18 Contrast 29 D Digital Zoom function 26 Dot Phase 31 F fH (Horizontal Frequency 38 fV (Vertical Frequency 38 G Gamma Mode 30 H H Size 31 High Altitude Mode 36 Hue 29 I Illumination 34 Image Flip 36 INPUT A connector 13 pin assignment 49 Input-A Signal Sel 33 52 Index Installation examples 16 notes 7 unsuitable conditions 8 unsuitable installation 7 L Lamp Mode 36 Lamp replacement 40 Lamp Timer...


