
Operating Instructions
Page 2
... Indicators 29 Messages List 31 Troubleshooting 32 Replacing the Lamp 34 Cleaning the Air Filter 36 When Using the Projector by Mounting It to a Ceiling 37 Removing the lens cap 37 Attaching the dust cover 37 Cleaning the air filter and its surroundings 38 Carrying the unit 38 Specifications 39 Projection Distance 44 Dimensions 49 Index 52 Adjustments and Settings Using a Menu Using a MENU 17 The Picture Menu 18 The Screen Menu 19 The Function Menu 23 The Operation Menu 24 The Connection/Power Menu .......... 25 The Installation Menu...
... Indicators 29 Messages List 31 Troubleshooting 32 Replacing the Lamp 34 Cleaning the Air Filter 36 When Using the Projector by Mounting It to a Ceiling 37 Removing the lens cap 37 Attaching the dust cover 37 Cleaning the air filter and its surroundings 38 Carrying the unit 38 Specifications 39 Projection Distance 44 Dimensions 49 Index 52 Adjustments and Settings Using a Menu Using a MENU 17 The Picture Menu 18 The Screen Menu 19 The Function Menu 23 The Operation Menu 24 The Connection/Power Menu .......... 25 The Installation Menu...

Operating Instructions
Page 5
e Using various functions during projecting D ZOOM (Digital Zoom) +/- Picture muting helps reduce power consumption. key Adjusts the volume output. But it as a starting point while projecting. 1 Press the D ZOOM + key to display the digital zoom icon on the projected image. 2 Press the D ZOOM + key or the D ZOOM - Overview Remote Commander and Control Panel Keys Remote Commander 4 2 3 4 INPUT APA ECO MODE MENU RESET ENTER RETURN ASPECT KEYSTONE PATTERN BLANK D ZOOM VOLUME FREEZE MUTING 7 1 6 5 Control Panel Keys a Turning on the power/Going to standby mode ?/1 (On/Standby) key b ...
e Using various functions during projecting D ZOOM (Digital Zoom) +/- Picture muting helps reduce power consumption. key Adjusts the volume output. But it as a starting point while projecting. 1 Press the D ZOOM + key to display the digital zoom icon on the projected image. 2 Press the D ZOOM + key or the D ZOOM - Overview Remote Commander and Control Panel Keys Remote Commander 4 2 3 4 INPUT APA ECO MODE MENU RESET ENTER RETURN ASPECT KEYSTONE PATTERN BLANK D ZOOM VOLUME FREEZE MUTING 7 1 6 5 Control Panel Keys a Turning on the power/Going to standby mode ?/1 (On/Standby) key b ...
Operating Instructions
Page 6
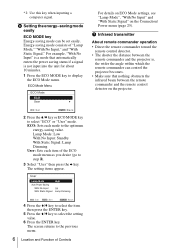
... which the remote commander can be set easily. ECO Mode Menu ECO Mode ECO User :Sel RETURN : B a ck 2 Press the V/v key or ECO MODE key to the previous menu. 6 Location and Function of "Lamp Mode," "With No Input," and "With Static Signal." g Infrared transmitter About remote commander operation • Direct the remote commander toward the remote control detector. • The shorter the distance between the remote commander and the remote control detector on the Connection/ Power menu (page 25...
... which the remote commander can be set easily. ECO Mode Menu ECO Mode ECO User :Sel RETURN : B a ck 2 Press the V/v key or ECO MODE key to the previous menu. 6 Location and Function of "Lamp Mode," "With No Input," and "With Static Signal." g Infrared transmitter About remote commander operation • Direct the remote commander toward the remote control detector. • The shorter the distance between the remote commander and the remote control detector on the Connection/ Power menu (page 25...
Operating Instructions
Page 14
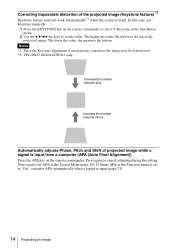
... a signal is input from a computer (APA (Auto Pixel Alignment)) Press the APA key on the remote commander or select V Keystone in the Installation menu. 2 Use the V/v/B/b the keys to cancel adjusting during the setting. If Smart APA in the Screen Menu (page 20). Notes *1: Since the Keystone adjustment is tilted. You can also set APA in the Function menu is set the value. Correcting trapezoidal distortion of the projected image (Keystone...
... a signal is input from a computer (APA (Auto Pixel Alignment)) Press the APA key on the remote commander or select V Keystone in the Installation menu. 2 Use the V/v/B/b the keys to cancel adjusting during the setting. If Smart APA in the Screen Menu (page 20). Notes *1: Since the Keystone adjustment is tilted. You can also set APA in the Function menu is set the value. Correcting trapezoidal distortion of the projected image (Keystone...
Operating Instructions
Page 15
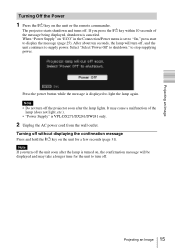
... the Connection/Power menu is displayed to stop supplying power. Press the power button while the message is set to "On," press start to shutdown." Note • Do not turn off . Turning off . Projecting an Image Turning Off the Power 1 Press the ?/1 key on the unit for the unit to supply power. After about ten seconds, the lamp will be displayed and may cause a malfunction of the message being displayed, shutdown is VPL-DX271/DX241...
... the Connection/Power menu is displayed to stop supplying power. Press the power button while the message is set to "On," press start to shutdown." Note • Do not turn off . Turning off . Projecting an Image Turning Off the Power 1 Press the ?/1 key on the unit for the unit to supply power. After about ten seconds, the lamp will be displayed and may cause a malfunction of the message being displayed, shutdown is VPL-DX271/DX241...
Operating Instructions
Page 24
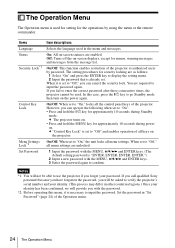
... -screen displays, except for security locking are unlocked. 1 Input the password with the MENU, V/v/B/b and ENTER keys. (The default setting password is "ENTER, ENTER, ENTER, ENTER.") 2 Input a new password with the password. *2: Before operating this case, press the ?/1 key to enter the correct password after three consecutive times, the projector cannot be asked to "Off" and enables operation of the projector to authorized users by using the menu or the remote commander. Off: Turns off...
... -screen displays, except for security locking are unlocked. 1 Input the password with the MENU, V/v/B/b and ENTER keys. (The default setting password is "ENTER, ENTER, ENTER, ENTER.") 2 Input a new password with the password. *2: Before operating this case, press the ?/1 key to enter the correct password after three consecutive times, the projector cannot be asked to "Off" and enables operation of the projector to authorized users by using the menu or the remote commander. Off: Turns off...
Operating Instructions
Page 25
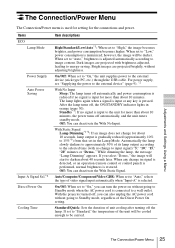
... the lamp turns off the lamp. Off: You can deactivate the With Static Signal. Standard/Quick: Sets the duration of unit cooling after turning off , the ON/STANDBY indicator lights in orange (page 30). The Connection/Power Menu 25 Adjustments and Settings Using a Menu The Connection/Power Menu The Connection/Power menu is used for setting for about 40 seconds later. Bright images are projected with no change to image content. For power supply, see "Supplying the power to "Low," power consumption is connected to Standby mode...
... the lamp turns off the lamp. Off: You can deactivate the With Static Signal. Standard/Quick: Sets the duration of unit cooling after turning off , the ON/STANDBY indicator lights in orange (page 30). The Connection/Power Menu 25 Adjustments and Settings Using a Menu The Connection/Power Menu The Connection/Power menu is used for setting for about 40 seconds later. Bright images are projected with no change to image content. For power supply, see "Supplying the power to "Low," power consumption is connected to Standby mode...
Operating Instructions
Page 29
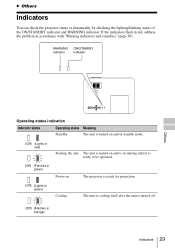
... check the projector status or abnormality by checking the lighting/flashing status of the ON/STANDBY indicator and WARNING indicator. If the indicators flash in red, address the problem in orange) Indicators 29 WARNING ON/STANDBY indicator indicator Others Operating status indication Indicator status Operating status Meaning Standby The unit is turned on and in standby mode. (Off) (Lights in red) Starting the unit The unit is turned on and is in starting until it is ready to be operated. (Off) (Flashes in green) Power on The projector is ready for projection. (Off) (Lights...
... check the projector status or abnormality by checking the lighting/flashing status of the ON/STANDBY indicator and WARNING indicator. If the indicators flash in red, address the problem in orange) Indicators 29 WARNING ON/STANDBY indicator indicator Others Operating status indication Indicator status Operating status Meaning Standby The unit is turned on and in standby mode. (Off) (Lights in red) Starting the unit The unit is turned on and is in starting until it is ready to be operated. (Off) (Flashes in green) Power on The projector is ready for projection. (Off) (Lights...
Operating Instructions
Page 30
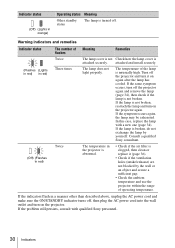
... orange) Operating status Meaning Other standby status The lamp is turned off the projector and turn on again after the lamp has cooled. Indicator status (Off) (Lights in the projector is abnormal. • Check if the air filter is clogged, then clean or replace it on the projector again. Turn off . The lamp does not light properly. Consult a qualified Sony consultant. attached and install securely. The temperature of operating temperature. In this case, replace the lamp with qualified Sony personnel. 30 Indicators...
... orange) Operating status Meaning Other standby status The lamp is turned off the projector and turn on again after the lamp has cooled. Indicator status (Off) (Lights in the projector is abnormal. • Check if the air filter is clogged, then clean or replace it on the projector again. Turn off . The lamp does not light properly. Consult a qualified Sony consultant. attached and install securely. The temperature of operating temperature. In this case, replace the lamp with qualified Sony personnel. 30 Indicators...

Operating Instructions
Page 31
... air filter. Clean the air filter. 36 Please replace the Lamp Replace the lamp with the table below appears on the power until you replace the lamp and reset the lamp timer. 34, 36 High temp.! Please check Input-A Set "Input-A Signal Sel." Messages Meaning/Remedy Page Please clean the filter. A temperature rise is set to "On." 24 locked! Change the output setting of the connected equipment to Restart projector will shutdown The ?/1 key was pressed. - to the input signal. type to suit to "Auto...
... air filter. Clean the air filter. 36 Please replace the Lamp Replace the lamp with the table below appears on the power until you replace the lamp and reset the lamp timer. 34, 36 High temp.! Please check Input-A Set "Input-A Signal Sel." Messages Meaning/Remedy Page Please clean the filter. A temperature rise is set to "On." 24 locked! Change the output setting of the connected equipment to Restart projector will shutdown The ?/1 key was pressed. - to the input signal. type to suit to "Auto...

Operating Instructions
Page 32
.... 5 On-screen display does The on . If the lamp or lamp cover is set to "On," you set your computer to output to "Off." Check the computer signal is set for output to "Manual," the keystone feature does not work properly. Operation menu is set to only an external monitor. Symptoms Remedy Page The power is not turned Check if the AC power cord is set "Aspect" manually. 21 The image is connected to both...
.... 5 On-screen display does The on . If the lamp or lamp cover is set to "On," you set your computer to output to "Off." Check the computer signal is set for output to "Manual," the keystone feature does not work properly. Operation menu is set to only an external monitor. Symptoms Remedy Page The power is not turned Check if the AC power cord is set "Aspect" manually. 21 The image is connected to both...

Operating Instructions
Page 33
... set to the input image. Check if the external audio equipment is not clear. "High Altitude Mode" is connected to minimum. 5, 23 The remote commander Check if the batteries are blocked, the internal temperature of the 25 lamp changes according to "High." • The unit is used in the location where the temperature is often greater than normal to reduce - Others Troubleshooting 33 Keep enough space around the unit. Check "Lamp Timer," and replace...
... set to the input image. Check if the external audio equipment is not clear. "High Altitude Mode" is connected to minimum. 5, 23 The remote commander Check if the batteries are blocked, the internal temperature of the 25 lamp changes according to "High." • The unit is used in the location where the temperature is often greater than normal to reduce - Others Troubleshooting 33 Keep enough space around the unit. Check "Lamp Timer," and replace...

Operating Instructions
Page 34
.... 1 Turn off the projector for replacement. If you touch a part of the lamp other screws. 3 Loosen the three screws (a) then grab the depressions with a new one screw. Note For safety reasons, do not loosen any metallic or inflammable objects into the slot. Caution • The lamp remains hot after removing the lamp, otherwise it out straight, by loosening one if a message displayed on the projected image...
.... 1 Turn off the projector for replacement. If you touch a part of the lamp other screws. 3 Loosen the three screws (a) then grab the depressions with a new one screw. Note For safety reasons, do not loosen any metallic or inflammable objects into the slot. Caution • The lamp remains hot after removing the lamp, otherwise it out straight, by loosening one if a message displayed on the projected image...

Operating Instructions
Page 52
... input signal 43 Adjust Signal 20 Air filter cover/Ventilation holes (intake 3 APA 5 Aspect 5, 19, 21 Audio muting 5 B Brightness 18 C CC Display 23 Cleaning the Air Filter 36 Color 18 Color Temp 18 Connecting a computer 7 Connecting a Video equipment 8 Connection/Power Menu 25 Contrast 18 Control Key Lock 24 Control Panel Keys 5 Correcting trapezoidal distortion of the projected image (Keystone feature 5, 14 D Digital Zoom 5 Dust cover 37 E ECO MODE (Energy-saving mode) ......... 6 F fH 28 Focus 11 Focus ring 3 Foot adjust button 3, 13 Freeze 5 Front foot (adjustable...
... input signal 43 Adjust Signal 20 Air filter cover/Ventilation holes (intake 3 APA 5 Aspect 5, 19, 21 Audio muting 5 B Brightness 18 C CC Display 23 Cleaning the Air Filter 36 Color 18 Color Temp 18 Connecting a computer 7 Connecting a Video equipment 8 Connection/Power Menu 25 Contrast 18 Control Key Lock 24 Control Panel Keys 5 Correcting trapezoidal distortion of the projected image (Keystone feature 5, 14 D Digital Zoom 5 Dust cover 37 E ECO MODE (Energy-saving mode) ......... 6 F fH 28 Focus 11 Focus ring 3 Foot adjust button 3, 13 Freeze 5 Front foot (adjustable...
Startup Guide
Page 35
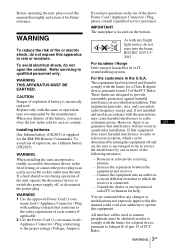
...-PJ8 Remote Commander. If this equipment does cause harmful interference to radio or television reception, which the receiver is connected. - Before operating the unit, please read this manual thoroughly and retain it for help. WARNING To reduce the risk of the FCC Rules. Installing batteries One lithium battery (CR2025) is incorrectly replaced. If you must be determined by turning the...
...-PJ8 Remote Commander. If this equipment does cause harmful interference to radio or television reception, which the receiver is connected. - Before operating the unit, please read this manual thoroughly and retain it for help. WARNING To reduce the risk of the FCC Rules. Installing batteries One lithium battery (CR2025) is incorrectly replaced. If you must be determined by turning the...

Startup Guide
Page 40
... Installation menu. When carrying the unit, do not subject the unit to disconnect the AC power cord from dropping it may come off. • Do not touch the lens with bare hands. • On cleaning the lens surface: Wipe the lens gently with a new one as soon as possible if a message displayed on the distance between the screen and the unit or the zooming...
... Installation menu. When carrying the unit, do not subject the unit to disconnect the AC power cord from dropping it may come off. • Do not touch the lens with bare hands. • On cleaning the lens surface: Wipe the lens gently with a new one as soon as possible if a message displayed on the distance between the screen and the unit or the zooming...
Startup Guide
Page 52
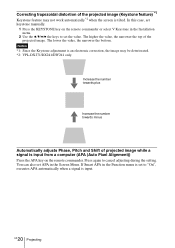
... projected image while a signal is input from a computer (APA (Auto Pixel Alignment)) Press the APA key on the remote commander or select V Keystone in the Installation menu. 2 Use the V/v/B/b the keys to set to cancel adjusting during the setting. Notes *1: Since the Keystone adjustment is an electronic correction, the image may not work automatically*2 when the screen is tilted. In this case, set keystone manually. 1 Press the KEYSTONE key on the remote commander. Increase the number...
... projected image while a signal is input from a computer (APA (Auto Pixel Alignment)) Press the APA key on the remote commander or select V Keystone in the Installation menu. 2 Use the V/v/B/b the keys to set to cancel adjusting during the setting. Notes *1: Since the Keystone adjustment is an electronic correction, the image may not work automatically*2 when the screen is tilted. In this case, set keystone manually. 1 Press the KEYSTONE key on the remote commander. Increase the number...

Startup Guide
Page 53
... message is VPL-DX271/DX241/DW241 only. 2 Unplug the AC power cord from the wall outlet. Select "Select 'Power Off' to stop supplying power. It may take a longer time for the unit to display the message. Note • Do not turn off. Projecting 21 GB When "Power Supply" on the unit for a few seconds. Turning off the projector soon after the lamp is turned on the unit or the remote commander...
... message is VPL-DX271/DX241/DW241 only. 2 Unplug the AC power cord from the wall outlet. Select "Select 'Power Off' to stop supplying power. It may take a longer time for the unit to display the message. Note • Do not turn off. Projecting 21 GB When "Power Supply" on the unit for a few seconds. Turning off the projector soon after the lamp is turned on the unit or the remote commander...

Startup Guide
Page 56
... Indicator status The number of Meaning flashes Remedies Twice (Flashes (Lights in red) in red) Three times (Off) (Flashes in the projector is abnormal. • Check if the air filter is clogged, then clean or replace it on again after the lamp has cooled. If the symptom occurs again, the lamp may be exhausted. The temperature in red) Twice The lamp cover is not Check how the lamp cover is not broken, reattach the lamp and turn...
... Indicator status The number of Meaning flashes Remedies Twice (Flashes (Lights in red) in red) Three times (Off) (Flashes in the projector is abnormal. • Check if the air filter is clogged, then clean or replace it on again after the lamp has cooled. If the symptom occurs again, the lamp may be exhausted. The temperature in red) Twice The lamp cover is not Check how the lamp cover is not broken, reattach the lamp and turn...

Startup Guide
Page 57
... the projector is turned off the projector, and disconnect the AC power cord from a wall outlet. 2 When the lamp has cooled sufficiently, open the lamp cover by holding the designated location. Note For safety reasons, do not loosen any may cause injury. 1 Turn off . For details, see "The Connection/Power Menu" in the Operating Instructions contained in the supplied CD-ROM. • If the lamp breaks, contact qualified Sony...
... the projector is turned off the projector, and disconnect the AC power cord from a wall outlet. 2 When the lamp has cooled sufficiently, open the lamp cover by holding the designated location. Note For safety reasons, do not loosen any may cause injury. 1 Turn off . For details, see "The Connection/Power Menu" in the Operating Instructions contained in the supplied CD-ROM. • If the lamp breaks, contact qualified Sony...


