User Manual
Page 5
...Side 11 Rear/Right Side/Bottom 11 Control Panel 12 Connector Panel 13 Remote Commander 14 Projecting the Picture Installing the Projector 16 Connecting the Projector 17 Connecting with a Computer ......17 Connecting with a VCR 18 Connecting with a Monitor Equipment (VPL-CS7 only 19 Projecting 19 Turning Off the Power 21 Adjustments and Settings... 43 Messages List 46 Specifications 48 Index 52 Convenient Function Selecting the Menu Language ..........23 Security Lock 24 Other Functions 25 Off & Go Function (VPL-CS7 only 25 Effective Tools for Your Presentation 26 5
...Side 11 Rear/Right Side/Bottom 11 Control Panel 12 Connector Panel 13 Remote Commander 14 Projecting the Picture Installing the Projector 16 Connecting the Projector 17 Connecting with a Computer ......17 Connecting with a VCR 18 Connecting with a Monitor Equipment (VPL-CS7 only 19 Projecting 19 Turning Off the Power 21 Adjustments and Settings... 43 Messages List 46 Specifications 48 Index 52 Convenient Function Selecting the Menu Language ..........23 Security Lock 24 Other Functions 25 Off & Go Function (VPL-CS7 only 25 Effective Tools for Your Presentation 26 5
User Manual
Page 10
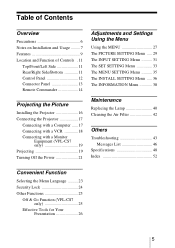
.... Panel key lock This function locks all the operation keys on the control panel of the projector, allowing use Remote Commander The Remote Commander is disconnected. This prevents the projector from operating incorrectly. 10 Features This enables you to move the projector to project no...off and the power cord is equipped with various convenient keys, including the D ZOOM key for zooming in your office. Off & Go function (VPL-CS7 only) The cooling fan built in the projector will work even after turning it possible to another location immediately after turning the power off . ...
.... Panel key lock This function locks all the operation keys on the control panel of the projector, allowing use Remote Commander The Remote Commander is disconnected. This prevents the projector from operating incorrectly. 10 Features This enables you to move the projector to project no...off and the power cord is equipped with various convenient keys, including the D ZOOM key for zooming in your office. Off & Go function (VPL-CS7 only) The cooling fan built in the projector will work even after turning it possible to another location immediately after turning the power off . ...
User Manual
Page 11
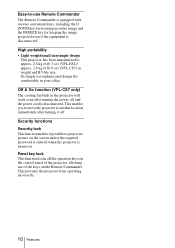
... when temperature inside the projector becomes unusually high. - For details, see pages 34, 45. For details, see "Cleaning the Air Filter" on . 3 Ventilation holes (exhaust) 4 Remote control detector 5 Adjuster (hind pad) Turn the adjuster to the right or left for minor tilt adjustment of its life or becomes a high temperature. -
... when temperature inside the projector becomes unusually high. - For details, see pages 34, 45. For details, see "Cleaning the Air Filter" on . 3 Ventilation holes (exhaust) 4 Remote control detector 5 Adjuster (hind pad) Turn the adjuster to the right or left for minor tilt adjustment of its life or becomes a high temperature. -
User Manual
Page 14
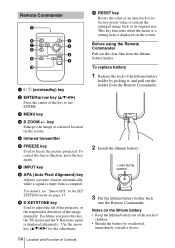
Remote Commander 1 I / 1 (on/standby) key 2 ENTER/arrow key (v/V/b/B) Press the center of an item back to its...battery • Keep the lithium battery out of the reach of the image manually. Before using the Remote Commander Pull out the clear film from the Remote Commander. 2 Install the lithium battery. + side facing upward 3 Put the lithium battery holder back into ...the Remote Commander. key Enlarges the image at a desired location on the screen. This key functions when the menu or ...
Remote Commander 1 I / 1 (on/standby) key 2 ENTER/arrow key (v/V/b/B) Press the center of an item back to its...battery • Keep the lithium battery out of the reach of the image manually. Before using the Remote Commander Pull out the clear film from the Remote Commander. 2 Install the lithium battery. + side facing upward 3 Put the lithium battery holder back into ...the Remote Commander. key Enlarges the image at a desired location on the screen. This key functions when the menu or ...
User Manual
Page 15
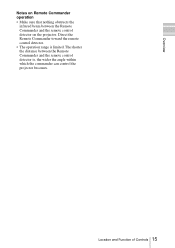
Direct the Remote Commander toward the remote control detector. • The operation range is , the wider the angle within which the commander can control the projector becomes. Overview Notes on Remote Commander operation • Make sure that nothing obstructs the infrared beam between the Remote Commander and the remote control detector is limited. Location and Function of Controls 15 The shorter the distance between the Remote Commander and the remote control detector on the projector.
Direct the Remote Commander toward the remote control detector. • The operation range is , the wider the angle within which the commander can control the projector becomes. Overview Notes on Remote Commander operation • Make sure that nothing obstructs the infrared beam between the Remote Commander and the remote control detector is limited. Location and Function of Controls 15 The shorter the distance between the Remote Commander and the remote control detector on the projector.
User Manual
Page 19
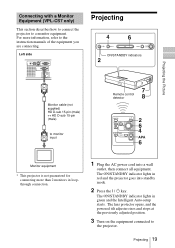
Projecting the Picture Connecting with a Monitor Equipment (VPL-CS7 only) This section describes how to connect the projector to the projector. The ON/STANDBY indicator lights in red and the projector goes into a wall ... TILT MENU PUSH ENTER ON/STANDBY indicators Monitor cable (not supplied) HD D-sub 15-pin (male) ↔ HD D-sub 15-pin (male) to monitor input Remote control detector 8 Monitor equipment * This projector is not guaranteed for connecting more information, refer to the instruction manuals of the equipment you are connecting. For...
Projecting the Picture Connecting with a Monitor Equipment (VPL-CS7 only) This section describes how to connect the projector to the projector. The ON/STANDBY indicator lights in red and the projector goes into a wall ... TILT MENU PUSH ENTER ON/STANDBY indicators Monitor cable (not supplied) HD D-sub 15-pin (male) ↔ HD D-sub 15-pin (male) to monitor input Remote control detector 8 Monitor equipment * This projector is not guaranteed for connecting more information, refer to the instruction manuals of the equipment you are connecting. For...
User Manual
Page 20
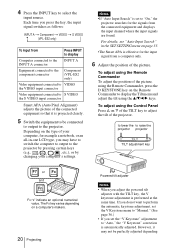
... / LCD VGA , / , etc.), or by changing your computer, for example a notebook, or an all-in the SET SETTING menu on the Remote Commander to display the Tilt menu and adjust the tilt using the v/V/b/B keys. Notes •If "Auto Input Search" is set the "V Keystone" ...the INPUT A INPUT A connector Equipment connected to the component connector Component (VPL-ES2 only) Video equipment connected to VIDEO the VIDEO input connector Video equipment connected to be perfectly adjusted depending To adjust using the Remote Commander, press the D KEYSTONE key on page 33. •The ...
... / LCD VGA , / , etc.), or by changing your computer, for example a notebook, or an all-in the SET SETTING menu on the Remote Commander to display the Tilt menu and adjust the tilt using the v/V/b/B keys. Notes •If "Auto Input Search" is set the "V Keystone" ...the INPUT A INPUT A connector Equipment connected to the component connector Component (VPL-ES2 only) Video equipment connected to VIDEO the VIDEO input connector Video equipment connected to be perfectly adjusted depending To adjust using the Remote Commander, press the D KEYSTONE key on page 33. •The ...

User Manual
Page 21
...has stopped running and the ON/STANDBY indicator has light in green and the fan continues to run for about 70 seconds (VPL-CS7)/for about 90 seconds (VPL-ES2) to reduce the internal heat. The powered tilt adjuster is effective until "V Keystone" appears on your eyes. During ...this case, adjust it manually. Please press I / 1 key. "POWER OFF? When you cannot confirm the onscreen message When you cannot confirm the on the Remote Commander...
...has stopped running and the ON/STANDBY indicator has light in green and the fan continues to run for about 70 seconds (VPL-CS7)/for about 90 seconds (VPL-ES2) to reduce the internal heat. The powered tilt adjuster is effective until "V Keystone" appears on your eyes. During ...this case, adjust it manually. Please press I / 1 key. "POWER OFF? When you cannot confirm the onscreen message When you cannot confirm the on the Remote Commander...
User Manual
Page 23
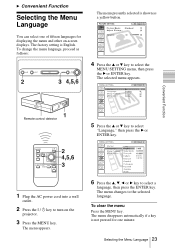
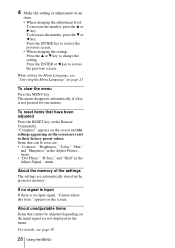
... menu appears. 6 Press the v, V, b or B key to select "Language," then press the B or ENTER key. Selecting the Menu Language 23 The selected menu appears. : : : : Input A A Remote control detector 5 Press the v or V key to select a language, then press the ENTER key. The menu disappears automatically if a key is not pressed for one...
... menu appears. 6 Press the v, V, b or B key to select "Language," then press the B or ENTER key. Selecting the Menu Language 23 The selected menu appears. : : : : Input A A Remote control detector 5 Press the v or V key to select a language, then press the ENTER key. The menu disappears automatically if a key is not pressed for one...

User Manual
Page 26
... icon appears in the image to its original size immediately. The enlargement ratio is input. 1 Project a normal image, and press the D ZOOM + key on the Remote Commander. This function does not work when a video signal is displayed on the image you want to move the icon. 3 Press the D ZOOM + key again...
... icon appears in the image to its original size immediately. The enlargement ratio is input. 1 Project a normal image, and press the D ZOOM + key on the Remote Commander. This function does not work when a video signal is displayed on the image you want to move the icon. 3 Press the D ZOOM + key again...
User Manual
Page 28
... signal are automatically stored in the Adjust Picture... For details, see "Selecting the Menu Language" on the screen. 4 Make the setting or adjustment on the Remote Commander. Items that cannot be reset are reset to their factory preset values. menu. • "Dot Phase," "H Size," and "Shift" in the menu. When setting...
... signal are automatically stored in the Adjust Picture... For details, see "Selecting the Menu Language" on the screen. 4 Make the setting or adjustment on the Remote Commander. Items that cannot be reset are reset to their factory preset values. menu. • "Dot Phase," "H Size," and "Shift" in the menu. When setting...
User Manual
Page 33
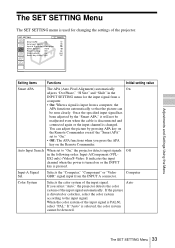
Once the specified input signal has been adjusted by pressing APA key on the Remote Commander even if the "Smart APA" set to the input signal. Computer Color System Selects the color system of the input signal automatically. SET SETTING ... to "On," the projector detects input signals Off in the INPUT SETTING menu for changing the settings of the input signal is turned on the Remote Commander. If you press the APA key on or the INPUT key is pressed. Input-A Signal Sel. You can be seen clearly. It indicates the...
Once the specified input signal has been adjusted by pressing APA key on the Remote Commander even if the "Smart APA" set to the input signal. Computer Color System Selects the color system of the input signal automatically. SET SETTING ... to "On," the projector detects input signals Off in the INPUT SETTING menu for changing the settings of the input signal is turned on the Remote Commander. If you press the APA key on or the INPUT key is pressed. Input-A Signal Sel. You can be seen clearly. It indicates the...
User Manual
Page 34
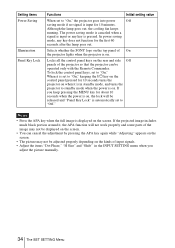
... will not work properly and some parts of the image may not be displayed on when it is input for 10 minutes. Selects whether the SONY logo on the top panel of input signals. • Adjust the items "Dot Phase," "H Size" and "Shift" in standby mode, and turns the projector to... cancel the adjustment by pressing the APA key again while "Adjusting" appears on the screen. • The picture may not be operated only with the Remote Commander.
... will not work properly and some parts of the image may not be displayed on when it is input for 10 minutes. Selects whether the SONY logo on the top panel of input signals. • Adjust the items "Dot Phase," "H Size" and "Shift" in standby mode, and turns the projector to... cancel the adjustment by pressing the APA key again while "Adjusting" appears on the screen. • The picture may not be operated only with the Remote Commander.
User Manual
Page 36
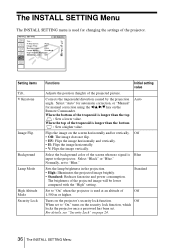
... correction, or "Manual" for changing the settings of the projector. Select the background color of the trapezoid is Blue input to "On," turns on the Remote Commander. When the top of the screen when no signal is longer than the top : Sets a lower value. The brightness of the projected picture. Off...
... correction, or "Manual" for changing the settings of the projector. Select the background color of the trapezoid is Blue input to "On," turns on the Remote Commander. When the top of the screen when no signal is longer than the top : Sets a lower value. The brightness of the projected picture. Off...
User Manual
Page 41
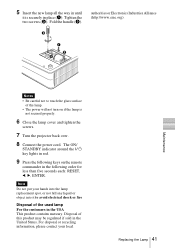
... the new lamp all the way in until it to touch the glass surface of the lamp. • The power will not turn on the remote commander in red. 9 Press the following order for less than five seconds each: RESET, b, B, ENTER. Tighten the two screws (2). Fold the handle (3). The ON/ STANDBY...
... the new lamp all the way in until it to touch the glass surface of the lamp. • The power will not turn on the remote commander in red. 9 Press the following order for less than five seconds each: RESET, b, B, ENTER. Tighten the two screws (2). Fold the handle (3). The ON/ STANDBY...
User Manual
Page 45
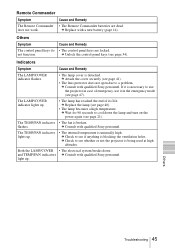
... page 47). c Wait for 90 seconds to see if anything is detached. c Consult with qualified Sony personnel. and TEMP/FAN indicators c Consult with qualified Sony personnel. Others Symptom The control panel keys do not function. The TEMP/FAN indicator • The ...c Check to a problem. If it is unusually high. Others Troubleshooting 45 c Replace with qualified Sony personnel. Remote Commander Symptom Cause and Remedy The Remote Commander • The Remote Commander batteries are locked. Cause and Remedy • The control panel keys are dead. Indicators Symptom...
... page 47). c Wait for 90 seconds to see if anything is detached. c Consult with qualified Sony personnel. and TEMP/FAN indicators c Consult with qualified Sony personnel. Others Symptom The control panel keys do not function. The TEMP/FAN indicator • The ...c Check to a problem. If it is unusually high. Others Troubleshooting 45 c Replace with qualified Sony personnel. Remote Commander Symptom Cause and Remedy The Remote Commander • The Remote Commander batteries are locked. Cause and Remedy • The control panel keys are dead. Indicators Symptom...
User Manual
Page 46
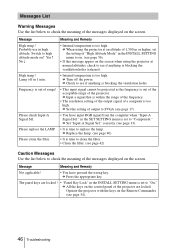
...). c Turn off in high altitude. Please replace the LAMP. • It is set to on. (see page 36) • If this message appers on the Remote Commander (see if anything is out of the acceptable range of the messages displayed on ? correctly (see page 17). Message Meaning and Remedy High temp...
...). c Turn off in high altitude. Please replace the LAMP. • It is set to on. (see page 36) • If this message appers on the Remote Commander (see if anything is out of the acceptable range of the messages displayed on ? correctly (see page 17). Message Meaning and Remedy High temp...

User Manual
Page 49
...terminated) CR/PR: 0.7 Vp-p ± 2 dB (75 ohms terminated) AUDIO Stereo minijack 500 mVrms, impedance more than 47 kilohms OUTPUT MONITOR OUT (VPL-CS7 only): HD D-sub 15-pin (female) R, G, B: Gain Unity: 75 ohms SYNC/HD, VD: 4 Vp-p (open), 1 Vp-p (75 ... Optional accessories Projector Lamp (for replacement) LMP-E180 (for VPL-CS7 only) LMP-E150 (for replacement) (1) Operating Instructions (CD-ROM) (1) Quick Reference Manual (1) Security Label (1) Design and specifications are subject to 90% Supplied accessories Remote Commander (1) Lithium battery CR2025 (1) HD D-sub 15 pin ...
...terminated) CR/PR: 0.7 Vp-p ± 2 dB (75 ohms terminated) AUDIO Stereo minijack 500 mVrms, impedance more than 47 kilohms OUTPUT MONITOR OUT (VPL-CS7 only): HD D-sub 15-pin (female) R, G, B: Gain Unity: 75 ohms SYNC/HD, VD: 4 Vp-p (open), 1 Vp-p (75 ... Optional accessories Projector Lamp (for replacement) LMP-E180 (for VPL-CS7 only) LMP-E150 (for replacement) (1) Operating Instructions (CD-ROM) (1) Quick Reference Manual (1) Security Label (1) Design and specifications are subject to 90% Supplied accessories Remote Commander (1) Lithium battery CR2025 (1) HD D-sub 15 pin ...

User Manual
Page 53
R Remote Commander 14 location and function of controls .........14 Remote control detector 11 Reset resettable items 28 resetting the item 28 S Scan Converter 31 Screen size 16, 48 Security Lock 36 Sharpness 29 Shift 31 Smart APA 33 Specifications 48 Status 35 Supplied accessories 49 T Tilt 36 Troubleshooting 43 V V Keystone 36 Volume 29 W Wide Mode 31 Index 53 Others
R Remote Commander 14 location and function of controls .........14 Remote control detector 11 Reset resettable items 28 resetting the item 28 S Scan Converter 31 Screen size 16, 48 Security Lock 36 Sharpness 29 Shift 31 Smart APA 33 Specifications 48 Status 35 Supplied accessories 49 T Tilt 36 Troubleshooting 43 V V Keystone 36 Volume 29 W Wide Mode 31 Index 53 Others
Brochure
Page 2
...11.625 x 3.125 x 9.375 inches Approximately 2.9 kg / 6 lbs 6 oz AC 100 to be clearly seen in normal room lighting. the VPL-CS7 achieves big-time performance at a modest price. High Brightness No need to turn it on your handouts. Delivers 1800 ANSI lumens, bright enough to 240V...to 85% (no uniform method of Sony or their respective owners. All trademarks referenced herein are trademarks of Sony. Sony Electronics Inc. 1 Sony Drive Park Ridge, NJ 07656 ©2005 Sony Electronics Inc. Automatic Setup No more fussing! Sony and Remote Commander are trademarks of measuring brightness, ...
...11.625 x 3.125 x 9.375 inches Approximately 2.9 kg / 6 lbs 6 oz AC 100 to be clearly seen in normal room lighting. the VPL-CS7 achieves big-time performance at a modest price. High Brightness No need to turn it on your handouts. Delivers 1800 ANSI lumens, bright enough to 240V...to 85% (no uniform method of Sony or their respective owners. All trademarks referenced herein are trademarks of Sony. Sony Electronics Inc. 1 Sony Drive Park Ridge, NJ 07656 ©2005 Sony Electronics Inc. Automatic Setup No more fussing! Sony and Remote Commander are trademarks of measuring brightness, ...


