Operating Instructions
Page 2
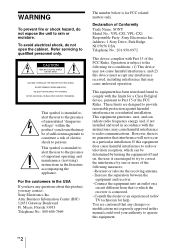
... Name: SONY Model No.: VPL-CS2, VPL-CX1 Responsible Party: Sony Electronics Inc. Reorient or relocate the receiving antenna. - Connect the equipment into an outlet on , the user is encouraged to try to constitute a risk of important operating and maintenance (servicing) instructions in this manual could void your authority to rain or moisture. WARNING To prevent fire or shock hazard, do not open the...
... Name: SONY Model No.: VPL-CS2, VPL-CX1 Responsible Party: Sony Electronics Inc. Reorient or relocate the receiving antenna. - Connect the equipment into an outlet on , the user is encouraged to try to constitute a risk of important operating and maintenance (servicing) instructions in this manual could void your authority to rain or moisture. WARNING To prevent fire or shock hazard, do not open the...

Operating Instructions
Page 5
... 7 Location and Function of Controls ... 9 Front/Left Side/Bottom 9 Rear/Right Side 9 Control Panel 11 Connector Panel 12 Remote Commander 13 Setting Up and Projecting Installing the Projector 15 Connecting the Projector 16 Connecting with a Computer ......16 Connecting with a VCR or 15k RGB/Component Equipment 18 Selecting the Menu Language ..........20 Projecting 22 Effective Tools for Your Presentation 25 Maintenance Maintenance 31 Replacing the Lamp 31 Cleaning the Air Filter 32 Troubleshooting 33 Warning Messages...
... 7 Location and Function of Controls ... 9 Front/Left Side/Bottom 9 Rear/Right Side 9 Control Panel 11 Connector Panel 12 Remote Commander 13 Setting Up and Projecting Installing the Projector 15 Connecting the Projector 16 Connecting with a Computer ......16 Connecting with a VCR or 15k RGB/Component Equipment 18 Selecting the Menu Language ..........20 Projecting 22 Effective Tools for Your Presentation 25 Maintenance Maintenance 31 Replacing the Lamp 31 Cleaning the Air Filter 32 Troubleshooting 33 Warning Messages...

Operating Instructions
Page 6
... process and does not indicate a malfunction. 6 GB Precautions To remove dust on the LCD projector. Never use a damp cloth, detergent solution, or thinner. • Clean the filter at the factory. B Overview Precautions On safety • Check that the operating voltage of your unit is identical with the voltage of your local power supply. • Should any windows that face the screen with opaque draperies...
... process and does not indicate a malfunction. 6 GB Precautions To remove dust on the LCD projector. Never use a damp cloth, detergent solution, or thinner. • Clean the filter at the factory. B Overview Precautions On safety • Check that the operating voltage of your unit is identical with the voltage of your local power supply. • Should any windows that face the screen with opaque draperies...
Operating Instructions
Page 7
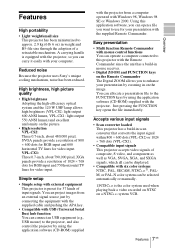
... of input signals. High brightness, high picture quality • High brightness Adopting the high-efficiency optical system and the 120 W UHP lamp allows high brightness (VPL-CS2: light output 600 ANSI lumen, VPL-CX1: light output 550 ANSI lumen) and excellent uniformity on the image. You can connect an USB equipment (e.g., USB mouse) to the projector, and also control the projector by using the application software (CD-ROM) supplied with the projector from an external signal source...
... of input signals. High brightness, high picture quality • High brightness Adopting the high-efficiency optical system and the 120 W UHP lamp allows high brightness (VPL-CS2: light output 600 ANSI lumen, VPL-CX1: light output 550 ANSI lumen) and excellent uniformity on the image. You can connect an USB equipment (e.g., USB mouse) to the projector, and also control the projector by using the application software (CD-ROM) supplied with the projector from an external signal source...

Operating Instructions
Page 11
... . - Overview Control Panel RESET MENU POWER ENTER INPUT APA VOLUME - + LAMP/COVER FAN/TEMP POWER SAVING ON/STANDBY 1 I / 1 (on/standby) key Turns on the projector with the I / 1 key. - Lights in standby mode, you can turn off . Each time you cannot light up when the lamp has reached the end of Controls 11 GB Lights up the ON/STANDBY indicator with the I / 1 key. During this time, you press the key, the input signal switches as follows: INPUT A t VIDEO t S VIDEO 3 APA (Auto Pixel Alignment) key Adjusts a picture clearest...
... . - Overview Control Panel RESET MENU POWER ENTER INPUT APA VOLUME - + LAMP/COVER FAN/TEMP POWER SAVING ON/STANDBY 1 I / 1 (on/standby) key Turns on the projector with the I / 1 key. - Lights in standby mode, you can turn off . Each time you cannot light up when the lamp has reached the end of Controls 11 GB Lights up the ON/STANDBY indicator with the I / 1 key. During this time, you press the key, the input signal switches as follows: INPUT A t VIDEO t S VIDEO 3 APA (Auto Pixel Alignment) key Adjusts a picture clearest...

Operating Instructions
Page 13
For details, see "To control the computer using the Remote Commander. Overview Remote Commander The keys that have the same names as the mouse of the computer connected to the unit. 5 Arrow keys (M/m/ MUTING I / 1 key 2 APA (Auto Pixel Alignment) key 3 ENTER key 4 Joystick Functions as those on page 23. CLICK (D ZOOM) 6 9 D ZOOM 1 FUNCTION 2 7 8 1 I / 1 + PIC 1 VOLUME - INPUT APA 2 MENU ENTER 3 4 5 0 + RESET R - You can control a connected computer using the supplied Remote Commander" on the control panel function identically.
For details, see "To control the computer using the Remote Commander. Overview Remote Commander The keys that have the same names as the mouse of the computer connected to the unit. 5 Arrow keys (M/m/ MUTING I / 1 key 2 APA (Auto Pixel Alignment) key 3 ENTER key 4 Joystick Functions as those on page 23. CLICK (D ZOOM) 6 9 D ZOOM 1 FUNCTION 2 7 8 1 I / 1 + PIC 1 VOLUME - INPUT APA 2 MENU ENTER 3 4 5 0 + RESET R - You can control a connected computer using the supplied Remote Commander" on the control panel function identically.
Operating Instructions
Page 16
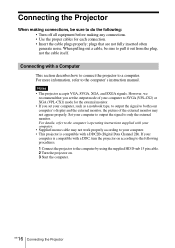
...'s operating instructions supplied with a DDC, turn the projector on . 3 Start the computer. However, we recommend that are not fully inserted often generate noise. GB 16 Connecting the Projector Set your computer. • This projector is compatible with your computer. • Supplied mouse cable may not appear properly. If your computer to SVGA (VPL-CS2) or XGA (VPL-CX1) mode for each connection. • Insert the cable plugs properly; Connecting with...
...'s operating instructions supplied with a DDC, turn the projector on . 3 Start the computer. However, we recommend that are not fully inserted often generate noise. GB 16 Connecting the Projector Set your computer. • This projector is compatible with your computer. • Supplied mouse cable may not appear properly. If your computer to SVGA (VPL-CS2) or XGA (VPL-CX1) mode for each connection. • Insert the cable plugs properly; Connecting with...
Operating Instructions
Page 23
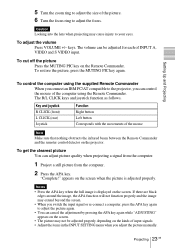
... image may extend beyond the screen. • When you switch the input signal or re-connect a computer, press the APA key again to adjust the picture again. • You can control the mouse of the computer using the supplied Remote Commander When you connect an IBM PC/AT compatible to the projector, you adjust the picture manually. Caution Looking into the lens when projecting may not be adjusted for each of input signals...
... image may extend beyond the screen. • When you switch the input signal or re-connect a computer, press the APA key again to adjust the picture again. • You can control the mouse of the computer using the supplied Remote Commander When you connect an IBM PC/AT compatible to the projector, you adjust the picture manually. Caution Looking into the lens when projecting may not be adjusted for each of input signals...

Operating Instructions
Page 26
..." on an item. PICTURE CTRL INPUT-A CONTRAST: 8 0 BRIGHT: 50 GAMMA MODE: GRAPHICS COLOR TEMP: HIGH 2 Use the M or m key to their factory preset values. Press the ENTER or < key to change the menu language displayed in the projector memory. To reset items that can change the setting. Cannot adjust this item." To clear the menu Press the MENU key. Menus Setting items SET SETTING INPUT-A STATUS: ON INPUT-A: RGB KEYSTONE MEMORY: OFF DIGITAL KEYSTONE: OFF LANGUAGE: ENGLISH...
..." on an item. PICTURE CTRL INPUT-A CONTRAST: 8 0 BRIGHT: 50 GAMMA MODE: GRAPHICS COLOR TEMP: HIGH 2 Use the M or m key to their factory preset values. Press the ENTER or < key to change the menu language displayed in the projector memory. To reset items that can change the setting. Cannot adjust this item." To clear the menu Press the MENU key. Menus Setting items SET SETTING INPUT-A STATUS: ON INPUT-A: RGB KEYSTONE MEMORY: OFF DIGITAL KEYSTONE: OFF LANGUAGE: ENGLISH...

Operating Instructions
Page 28
... picture after the picture is input INPUT SETTING ASPECT: 4:3 VIDEO No. 01 VIDEO/60 Memory No. The higher GB 28 The INPUT SETTING Menu the setting, the larger the horizontal size of the picture. SHIFT Adjusts the position of the LCD panel and the signal input from the INPUT A connector. As the setting for the preset signals, see page 40. VPL-CS2: When SVGA, XGA or SXGA signal is input VPL-CX1: When XGA or SXGA signal is input INPUT SETTING DOT PHASE: 1 5 SIZE...
... picture after the picture is input INPUT SETTING ASPECT: 4:3 VIDEO No. 01 VIDEO/60 Memory No. The higher GB 28 The INPUT SETTING Menu the setting, the larger the horizontal size of the picture. SHIFT Adjusts the position of the LCD panel and the signal input from the INPUT A connector. As the setting for the preset signals, see page 40. VPL-CS2: When SVGA, XGA or SXGA signal is input VPL-CX1: When XGA or SXGA signal is input INPUT SETTING DOT PHASE: 1 5 SIZE...

Operating Instructions
Page 29
...:9: When the picture with ratio 16:9 (squeezed) is input, the projector automatically detects the signal type and recalls the data for the signal from the preset memory about the following signals, you adjust the data of preset data for input signals for the first time, a memory number is other than 20 user memories are displayed in the INPUT SETTING menu. You can use these preset data by adjusting SHIFT. Signal Super Mac-2 SGI-1 Macintosh...
...:9: When the picture with ratio 16:9 (squeezed) is input, the projector automatically detects the signal type and recalls the data for the signal from the preset memory about the following signals, you adjust the data of preset data for input signals for the first time, a memory number is other than 20 user memories are displayed in the INPUT SETTING menu. You can use these preset data by adjusting SHIFT. Signal Super Mac-2 SGI-1 Macintosh...

Operating Instructions
Page 30
... projector. When the upside of hours for the menus, a message when turning off the on-screen displays except for which the lamp currently used has been operated. SIRCS RECEIVER Selects the remote control detectors (SIRCS receiver) on the front and rear of the on the projection angle. LAMP TIMER Indicates the total number of the trapezoid is not correct, "Please check INPUT-A setting." SET SETTING INPUT-A STATUS: ON INPUT-A: RGB KEYSTONE MEMORY: OFF DIGITAL KEYSTONE: OFF LANGUAGE: ENGLISH POWER...
... projector. When the upside of hours for the menus, a message when turning off the on-screen displays except for which the lamp currently used has been operated. SIRCS RECEIVER Selects the remote control detectors (SIRCS receiver) on the front and rear of the on the projection angle. LAMP TIMER Indicates the total number of the trapezoid is not correct, "Please check INPUT-A setting." SET SETTING INPUT-A STATUS: ON INPUT-A: RGB KEYSTONE MEMORY: OFF DIGITAL KEYSTONE: OFF LANGUAGE: ENGLISH POWER...

Operating Instructions
Page 31
.... When replacing the lamp after using the projector Turn off the projector with a new LMP-C120 Projector Lamp. Caution The lamp becomes a high temperature after turning it over so you may scald your finger. Wait for at least an hour for the lamp to touch the glass surface of the lamp. • The power will not turn on the lamp unit with the LMP-C120 Projector Lamp). Turn the projector over . 2 Open the lamp cover by...
.... When replacing the lamp after using the projector Turn off the projector with a new LMP-C120 Projector Lamp. Caution The lamp becomes a high temperature after turning it over so you may scald your finger. Wait for at least an hour for the lamp to touch the glass surface of the lamp. • The power will not turn on the lamp unit with the LMP-C120 Projector Lamp). Turn the projector over . 2 Open the lamp cover by...

Operating Instructions
Page 32
6 Turn the projector back over. 7 Connect the power cord and turn the projector to standby mode. 8 Press the following keys on the control panel in the following order for less than five seconds each: RESET,
6 Turn the projector back over. 7 Connect the power cord and turn the projector to standby mode. 8 Press the following keys on the control panel in the following order for less than five seconds each: RESET,
Operating Instructions
Page 33
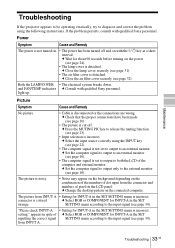
... connected computer. Maintenance Troubleshooting If the projector appears to be operating erratically, try to diagnose and correct the problem using the INPUT key (see page 30). c Close the air filter cover securely (see page 16). setting." from INPUT A • Setting for INPUT-A in the SET SETTING menu is cut off and on . • The power has been turned off . If the problem persists, consult with qualified Sony personnel. c Check that the proper connections...
... connected computer. Maintenance Troubleshooting If the projector appears to be operating erratically, try to diagnose and correct the problem using the INPUT key (see page 30). c Close the air filter cover securely (see page 16). setting." from INPUT A • Setting for INPUT-A in the SET SETTING menu is cut off and on . • The power has been turned off . If the problem persists, consult with qualified Sony personnel. c Check that the proper connections...

Operating Instructions
Page 34
... proper connections have been made (see page 27). sound comes through AUDIO connector, c Input stereo sound. The joystick, R CLICK, or • The mouse port on . c Leave the projector for about two hours with new batteries (see page 28). c Adjust DOT PHASE in the INPUT SETTING menu properly (see page 30). Remote Commander Symptom Cause and Remedy The Remote Commander does not work. • The Remote Commander batteries are wrong. The picture is...
... proper connections have been made (see page 27). sound comes through AUDIO connector, c Input stereo sound. The joystick, R CLICK, or • The mouse port on . c Leave the projector for about two hours with new batteries (see page 28). c Adjust DOT PHASE in the INPUT SETTING menu properly (see page 30). Remote Commander Symptom Cause and Remedy The Remote Commander does not work. • The Remote Commander batteries are wrong. The picture is...
Operating Instructions
Page 35
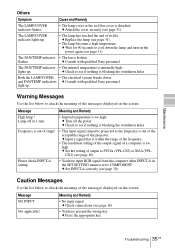
... the lamp and turn on the screen. c Attach the cover securely (see page 31). • The lamp becomes a high temperature. Maintenance Others Symptom Cause and Remedy The LAMP/COVER indicator flashes. • The lamp cover or the air filter cover is blocking the ventilation holes. The LAMP/COVER indicator lights up. • The lamp has reached the end of the messages displayed on the screen. c Set the setting of output to check the meaning of its life. Please check INPUT-A setting...
... the lamp and turn on the screen. c Attach the cover securely (see page 31). • The lamp becomes a high temperature. Maintenance Others Symptom Cause and Remedy The LAMP/COVER indicator flashes. • The lamp cover or the air filter cover is blocking the ventilation holes. The LAMP/COVER indicator lights up. • The lamp has reached the end of the messages displayed on the screen. c Set the setting of output to check the meaning of its life. Please check INPUT-A setting...
Operating Instructions
Page 38
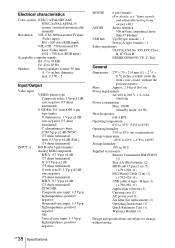
... dots (RGB input) Acceptable computer signals fH: 15 to 91 kHz fV: 43 to 90% Supplied accessories Remote Commander RM-PJM10 (1) Size AA (R6) batteries (2) HD D-sub 15 pin (2 m) (1) (1-791-992-11) PS/2 Mouse Cable (2 m) (1) (1-792-424-11) USB cable A type - B type (1) (1-790-081-11) Application software (1) Carrying case (1) AC power cord (1) Air filter (for replacement) (1) Operating Instructions (1) Quick Reference Card (1) Warranty Booklet (1) Design and specifications are subject to change...
... dots (RGB input) Acceptable computer signals fH: 15 to 91 kHz fV: 43 to 90% Supplied accessories Remote Commander RM-PJM10 (1) Size AA (R6) batteries (2) HD D-sub 15 pin (2 m) (1) (1-791-992-11) PS/2 Mouse Cable (2 m) (1) (1-792-424-11) USB cable A type - B type (1) (1-790-081-11) Application software (1) Carrying case (1) AC power cord (1) Air filter (for replacement) (1) Operating Instructions (1) Quick Reference Card (1) Warranty Booklet (1) Design and specifications are subject to change...

Operating Instructions
Page 39
... 1 DATA 2 N.C. 3 GND 4 +5V 5 CLK 6 N.C. 1 R/R-Y 9 N.C. 2 G/Y 10 GND 3 B/B-Y 11 GND 4 GND 12 N.C. 5 GND 13 HD/C.Sync 6 GND (R) 14 VD 7 GND (G) 15 N.C. 8 GND (B) Other Specifications 39 GB Optional accessories Projector Lamp LMP-C120 (for replacement) Signal Cable SMF-402 (HD D-sub 15-pin (male) y 3 K phono type (male)) Monitor Cable SMF-410 (HD D-sub 15 pin (male) y HD D-sub 15 pin (male)) Signal Adapter ADP...
... 1 DATA 2 N.C. 3 GND 4 +5V 5 CLK 6 N.C. 1 R/R-Y 9 N.C. 2 G/Y 10 GND 3 B/B-Y 11 GND 4 GND 12 N.C. 5 GND 13 HD/C.Sync 6 GND (R) 14 VD 7 GND (G) 15 N.C. 8 GND (B) Other Specifications 39 GB Optional accessories Projector Lamp LMP-C120 (for replacement) Signal Cable SMF-402 (HD D-sub 15-pin (male) y 3 K phono type (male)) Monitor Cable SMF-410 (HD D-sub 15 pin (male) y HD D-sub 15 pin (male)) Signal Adapter ADP...

Operating Instructions
Page 43
... assignment 39 INPUT SETTING menu .28 INPUT-A 30 Installation examples ......15 notes 36 unsuitable conditions ..36 K KEYSTONE MEMORY 30 L Lamp replacement ..........31 LAMP TIMER 30 LANGUAGE 30 selecting the menu language 20 Location and function of controls connector panel ..........12 control panel 11 front/left/bottom side ....9 rear/right side 9 Remote Commander ...13 M Menu clearing the menu display 26 INPUT SETTING menu 28 PICTURE CTRL menu 27 SET SETTING menu .30 using the menu ...........26 Message caution 35 warning 35 Mouse cable connection 18 pin...
... assignment 39 INPUT SETTING menu .28 INPUT-A 30 Installation examples ......15 notes 36 unsuitable conditions ..36 K KEYSTONE MEMORY 30 L Lamp replacement ..........31 LAMP TIMER 30 LANGUAGE 30 selecting the menu language 20 Location and function of controls connector panel ..........12 control panel 11 front/left/bottom side ....9 rear/right side 9 Remote Commander ...13 M Menu clearing the menu display 26 INPUT SETTING menu 28 PICTURE CTRL menu 27 SET SETTING menu .30 using the menu ...........26 Message caution 35 warning 35 Mouse cable connection 18 pin...


