
User Guide
Page 3
... ...77 Connecting an i.LINK Device ...78 Connecting to a Network (LAN) ...80 Customizing Your VAIO Computer ...82 Setting the Password ...83 Setting Up Your Computer with VAIO Central ...86 Using the Power Saving Modes ...87 Upgrading Your VAIO Computer...90 Before Upgrading Your Computer ...91 Adding and Removing Memory...92 Installing the Hard Disk Drive...102...
... ...77 Connecting an i.LINK Device ...78 Connecting to a Network (LAN) ...80 Customizing Your VAIO Computer ...82 Setting the Password ...83 Setting Up Your Computer with VAIO Central ...86 Using the Power Saving Modes ...87 Upgrading Your VAIO Computer...90 Before Upgrading Your Computer ...91 Adding and Removing Memory...92 Installing the Hard Disk Drive...102...
User Guide
Page 90
...invalidation of memory installed on your dealer to the online Specifications. To find the nearest center or agent, visit the Sony online support Web site. ❑ Before Upgrading Your Computer (page 91) ❑ Adding and Removing Memory (page 92) ❑ Installing the Hard Disk Drive ...You do not install it yourself, if you are not familiar with upgrading memory on a computer. ❑ You do not touch the connectors or open the memory panel. n 90 N Upgrading Your VAIO Computer Upgrading Your VAIO Computer Your computer and memory modules use high precision components and electronic ...
...invalidation of memory installed on your dealer to the online Specifications. To find the nearest center or agent, visit the Sony online support Web site. ❑ Before Upgrading Your Computer (page 91) ❑ Adding and Removing Memory (page 92) ❑ Installing the Hard Disk Drive ...You do not install it yourself, if you are not familiar with upgrading memory on a computer. ❑ You do not touch the connectors or open the memory panel. n 90 N Upgrading Your VAIO Computer Upgrading Your VAIO Computer Your computer and memory modules use high precision components and electronic ...

User Guide
Page 91
... computer or follow any procedures in personal injury or equipment damage. Electrostatic discharge (ESD) can damage disk drives and other components. n 91 N Upgrading Your VAIO Computer Before Upgrading Your Computer The upgrading procedures described in this section. ! Otherwise, damage may result in this section assume that produce or hold static electricity (for example, cellophane...
... computer or follow any procedures in personal injury or equipment damage. Electrostatic discharge (ESD) can damage disk drives and other components. n 91 N Upgrading Your VAIO Computer Before Upgrading Your Computer The upgrading procedures described in this section. ! Otherwise, damage may result in this section assume that produce or hold static electricity (for example, cellophane...

User Guide
Page 92
... of available slots depends on adding/removing memory modules ❑ Be careful when changing memory. n 92 N Upgrading Your VAIO Computer Adding and Removing Memory If you want to expand the functionality of your computer, you upgrade your computer's memory, read the notes and procedures in the following : ❑ The procedures described in personal...
... of available slots depends on adding/removing memory modules ❑ Be careful when changing memory. n 92 N Upgrading Your VAIO Computer Adding and Removing Memory If you want to expand the functionality of your computer, you upgrade your computer's memory, read the notes and procedures in the following : ❑ The procedures described in personal...

User Guide
Page 93
n 93 N Upgrading Your VAIO Computer ❑ Use the special bag delivered with care. To avoid injuries to : ❑ Heat sources such as radiators or air ducts ❑ Direct sunlight &#...
n 93 N Upgrading Your VAIO Computer ❑ Use the special bag delivered with care. To avoid injuries to : ❑ Heat sources such as radiators or air ducts ❑ Direct sunlight &#...

User Guide
Page 94
If you remove the top panel immediately after you attempt to remove the panel. Wait about one hour to touch. n 94 N Upgrading Your VAIO Computer Removing and Installing a Memory Module ! To change or add a memory module 1 Shut down the computer, the internal components may be too hot to let the components cool down before you shut down the computer and turn off all peripheral devices, such as a printer. 2 Unplug the computer and disconnect any peripheral devices.
If you remove the top panel immediately after you attempt to remove the panel. Wait about one hour to touch. n 94 N Upgrading Your VAIO Computer Removing and Installing a Memory Module ! To change or add a memory module 1 Shut down the computer, the internal components may be too hot to let the components cool down before you shut down the computer and turn off all peripheral devices, such as a printer. 2 Unplug the computer and disconnect any peripheral devices.
User Guide
Page 95
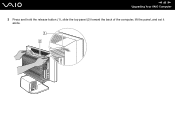
n 95 N Upgrading Your VAIO Computer 3 Press and hold the release button (1), slide the top panel (2) toward the back of the computer, lift the panel, and set it aside.
n 95 N Upgrading Your VAIO Computer 3 Press and hold the release button (1), slide the top panel (2) toward the back of the computer, lift the panel, and set it aside.
User Guide
Page 96
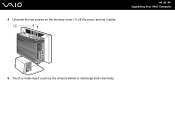
n 96 N Upgrading Your VAIO Computer 5 Touch a metal object (such as the chassis frame) to discharge static electricity. 4 Unscrew the two screws on the memory cover (1), lift the cover, and set it aside.
n 96 N Upgrading Your VAIO Computer 5 Touch a metal object (such as the chassis frame) to discharge static electricity. 4 Unscrew the two screws on the memory cover (1), lift the cover, and set it aside.

User Guide
Page 97
Store the module in a static-free bag. n 97 N Upgrading Your VAIO Computer 6 Locate the memory module(s) you wish to remove. 7 Push down on the latches (1), located on both sides of the module, to gently eject it from the slot. 8 Grasp the memory module by the sides and remove from the computer.
Store the module in a static-free bag. n 97 N Upgrading Your VAIO Computer 6 Locate the memory module(s) you wish to remove. 7 Push down on the latches (1), located on both sides of the module, to gently eject it from the slot. 8 Grasp the memory module by the sides and remove from the computer.

User Guide
Page 98
n 98 N Upgrading Your VAIO Computer 9 Locate the center notch (1) on the bottom edge of the memory module and align it to relieve pressure. The side latches (3) snap into the slot by pressing down evenly against the module's upper corners. To avoid damaging a memory module or the memory module slot, move the side latches slightly outward to the center bump in the open module slot. 10 Firmly insert the lower edge of the module (2) into position, holding the memory module in place. !
n 98 N Upgrading Your VAIO Computer 9 Locate the center notch (1) on the bottom edge of the memory module and align it to relieve pressure. The side latches (3) snap into the slot by pressing down evenly against the module's upper corners. To avoid damaging a memory module or the memory module slot, move the side latches slightly outward to the center bump in the open module slot. 10 Firmly insert the lower edge of the module (2) into position, holding the memory module in place. !

User Guide
Page 99
11 Replace the memory cover (1) and tighten the two screws. n 99 N Upgrading Your VAIO Computer
11 Replace the memory cover (1) and tighten the two screws. n 99 N Upgrading Your VAIO Computer
User Guide
Page 100
12 Gently slide the top panel onto the computer until it snaps into place. n 100 N Upgrading Your VAIO Computer
12 Gently slide the top panel onto the computer until it snaps into place. n 100 N Upgrading Your VAIO Computer

User Guide
Page 101
n 101 N Upgrading Your VAIO Computer Viewing the Amount of Memory To view the amount of system memory. If the additional memory does not appear, repeat the whole procedure and restart the computer. You can view the amount of memory 1 Turn on the computer. 2 Click Start, point to All Programs, and click VAIO Central. 3 Click the System Information tab in the VAIO Central window. 4 Double-click the System Information folder. 5 Double-click the System Information icon.
n 101 N Upgrading Your VAIO Computer Viewing the Amount of Memory To view the amount of system memory. If the additional memory does not appear, repeat the whole procedure and restart the computer. You can view the amount of memory 1 Turn on the computer. 2 Click Start, point to All Programs, and click VAIO Central. 3 Click the System Information tab in the VAIO Central window. 4 Double-click the System Information folder. 5 Double-click the System Information icon.
User Guide
Page 102
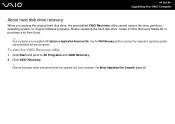
n 102 N Upgrading Your VAIO Computer Installing the Hard Disk Drive Your computer may be changed. Visit the Sony online support Web site for removable media, may not reflect correct drive/icon associations. Replacing the Original Hard Disk Drive If you replace the ... letter to install it in the computer. Review the manufacturer's information provided with open internal bays to correct the drive mapping, and/or create a VAIO Recovery Media Kit. For more information. See the online Specifications for details about the installed hard disk drive. About drive mapping When a new hard...
n 102 N Upgrading Your VAIO Computer Installing the Hard Disk Drive Your computer may be changed. Visit the Sony online support Web site for removable media, may not reflect correct drive/icon associations. Replacing the Original Hard Disk Drive If you replace the ... letter to install it in the computer. Review the manufacturer's information provided with open internal bays to correct the drive mapping, and/or create a VAIO Recovery Media Kit. For more information. See the online Specifications for details about the installed hard disk drive. About drive mapping When a new hard...
User Guide
Page 103
... VAIO Recovery utility cannot restore the drive partitions, operating system, or original software programs. Before replacing the hard disk drive, create a VAIO Recovery Media Kit or purchase a kit from Sony. ✍ Your computer is not supplied with System or Application Recovery CDs. n 103 N Upgrading Your VAIO Computer About hard disk drive recovery When you upgrade your Sony...
... VAIO Recovery utility cannot restore the drive partitions, operating system, or original software programs. Before replacing the hard disk drive, create a VAIO Recovery Media Kit or purchase a kit from Sony. ✍ Your computer is not supplied with System or Application Recovery CDs. n 103 N Upgrading Your VAIO Computer About hard disk drive recovery When you upgrade your Sony...

User Guide
Page 104
n 104 N Upgrading Your VAIO Computer Drive letter assignment When a new hard disk drive is installed, an identifying drive letter is the default location to save files created with the ..., the software automatically creates a new save folder on the new drive. ✍ When you register for the first time, after recovering your computer with the VAIO Recovery utility. The drive letter assignment becomes effective after you start the Click to DVD software creates a new folder location on the new drive.
n 104 N Upgrading Your VAIO Computer Drive letter assignment When a new hard disk drive is installed, an identifying drive letter is the default location to save files created with the ..., the software automatically creates a new save folder on the new drive. ✍ When you register for the first time, after recovering your computer with the VAIO Recovery utility. The drive letter assignment becomes effective after you start the Click to DVD software creates a new folder location on the new drive.

User Guide
Page 105
Wait about one hour to let the components cool down before you shut down the computer and turn off all peripheral devices, such as a printer. 2 Unplug the computer and disconnect any peripheral devices. To install an additional hard disk drive 1 Shut down the computer, the internal components may be too hot to touch. n 105 N Upgrading Your VAIO Computer Installing an Additional Hard Disk Drive You can install up to two SATA hard disk drives to remove the panel. If you remove the back panel immediately after you attempt to the internal hard disk drive bay. !
Wait about one hour to let the components cool down before you shut down the computer and turn off all peripheral devices, such as a printer. 2 Unplug the computer and disconnect any peripheral devices. To install an additional hard disk drive 1 Shut down the computer, the internal components may be too hot to touch. n 105 N Upgrading Your VAIO Computer Installing an Additional Hard Disk Drive You can install up to two SATA hard disk drives to remove the panel. If you remove the back panel immediately after you attempt to the internal hard disk drive bay. !

User Guide
Page 106
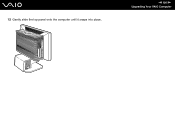
Use caution when placing the LCD screen face-down . ! The work surface must be free of dirt or debris that may damage the screen. n 106 N Upgrading Your VAIO Computer 3 Gently place the computer on a flat and stable surface, with the LCD screen facing down on a table or other flat surface.
Use caution when placing the LCD screen face-down . ! The work surface must be free of dirt or debris that may damage the screen. n 106 N Upgrading Your VAIO Computer 3 Gently place the computer on a flat and stable surface, with the LCD screen facing down on a table or other flat surface.

User Guide
Page 107
n 107 N Upgrading Your VAIO Computer 5 Slide the back panel toward the bottom of the back panel (1). 4 Unscrew the four screws on the bottom of the computer, lift the panel, and set it aside.
n 107 N Upgrading Your VAIO Computer 5 Slide the back panel toward the bottom of the back panel (1). 4 Unscrew the four screws on the bottom of the computer, lift the panel, and set it aside.

User Guide
Page 108
n 108 N Upgrading Your VAIO Computer 7 Unscrew the four screws on the hard disk cover (1), lift the cover, and set it aside. 6 Unscrew the two screws on the drive holder (1).
n 108 N Upgrading Your VAIO Computer 7 Unscrew the four screws on the hard disk cover (1), lift the cover, and set it aside. 6 Unscrew the two screws on the drive holder (1).


