
User Guide
Page 2
n2 N Contents Before Use ...5 Documentation ...5 Ergonomic Considerations ...7 Getting Started ...9 Locating Controls and Ports...10 About the Indicator Lights ...14 Connecting the Power Cord ...15 Shutting Down Your Computer Safely ...17 Using Your VAIO Computer ...18 Using the Keyboard ...19 Using the Mouse ...25 Using the Optical Disc Drive ...30 Using the TV Function ...37 Using PC Cards ...52 Using the Memory Stick Media ...55 Using Other Memory Cards ...60 Using the Internet...63 Using Wireless LAN (WLAN) ...64
n2 N Contents Before Use ...5 Documentation ...5 Ergonomic Considerations ...7 Getting Started ...9 Locating Controls and Ports...10 About the Indicator Lights ...14 Connecting the Power Cord ...15 Shutting Down Your Computer Safely ...17 Using Your VAIO Computer ...18 Using the Keyboard ...19 Using the Mouse ...25 Using the Optical Disc Drive ...30 Using the TV Function ...37 Using PC Cards ...52 Using the Memory Stick Media ...55 Using Other Memory Cards ...60 Using the Internet...63 Using Wireless LAN (WLAN) ...64

User Guide
Page 3
... N Using Peripheral Devices ...73 Connecting an External Microphone ...74 Connecting a Universal Serial Bus (USB) Device...75 Connecting a Printer ...77 Connecting an i.LINK Device ...78 Connecting to a Network (LAN) ...80 Customizing Your VAIO Computer ...82 Setting the Password ...83 Setting Up Your Computer with VAIO Central ...86 Using the Power Saving Modes ...87 Upgrading Your VAIO Computer...90 Before Upgrading Your Computer ...91 Adding and Removing Memory...92 Installing the Hard Disk Drive...102 Precautions ...113 On Handling the LCD Screen ...114 On Using the Power...
... N Using Peripheral Devices ...73 Connecting an External Microphone ...74 Connecting a Universal Serial Bus (USB) Device...75 Connecting a Printer ...77 Connecting an i.LINK Device ...78 Connecting to a Network (LAN) ...80 Customizing Your VAIO Computer ...82 Setting the Password ...83 Setting Up Your Computer with VAIO Central ...86 Using the Power Saving Modes ...87 Upgrading Your VAIO Computer...90 Before Upgrading Your Computer ...91 Adding and Removing Memory...92 Installing the Hard Disk Drive...102 Precautions ...113 On Handling the LCD Screen ...114 On Using the Power...

User Guide
Page 6
... hard disk drive to the original factory installed settings. It also includes information about the software programs included with your computer. To access this manual) - Provides information about using the Windows XP Media Center Edition operating system. n6 N Before Use Non-printed Documentation ❑ User Guide (this online VAIO Recovery Guide: 1 Click Start, point to All Programs, and click VAIO Support Central. 2 Click VAIO Documentation. 3 Click VAIO Recovery Guide. ❑ MCE guide - To view the online Specifications: 1 Connect to the Internet...
... hard disk drive to the original factory installed settings. It also includes information about the software programs included with your computer. To access this manual) - Provides information about using the Windows XP Media Center Edition operating system. n6 N Before Use Non-printed Documentation ❑ User Guide (this online VAIO Recovery Guide: 1 Click Start, point to All Programs, and click VAIO Support Central. 2 Click VAIO Documentation. 3 Click VAIO Recovery Guide. ❑ MCE guide - To view the online Specifications: 1 Connect to the Internet...
User Guide
Page 11
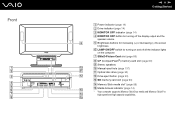
... speakers J Manual eject hole (page 137) K Optical disc drive (page 30) L Drive eject button (page 30) M SD memory card slot (page 60) N Memory Stick media slot* (page 55) O Media Access indicator (page 14) * Your computer supports Memory Stick Duo media and Memory Stick Pro high speed and high capacity capabilities. Front n 11 N Getting Started A Power indicator (page 14) B Drive indicator (page 14) C MONITOR OFF indicator (page 14) D MONITOR OFF button for turning off all the indicator lights on...
... speakers J Manual eject hole (page 137) K Optical disc drive (page 30) L Drive eject button (page 30) M SD memory card slot (page 60) N Memory Stick media slot* (page 55) O Media Access indicator (page 14) * Your computer supports Memory Stick Duo media and Memory Stick Pro high speed and high capacity capabilities. Front n 11 N Getting Started A Power indicator (page 14) B Drive indicator (page 14) C MONITOR OFF indicator (page 14) D MONITOR OFF button for turning off all the indicator lights on...

User Guide
Page 14
... this indicator is on .) When the indicator is not being used. Illuminates when data is on . Illuminates when data is read from or written to a memory card. (Do not enter Standby mode or turn off the computer when this indicator is read from or written to the hard disk or optical disc drive. n 14 N Getting Started About the Indicator Lights Your computer is...
... this indicator is on .) When the indicator is not being used. Illuminates when data is on . Illuminates when data is read from or written to a memory card. (Do not enter Standby mode or turn off the computer when this indicator is read from or written to the hard disk or optical disc drive. n 14 N Getting Started About the Indicator Lights Your computer is...
User Guide
Page 32
..., CD-R, CD-RW, DVD, most DVD-R, DVD-RW, - Sony does NOT guarantee the compatibility of a DualDisc may not play on the model you purchased. This product is a two sided disc product which types of the recordable disc. Due to CD-ROM CD, CD-R, and CD-RW - USING NON-COMPLIANT DISCS CAN CAUSE FATAL DAMAGE TO YOUR VAIO PC OR CREATE SOFTWARE CONFLICTS AND CAUSE...
..., CD-R, CD-RW, DVD, most DVD-R, DVD-RW, - Sony does NOT guarantee the compatibility of a DualDisc may not play on the model you purchased. This product is a two sided disc product which types of the recordable disc. Due to CD-ROM CD, CD-R, and CD-RW - USING NON-COMPLIANT DISCS CAN CAUSE FATAL DAMAGE TO YOUR VAIO PC OR CREATE SOFTWARE CONFLICTS AND CAUSE...

User Guide
Page 34
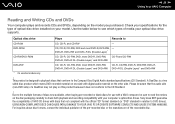
... not switch power saving modes while the computer is playing a DVD. ❑ Region code indicators are labeled on the DVDs to speed up disc access when playing a DVD. If the Audio CD window appears, click to open applications before playing a disc. ❑ Some discs recorded at 20 or 24 bits may produce noise while playing. Playing CDs To play an audio CD 1 Insert the disc into the optical disc drive...
... not switch power saving modes while the computer is playing a DVD. ❑ Region code indicators are labeled on the DVDs to speed up disc access when playing a DVD. If the Audio CD window appears, click to open applications before playing a disc. ❑ Some discs recorded at 20 or 24 bits may produce noise while playing. Playing CDs To play an audio CD 1 Insert the disc into the optical disc drive...

User Guide
Page 44
... rear of your TV monitor or display. 3 Connect the double mini-plugs of the audio cable (6) (not supplied) to the Composite Audio Out (L/R) jacks (7) on the back panel of your STB unit (3), matching the jack colors. Connect the other end of the same S Video cable to the S Video In jack (11) on your STB unit (3). n 44 N Using Your VAIO Computer To connect in STB mode (Option 2) 1 Connect one end of the S Video cable...
... rear of your TV monitor or display. 3 Connect the double mini-plugs of the audio cable (6) (not supplied) to the Composite Audio Out (L/R) jacks (7) on the back panel of your STB unit (3), matching the jack colors. Connect the other end of the same S Video cable to the S Video In jack (11) on your STB unit (3). n 44 N Using Your VAIO Computer To connect in STB mode (Option 2) 1 Connect one end of the S Video cable...

User Guide
Page 77
Connecting a Printer Using the USB Port You can connect a Windows-compatible printer to your computer to print documents. n 77 N Using Peripheral Devices Connecting a Printer You can connect a USB printer compatible with your version of a USB printer cable (2) into the USB port and the other end to your printer. To connect a printer using the USB port 1 Plug the printer power cord into an AC outlet (1). 2 Choose the USB port (3) you prefer to use. 3 Plug one end of Windows to the computer. ✍ You need to slide the back panel cover up to access the USB ports on the bottom panel.
Connecting a Printer Using the USB Port You can connect a Windows-compatible printer to your computer to print documents. n 77 N Using Peripheral Devices Connecting a Printer You can connect a USB printer compatible with your version of a USB printer cable (2) into the USB port and the other end to your printer. To connect a printer using the USB port 1 Plug the printer power cord into an AC outlet (1). 2 Choose the USB port (3) you prefer to use. 3 Plug one end of Windows to the computer. ✍ You need to slide the back panel cover up to access the USB ports on the bottom panel.

User Guide
Page 78
... the external device. ❑ i.LINK cables compatible with the computer include cables with the following part numbers: VMC-IL4415 (a 1.5 meter cable with a 4-pin connector at each end), VMC-IL4408 Series (a 0.8 meter cable with a 4-pin connector at each end). ❑ The optional i.LINK cables may not be available, depending on the country or area of your residency. ❑ An i.LINK connection with your software for example, an HDD or...
... the external device. ❑ i.LINK cables compatible with the computer include cables with the following part numbers: VMC-IL4415 (a 1.5 meter cable with a 4-pin connector at each end), VMC-IL4408 Series (a 0.8 meter cable with a 4-pin connector at each end). ❑ The optional i.LINK cables may not be available, depending on the country or area of your residency. ❑ An i.LINK connection with your software for example, an HDD or...

User Guide
Page 80
... sticker covering the Network (Ethernet) port located on the left of the computer and the other end to your network administrator. ✍ The computer can be connected to the network with the default settings. Connect one end of an optional network cable to the Network (Ethernet) port on the left of the computer. For detailed settings and devices needed to connect to the network, see your network. n 80 N Using Peripheral Devices Connecting to a Network (LAN) You can connect your network...
... sticker covering the Network (Ethernet) port located on the left of the computer and the other end to your network administrator. ✍ The computer can be connected to the network with the default settings. Connect one end of an optional network cable to the Network (Ethernet) port on the left of the computer. For detailed settings and devices needed to connect to the network, see your network. n 80 N Using Peripheral Devices Connecting to a Network (LAN) You can connect your network...
User Guide
Page 84
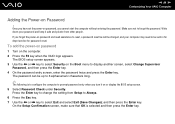
... the F2 key when the VAIO logo appears. n 84 N Customizing Your VAIO Computer Adding the Power-on or display the BIOS setup screen. 5 Select Password Check under Security. The password can be sent in for depot service for password reset. If you have set the power-on the Boot menu to prompt password entry when you cannot start the computer without entering the password. To add the power-on password 1 Turn on password and need assistance to reset, a password reset fee...
... the F2 key when the VAIO logo appears. n 84 N Customizing Your VAIO Computer Adding the Power-on or display the BIOS setup screen. 5 Select Password Check under Security. The password can be sent in for depot service for password reset. If you have set the power-on the Boot menu to prompt password entry when you cannot start the computer without entering the password. To add the power-on password 1 Turn on password and need assistance to reset, a password reset fee...

User Guide
Page 88
... press the power button for more than out of Hibernate mode. To activate Standby mode 1 Click Start and then Turn Off Computer. 2 Click Stand By. ✍ Alternatively, you can press the Standby button on the keyboard to a low power consumption mode. You will switch off the LCD screen and sets the hard disk and the CPU to put the computer in this , you can change the Standby mode settings.
... press the power button for more than out of Hibernate mode. To activate Standby mode 1 Click Start and then Turn Off Computer. 2 Click Stand By. ✍ Alternatively, you can press the Standby button on the keyboard to a low power consumption mode. You will switch off the LCD screen and sets the hard disk and the CPU to put the computer in this , you can change the Standby mode settings.
User Guide
Page 90
... your dealer to the online Specifications. To find the nearest center or agent, visit the Sony online support Web site. ❑ Before Upgrading Your Computer (page 91) ❑ Adding and Removing Memory (page 92) ❑ Installing the Hard Disk Drive (page 102) To avoid the invalidation of memory installed on a computer. ❑ You do not touch the connectors or open the memory panel. For assistance, contact an authorized Sony Service Center.
... your dealer to the online Specifications. To find the nearest center or agent, visit the Sony online support Web site. ❑ Before Upgrading Your Computer (page 91) ❑ Adding and Removing Memory (page 92) ❑ Installing the Hard Disk Drive (page 102) To avoid the invalidation of memory installed on a computer. ❑ You do not touch the connectors or open the memory panel. For assistance, contact an authorized Sony Service Center.
User Guide
Page 126
... applicable). ❑ If a non-bootable media is in the drive: 1 Remove the media. 2 Restart the computer and confirm that the Microsoft Windows operating system starts properly. ❑ If the Windows operating system still does not start, follow these steps to initialize the BIOS: 1 If there is a CD or DVD in the optical disc drive, remove it. 2 Turn off the computer. 3 Remove any peripheral devices connected to select Load Setup Defaults. 8 Press the Enter key.
... applicable). ❑ If a non-bootable media is in the drive: 1 Remove the media. 2 Restart the computer and confirm that the Microsoft Windows operating system starts properly. ❑ If the Windows operating system still does not start, follow these steps to initialize the BIOS: 1 If there is a CD or DVD in the optical disc drive, remove it. 2 Turn off the computer. 3 Remove any peripheral devices connected to select Load Setup Defaults. 8 Press the Enter key.

User Guide
Page 138
... Start and then Control Panel. 2 Click Performance and Maintenance. 3 Click System. If you need to clean the disc, see On Handling Discs (page 119) for dirt or damage. The System Properties window appears. 4 Select the Hardware tab, and click Device Manager in the audio mixer. ❑ If you are using external speakers, check the volume settings on the listed device, you are playing a CD or DVD and cannot hear sound...
... Start and then Control Panel. 2 Click Performance and Maintenance. 3 Click System. If you need to clean the disc, see On Handling Discs (page 119) for dirt or damage. The System Properties window appears. 4 Select the Hardware tab, and click Device Manager in the audio mixer. ❑ If you are using external speakers, check the volume settings on the listed device, you are playing a CD or DVD and cannot hear sound...
User Guide
Page 140
... DVD writing. ❑ Are you using the correct DVD recordable media? ❑ Check which DVD recordable format is equipped with an optical disc drive capable of DVD recordable media do if I cannot write to selected models only. This could cause a write error or other damage. Macrovision or a similar video protection technology prevents users from copying DVD movies. n 140 N Troubleshooting What should I do not work. ❑ The preinstalled software...
... DVD writing. ❑ Are you using the correct DVD recordable media? ❑ Check which DVD recordable format is equipped with an optical disc drive capable of DVD recordable media do if I cannot write to selected models only. This could cause a write error or other damage. Macrovision or a similar video protection technology prevents users from copying DVD movies. n 140 N Troubleshooting What should I do not work. ❑ The preinstalled software...
User Guide
Page 142
... change to cancel the Enable bidirectional support check box. 7 Click OK. Follow these steps: 1 Click Start and then Control Panel. 2 Click Printers and Other Hardware. 3 Click Printers and Faxes. 4 Right-click an unused printer and select Properties. 5 Click the Ports tab. 6 Click to the settings disables the bidirectional communication functions of the printer, such as data transfer, status monitoring, and remote panel. n 142 N Troubleshooting...
... change to cancel the Enable bidirectional support check box. 7 Click OK. Follow these steps: 1 Click Start and then Control Panel. 2 Click Printers and Other Hardware. 3 Click Printers and Faxes. 4 Right-click an unused printer and select Properties. 5 Click the Ports tab. 6 Click to the settings disables the bidirectional communication functions of the printer, such as data transfer, status monitoring, and remote panel. n 142 N Troubleshooting...
User Guide
Page 145
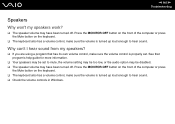
... control, make sure the volume control is turned up loud enough to mute, the volume setting may be too low, or the audio option may be set . Why can't I hear sound from my speakers? ❑ If you are using a program that program's help guide for more information. ❑ Your speakers may be disabled. ❑ The speaker volume may have been turned off . n 145 N Troubleshooting Speakers Why won't my speakers work...
... control, make sure the volume control is turned up loud enough to mute, the volume setting may be too low, or the audio option may be set . Why can't I hear sound from my speakers? ❑ If you are using a program that program's help guide for more information. ❑ Your speakers may be disabled. ❑ The speaker volume may have been turned off . n 145 N Troubleshooting Speakers Why won't my speakers work...

User Guide
Page 163
n 163 N Support Options VAIO® Central Sony Electronics Inc. VAIO Central provides a central location that gathers resources to configure your VAIO computer and view your computer's configuration and specifications. ❑ For users in USA Web Site http://www.sony.com/pcsupport Telephone 888-4-SONY-PC (888-476-6972) ❑ For users in Canada Web Site http://www.sony.ca/support ❑ For users in Latin American countries or areas Web Site http://www.sony.com/lapcsupport Telephone 888-4-SONY-PC (888-476-6972)
n 163 N Support Options VAIO® Central Sony Electronics Inc. VAIO Central provides a central location that gathers resources to configure your VAIO computer and view your computer's configuration and specifications. ❑ For users in USA Web Site http://www.sony.com/pcsupport Telephone 888-4-SONY-PC (888-476-6972) ❑ For users in Canada Web Site http://www.sony.ca/support ❑ For users in Latin American countries or areas Web Site http://www.sony.com/lapcsupport Telephone 888-4-SONY-PC (888-476-6972)


