Operating Instructions
Page 5
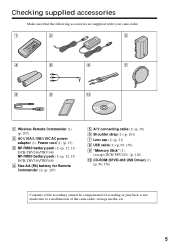
...accessories are supplied with your camcorder. 1 2 3 4 5 6 7 8 9 0 1 Wireless Remote Commander (1) (p. 207) 2 AC-L10A/L10B/L10C AC power adaptor (1), Power cord (1) (p. 13) 3 NP-FM30 battery pack (1) (p. 12, 13) DCR-TRV240/TRV340 NP-FM50 battery pack (1) (p. 12, 13) DCR-TRV740/TRV840 4 Size AA (R6...) battery for Remote Commander (2) (p. 207) 5 A/V connecting cable (1) (p. 38) 6 Shoulder strap (1) (p. 201) 7 Lens cap (1) (p. 21) 8 USB cable (1) (p. 96, 156) 9 "Memory Stick" (1) (except DCR-TRV240) (p. 116) 0 CD-ROM (SPVD-008 USB Driver) (1) (p. 96...
...accessories are supplied with your camcorder. 1 2 3 4 5 6 7 8 9 0 1 Wireless Remote Commander (1) (p. 207) 2 AC-L10A/L10B/L10C AC power adaptor (1), Power cord (1) (p. 13) 3 NP-FM30 battery pack (1) (p. 12, 13) DCR-TRV240/TRV340 NP-FM50 battery pack (1) (p. 12, 13) DCR-TRV740/TRV840 4 Size AA (R6...) battery for Remote Commander (2) (p. 207) 5 A/V connecting cable (1) (p. 38) 6 Shoulder strap (1) (p. 201) 7 Lens cap (1) (p. 21) 8 USB cable (1) (p. 96, 156) 9 "Memory Stick" (1) (except DCR-TRV240) (p. 116) 0 CD-ROM (SPVD-008 USB Driver) (1) (p. 96...

Operating Instructions
Page 94
...USB connector is necessary to e-mail. Viewing images recorded on a tape on your computer (Windows users only) If you connect your camcorder and your computer using Windows 98, you capture images recorded on the file size of editing images) Display: 4 MB VRAM video ...disk space or more recommended for working area (depending on a tape from your camcorder and pictures recorded on a tape on your computer •Installing the USB driver (p. 96) •Installing "PIXELA ImageMixer Ver.1.0 for Sony" (p. 101) Recommended computer environment OS: Microsoft Windows 98SE, Windows Me, Windows...
...USB connector is necessary to e-mail. Viewing images recorded on a tape on your computer (Windows users only) If you connect your camcorder and your computer using Windows 98, you capture images recorded on the file size of editing images) Display: 4 MB VRAM video ...disk space or more recommended for working area (depending on a tape from your camcorder and pictures recorded on a tape on your computer •Installing the USB driver (p. 96) •Installing "PIXELA ImageMixer Ver.1.0 for Sony" (p. 101) Recommended computer environment OS: Microsoft Windows 98SE, Windows Me, Windows...
Operating Instructions
Page 96
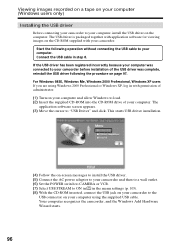
... using Windows 2000 Professional or Windows XP, log in with your computer. This starts USB driver installation. (4) Follow the on-screen messages to install the USB driver. (5) Connect the AC power adaptor to your camcorder and then to a wall outlet. (6) Set the POWER switch to CAMERA or VCR. ... in in step 8. The application software screen appears. (3) Move the cursor to your camcorder. Start the following the procedure on your computer and allow Windows to your camcorder before installation of the USB driver was connected to load. (2) Insert the supplied CD-ROM into the CD-ROM drive...
... using Windows 2000 Professional or Windows XP, log in with your computer. This starts USB driver installation. (4) Follow the on-screen messages to install the USB driver. (5) Connect the AC power adaptor to your camcorder and then to a wall outlet. (6) Set the POWER switch to CAMERA or VCR. ... in in step 8. The application software screen appears. (3) Move the cursor to your camcorder. Start the following the procedure on your computer and allow Windows to your camcorder before installation of the USB driver was connected to load. (2) Insert the supplied CD-ROM into the CD-ROM drive...
Operating Instructions
Page 97
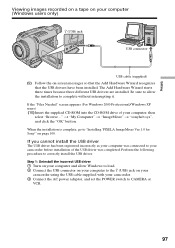
... installation of the USB driver was connected to your computer, then select "Browse..." When the installation is complete, go to "Installing 'PIXELA ImageMixer Ver.1.0 for Sony'" on your camcorder using the USB cable supplied with your camcorder. 3 Connect the AC power adaptor, and set the POWER ...switch to CAMERA or VCR. 97 t "My Computer" t "ImageMixer" t "sonyhcb.sys", and click the "OK" button. Step 1: Uninstall the incorrect USB driver 1 Turn ...
... installation of the USB driver was connected to your computer, then select "Browse..." When the installation is complete, go to "Installing 'PIXELA ImageMixer Ver.1.0 for Sony'" on your camcorder using the USB cable supplied with your camcorder. 3 Connect the AC power adaptor, and set the POWER ...switch to CAMERA or VCR. 97 t "My Computer" t "ImageMixer" t "sonyhcb.sys", and click the "OK" button. Step 1: Uninstall the incorrect USB driver 1 Turn ...
Operating Instructions
Page 99
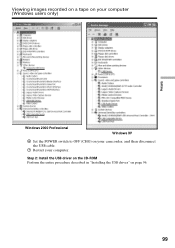
Viewing images recorded on a tape on your computer (Windows users only) Editing Windows 2000 Professional Windows XP 6 Set the POWER switch to OFF (CHG) on page 96. 99 Step 2: Install the USB driver on the CD-ROM Perform the entire procedure described in "Installing the USB driver" on your camcorder, and then disconnect the USB cable. 7 Restart your computer.
Viewing images recorded on a tape on your computer (Windows users only) Editing Windows 2000 Professional Windows XP 6 Set the POWER switch to OFF (CHG) on page 96. 99 Step 2: Install the USB driver on the CD-ROM Perform the entire procedure described in "Installing the USB driver" on your camcorder, and then disconnect the USB cable. 7 Restart your computer.

Operating Instructions
Page 104
...Carry out the following operations after three minutes. •We recommend setting DEMO MODE to the system used for Sony" is inserted. •Indicators in the camcorder LCD screen do not appear on -line help Click located in the upper-right corner of the "ImageMixer's Manual"... located in the upper-right corner of the screen. If any questions about "PIXELA ImageMixer Ver.1.0 for Sony" "ImageMixer Ver.1.0 for Sony" is not a malfunction: - Reinstall the USB driver following may not recover after recovering from the contents. Viewing images recorded on a tape on your computer ...
...Carry out the following operations after three minutes. •We recommend setting DEMO MODE to the system used for Sony" is inserted. •Indicators in the camcorder LCD screen do not appear on -line help Click located in the upper-right corner of the "ImageMixer's Manual"... located in the upper-right corner of the screen. If any questions about "PIXELA ImageMixer Ver.1.0 for Sony" "ImageMixer Ver.1.0 for Sony" is not a malfunction: - Reinstall the USB driver following may not recover after recovering from the contents. Viewing images recorded on a tape on your computer ...
Operating Instructions
Page 156
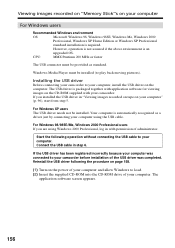
... because your computer was connected to load. (2) Insert the supplied CD-ROM into the CD-ROM drive of your camcorder before installation of the USB driver was completed. CPU: MMX Pentium 200 MHz or faster The USB connector must be installed. Viewing images recorded on ... step 6. Start the following the procedure on page 158. (1) Turn on the computer. Installing the USB driver Before connecting your camcorder to your computer, install the USB driver on the power of administrator. If you are using the USB cable. Your computer is packaged together with ...
... because your computer was connected to load. (2) Insert the supplied CD-ROM into the CD-ROM drive of your camcorder before installation of the USB driver was completed. CPU: MMX Pentium 200 MHz or faster The USB connector must be installed. Viewing images recorded on ... step 6. Start the following the procedure on page 158. (1) Turn on the computer. Installing the USB driver Before connecting your camcorder to your computer, install the USB driver on the power of administrator. If you are using the USB cable. Your computer is packaged together with ...
Operating Instructions
Page 157
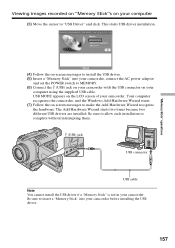
... supplied USB cable. This starts USB driver installation. (4) Follow the on-screen messages to install the USB driver. (5) Insert a "Memory Stick" into your camcorder before installing the USB driver. 157 Your computer recognizes the camcorder, and the Windows Add Hardware Wizard starts. (7) Follow the on the LCD screen of your camcorder, connect the AC power adaptor and...
... supplied USB cable. This starts USB driver installation. (4) Follow the on-screen messages to install the USB driver. (5) Insert a "Memory Stick" into your camcorder before installing the USB driver. 157 Your computer recognizes the camcorder, and the Windows Add Hardware Wizard starts. (7) Follow the on the LCD screen of your camcorder, connect the AC power adaptor and...

Operating Instructions
Page 158
... click "Device Manager". 6 Select "Other devices". mark and delete. Ex: (?)Sony Camcorder 7 Turn the POWER switch to OFF (CHG), and then disconnect the USB cable. 8 Restart your camcorder before installation of the USB driver was completed. Perform the following procedure to correctly install the USB driver. Windows 2000 Professional: Select "My Computer" t "Control Panel" t "Hardware...
... click "Device Manager". 6 Select "Other devices". mark and delete. Ex: (?)Sony Camcorder 7 Turn the POWER switch to OFF (CHG), and then disconnect the USB cable. 8 Restart your camcorder before installation of the USB driver was completed. Perform the following procedure to correctly install the USB driver. Windows 2000 Professional: Select "My Computer" t "Control Panel" t "Hardware...
Operating Instructions
Page 160
... Mac OS 8.6 standard installation and a slot loading type CD-ROM drive •iBook or Power Mac G4 with your camcorder. Installing the USB driver Before connecting your camcorder to your computer, install the USB driver on the CD-ROM supplied with the Mac OS 8.6 standard installation The USB connector must be installed. Your Mac...
... Mac OS 8.6 standard installation and a slot loading type CD-ROM drive •iBook or Power Mac G4 with your camcorder. Installing the USB driver Before connecting your camcorder to your computer, install the USB driver on the CD-ROM supplied with the Mac OS 8.6 standard installation The USB connector must be installed. Your Mac...
Operating Instructions
Page 161
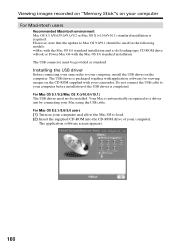
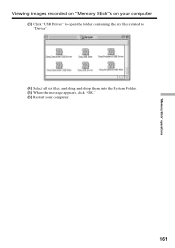
"Memory Stick" operations Viewing images recorded on "Memory Stick"s on your computer (3) Click "USB Driver" to open the folder containing the six files related to "Driver". (4) Select all six files, and drag and drop them into the System Folder. (5) When the message appears, click "OK." (6) Restart your computer. 161
"Memory Stick" operations Viewing images recorded on "Memory Stick"s on your computer (3) Click "USB Driver" to open the folder containing the six files related to "Driver". (4) Select all six files, and drag and drop them into the System Folder. (5) When the message appears, click "OK." (6) Restart your computer. 161
Operating Instructions
Page 183
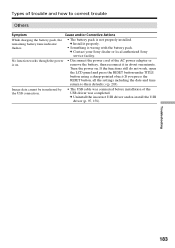
...function works though the power is on . c Uninstall the incorrect USB driver and re-install the USB driver (p. 97, 158). c Install it in about one minute. Turn the... trouble and how to their defaults.) (p. 203). If the functions still do not work, open the LCD panel and press the RESET button under TITLE button using a sharp-pointed object (If you press the RESET... flashes. • The battery pack is wrong with the battery pack. c Contact your Sony dealer or local authorized Sony service facility. Image data cannot be transferred by the USB connection. • The USB cable...
...function works though the power is on . c Uninstall the incorrect USB driver and re-install the USB driver (p. 97, 158). c Install it in about one minute. Turn the... trouble and how to their defaults.) (p. 203). If the functions still do not work, open the LCD panel and press the RESET button under TITLE button using a sharp-pointed object (If you press the RESET... flashes. • The battery pack is wrong with the battery pack. c Contact your Sony dealer or local authorized Sony service facility. Image data cannot be transferred by the USB connection. • The USB cable...


