Operating Instructions
Page 5
...picture effects ..... 52 Playing back a tape with analog video unit and your camcorder abroad 151 Maintenance information and precautions 152 Specifications 157 Editing Quick Reference Dubbing a...132 Deleting images 133 Writing a print mark - MEMORY MIX 110 Copying still images from a VCR - Photo save 115 Viewing a still image - BACK LIGHT 23 Shooting in a continuous ... solutions ......... 138 Self-diagnosis display 143 Warning indicators and messages 144 Additional Information Digital8 system, recording and playback 146 About the "InfoLITHIUM" battery pack 148 About i....
...picture effects ..... 52 Playing back a tape with analog video unit and your camcorder abroad 151 Maintenance information and precautions 152 Specifications 157 Editing Quick Reference Dubbing a...132 Deleting images 133 Writing a print mark - MEMORY MIX 110 Copying still images from a VCR - Photo save 115 Viewing a still image - BACK LIGHT 23 Shooting in a continuous ... solutions ......... 138 Self-diagnosis display 143 Warning indicators and messages 144 Additional Information Digital8 system, recording and playback 146 About the "InfoLITHIUM" battery pack 148 About i....
Operating Instructions
Page 7
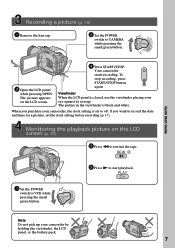
... (p. 27) 2 Press m to rewind the tape. PLAY OFCFR(CHG) 1 Set the POWER switch to CAMERA while pressing the small green button. Your camcorder starts recording. V POWER OFCFR(CHG) CAM M 3 Open the LCD panel while pressing OPEN. The picture in the viewfinder is closed, use the viewfinder ..., or the battery pack. 7 E ERMAORY E ERMAORY Quick Start Guide Recording a picture (p. 19) 1 Remove the lens cap. 2 Set the POWER switch to VCR while pressing the small green button. When you want to record the date and time for a picture, set to start playback. V POWER CAM M Note Do...
... (p. 27) 2 Press m to rewind the tape. PLAY OFCFR(CHG) 1 Set the POWER switch to CAMERA while pressing the small green button. Your camcorder starts recording. V POWER OFCFR(CHG) CAM M 3 Open the LCD panel while pressing OPEN. The picture in the viewfinder is closed, use the viewfinder ..., or the battery pack. 7 E ERMAORY E ERMAORY Quick Start Guide Recording a picture (p. 19) 1 Remove the lens cap. 2 Set the POWER switch to VCR while pressing the small green button. When you want to record the date and time for a picture, set to start playback. V POWER CAM M Note Do...
Operating Instructions
Page 22
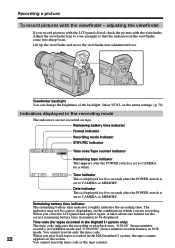
... correct, depending on tape. Date indicator This is set to CAMERA for five seconds after the POWER switch is displayed for tapes recorded in the Digital8 system only) The time code indicates the recording or playback time, "0:00:00" (hours:minutes: seconds) in CAMERA mode and "0:00:00:00"...change the brightness of the backlight. JUL 4 2001 12:05:56 AM Time indicator This is set to your eyesight so that the indicators in VCR mode. When you are recording. Select VF B.L. Recording a picture To record pictures with the viewfinder. Time code (for five seconds after the ...
... correct, depending on tape. Date indicator This is set to CAMERA for five seconds after the POWER switch is displayed for tapes recorded in the Digital8 system only) The time code indicates the recording or playback time, "0:00:00" (hours:minutes: seconds) in CAMERA mode and "0:00:00:00"...change the brightness of the backlight. JUL 4 2001 12:05:56 AM Time indicator This is set to your eyesight so that the indicators in VCR mode. When you are recording. Select VF B.L. Recording a picture To record pictures with the viewfinder. Time code (for five seconds after the ...

Operating Instructions
Page 25
.... The POWER switch is set to OFF in the menu settings in step 6. (p. 34) To cancel self-timer recording Set SELFTIMER to OFF (CHG) or VCR. To record still images using the self-timer Press PHOTO in the standby mode. You can also record still images on "Memory Stick"s with a beep...
.... The POWER switch is set to OFF in the menu settings in step 6. (p. 34) To cancel self-timer recording Set SELFTIMER to OFF (CHG) or VCR. To record still images using the self-timer Press PHOTO in the standby mode. You can also record still images on "Memory Stick"s with a beep...

Operating Instructions
Page 27
...buttons on VOLUME. If you close the LCD panel, you can monitor the playback picture on your camcorder. (1) Install the power source and insert the recorded tape. (2) Set the POWER switch to VCR while pressing the small green button. (3) Open the LCD panel while pressing OPEN. (4) Press m... to rewind the tape. (5) Press N to the camcorder body with your camcorder is silent when the LCD panel is closed. 2 V 4 OFCFR(CHG)...
...buttons on VOLUME. If you close the LCD panel, you can monitor the playback picture on your camcorder. (1) Install the power source and insert the recorded tape. (2) Set the POWER switch to VCR while pressing the small green button. (3) Open the LCD panel while pressing OPEN. (4) Press m... to rewind the tape. (5) Press N to the camcorder body with your camcorder is silent when the LCD panel is closed. 2 V 4 OFCFR(CHG)...

Operating Instructions
Page 29
... control buttons, set . To view the picture at slow speed (slow playback) Press y on the Remote Commander during playback. For frame-by a camcorder without the date and time set the POWER switch to reverse the playback direction. To change the playback direction Press on the Remote Commander during... playback to VCR. To search the last scene recorded (END SEARCH) Press END SEARCH in the stop mode. To advance the tape Press M in the ...
... control buttons, set . To view the picture at slow speed (slow playback) Press y on the Remote Commander during playback. For frame-by a camcorder without the date and time set the POWER switch to reverse the playback direction. To change the playback direction Press on the Remote Commander during... playback to VCR. To search the last scene recorded (END SEARCH) Press END SEARCH in the stop mode. To advance the tape Press M in the ...
Operating Instructions
Page 31
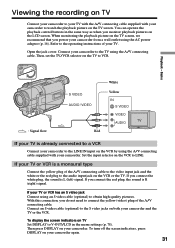
... screen. If you monitor playback pictures on the VCR by using the A/V connecting cable. Viewing the recording on TV Connect your camcorder to your TV with the A/V connecting cable supplied with your camcorder. If your TV. Connect your camcorder again. 31 You can operate the playback control ...connecting cable. If your TV or VCR is already connected to VCR. Then press DISPLAY on the VCR or the TV. To turn off the screen indicators, press DISPLAY on your camcorder to the TV using the A/V connecting cable supplied with your camcorder to watch the playback picture on ...
... screen. If you monitor playback pictures on the VCR by using the A/V connecting cable. Viewing the recording on TV Connect your camcorder to your TV with the A/V connecting cable supplied with your camcorder. If your TV. Connect your camcorder again. 31 You can operate the playback control ...connecting cable. If your TV or VCR is already connected to VCR. Then press DISPLAY on the VCR or the TV. To turn off the screen indicators, press DISPLAY on your camcorder to the TV using the A/V connecting cable supplied with your camcorder to watch the playback picture on ...
Operating Instructions
Page 32
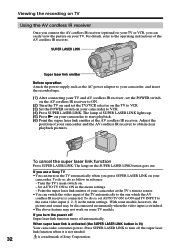
... the SUPER LASER LINK button goes out. Press SUPER LASER LINK to the operating instructions of Sony Corporation. To do so, do so, set the TV/VCR selector on the TV to VCR. (3) Set the POWER switch on your camcorder to obtain clear playback pictures. To do as the AC power adaptor to your... TV Using the AV cordless IR receiver Once you connect the AV cordless IR receiver (optional) to your TV or VCR, you press SUPER LASER LINK on your camcorder. If you use a Sony TV • You can turn the power off Super laser link function turns off the super laser link function when...
... the SUPER LASER LINK button goes out. Press SUPER LASER LINK to the operating instructions of Sony Corporation. To do so, do so, set the TV/VCR selector on the TV to VCR. (3) Set the POWER switch on your camcorder to obtain clear playback pictures. To do as the AC power adaptor to your... TV Using the AV cordless IR receiver Once you connect the AV cordless IR receiver (optional) to your TV or VCR, you press SUPER LASER LINK on your camcorder. If you use a Sony TV • You can turn the power off Super laser link function turns off the super laser link function when...

Operating Instructions
Page 34
... select SELFTIMER, then press the dial. (4) Turn the SEL/PUSH EXEC dial to select ON, then press the dial. (5) Press MENU to OFF (CHG) or VCR. 34 You can record still images on a tape - Self-timer recording is automatically cancelled when: - Self-timer starts counting down from 10 with the self...
... select SELFTIMER, then press the dial. (4) Turn the SEL/PUSH EXEC dial to select ON, then press the dial. (5) Press MENU to OFF (CHG) or VCR. 34 You can record still images on a tape - Self-timer recording is automatically cancelled when: - Self-timer starts counting down from 10 with the self...

Operating Instructions
Page 48
... does not sound. You can superimpose a title. Superimposing a title To superimpose the title while you are recording Press TITLE while you dub a tape connecting your camcorder to the VCR with the A/V connecting cable. When you are selecting and setting the title You cannot record the title displayed on tape.
... does not sound. You can superimpose a title. Superimposing a title To superimpose the title while you are recording Press TITLE while you dub a tape connecting your camcorder to the VCR with the A/V connecting cable. When you are selecting and setting the title You cannot record the title displayed on tape.

Operating Instructions
Page 49
... title menu disappear. 1 TITLE PRESET T I TLE HEL LO ! Making your own titles You can have up to 20 characters. (1) Press TITLE in the standby or VCR mode. (2) Turn the SEL/PUSH EXEC dial to select , then press the dial. (3) Turn the SEL/PUSH EXEC dial to select CUSTOM1 SET or CUSTOM2... select the desired character, then press the dial. (6) Repeat steps 4 and 5 until you have selected all characters and completed the title. (7) To finish making your camcorder.
... title menu disappear. 1 TITLE PRESET T I TLE HEL LO ! Making your own titles You can have up to 20 characters. (1) Press TITLE in the standby or VCR mode. (2) Turn the SEL/PUSH EXEC dial to select , then press the dial. (3) Turn the SEL/PUSH EXEC dial to select CUSTOM1 SET or CUSTOM2... select the desired character, then press the dial. (6) Repeat steps 4 and 5 until you have selected all characters and completed the title. (7) To finish making your camcorder.

Operating Instructions
Page 50
...to select [C], then press the dial to return To erase a character Select [C]. We recommend setting the POWER switch to VCR or removing the cassette so that your camcorder The power automatically goes off while you are entering title characters. Making your own titles To change a title you have ...entered remain stored in your camcorder does not automatically turn it to change, then press the SEL/PUSH EXEC dial. Enter the new title as desired. The characters you...
...to select [C], then press the dial to return To erase a character Select [C]. We recommend setting the POWER switch to VCR or removing the cassette so that your camcorder The power automatically goes off while you are entering title characters. Making your own titles To change a title you have ...entered remain stored in your camcorder does not automatically turn it to change, then press the SEL/PUSH EXEC dial. Enter the new title as desired. The characters you...
Operating Instructions
Page 52
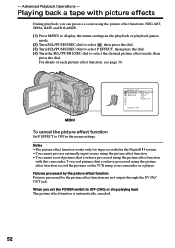
...then press the dial. - Notes • The picture effect function works only for tapes recorded in the Digital8 system. • You cannot process externally input scenes using your camcorder as a player. For ditails of each picture effect function, see page 39. Pictures processed by the picture... the picture effect function with picture effects During playback, you have processed using the picture effect function, record the pictures on the VCR using the picture effect function. • You cannot record pictures that you set the POWER switch to display the menu settings in...
...then press the dial. - Notes • The picture effect function works only for tapes recorded in the Digital8 system. • You cannot process externally input scenes using your camcorder as a player. For ditails of each picture effect function, see page 39. Pictures processed by the picture... the picture effect function with picture effects During playback, you have processed using the picture effect function, record the pictures on the VCR using the picture effect function. • You cannot record pictures that you set the POWER switch to display the menu settings in...

Operating Instructions
Page 53
... EXEC dial to adjust the effect. To record images that you can process a scene using your camcorder as a still image. (5) Turn the SEL/PUSH EXEC dial to select the desired digital effect mode... digital effect function works only for tapes recorded in memory as a player. The bars appear on the VCR using the digital effect functions: STILL, FLASH, LUMI. When you press the SEL/PUSH EXEC dial is... to OFF (CHG) or stop playing back The digital effect function is stored in the Digital8 system. •You cannot process externally input scenes using the digital effect function. •...
... EXEC dial to adjust the effect. To record images that you can process a scene using your camcorder as a still image. (5) Turn the SEL/PUSH EXEC dial to select the desired digital effect mode... digital effect function works only for tapes recorded in memory as a player. The bars appear on the VCR using the digital effect functions: STILL, FLASH, LUMI. When you press the SEL/PUSH EXEC dial is... to OFF (CHG) or stop playing back The digital effect function is stored in the Digital8 system. •You cannot process externally input scenes using the digital effect function. •...

Operating Instructions
Page 54
... image, then press the dial. Besides the operation described here, your camcorder can enlarge still images recorded on "Memory Stick"s. (1) Press PB ZOOM on the VCR using your camcorder in the Digital8 system. •You cannot process externally input scenes using PB ZOOM function... with this camcorder. you have processed using PB ZOOM function. •You cannot record pictures that you ...
... image, then press the dial. Besides the operation described here, your camcorder can enlarge still images recorded on "Memory Stick"s. (1) Press PB ZOOM on the VCR using your camcorder in the Digital8 system. •You cannot process externally input scenes using PB ZOOM function... with this camcorder. you have processed using PB ZOOM function. •You cannot record pictures that you ...

Operating Instructions
Page 56
... DEC 31 2001 [a] [b] [c] (1) Set the POWER switch to search towards [a] or press > to VCR. (2) Press SEARCH MODE on the Remote Commander repeatedly, until the date search indicator appears on the screen.... Each time you press . If a tape has a blank portion in the Digital8 system. •If one day's recording is [b], press . Use the Remote Commander ...indicator) (3) When the current position is less than two minutes, your camcorder may not work correctly. 56 Your camcorder automatically starts playback at each recording date. Date search You can automatically search...
... DEC 31 2001 [a] [b] [c] (1) Set the POWER switch to search towards [a] or press > to VCR. (2) Press SEARCH MODE on the Remote Commander repeatedly, until the date search indicator appears on the screen.... Each time you press . If a tape has a blank portion in the Digital8 system. •If one day's recording is [b], press . Use the Remote Commander ...indicator) (3) When the current position is less than two minutes, your camcorder may not work correctly. 56 Your camcorder automatically starts playback at each recording date. Date search You can automatically search...

Operating Instructions
Page 57
or >, the camcorder searches for these operations. You can search for the recorded still image recorded on the screen. The indicator changes as follows: DATE SEARCH t PHOTO SEARCH t ... Searching for a photo (1) Set the POWER switch to select the photo for five seconds automatically (photo scan). Each time you press . Searching for a photo - Your camcorder automatically starts playback from the photo. 2 SEARCH MODE PHOTO 00 SEARCH 3 PHOTO 01 SEARCH To stop searching Press x. 57 or > to...
or >, the camcorder searches for these operations. You can search for the recorded still image recorded on the screen. The indicator changes as follows: DATE SEARCH t PHOTO SEARCH t ... Searching for a photo (1) Set the POWER switch to select the photo for five seconds automatically (photo scan). Each time you press . Searching for a photo - Your camcorder automatically starts playback from the photo. 2 SEARCH MODE PHOTO 00 SEARCH 3 PHOTO 01 SEARCH To stop searching Press x. 57 or > to...

Operating Instructions
Page 58
... changes as follows: DATE SEARCH t PHOTO SEARCH t PHOTO SCAN t (no indicator) (3) Press . If a tape has a blank portion in the Digital8 system. Photo search/Photo scan Scanning photo (1) Set the POWER switch to VCR. (2) Press SEARCH MODE on the Remote Commander repeatedly, until the photo scan indicator appears on the screen. Note The...
... changes as follows: DATE SEARCH t PHOTO SEARCH t PHOTO SCAN t (no indicator) (3) Press . If a tape has a blank portion in the Digital8 system. Photo search/Photo scan Scanning photo (1) Set the POWER switch to VCR. (2) Press SEARCH MODE on the Remote Commander repeatedly, until the photo scan indicator appears on the screen. Note The...
Operating Instructions
Page 59
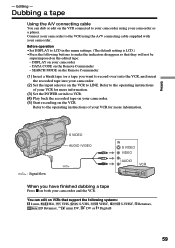
...settings. (The default setting is LCD.) •Press the following buttons to record over) into the VCR, and insert the recorded tape into your camcorder. (5) Start recording on the Remote Commander - S VIDEO AUDIO / VIDEO IN S VIDEO VIDEO ...AUDIO : Signal flow When you want to make the indicators disappear so that support the following systems: 8 mm, Hi8, VHS, S-VHS, VHSC, S-VHSC, Betamax, ED Betamax, mini DV, DV or Digital8 59 Editing - DATA CODE on the VCR...
...settings. (The default setting is LCD.) •Press the following buttons to record over) into the VCR, and insert the recorded tape into your camcorder. (5) Start recording on the Remote Commander - S VIDEO AUDIO / VIDEO IN S VIDEO VIDEO ...AUDIO : Signal flow When you want to make the indicators disappear so that support the following systems: 8 mm, Hi8, VHS, S-VHS, VHSC, S-VHSC, Betamax, ED Betamax, mini DV, DV or Digital8 59 Editing - DATA CODE on the VCR...

Operating Instructions
Page 60
... indicators. (1) Insert a blank tape (or a tape you want to record over) into the VCR, and insert the recorded tape into your camcorder. (2) Set the input selector on the VCR to the S video jacks of your VCR for more information. With this connection, you have finished dubbing a tape Press x on your... When you do not need to obtain high-quality pictures. DV DV IN/OUT 60 If your camcorder and the VCR. Refer to the operating instructions of both your camcorder. (5) Start recording on the VCR or the TV. When the white plug is connected, the left channel audio is output, and...
... indicators. (1) Insert a blank tape (or a tape you want to record over) into the VCR, and insert the recorded tape into your camcorder. (2) Set the input selector on the VCR to the S video jacks of your VCR for more information. With this connection, you have finished dubbing a tape Press x on your... When you do not need to obtain high-quality pictures. DV DV IN/OUT 60 If your camcorder and the VCR. Refer to the operating instructions of both your camcorder. (5) Start recording on the VCR or the TV. When the white plug is connected, the left channel audio is output, and...


