Camera Operations Guide
Page 5
... 7: Setting the screen language 22 Recording Recording movies 24 Recording for "Memory Stick" only. Table of Easy Handycam operation 34 ,continued 5 Read this first 2 Quick Start Guide Recording movies 8 Recording still images 10 Recording/Playing back with ease 12 Getting started Step 1: Checking supplied items 13 Step 2: Charging the battery pack 14...
... 7: Setting the screen language 22 Recording Recording movies 24 Recording for "Memory Stick" only. Table of Easy Handycam operation 34 ,continued 5 Read this first 2 Quick Start Guide Recording movies 8 Recording still images 10 Recording/Playing back with ease 12 Getting started Step 1: Checking supplied items 13 Step 2: Charging the battery pack 14...
Camera Operations Guide
Page 6
...screen indicators 54 Displaying the date/time and camera settings data - Zero set memory 57 Searching for the last scene of Easy Handycam operation 52 Various playback functions 53 Magnifying pictures - SPOT FOCUS 38 Adjusting the focus manually 39 Recording a picture using various effects...Searching for a scene by date of a scene - Rec review 45 Playback Viewing movies recorded on a "Memory Stick 49 Playing back in dark places - Easy Handycam 51 Making full use of the most recently recorded scenes - Date search 57 6 NightShot plus, etc 37 Adjusting the focus...
...screen indicators 54 Displaying the date/time and camera settings data - Zero set memory 57 Searching for the last scene of Easy Handycam operation 52 Various playback functions 53 Magnifying pictures - SPOT FOCUS 38 Adjusting the focus manually 39 Recording a picture using various effects...Searching for a scene by date of a scene - Rec review 45 Playback Viewing movies recorded on a "Memory Stick 49 Playing back in dark places - Easy Handycam 51 Making full use of the most recently recorded scenes - Date search 57 6 NightShot plus, etc 37 Adjusting the focus...
Camera Operations Guide
Page 7
...99 Printing recorded images (PictBridge compliant printer 101 Troubleshooting Troubleshooting 103 Warning indicators and messages ...110 Additional Information Using your camcorder abroad ..........114 Usable cassette tapes 115 About the "Memory Stick 116 About the "InfoLITHIUM" battery pack 118 About i....- EFFECT/SLIDE SHOW/ FRAME REC/INTERVAL REC, etc 68 Using the (EDIT/PLAY) menu - Digital program editing 91 Deleting recorded pictures 98 Marking recorded images with your camcorder: • Editing images with specific information - Advanced operations Using the Menu Selecting...
...99 Printing recorded images (PictBridge compliant printer 101 Troubleshooting Troubleshooting 103 Warning indicators and messages ...110 Additional Information Using your camcorder abroad ..........114 Usable cassette tapes 115 About the "Memory Stick 116 About the "InfoLITHIUM" battery pack 118 About i....- EFFECT/SLIDE SHOW/ FRAME REC/INTERVAL REC, etc 68 Using the (EDIT/PLAY) menu - Digital program editing 91 Deleting recorded pictures 98 Marking recorded images with your camcorder: • Editing images with specific information - Advanced operations Using the Menu Selecting...
Camera Operations Guide
Page 9
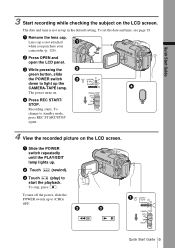
... the POWER switch down to start the playback. a Slide the POWER switch repeatedly until the PLAY/EDIT lamp lights up in the default setting. To stop, press . The power turns on the LCD screen. Recording... starts. c Touch (play) to light up to standby mode, press REC START/STOP again. 4 View the recorded picture on... b Touch (rewind). The date and time is not attached when you purchase your camcorder (p. 126). To set up . b Press OPEN and open the LCD panel. To change to (CHG) OFF. Quick ...
... the POWER switch down to start the playback. a Slide the POWER switch repeatedly until the PLAY/EDIT lamp lights up in the default setting. To stop, press . The power turns on the LCD screen. Recording... starts. c Touch (play) to light up to standby mode, press REC START/STOP again. 4 View the recorded picture on... b Touch (rewind). The date and time is not attached when you purchase your camcorder (p. 126). To set up . b Press OPEN and open the LCD panel. To change to (CHG) OFF. Quick ...
Camera Operations Guide
Page 11
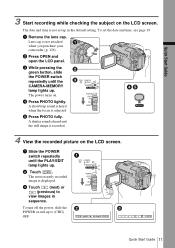
... is displayed. b Press OPEN and open the LCD panel. a Remove the lens cap. The most recently recorded image is not attached when you purchase your camcorder (p. 126). e Press PHOTO fully. The date and time is adjusted. A short beep sound is heard when the focus is not set the date and time..., see page 19. c While pressing the green button, slide the POWER switch repeatedly until the PLAY/EDIT lamp lights up . a Slide the POWER switch repeatedly until the CAMERA-MEMORY lamp lights up .
... is displayed. b Press OPEN and open the LCD panel. a Remove the lens cap. The most recently recorded image is not attached when you purchase your camcorder (p. 126). e Press PHOTO fully. The date and time is adjusted. A short beep sound is heard when the focus is not set the date and time..., see page 19. c While pressing the green button, slide the POWER switch repeatedly until the PLAY/EDIT lamp lights up . a Slide the POWER switch repeatedly until the CAMERA-MEMORY lamp lights up .
Camera Operations Guide
Page 12
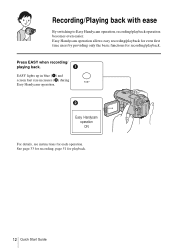
See page 33 for recording, page 51 for each operation. EASY lights up in blue (1) and screen font size increases (2) during Easy Handycam operation. Easy Handycam operation ON For details, see instructions for playback. 12 Quick Start Guide Press EASY when recording/ playing back. Easy Handycam operation allows easy recording/playback for even first time users by providing only the basic functions for recording/playback. Recording/Playing back with ease By switching to Easy Handycam operation, recording/playback operation becomes even easier.
See page 33 for recording, page 51 for each operation. EASY lights up in blue (1) and screen font size increases (2) during Easy Handycam operation. Easy Handycam operation ON For details, see instructions for playback. 12 Quick Start Guide Press EASY when recording/ playing back. Easy Handycam operation allows easy recording/playback for even first time users by providing only the basic functions for recording/playback. Recording/Playing back with ease By switching to Easy Handycam operation, recording/playback operation becomes even easier.

Camera Operations Guide
Page 16
... 475 230 QM91D Recording time when recording with the LCD screen on other devices in the Digital8 system. Battery pack LCD panel opened NP-FM30 80 (supplied) NP-FM50 135 NP-QM71...170 85 NP-QM71/ 415 205 QM71D NP-QM91/ 625 310 QM91D * Approximate number of your camcorder in low temperature. • The CHG (charge) lamp flashes during charging, or the battery information...charged battery pack at 25°C (77°F). The battery pack is damaged. - For DCR-TRV460: The playing time of minutes available when you use a fully charged battery pack at 25°C (77&#...
... 475 230 QM91D Recording time when recording with the LCD screen on other devices in the Digital8 system. Battery pack LCD panel opened NP-FM30 80 (supplied) NP-FM50 135 NP-QM71...170 85 NP-QM71/ 415 205 QM71D NP-QM91/ 625 310 QM91D * Approximate number of your camcorder in low temperature. • The CHG (charge) lamp flashes during charging, or the battery information...charged battery pack at 25°C (77°F). The battery pack is damaged. - For DCR-TRV460: The playing time of minutes available when you use a fully charged battery pack at 25°C (77&#...
Camera Operations Guide
Page 17
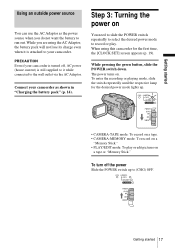
... the battery pack" (p. 14). Getting started 17 Connect your camcorder as the power source when you are using this camcorder for the desired power mode lights up to your camcorder is attached to (CHG) OFF. The power turns on a "Memory Stick." • PLAY/EDIT mode: To play . To turn off , AC power (house current) is...
... the battery pack" (p. 14). Getting started 17 Connect your camcorder as the power source when you are using this camcorder for the desired power mode lights up to your camcorder is attached to (CHG) OFF. The power turns on a "Memory Stick." • PLAY/EDIT mode: To play . To turn off , AC power (house current) is...
Camera Operations Guide
Page 26
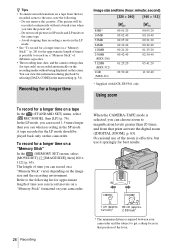
... of time you can record movies on a "Memory Stick" formatted on your camcorder and the subject to get a sharp focus in the SP mode. Do not remove the cassette. (The picture will be played back only on this information during playback by selecting [DATA CODE] in the ... length of time it sparingly for best results. 26 Recording 1 cm (approx. 80 cm (approx. 1/2 inch)* 2 5/8 feet)* * The minimum distance required between your camcorder. Using zoom To record for a longer time on a "Memory Stick" In the (MEMORY SET) menu, select [MOVIE SET], [ IMAGE SIZE], then [160 ×...
... of time you can record movies on a "Memory Stick" formatted on your camcorder and the subject to get a sharp focus in the SP mode. Do not remove the cassette. (The picture will be played back only on this information during playback by selecting [DATA CODE] in the ... length of time it sparingly for best results. 26 Recording 1 cm (approx. 80 cm (approx. 1/2 inch)* 2 5/8 feet)* * The minimum distance required between your camcorder. Using zoom To record for a longer time on a "Memory Stick" In the (MEMORY SET) menu, select [MOVIE SET], [ IMAGE SIZE], then [160 ×...
Camera Operations Guide
Page 44
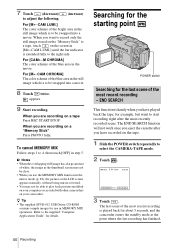
...images for the last scene of the blue area in the still image which is to be able to play back pictures modified on your computer or recorded with other camcorders on your camcorder. Refer to the right side. The last scene of the blue area in the movie. When you ... movie. For [MTCAM CHROMA] The color scheme of the most recent recording is played back for details. END SEARCH This function is extended fully to the supplied "Computer Applications Guide" for about 5 seconds, and the camcorder enters the standby mode at the point where the last recording has finished. 44 ...
...images for the last scene of the blue area in the still image which is to be able to play back pictures modified on your computer or recorded with other camcorders on your camcorder. Refer to the right side. The last scene of the blue area in the movie. When you ... movie. For [MTCAM CHROMA] The color scheme of the most recent recording is played back for details. END SEARCH This function is extended fully to the supplied "Computer Applications Guide" for about 5 seconds, and the camcorder enters the standby mode at the point where the last recording has finished. 44 ...

Camera Operations Guide
Page 45
... b Note • For DCR-TRV460: The EDIT SEARCH function does not work for the tapes recorded on other devices in the Hi8 / standard 8 mm system. EDIT SEARCH Reviewing the most recently recorded scene are played back. Then, your camcorder is not played back during the search. 1 Slide... the POWER switch to the standby mode. When PLAY/EDIT mode is a blank section between recorded sections on the tape. • For DCR-TRV460: The END SEARCH function does not...
... b Note • For DCR-TRV460: The EDIT SEARCH function does not work for the tapes recorded on other devices in the Hi8 / standard 8 mm system. EDIT SEARCH Reviewing the most recently recorded scene are played back. Then, your camcorder is not played back during the search. 1 Slide... the POWER switch to the standby mode. When PLAY/EDIT mode is a blank section between recorded sections on the tape. • For DCR-TRV460: The END SEARCH function does not...
Camera Operations Guide
Page 46
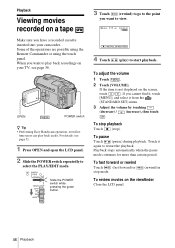
...from the (STANDARD SET) menu. 3 Adjust the volume by touching (decrease) / (increase), then touch . Playback Viewing movies recorded on your camcorder. Some of the operations are possible using the Remote Commander or using the touch panel. To adjust the volume 1 Touch . 2 Touch [VOLUME...rewind Touch (fast forward) or stop ). OPEN POWER switch z Tip • Performing Easy Handycam operation, even first time users can play ) to view. 60min 0:00:00:00 P-MENU 4 Touch (play back easily. Slide the POWER switch while pressing the green button. 3 Touch (rewind) to ...
...from the (STANDARD SET) menu. 3 Adjust the volume by touching (decrease) / (increase), then touch . Playback Viewing movies recorded on your camcorder. Some of the operations are possible using the Remote Commander or using the touch panel. To adjust the volume 1 Touch . 2 Touch [VOLUME...rewind Touch (fast forward) or stop ). OPEN POWER switch z Tip • Performing Easy Handycam operation, even first time users can play ) to view. 60min 0:00:00:00 P-MENU 4 Touch (play back easily. Slide the POWER switch while pressing the green button. 3 Touch (rewind) to ...
Camera Operations Guide
Page 47
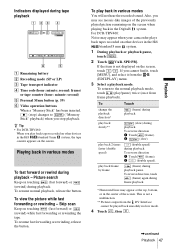
To resume normal playback, release the button. To view the picture while fast forwarding or rewinding - For DCR-TRV460: Noise may appear when your camcorder plays back tapes recorded on other devices in various modes To fast forward or rewind during frame playback. * Horizontal ... to ("Memory Stick" playback) when you cannot find it, touch [MENU], and select it from the DV Interface cannot be played back smoothly in the Digital8 system. To Touch change the playback direction* (frame) during playback. To reverse direction, touch (frame) again during playback - To...
To resume normal playback, release the button. To view the picture while fast forwarding or rewinding - For DCR-TRV460: Noise may appear when your camcorder plays back tapes recorded on other devices in various modes To fast forward or rewind during frame playback. * Horizontal ... to ("Memory Stick" playback) when you cannot find it, touch [MENU], and select it from the DV Interface cannot be played back smoothly in the Digital8 system. To Touch change the playback direction* (frame) during playback. To reverse direction, touch (frame) again during playback - To...
Camera Operations Guide
Page 48
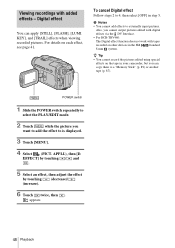
... 4, then select [OFF] in step 5. POWER switch 1 Slide the POWER switch repeatedly to select the PLAY/EDIT mode. 2 Touch while the picture you can apply [STILL], [FLASH], [LUMI. Digital effect You.... Also, you cannot output pictures edited with digital effects via the DV Interface. • For DCR-TRV460: The Digital effect function does not work with added effects - APPLI.), then [D. To cancel Digital effect... on other devices in the Hi8 /standard 8 mm system. For details on the tape in your camcorder, but you want to add the effect to a "Memory Stick" (p. 89) or another tape ...
... 4, then select [OFF] in step 5. POWER switch 1 Slide the POWER switch repeatedly to select the PLAY/EDIT mode. 2 Touch while the picture you can apply [STILL], [FLASH], [LUMI. Digital effect You.... Also, you cannot output pictures edited with digital effects via the DV Interface. • For DCR-TRV460: The Digital effect function does not work with added effects - APPLI.), then [D. To cancel Digital effect... on other devices in the Hi8 /standard 8 mm system. For details on the tape in your camcorder, but you want to add the effect to a "Memory Stick" (p. 89) or another tape ...
Camera Operations Guide
Page 49
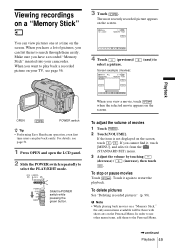
...camcorder. The most recently recorded picture appears on the Personal Menu. When you have a recorded "Memory Stick" inserted into your TV, see page 51. 1 Press OPEN and open the LCD panel. 2 Slide the POWER switch repeatedly to Playback OPEN POWER switch z Tip • Performing Easy Handycam operation, even first time users can play... back a recorded picture on the screen, touch / . To stop or pause movies Touch . b Note • While playing back movies on a "Memory Stick,"...
...camcorder. The most recently recorded picture appears on the Personal Menu. When you have a recorded "Memory Stick" inserted into your TV, see page 51. 1 Press OPEN and open the LCD panel. 2 Slide the POWER switch repeatedly to Playback OPEN POWER switch z Tip • Performing Easy Handycam operation, even first time users can play... back a recorded picture on the screen, touch / . To stop or pause movies Touch . b Note • While playing back movies on a "Memory Stick,"...
Camera Operations Guide
Page 50
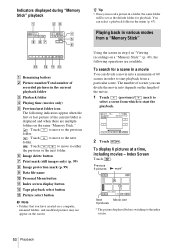
...folders, and modified pictures may not appear on the length of scenes you record a picture in the current playback folder C Playback folder D Playing time (movies only) E Previous/next folder icon The following operations are multiple folders on the same "Memory Stick." : Touch to move...-0010 1 0 / 10 101 0:00:00 z Tip • Once you can divide a movie into depends on the screen. Index Screen Touch . Playing back in various modes from which to select a scene from a "Memory Stick" P-MENU A Remaining battery B Picture number/Total number of recorded pictures in...
...folders, and modified pictures may not appear on the length of scenes you record a picture in the current playback folder C Playback folder D Playing time (movies only) E Previous/next folder icon The following operations are multiple folders on the same "Memory Stick." : Touch to move...-0010 1 0 / 10 101 0:00:00 z Tip • Once you can divide a movie into depends on the screen. Index Screen Touch . Playing back in various modes from which to select a scene from a "Memory Stick" P-MENU A Remaining battery B Picture number/Total number of recorded pictures in...
Camera Operations Guide
Page 51
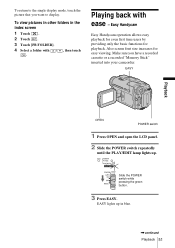
... with / , then touch . EASY Playback OPEN POWER switch 1 Press OPEN and open the LCD panel. 2 Slide the POWER switch repeatedly until the PLAY/EDIT lamp lights up in the index screen 1 Touch . 2 Touch . 3 Touch [PB FOLDER]. 4 Select a folder with ease - To view pictures in ...other folders in blue. ,continued Playback 51 Make sure you want to display. Easy Handycam Easy Handycam operation allows easy playback for even first time users by providing only the basic functions for easy viewing. To return to the single display ...
... with / , then touch . EASY Playback OPEN POWER switch 1 Press OPEN and open the LCD panel. 2 Slide the POWER switch repeatedly until the PLAY/EDIT lamp lights up in the index screen 1 Touch . 2 Touch . 3 Touch [PB FOLDER]. 4 Select a folder with ease - To view pictures in ...other folders in blue. ,continued Playback 51 Make sure you want to display. Easy Handycam Easy Handycam operation allows easy playback for even first time users by providing only the basic functions for easy viewing. To return to the single display ...
Camera Operations Guide
Page 52
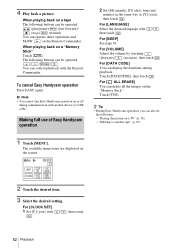
... 87) 1 Touch [MENU]. Touch [YES]. The available menu items are displayed on a TV" (p. 56) - To cancel Easy Handycam operation Press EASY again. 4 Play back a picture. For [VOLUME] Adjust the volume by touching (decrease)/ (increase), then touch . Making full use of Easy... Handycam operation 2 Set [M] (month), [D] (day), hour and minutes in the same way as [Y] (year), then touch . For [LANGUAGE] Select the desired language with . / , then touch 52 Playback Touch [DATE/TIME], then touch . "Playing the picture on the screen. 60min...
... 87) 1 Touch [MENU]. Touch [YES]. The available menu items are displayed on a TV" (p. 56) - To cancel Easy Handycam operation Press EASY again. 4 Play back a picture. For [VOLUME] Adjust the volume by touching (decrease)/ (increase), then touch . Making full use of Easy... Handycam operation 2 Set [M] (month), [D] (day), hour and minutes in the same way as [Y] (year), then touch . For [LANGUAGE] Select the desired language with . / , then touch 52 Playback Touch [DATE/TIME], then touch . "Playing the picture on the screen. 60min...
Camera Operations Guide
Page 53
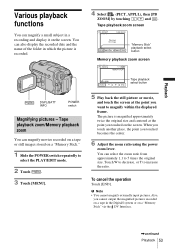
...and the name of the folder in the Digital8 system or on a "Memory Stick" via the DV Interface. ,continued Playback 53 Touch W to decrease, or T to 5 times the original size. DSPL/BATT INFO POWER switch Magnifying pictures - Also, you want to select the PLAY/EDIT mode. 2 Touch . 3 Touch ...recorded. PB END "Memory Stick" playback select button Memory playback zoom screen PB ZOOM 1 / 10 101 MEMORY PLAY 101-0001 VIDEO Tape playback select button END 5 Play back the still picture or movie, and touch the screen at the point you touched becomes the center. 6 Adjust...
...and the name of the folder in the Digital8 system or on a "Memory Stick" via the DV Interface. ,continued Playback 53 Touch W to decrease, or T to 5 times the original size. DSPL/BATT INFO POWER switch Magnifying pictures - Also, you want to select the PLAY/EDIT mode. 2 Touch . 3 Touch ...recorded. PB END "Memory Stick" playback select button Memory playback zoom screen PB ZOOM 1 / 10 101 MEMORY PLAY 101-0001 VIDEO Tape playback select button END 5 Play back the still picture or movie, and touch the screen at the point you touched becomes the center. 6 Adjust...
Camera Operations Guide
Page 54
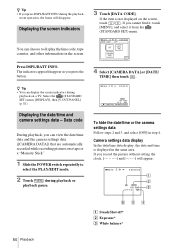
... date/time or the camera settings data Follow steps 2 and 3, and select [OFF] in the same area. z Tip • You can choose to select the PLAY/EDIT mode. 2 Touch during the playback zoom operation, the frame will appear. 60min 0:00:00:00 AUTO 100 AWB F1.6 9dB 54 Playback A SteadyShot off...
... date/time or the camera settings data Follow steps 2 and 3, and select [OFF] in the same area. z Tip • You can choose to select the PLAY/EDIT mode. 2 Touch during the playback zoom operation, the frame will appear. 60min 0:00:00:00 AUTO 100 AWB F1.6 9dB 54 Playback A SteadyShot off...


