Camera Operations Guide
Page 3
...equipment off and on your camcorder. Model No. Reorient or relocate the receiving antenna. - Notes on standard 8 mm and Hi8 , Digital8 video cassettes in a residential installation. Refer to comply with the instructions, may call upon your Sony dealer regarding this product. ...you have any way. ,continued 3 Model No. These limits are normal results of Conformity Trade Name: SONY Model No.: DCR-TRV460 Responsible Party: Sony Electronics Inc. The interface cable supplied must accept any interference received, including interference that appear constantly on a...
...equipment off and on your camcorder. Model No. Reorient or relocate the receiving antenna. - Notes on standard 8 mm and Hi8 , Digital8 video cassettes in a residential installation. Refer to comply with the instructions, may call upon your Sony dealer regarding this product. ...you have any way. ,continued 3 Model No. These limits are normal results of Conformity Trade Name: SONY Model No.: DCR-TRV460 Responsible Party: Sony Electronics Inc. The interface cable supplied must accept any interference received, including interference that appear constantly on a...
Camera Operations Guide
Page 4
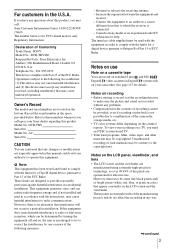
... as shown in the wrong direction, the terminal may appear different from what you start reading this manual, check the model name of your camcorder correctly. If you insert the connector plug forcibly in the following parts. Viewfinder LCD panel Battery pack • To ensure a good grip,... as a VCR or a computer with a USB or i.LINK cable, be damaged, or this manual are using the camcorder • Hold your camcorder. Doing so might cause your camcorder. Notes on using this manual • The images of the LCD screen and the viewfinder used for screen display on this...
... as shown in the wrong direction, the terminal may appear different from what you start reading this manual, check the model name of your camcorder correctly. If you insert the connector plug forcibly in the following parts. Viewfinder LCD panel Battery pack • To ensure a good grip,... as a VCR or a computer with a USB or i.LINK cable, be damaged, or this manual are using the camcorder • Hold your camcorder. Doing so might cause your camcorder. Notes on using this manual • The images of the LCD screen and the viewfinder used for screen display on this...
Camera Operations Guide
Page 7
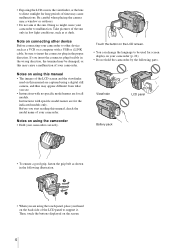
...88 Dubbing pictures from a tape to a "Memory Stick 89 Dubbing still images from a "Memory Stick" to other operating instructions supplied with your camcorder abroad ..........114 Usable cassette tapes 115 About the "Memory Stick 116 About the "InfoLITHIUM" battery pack 118 About i.LINK 119 Maintenance and precautions ............. mark 99 Printing recorded images (PictBridge compliant printer 101 Troubleshooting Troubleshooting 103 Warning indicators and messages ...110 Additional Information Using your camcorder: • Editing images with specific information - APPLI.) menu -
...88 Dubbing pictures from a tape to a "Memory Stick 89 Dubbing still images from a "Memory Stick" to other operating instructions supplied with your camcorder abroad ..........114 Usable cassette tapes 115 About the "Memory Stick 116 About the "InfoLITHIUM" battery pack 118 About i.LINK 119 Maintenance and precautions ............. mark 99 Printing recorded images (PictBridge compliant printer 101 Troubleshooting Troubleshooting 103 Warning indicators and messages ...110 Additional Information Using your camcorder: • Editing images with specific information - APPLI.) menu -
Camera Operations Guide
Page 8
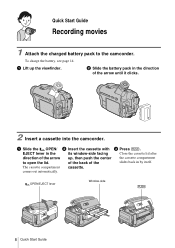
a Slide the OPEN/ b Insert the cassette with c Press . a Lift up , then push the center the cassette compartment to the camcorder. OPEN/EJECT lever Window-side 8 Quick Start Guide b Slide the battery pack in by itself. comes out automatically. Quick Start Guide Recording ... lever in the its window-side facing Close the cassette lid after direction of the arrow until it clicks. 2 Insert a cassette into the camcorder. The cassette compartment cassette. of the back of the slides back in the direction of the arrow up the viewfinder. To charge the battery,...
a Slide the OPEN/ b Insert the cassette with c Press . a Lift up , then push the center the cassette compartment to the camcorder. OPEN/EJECT lever Window-side 8 Quick Start Guide b Slide the battery pack in by itself. comes out automatically. Quick Start Guide Recording ... lever in the its window-side facing Close the cassette lid after direction of the arrow until it clicks. 2 Insert a cassette into the camcorder. The cassette compartment cassette. of the back of the slides back in the direction of the arrow up the viewfinder. To charge the battery,...
Camera Operations Guide
Page 9
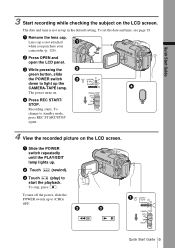
... POWER switch repeatedly until the PLAY/EDIT lamp lights up in the default setting. The date and time is not attached when you purchase your camcorder (p. 126). b Press OPEN and open the LCD panel. d Press REC START/ STOP. To turn off the power, slide the POWER switch up the CAMERA-TAPE...
... POWER switch repeatedly until the PLAY/EDIT lamp lights up in the default setting. The date and time is not attached when you purchase your camcorder (p. 126). b Press OPEN and open the LCD panel. d Press REC START/ STOP. To turn off the power, slide the POWER switch up the CAMERA-TAPE...
Camera Operations Guide
Page 10
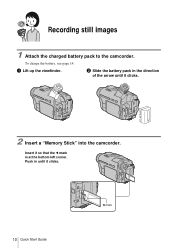
a Lift up the viewfinder. b Slide the battery pack in until it clicks. 2 Insert a "Memory Stick" into the camcorder. Push in the direction of the arrow until it so that the b mark is at the bottom left corner. Insert it clicks. 10 Quick Start Guide b mark To charge the battery, see page 14. Recording still images 1 Attach the charged battery pack to the camcorder.
a Lift up the viewfinder. b Slide the battery pack in until it clicks. 2 Insert a "Memory Stick" into the camcorder. Push in the direction of the arrow until it so that the b mark is at the bottom left corner. Insert it clicks. 10 Quick Start Guide b mark To charge the battery, see page 14. Recording still images 1 Attach the charged battery pack to the camcorder.
Camera Operations Guide
Page 11
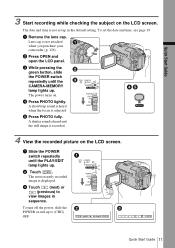
... PLAY/EDIT lamp lights up . b Touch . Quick Start Guide 11 A shutter sound is heard and the still image is not attached when you purchase your camcorder (p. 126). The most recently recorded image is adjusted. The date and time is not set the date and time, see page 19. To set up...
... PLAY/EDIT lamp lights up . b Touch . Quick Start Guide 11 A shutter sound is heard and the still image is not attached when you purchase your camcorder (p. 126). The most recently recorded image is adjusted. The date and time is not set the date and time, see page 19. To set up...

Camera Operations Guide
Page 13
... supplied with DCR-TRV361. Getting started Step 1: Checking supplied items Make sure you have following items supplied with your camcorder. "Memory Stick" 8MB (1) (DCR-TRV361) "Memory Stick" media is only supplied with DCR-TRV460. The number in parentheses indicates the number of that item supplied. There is already installed. A/V connecting cable (1) USB...
... supplied with DCR-TRV361. Getting started Step 1: Checking supplied items Make sure you have following items supplied with your camcorder. "Memory Stick" 8MB (1) (DCR-TRV361) "Memory Stick" media is only supplied with DCR-TRV460. The number in parentheses indicates the number of that item supplied. There is already installed. A/V connecting cable (1) USB...
Camera Operations Guide
Page 14
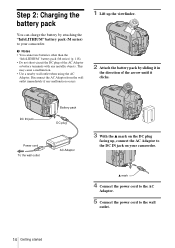
...the v mark on the DC plug facing up the viewfinder. 2 Attach the battery pack by attaching the "InfoLITHIUM" battery pack (M series) to your camcorder. Disconnect the AC Adaptor from the wall outlet immediately if any metallic objects. v mark 4 Connect the power cord to the AC Adaptor. 5 Connect the... power cord to the DC IN jack on your camcorder. b Notes • You cannot use batteries other than the "InfoLITHIUM" battery pack (M series) (p. 118). • Do not short-circuit the DC...
...the v mark on the DC plug facing up the viewfinder. 2 Attach the battery pack by attaching the "InfoLITHIUM" battery pack (M series) to your camcorder. Disconnect the AC Adaptor from the wall outlet immediately if any metallic objects. v mark 4 Connect the power cord to the AC Adaptor. 5 Connect the... power cord to the DC IN jack on your camcorder. b Notes • You cannot use batteries other than the "InfoLITHIUM" battery pack (M series) (p. 118). • Do not short-circuit the DC...

Camera Operations Guide
Page 16
... 130 60 NP-QM71/ 315 150 QM71D NP-QM91/ 475 230 QM91D Recording time when recording with the LCD screen on other devices in the Digital8 system. This table shows the playing time for tapes recorded in the Hi8 /standard 8 mm system is reduced by about 20%. Battery pack LCD panel... will be shorter when you use a fully charged battery pack at 25°C (77°F). For DCR-TRV460: The playing time of tapes recorded on Approximate number of minutes available when you use your camcorder, even if its power cord is disconnected from the battery pack when the AC Adaptor is fully...
... 130 60 NP-QM71/ 315 150 QM71D NP-QM91/ 475 230 QM91D Recording time when recording with the LCD screen on other devices in the Digital8 system. This table shows the playing time for tapes recorded in the Hi8 /standard 8 mm system is reduced by about 20%. Battery pack LCD panel... will be shorter when you use a fully charged battery pack at 25°C (77°F). For DCR-TRV460: The playing time of tapes recorded on Approximate number of minutes available when you use your camcorder, even if its power cord is disconnected from the battery pack when the AC Adaptor is fully...
Camera Operations Guide
Page 17
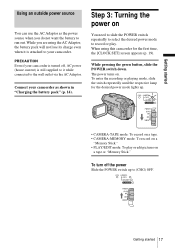
...on a tape or "Memory Stick." When using the AC Adaptor, the battery pack will not lose its charge even when it while connected to your camcorder. To turn off , AC power (house current) is still supplied to run out. While you do not want the battery to it is turned ... . While pressing the green button, slide the POWER switch down. The power turns on a "Memory Stick." • PLAY/EDIT mode: To play . Connect your camcorder is attached to the wall outlet via the AC Adaptor. To enter the recording or playing mode, slide the switch repeatedly until the respective lamp...
...on a tape or "Memory Stick." When using the AC Adaptor, the battery pack will not lose its charge even when it while connected to your camcorder. To turn off , AC power (house current) is still supplied to run out. While you do not want the battery to it is turned ... . While pressing the green button, slide the POWER switch down. The power turns on a "Memory Stick." • PLAY/EDIT mode: To play . Connect your camcorder is attached to the wall outlet via the AC Adaptor. To enter the recording or playing mode, slide the switch repeatedly until the respective lamp...
Camera Operations Guide
Page 18
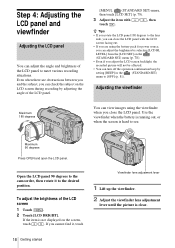
Open the LCD panel 90 degrees to the camcorder, then rotate it , touch Viewfinder lens adjustment lever 1 Lift up the viewfinder. 2 Adjust the viewfinder lens adjustment lever until the picture is not displayed on ...
Open the LCD panel 90 degrees to the camcorder, then rotate it , touch Viewfinder lens adjustment lever 1 Lift up the viewfinder. 2 Adjust the viewfinder lens adjustment lever until the picture is not displayed on ...
Camera Operations Guide
Page 19
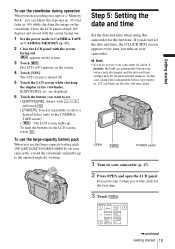
... screen, touch . are recording on a tape or a "Memory Stick", you can adjust the exposure (p. 35) and fader (p. 40) while checking the image on your camcorder for about 3 months, the built-in the CAMERA- To hide the buttons on the screen. 4 Touch [YES]. If you do not use your...button-type battery (p. 123) and then set the date and time, the [CLOCK SET] screen appears every time you turn on your camcorder. EXPO- OPEN POWER switch 1 Turn on your camcorder (p. 17). 2 Press OPEN and open the LCD panel. Step 5: Setting the date and time Set the date and time when ...
... screen, touch . are recording on a tape or a "Memory Stick", you can adjust the exposure (p. 35) and fader (p. 40) while checking the image on your camcorder for about 3 months, the built-in the CAMERA- To hide the buttons on the screen. 4 Touch [YES]. If you do not use your...button-type battery (p. 123) and then set the date and time, the [CLOCK SET] screen appears every time you turn on your camcorder. EXPO- OPEN POWER switch 1 Turn on your camcorder (p. 17). 2 Press OPEN and open the LCD panel. Step 5: Setting the date and time Set the date and time when ...
Camera Operations Guide
Page 20
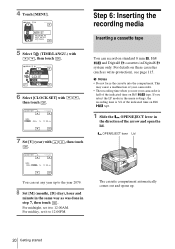
...-:--:-- DATE 2004Y JAN M 1D 12: 00 AM OK 7 Set [Y] (year) with / , then touch . 60min -:--:-- If you use your camcorder. • The recording time when you select the LP mode in the menu settings, the recording time is half of the arrow and open the ... the direction of the indicated time on these cassettes (such as was done in Digital8 system only. For details on Hi8 tape. This may cause a malfunction of your camcorder is 3/4 of the indicated time on standard 8 mm , Hi8 and Digital8 cassettes in step 7, then touch . Step 6: Inserting the recording media Inserting a ...
...-:--:-- DATE 2004Y JAN M 1D 12: 00 AM OK 7 Set [Y] (year) with / , then touch . 60min -:--:-- If you use your camcorder. • The recording time when you select the LP mode in the menu settings, the recording time is half of the arrow and open the ... the direction of the indicated time on these cassettes (such as was done in Digital8 system only. For details on Hi8 tape. This may cause a malfunction of your camcorder is 3/4 of the indicated time on standard 8 mm , Hi8 and Digital8 cassettes in step 7, then touch . Step 6: Inserting the recording media Inserting a ...

Camera Operations Guide
Page 21
Your camcorder may malfunction when it clicks. To eject the cassette 1 Slide the OPEN/EJECT lever in once. To eject a "Memory Stick" Lightly push the "Memory Stick" ...
Your camcorder may malfunction when it clicks. To eject the cassette 1 Slide the OPEN/EJECT lever in once. To eject a "Memory Stick" Lightly push the "Memory Stick" ...
Camera Operations Guide
Page 22
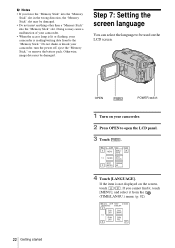
...- SURE 1/3 FADER SPOT FOCUS SPOT PRGRAM METER AE 4 Touch [LANGUAGE]. Doing so may cause a malfunction of your camcorder. • When the access lamp is lit or flashing, your camcorder is not displayed on your camcorder. 2 Press OPEN to be damaged. Otherwise, image data may be damaged. • Do not insert anything other than... Stick" slot. b Notes • If you cannot find it, touch [MENU], and select it from /to the "Memory Stick." Do not shake or knock your camcorder, turn the power off, eject the "Memory Stick," or remove the battery pack.
...- SURE 1/3 FADER SPOT FOCUS SPOT PRGRAM METER AE 4 Touch [LANGUAGE]. Doing so may cause a malfunction of your camcorder. • When the access lamp is lit or flashing, your camcorder is not displayed on your camcorder. 2 Press OPEN to be damaged. Otherwise, image data may be damaged. • Do not insert anything other than... Stick" slot. b Notes • If you cannot find it, touch [MENU], and select it from /to the "Memory Stick." Do not shake or knock your camcorder, turn the power off, eject the "Memory Stick," or remove the battery pack.

Camera Operations Guide
Page 23
Getting started 5 Select the desired language with / , then touch . z Tip • Your camcorder offers [ENG[SIMP]](simplified English) for when you cannot find your native tongue among the options. Getting started 23
Getting started 5 Select the desired language with / , then touch . z Tip • Your camcorder offers [ENG[SIMP]](simplified English) for when you cannot find your native tongue among the options. Getting started 23
Camera Operations Guide
Page 24
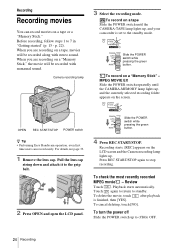
... or a "Memory Stick." Slide the POWER switch while pressing the green button. OPEN REC START/STOP POWER switch z Tip • Performing Easy Handycam operation, even first time users can record movies on a tape Slide the POWER switch until the CAMERA-MEMORY lamp lights up . For details,see ...22). To record on a tape, movies will be recorded along with monaural sound. To turn the power off Slide the POWER switch up , and your camcorder is finished, then [YES]. Before recording, follow steps 1 to the grip belt. 2 Press OPEN and open the LCD panel. Camera recording lamp 3 Select...
... or a "Memory Stick." Slide the POWER switch while pressing the green button. OPEN REC START/STOP POWER switch z Tip • Performing Easy Handycam operation, even first time users can record movies on a tape Slide the POWER switch until the CAMERA-MEMORY lamp lights up . For details,see ...22). To record on a tape, movies will be recorded along with monaural sound. To turn the power off Slide the POWER switch up , and your camcorder is finished, then [YES]. Before recording, follow steps 1 to the grip belt. 2 Press OPEN and open the LCD panel. Camera recording lamp 3 Select...
Camera Operations Guide
Page 25
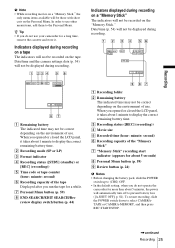
...other menu items, add them to prevent battery loss ([A.SHUT OFF], p. 81). To restart recording, slide the POWER switch down to use your camcorder for a long time, remove the cassette and store it takes about 5 minutes, the power will not be displayed during recording. 60min REC 101...opened or closed the LCD panel, it takes about 1 minute to display the correct remaining battery time. z Tip • If you do not operate the camcorder for more than about 1 minute to display the correct remaining battery time. B Recording mode (SP or LP) C Format indicator D Recording status ([STBY]...
...other menu items, add them to prevent battery loss ([A.SHUT OFF], p. 81). To restart recording, slide the POWER switch down to use your camcorder for a long time, remove the cassette and store it takes about 5 minutes, the power will not be displayed during recording. 60min REC 101...opened or closed the LCD panel, it takes about 1 minute to display the correct remaining battery time. z Tip • If you do not operate the camcorder for more than about 1 minute to display the correct remaining battery time. B Recording mode (SP or LP) C Format indicator D Recording status ([STBY]...
Camera Operations Guide
Page 26
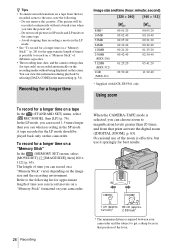
..., select [ REC MODE], then [LP] (p. 76). Occasional use of the zoom is effective, but use it is selected, you can view this camcorder. Recording for tape only) are recorded automatically on the recording media without a break even when you turn the power off). - The length of time ... time it sparingly for best results. 26 Recording 1 cm (approx. 80 cm (approx. 1/2 inch)* 2 5/8 feet)* * The minimum distance required between your camcorder. z Tips • To ensure smooth transition on a tape from that position of the lever. In the LP mode, you can when recording in the SP...
..., select [ REC MODE], then [LP] (p. 76). Occasional use of the zoom is effective, but use it is selected, you can view this camcorder. Recording for tape only) are recorded automatically on the recording media without a break even when you turn the power off). - The length of time ... time it sparingly for best results. 26 Recording 1 cm (approx. 80 cm (approx. 1/2 inch)* 2 5/8 feet)* * The minimum distance required between your camcorder. z Tips • To ensure smooth transition on a tape from that position of the lever. In the LP mode, you can when recording in the SP...


