Operating Instructions
Page 6
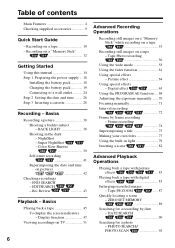
... Slow Shutter 39 Self-timer recording 41 Superimposing the date and time on a "Memory Stick" 12 Getting Started Using this manual 14 Step 1 Preparing the power supply ... 18 Installing the battery pack 18 Charging the battery pack 19 Connecting to a wall outlet 24 Step 2 Setting the date and time ........ 26 Step 3 Inserting...
... Slow Shutter 39 Self-timer recording 41 Superimposing the date and time on a "Memory Stick" 12 Getting Started Using this manual 14 Step 1 Preparing the power supply ... 18 Installing the battery pack 18 Charging the battery pack 19 Connecting to a wall outlet 24 Step 2 Setting the date and time ........ 26 Step 3 Inserting...
Operating Instructions
Page 9
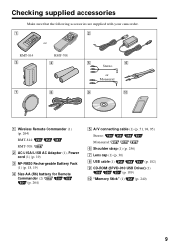
... Make sure that the following accessories are supplied with your camcorder. 1 2 or RMT-814 3 RMT-708 4 5 6 Stereo or Monaural 7 8 9 q; 1 Wireless Remote Commander (1) (p. 264) RMT-814: RMT-708: 2 AC-L15A/L15B AC Adaptor (1), Power cord (1) (p. 19) 3 NP-FM30 Rechargeable Battery Pack (1) (p. 18, 19) 4 Size AA (R6) battery for Remote Commander (2) (p. 264) 5 A/V connecting cable (1) (p. 51...
... Make sure that the following accessories are supplied with your camcorder. 1 2 or RMT-814 3 RMT-708 4 5 6 Stereo or Monaural 7 8 9 q; 1 Wireless Remote Commander (1) (p. 264) RMT-814: RMT-708: 2 AC-L15A/L15B AC Adaptor (1), Power cord (1) (p. 19) 3 NP-FM30 Rechargeable Battery Pack (1) (p. 18, 19) 4 Size AA (R6) battery for Remote Commander (2) (p. 264) 5 A/V connecting cable (1) (p. 51...

Operating Instructions
Page 10
... its v mark facing up . 3 Close the cassette compartment by pressing on a tape of your camcorder outdoors (p. 18). AC Adaptor (supplied) Inserting a cassette (p. 28) 1 Slide OPEN/ EJECT in parentheses "( )" for more information. Open... the DC IN jack cover. Recording on a tape This chapter introduces you to the basic features to record on the cassette compartment. Quick Start Guide 10 Connecting the power cord (p. 24) Use the battery pack when using your camcorder...
... its v mark facing up . 3 Close the cassette compartment by pressing on a tape of your camcorder outdoors (p. 18). AC Adaptor (supplied) Inserting a cassette (p. 28) 1 Slide OPEN/ EJECT in parentheses "( )" for more information. Open... the DC IN jack cover. Recording on a tape This chapter introduces you to the basic features to record on the cassette compartment. Quick Start Guide 10 Connecting the power cord (p. 24) Use the battery pack when using your camcorder...

Operating Instructions
Page 12
AC Adaptor (supplied) Inserting a "Memory Stick" (p. 127) Insert a "Memory Stick" in parentheses "( )" for more information. Quick Start Guide - Open the DC IN jack cover. "Memory Stick" slot b mark ... "Memory Stick" slot as far as it can go with its v mark facing up. Power cord Connect the plug with the b mark facing the LCD panel as illustrated. Connecting the power cord (p. 24) Use the battery pack when using your camcorder. Recording on a "Memory Stick" Quick Start Guide This chapter introduces you to the...
AC Adaptor (supplied) Inserting a "Memory Stick" (p. 127) Insert a "Memory Stick" in parentheses "( )" for more information. Quick Start Guide - Open the DC IN jack cover. "Memory Stick" slot b mark ... "Memory Stick" slot as far as it can go with its v mark facing up. Power cord Connect the plug with the b mark facing the LCD panel as illustrated. Connecting the power cord (p. 24) Use the battery pack when using your camcorder. Recording on a "Memory Stick" Quick Start Guide This chapter introduces you to the...
Operating Instructions
Page 18
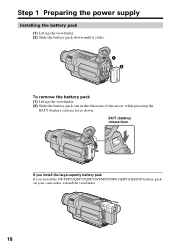
Step 1 Preparing the power supply Installing the battery pack (1) Lift up the viewfinder. (2) Slide the battery pack down until it clicks. 1 2 To remove the battery pack (1) Lift up the viewfinder. (2) Slide the battery pack out in the direction of the arrow while pressing the BATT (battery) release lever down. BATT (battery) release lever If you install the large-capacity battery pack If you install the NP-FM70/QM71/QM71D/FM90/FM91/QM91/QM91D battery pack on your camcorder, extend the viewfinder. 18
Step 1 Preparing the power supply Installing the battery pack (1) Lift up the viewfinder. (2) Slide the battery pack down until it clicks. 1 2 To remove the battery pack (1) Lift up the viewfinder. (2) Slide the battery pack out in the direction of the arrow while pressing the BATT (battery) release lever down. BATT (battery) release lever If you install the large-capacity battery pack If you install the NP-FM70/QM71/QM71D/FM90/FM91/QM91/QM91D battery pack on your camcorder, extend the viewfinder. 18
Operating Instructions
Page 19
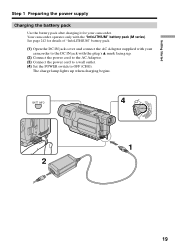
... only with the plug's v mark facing up when charging begins. See page 242 for your camcorder to OFF (CHG). Getting Started Step 1 Preparing the power supply Charging the battery pack Use the battery pack after charging it for details of "InfoLITHIUM" battery pack. (1) Open the... DC IN jack cover and connect the AC Adaptor supplied with your camcorder. BATT INFO 4 V POWER CR OFF(CHG) CAM ME ERMAORY 1 2...
... only with the plug's v mark facing up when charging begins. See page 242 for your camcorder to OFF (CHG). Getting Started Step 1 Preparing the power supply Charging the battery pack Use the battery pack after charging it for details of "InfoLITHIUM" battery pack. (1) Open the... DC IN jack cover and connect the AC Adaptor supplied with your camcorder. BATT INFO 4 V POWER CR OFF(CHG) CAM ME ERMAORY 1 2...

Operating Instructions
Page 20
..., the battery charge level indicator shows 100% and the charge lamp goes out. BATTERY INFO BATTERY CHARGE LEVEL 0% 50% 100% REC TIME AVAILABLE LCD SCREEN: 56 min VIEWFINDER: 73 min Charging j BATTERY INFO BATTERY CHARGE LEVEL 0% 50% 100% The battery charge level is displayed as a rough...time with the metal parts on your camcorder. Note Prevent metallic objects from the wall outlet as soon as possible to the value displayed in the following cases: - The BATTERY INFO is displayed for up to OFF (CHG). - Step 1 Preparing the power supply To check the state of the ...
..., the battery charge level indicator shows 100% and the charge lamp goes out. BATTERY INFO BATTERY CHARGE LEVEL 0% 50% 100% REC TIME AVAILABLE LCD SCREEN: 56 min VIEWFINDER: 73 min Charging j BATTERY INFO BATTERY CHARGE LEVEL 0% 50% 100% The battery charge level is displayed as a rough...time with the metal parts on your camcorder. Note Prevent metallic objects from the wall outlet as soon as possible to the value displayed in the following cases: - The BATTERY INFO is displayed for up to OFF (CHG). - Step 1 Preparing the power supply To check the state of the ...
Operating Instructions
Page 21
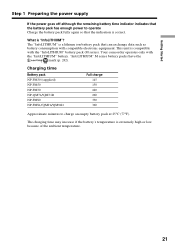
... can exchange data such as battery consumption with the "InfoLITHIUM" battery. "InfoLITHIUM" M series battery packs have the mark (p. 242). Your camcorder operates only with compatible electronic equipment. What is extremely high or low because of the ambient temperature. 21 TM SERIES Charging time Battery pack ... series). The charging time may increase if the battery's temperature is "InfoLITHIUM"? This unit is correct. Getting Started Step 1 Preparing the power supply If the power goes off although the remaining battery time indicator indicates that the battery pack has enough...
... can exchange data such as battery consumption with the "InfoLITHIUM" battery. "InfoLITHIUM" M series battery packs have the mark (p. 242). Your camcorder operates only with compatible electronic equipment. What is extremely high or low because of the ambient temperature. 21 TM SERIES Charging time Battery pack ... series). The charging time may increase if the battery's temperature is "InfoLITHIUM"? This unit is correct. Getting Started Step 1 Preparing the power supply If the power goes off although the remaining battery time indicator indicates that the battery pack has enough...
Operating Instructions
Page 22
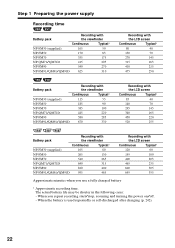
...charging (p. 242). 22 When you use a fully charged battery * Approximate recording time. Step 1 Preparing the power supply Recording time Battery pack Recording with the viewfinder Continuous Typical* NP-FM30 (supplied) 105 50 NP-FM50 170 85 NP-FM70 355 175 NP-QM71/QM71D 415 205 NP-FM90 540 270... 285 NP-FM91/QM91/QM91D 670 330 Recording with the LCD screen Continuous Typical* 85 40 140 70 295 145 340 165 450 220 520 255 Battery pack Recording with the viewfinder Continuous Typical* NP-FM30 (supplied) 165 80 NP-FM50 265 130 NP-FM70 540 265...
...charging (p. 242). 22 When you use a fully charged battery * Approximate recording time. Step 1 Preparing the power supply Recording time Battery pack Recording with the viewfinder Continuous Typical* NP-FM30 (supplied) 105 50 NP-FM50 170 85 NP-FM70 355 175 NP-QM71/QM71D 415 205 NP-FM90 540 270... 285 NP-FM91/QM91/QM91D 670 330 Recording with the LCD screen Continuous Typical* 85 40 140 70 295 145 340 165 450 220 520 255 Battery pack Recording with the viewfinder Continuous Typical* NP-FM30 (supplied) 165 80 NP-FM50 265 130 NP-FM70 540 265...
Operating Instructions
Page 23
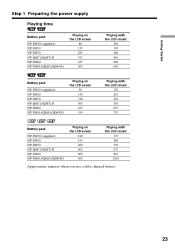
... Step 1 Preparing the power supply Playing time Battery pack NP-FM30 (supplied) NP-FM50 NP-FM70 NP-QM71/QM71D NP-FM90 NP-FM91/QM91/QM91D Playing on the LCD screen 80 135 285 335 435 505 Playing with the LCD closed 120 195 400 465 600 695 Battery pack NP-FM30 (supplied) NP-FM50 NP-FM70... NP-QM71/QM71D NP-FM90 NP-FM91/QM91/QM91D Playing on the LCD screen 90 150 310 365 475 550 Playing with the LCD closed 130 210 430 505 655 755 Battery pack NP-FM30 (supplied) NP-FM50 NP-FM70 NP-QM71/QM71D NP-FM90 NP-FM91/QM91/QM91D Playing...
... Step 1 Preparing the power supply Playing time Battery pack NP-FM30 (supplied) NP-FM50 NP-FM70 NP-QM71/QM71D NP-FM90 NP-FM91/QM91/QM91D Playing on the LCD screen 80 135 285 335 435 505 Playing with the LCD closed 120 195 400 465 600 695 Battery pack NP-FM30 (supplied) NP-FM50 NP-FM70... NP-QM71/QM71D NP-FM90 NP-FM91/QM91/QM91D Playing on the LCD screen 90 150 310 365 475 550 Playing with the LCD closed 130 210 430 505 655 755 Battery pack NP-FM30 (supplied) NP-FM50 NP-FM70 NP-QM71/QM71D NP-FM90 NP-FM91/QM91/QM91D Playing...
Operating Instructions
Page 24
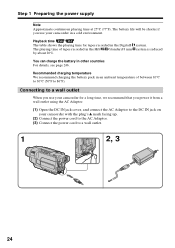
... 86°F). The battery life will be shorter if you power it from a wall outlet using the AC Adaptor. (1) Open the DC IN jack cover, and connect the AC Adaptor to the DC IN jack on your camcorder in the Digital8 The playing time of between 10°C to 30°...;C (50°F to a wall outlet. 1 2, 3 24 Playback time The table shows the playing time for a long time, we recommend that you use your camcorder for tapes recorded in a cold environment. Step 1 Preparing the power supply Note ...
... 86°F). The battery life will be shorter if you power it from a wall outlet using the AC Adaptor. (1) Open the DC IN jack cover, and connect the AC Adaptor to the DC IN jack on your camcorder in the Digital8 The playing time of between 10°C to 30°...;C (50°F to a wall outlet. 1 2, 3 24 Playback time The table shows the playing time for a long time, we recommend that you use your camcorder for tapes recorded in a cold environment. Step 1 Preparing the power supply Note ...

Operating Instructions
Page 25
...camcorder. •The DC IN jack has "source priority." While using the AC Adaptor, if any power if the power cord is connected to the operating instructions of the Car Battery Adaptor for further information. 25 Using a car battery Use Sony Car Battery Adaptor (optional). Notes •The AC Adaptor can supply power... even if the battery pack is attached to cut off . Getting Started Step 1 Preparing the power supply PRECAUTION The set is not disconnected from ...
...camcorder. •The DC IN jack has "source priority." While using the AC Adaptor, if any power if the power cord is connected to the operating instructions of the Car Battery Adaptor for further information. 25 Using a car battery Use Sony Car Battery Adaptor (optional). Notes •The AC Adaptor can supply power... even if the battery pack is attached to cut off . Getting Started Step 1 Preparing the power supply PRECAUTION The set is not disconnected from ...
Operating Instructions
Page 45
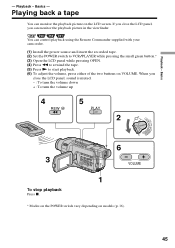
... playback picture in the viewfinder. You can control playback using the Remote Commander supplied with your camcorder. (1) Install the power source and insert the recorded tape. (2) Set the POWER switch to VCR/PLAYER while pressing the small green button.* (3) Open the LCD panel while pressing OPEN. (4) Press m to rewind the tape. (5) Press N to start playback...
... playback picture in the viewfinder. You can control playback using the Remote Commander supplied with your camcorder. (1) Install the power source and insert the recorded tape. (2) Set the POWER switch to VCR/PLAYER while pressing the small green button.* (3) Open the LCD panel while pressing OPEN. (4) Press m to rewind the tape. (5) Press N to start playback...
Operating Instructions
Page 51
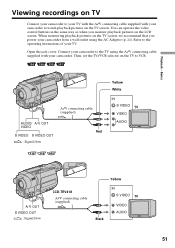
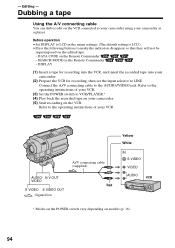
...to watch playback pictures on the LCD screen. A/V connecting cable (supplied) AUDIO/ A/ V OUT VIDEO Red S VIDEO S VIDEO OUT : Signal flow Yellow White IN S VIDEO TV VIDEO AUDIO A/ V OUT S VIDEO OUT : Signal flow CCD-TRV418 A/V connecting cable (supplied) Yellow IN S VIDEO TV ...buttons in the same way as when you power your camcorder from a wall outlet using the A/V connecting cable supplied with your camcorder. Basics Viewing recordings on TV Connect your camcorder to your TV with the A/V connecting cable supplied with your camcorder to VCR. Connect your TV. Playback ...
...to watch playback pictures on the LCD screen. A/V connecting cable (supplied) AUDIO/ A/ V OUT VIDEO Red S VIDEO S VIDEO OUT : Signal flow Yellow White IN S VIDEO TV VIDEO AUDIO A/ V OUT S VIDEO OUT : Signal flow CCD-TRV418 A/V connecting cable (supplied) Yellow IN S VIDEO TV ...buttons in the same way as when you power your camcorder from a wall outlet using the A/V connecting cable supplied with your camcorder. Basics Viewing recordings on TV Connect your camcorder to your TV with the A/V connecting cable supplied with your camcorder to VCR. Connect your TV. Playback ...

Operating Instructions
Page 81
... the risk of fire. •To prevent possible burn hazard, disconnect the power source before replacing the bulb. (1) Remove the built-in light unit while pushing the hole under the built-in light Replacing the bulb Use the Sony XB-3D halogen lamp (optional). If the bulb is not commercially available. Advanced... bulb housing by turning it clockwise, then replace the built-in light unit. 1 2 3 4 NOTE Be sure to align the tab with a dry cloth, etc. The supplied halogen lamp is smudged, wipe it with the groove when inserting.
... the risk of fire. •To prevent possible burn hazard, disconnect the power source before replacing the bulb. (1) Remove the built-in light unit while pushing the hole under the built-in light Replacing the bulb Use the Sony XB-3D halogen lamp (optional). If the bulb is not commercially available. Advanced... bulb housing by turning it clockwise, then replace the built-in light unit. 1 2 3 4 NOTE Be sure to align the tab with a dry cloth, etc. The supplied halogen lamp is smudged, wipe it with the groove when inserting.
Operating Instructions
Page 94
...LCD.) • Press the following buttons to make the indicators disappear so that they will not be superimposed on models (p. 16). 94 DISPLAY (1) Insert a tape for recording, then set the input selector to the operating instructions of your camcorder. (5) Start recording on your VCR. A/V connecting cable (supplied...) AUDIO/ A/ V OUT VIDEO Red S VIDEO S VIDEO OUT : Signal flow Yellow White IN S VIDEO VIDEO AUDIO VCR * Modes on the POWER switch vary depending on the ...
...LCD.) • Press the following buttons to make the indicators disappear so that they will not be superimposed on models (p. 16). 94 DISPLAY (1) Insert a tape for recording, then set the input selector to the operating instructions of your camcorder. (5) Start recording on your VCR. A/V connecting cable (supplied...) AUDIO/ A/ V OUT VIDEO Red S VIDEO S VIDEO OUT : Signal flow Yellow White IN S VIDEO VIDEO AUDIO VCR * Modes on the POWER switch vary depending on the ...

Operating Instructions
Page 119
...REC TV Yellow OUT S VIDEO VIDEO White S VIDEO AUDIO / VIDEO AUDIO VCR : Signal flow A/V connecting cable Red (supplied) When you have finished dubbing a tape Press x on both your camcorder and the VCR. 119 The picture from the TV or VCR appears on the screen of your... camcorder. (5) Press X on your camcorder. (4) Press N on your camcorder at the scene where you record a tape from TV. Before operation Set DISPLAY to LCD in the menu settings. (The default setting is LCD.) (1) Insert a tape for recording into the VCR. (2) Set the POWER switch to VCR on your camcorder. (3)...
...REC TV Yellow OUT S VIDEO VIDEO White S VIDEO AUDIO / VIDEO AUDIO VCR : Signal flow A/V connecting cable Red (supplied) When you have finished dubbing a tape Press x on both your camcorder and the VCR. 119 The picture from the TV or VCR appears on the screen of your... camcorder. (5) Press X on your camcorder. (4) Press N on your camcorder at the scene where you record a tape from TV. Before operation Set DISPLAY to LCD in the menu settings. (The default setting is LCD.) (1) Insert a tape for recording into the VCR. (2) Set the POWER switch to VCR on your camcorder. (3)...
Operating Instructions
Page 138
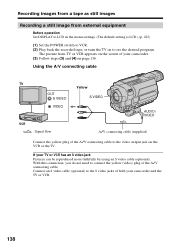
...images from a tape as still images Recording a still image from TV or VCR appears on the screen of your camcorder. (3) Follow steps (3) and (4) on page 136. If your camcorder and the TV or VCR. 138 With this connection, you do not need to VCR. (2) Play back the recorded...connecting cable (supplied) Connect the yellow plug of the A/V connecting cable to the video output jack on to the S video jacks of the A/V connecting cable. The picture from external equipment Before operation Set DISPLAY to LCD in the menu settings. (The default setting is LCD.) (p. 222) (1) Set the POWER switch to...
...images from a tape as still images Recording a still image from TV or VCR appears on the screen of your camcorder. (3) Follow steps (3) and (4) on page 136. If your camcorder and the TV or VCR. 138 With this connection, you do not need to VCR. (2) Play back the recorded...connecting cable (supplied) Connect the yellow plug of the A/V connecting cable to the video output jack on to the S video jacks of the A/V connecting cable. The picture from external equipment Before operation Set DISPLAY to LCD in the menu settings. (The default setting is LCD.) (p. 222) (1) Set the POWER switch to...

Operating Instructions
Page 145
...For C. Recording 145 For C. CHROM:18 images (such as a frame) DSC 00001 to 101-0020 •The CD-ROM supplied with your camcorder is already stored with your camcorder is used (p. 162). CHROM: two images (such as a background) 101-0019 to DSC 00018 - The recording folder you... selected when the POWER switch was set to DSC 00020 "Memory Stick" Operations - MEMORY MIX Notes •You cannot use MEMORY MIX for moving pictures recorded on an image - Sample images •The "Memory Stick" supplied with the protected 20 images : - For...
...For C. Recording 145 For C. CHROM:18 images (such as a frame) DSC 00001 to 101-0020 •The CD-ROM supplied with your camcorder is already stored with your camcorder is used (p. 162). CHROM: two images (such as a background) 101-0019 to DSC 00018 - The recording folder you... selected when the POWER switch was set to DSC 00020 "Memory Stick" Operations - MEMORY MIX Notes •You cannot use MEMORY MIX for moving pictures recorded on an image - Sample images •The "Memory Stick" supplied with the protected 20 images : - For...
Operating Instructions
Page 152
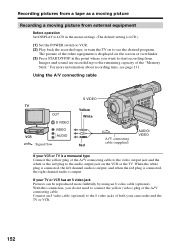
...A/V connecting cable TV OUT S VIDEO VIDEO VCR AUDIO : Signal flow S VIDEO Yellow White A/V connecting cable (supplied) Red AUDIO/ VIDEO If your VCR or TV is displayed on the screen or viewfinder. (3) Press START/STOP... you do not need to the audio output jack on to LCD in the menu settings. (The default setting is output. If your camcorder and the TV or VCR. 152 The picture of the other...channel audio is output, and when the red plug is connected, the right channel audio is LCD.) (1) Set the POWER switch to VCR. (2) Play back the recorded tape, or turn the TV on the VCR...
...A/V connecting cable TV OUT S VIDEO VIDEO VCR AUDIO : Signal flow S VIDEO Yellow White A/V connecting cable (supplied) Red AUDIO/ VIDEO If your VCR or TV is displayed on the screen or viewfinder. (3) Press START/STOP... you do not need to the audio output jack on to LCD in the menu settings. (The default setting is output. If your camcorder and the TV or VCR. 152 The picture of the other...channel audio is output, and when the red plug is connected, the right channel audio is LCD.) (1) Set the POWER switch to VCR. (2) Play back the recorded tape, or turn the TV on the VCR...


