Operating Instructions
Page 5
...European countries with the supplied remote control. You can also use the buttons or knobs on European Union legislation shall be different from Dolby Laboratories. iPhone, iPod, iPod classic, iPod nano, and iPod touch are for model STR-DH540. Notice for the recycling of...For customers in Australia Disposal of Old Electrical & Electronic Equipment (Applicable in the U.S. The model number is only applicable to the authorized representative, Sony Deutschland GmbH, Hedelfinger Strasse 61, 70327 Stuttgart, Germany. Patent Nos: 5,956,674; 5,974,380; 6,226,616; 6,487,535; 7,212,...
...European countries with the supplied remote control. You can also use the buttons or knobs on European Union legislation shall be different from Dolby Laboratories. iPhone, iPod, iPod classic, iPod nano, and iPod touch are for model STR-DH540. Notice for the recycling of...For customers in Australia Disposal of Old Electrical & Electronic Equipment (Applicable in the U.S. The model number is only applicable to the authorized representative, Sony Deutschland GmbH, Hedelfinger Strasse 61, 70327 Stuttgart, Germany. Patent Nos: 5,956,674; 5,974,380; 6,226,616; 6,487,535; 7,212,...
Operating Instructions
Page 8
Using the Remote Control Reassigning the input button .......66 Resetting the input buttons ..........67 Additional Information Precautions 68 Troubleshooting 69 Specifications 76 Index 78 8GB
Using the Remote Control Reassigning the input button .......66 Resetting the input buttons ..........67 Additional Information Precautions 68 Troubleshooting 69 Specifications 76 Index 78 8GB
Operating Instructions
Page 9
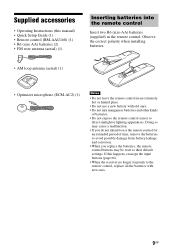
...from battery leakage and corrosion. • When you do not intend to use the remote control for an extended period of batteries. • Do not expose the remote control sensor to their default settings. Observe the correct polarity when installing batteries. • ...) (1) Notes • Do not leave the remote control in the remote control. If this manual) • Quick Setup Guide (1) • Remote control (RM-AAU168) (1) • R6 (size AA) batteries (2) • FM wire antenna (aerial) (1) Inserting batteries into the remote control Insert two R6 (size-AA) batteries (supplied...
...from battery leakage and corrosion. • When you do not intend to use the remote control for an extended period of batteries. • Do not expose the remote control sensor to their default settings. Observe the correct polarity when installing batteries. • ...) (1) Notes • Do not leave the remote control in the remote control. If this manual) • Quick Setup Guide (1) • Remote control (RM-AAU168) (1) • R6 (size AA) batteries (2) • FM wire antenna (aerial) (1) Inserting batteries into the remote control Insert two R6 (size-AA) batteries (supplied...
Operating Instructions
Page 10
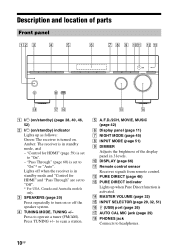
... (page 46) M PURE DIRECT indicator Lights up as follows: Green: The receiver is turned on or off when the receiver is in standby mode and "Control for HDMI" (page 59) is activated. N MASTER VOLUME (page 32) O INPUT SELECTOR (page 29, 32, 51) P (USB) port (page 26) ... jack Connects to operate a tuner (FM/AM). Description and location of the display panel in standby mode, and - J DISPLAY (page 66) K Remote control sensor Receives signals from remote control. "Pass Through" (page 60) is in 3 levels. C SPEAKERS (page 20) Press repeatedly to turn on . Press to headphones. 10GB...
... (page 46) M PURE DIRECT indicator Lights up as follows: Green: The receiver is turned on or off when the receiver is in standby mode and "Control for HDMI" (page 59) is activated. N MASTER VOLUME (page 32) O INPUT SELECTOR (page 29, 32, 51) P (USB) port (page 26) ... jack Connects to operate a tuner (FM/AM). Description and location of the display panel in standby mode, and - J DISPLAY (page 66) K Remote control sensor Receives signals from remote control. "Pass Through" (page 60) is in 3 levels. C SPEAKERS (page 20) Press repeatedly to turn on . Press to headphones. 10GB...
Operating Instructions
Page 14
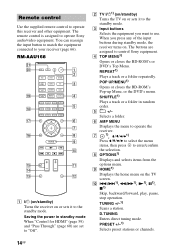
.... J ./>1), m/M1), N1), X1), x1) Skip, backward/forward, play, pause, stop operation. D.TUNING Enters direct tuning mode. Remote control Use the supplied remote control to use. The buttons are set to the standby mode. E +/- H OPTIONS1) Displays and selects items from the options menu. PRESET...HOME1) Displays the home menu on . TUNING +/-1) Scans a station. The remote control is assigned to your receiver (page 66). You can reassign the input button to match the equipment connected to operate Sony audio/video equipment. RM-AAU168 A ?/1 (on/standby) Turns the receiver...
.... J ./>1), m/M1), N1), X1), x1) Skip, backward/forward, play, pause, stop operation. D.TUNING Enters direct tuning mode. Remote control Use the supplied remote control to use. The buttons are set to the standby mode. E +/- H OPTIONS1) Displays and selects items from the options menu. PRESET...HOME1) Displays the home menu on . TUNING +/-1) Scans a station. The remote control is assigned to your receiver (page 66). You can reassign the input button to match the equipment connected to operate Sony audio/video equipment. RM-AAU168 A ?/1 (on/standby) Turns the receiver...

Operating Instructions
Page 16
... serve as examples. • Depending on the model of your connected equipment, some functions explained in this section may not work with the supplied remote control. To control other Sony equipment Name TV VCR 2 TV ?/1 z 4 TOP MENU, REPEAT POP UP/MENU, SHUFFLE 7 V/v/B/b, z z 8 OPTIONS z I HOME z z J ./PRESET -, >/PRESET + z z m/TUNING -, M/TUNING + z z N, X, x z z qh RETURN O z Q DISPLAY z z R Numeric buttons z z wa...
... serve as examples. • Depending on the model of your connected equipment, some functions explained in this section may not work with the supplied remote control. To control other Sony equipment Name TV VCR 2 TV ?/1 z 4 TOP MENU, REPEAT POP UP/MENU, SHUFFLE 7 V/v/B/b, z z 8 OPTIONS z I HOME z z J ./PRESET -, >/PRESET + z z m/TUNING -, M/TUNING + z z N, X, x z z qh RETURN O z Q DISPLAY z z R Numeric buttons z z wa...
Operating Instructions
Page 25
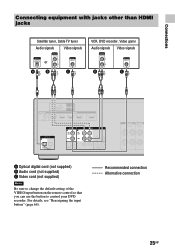
For details, see "Reassigning the input button" (page 66). Recommended connection Alternative connection 25GB Connections Connecting equipment with jacks other than HDMI jacks Satellite tuner, Cable TV tuner Audio signals Video signals VCR, DVD recorder, Video game Audio signals Video signals or A B C B C A Optical digital cord (not supplied) B Audio cord (not supplied) C Video cord (not supplied) Note Be sure to change the default setting of the VIDEO input button on the remote control so that you can use the button to control your DVD recorder.
For details, see "Reassigning the input button" (page 66). Recommended connection Alternative connection 25GB Connections Connecting equipment with jacks other than HDMI jacks Satellite tuner, Cable TV tuner Audio signals Video signals VCR, DVD recorder, Video game Audio signals Video signals or A B C B C A Optical digital cord (not supplied) B Audio cord (not supplied) C Video cord (not supplied) Note Be sure to change the default setting of the VIDEO input button on the remote control so that you can use the button to control your DVD recorder.
Operating Instructions
Page 28
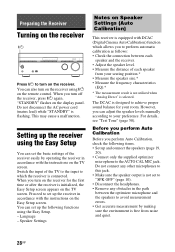
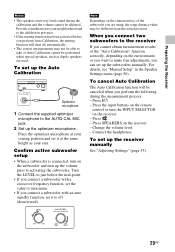
... quiet. 28GB Before you perform Auto Calibration Before you perform Auto Calibration, check the following items. • Set up the following functions using ?/1 on the remote control. Do not connect any other microphones to set up and connect the speakers (page 19, 20). • Connect only the supplied optimizer microphone to which...
... quiet. 28GB Before you perform Auto Calibration Before you perform Auto Calibration, check the following items. • Set up the following functions using ?/1 on the remote control. Do not connect any other microphones to set up and connect the speakers (page 19, 20). • Connect only the supplied optimizer microphone to which...
Operating Instructions
Page 29
... same height as dipole speakers are using, the setup distance value may not be able to activating the subwoofer. Press the input buttons on the remote control or turn up the Auto Calibration Optimizer microphone 1 Connect the supplied optimizer microphone to off automatically. • The correct measurements may be different from the...
... same height as dipole speakers are using, the setup distance value may not be able to activating the subwoofer. Press the input buttons on the remote control or turn up the Auto Calibration Optimizer microphone 1 Connect the supplied optimizer microphone to off automatically. • The correct measurements may be different from the...
Operating Instructions
Page 30
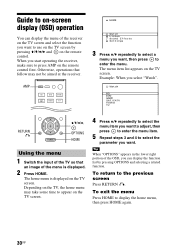
... "Watch". Tip When "OPTIONS" appears in the lower right portion of the OSD, you start operating the receiver, make sure to press AMP on the remote control first. When you can display the menu of the receiver on the TV screen and select the function you want, then press to enter the... by pressing OPTIONS and selecting a related function. Guide to on-screen display (OSD) operation You can display the function list by pressing V/v/B/b and on the remote control.
... "Watch". Tip When "OPTIONS" appears in the lower right portion of the OSD, you start operating the receiver, make sure to press AMP on the remote control first. When you can display the menu of the receiver on the TV screen and select the function you want, then press to enter the... by pressing OPTIONS and selecting a related function. Guide to on-screen display (OSD) operation You can display the function list by pressing V/v/B/b and on the remote control.
Operating Instructions
Page 32
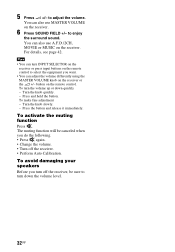
...42. To make fine adjustment - The muting function will be sure to turn INPUT SELECTOR on the receiver or press input buttons on the remote control to select the equipment you want. • You can turn down quickly - Tips • You can adjust the volume differently using the... MASTER VOLUME knob on the remote control. To avoid damaging your speakers Before you do the following. • Press again. • Change the volume. • Turn off the receiver. ...
...42. To make fine adjustment - The muting function will be sure to turn INPUT SELECTOR on the receiver or press input buttons on the remote control to select the equipment you want. • You can turn down quickly - Tips • You can adjust the volume differently using the... MASTER VOLUME knob on the remote control. To avoid damaging your speakers Before you do the following. • Press again. • Change the volume. • Turn off the receiver. ...
Operating Instructions
Page 34
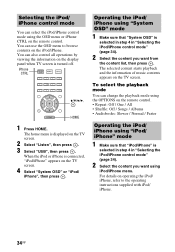
...the information of music contents appears on operating the iPod/ iPhone, refer to browse contents on the remote control. The home menu is selected in step 4 in "Selecting the iPod/iPhone control mode" (page 34). 2 Select the content you want using iPod/iPhone menu. To select ...the playback mode You can change the playback mode using the OPTIONS on the remote control. • Repeat: Off / One / All • Shuffle: Off / Songs / Albums • Audiobooks: Slower / Normal / Faster Operating the iPod/ iPhone using "...
...the information of music contents appears on operating the iPod/ iPhone, refer to browse contents on the remote control. The home menu is selected in step 4 in "Selecting the iPod/iPhone control mode" (page 34). 2 Select the content you want using iPod/iPhone menu. To select ...the playback mode You can change the playback mode using the OPTIONS on the remote control. • Repeat: Off / One / All • Shuffle: Off / Songs / Albums • Audiobooks: Slower / Normal / Faster Operating the iPod/ iPhone using "...
Operating Instructions
Page 35
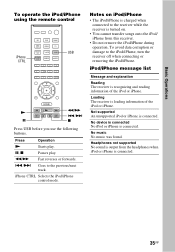
iPhone CTRL Selects the iPod/iPhone control mode. iPod/iPhone message list Message and explanation Reading The receiver is connected. Not supported An unsupported iPod or iPhone is recognizing and reading information ... or iPhone is output from this receiver. • Do not remove the iPod/iPhone during operation. Basic Operations To operate the iPod/iPhone using the remote control USB iPhone CTRL m/M N ./> X x Press USB before you use the following buttons.
iPhone CTRL Selects the iPod/iPhone control mode. iPod/iPhone message list Message and explanation Reading The receiver is connected. Not supported An unsupported iPod or iPhone is recognizing and reading information ... or iPhone is output from this receiver. • Do not remove the iPod/iPhone during operation. Basic Operations To operate the iPod/iPhone using the remote control USB iPhone CTRL m/M N ./> X x Press USB before you use the following buttons.
Operating Instructions
Page 37
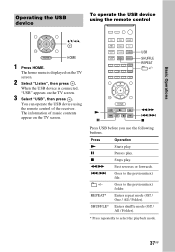
...3 Select "USB", then press . X Pauses play . Goes to the previous/next file. +/- You can operate the USB device using the remote control V/v/B/b, HOME 1 Press HOME. Press Operation N Starts play . When the USB device is displayed on the TV screen. 2 Select "Listen", then... Fast reverses or forwards. ./> Goes to the previous/next folder. Basic Operations Operating the USB device To operate the USB device using the remote control of music contents appear on the TV screen. m/M N ./> X x Press USB before you use the following buttons. SHUFFLE* Enters shuffle...
...3 Select "USB", then press . X Pauses play . Goes to the previous/next file. +/- You can operate the USB device using the remote control V/v/B/b, HOME 1 Press HOME. Press Operation N Starts play . When the USB device is displayed on the TV screen. 2 Select "Listen", then... Fast reverses or forwards. ./> Goes to the previous/next folder. Basic Operations Operating the USB device To operate the USB device using the remote control of music contents appear on the TV screen. m/M N ./> X x Press USB before you use the following buttons. SHUFFLE* Enters shuffle...
Operating Instructions
Page 42
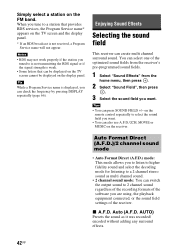
... to listen to higher fidelity sound and select the decoding mode for listening to a station that can also use A.F.D./2CH, MOVIE or MUSIC on the remote control repeatedly to select the sound field you want . Auto Format Direct (A.F.D.)/2 channel sound mode • Auto Format Direct (A.F.D.) mode: This mode allows you tune to...
... to listen to higher fidelity sound and select the decoding mode for listening to a station that can also use A.F.D./2CH, MOVIE or MUSIC on the remote control repeatedly to select the sound field you want . Auto Format Direct (A.F.D.)/2 channel sound mode • Auto Format Direct (A.F.D.) mode: This mode allows you tune to...
Operating Instructions
Page 46
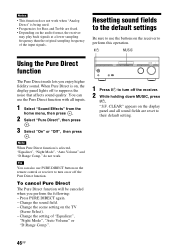
... Treble are reset to their default setting. 46GB Press PURE DIRECT again. - Notes • This function does not work . Change the scene setting on the remote control or receiver to suppress the noise that affects sound quality. CLEAR" appears on , the display panel lights off to turn off the Pure Direct function...
... Treble are reset to their default setting. 46GB Press PURE DIRECT again. - Notes • This function does not work . Change the scene setting on the remote control or receiver to suppress the noise that affects sound quality. CLEAR" appears on , the display panel lights off to turn off the Pure Direct function...
Operating Instructions
Page 49
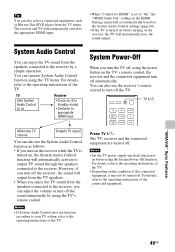
... such as follows. • If you turn on the receiver while the TV is turned on before using the power button on the TV's remote control, the receiver and the connected equipment turn off automatically. TV ?/1 Minimizes TV volume Outputs TV sound You can also use the receiver...to turn the TV off, using the System Power-Off function. You can operate System Audio Control function using the TV's remote control. The receiver and TV will automatically switch to the appropriate HDMI input. • When "Control for HDMI" is set to "On", the "HDMI Audio Out" settings in the HDMI ...
... such as follows. • If you turn on the receiver while the TV is turned on before using the power button on the TV's remote control, the receiver and the connected equipment turn off automatically. TV ?/1 Minimizes TV volume Outputs TV sound You can also use the receiver...to turn the TV off, using the System Power-Off function. You can operate System Audio Control function using the TV's remote control. The receiver and TV will automatically switch to the appropriate HDMI input. • When "Control for HDMI" is set to "On", the "HDMI Audio Out" settings in the HDMI ...
Operating Instructions
Page 50
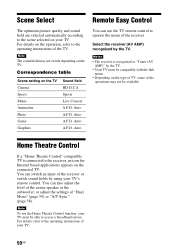
Correspondence table Scene setting on the connected TV. Note To use the TV remote control to operate the menu of "Dual Mono" (page 59) or "A/V Sync." (page 58). Auto A.F.D. Auto A.F.D. Select the receiver (AV AMP) recognized by the TV. •... Animation Photo Game Graphics Sound field HD-D.C.S. Notes • The receiver is connected to access a broadband service. Auto You can use the Home Theatre Control function, your TV's remote control. Home Theatre Control If a "Home Theatre Control"-compatible TV is recognized as "Tuner (AV AMP)" by the TV. Auto A.F.D.
Correspondence table Scene setting on the connected TV. Note To use the TV remote control to operate the menu of "Dual Mono" (page 59) or "A/V Sync." (page 58). Auto A.F.D. Auto A.F.D. Select the receiver (AV AMP) recognized by the TV. •... Animation Photo Game Graphics Sound field HD-D.C.S. Notes • The receiver is connected to access a broadband service. Auto You can use the Home Theatre Control function, your TV's remote control. Home Theatre Control If a "Home Theatre Control"-compatible TV is recognized as "Tuner (AV AMP)" by the TV. Auto A.F.D.
Operating Instructions
Page 51
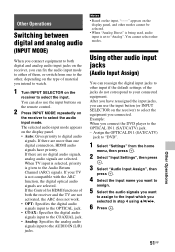
...the type of material you intend to watch. 1 Turn INPUT SELECTOR on the receiver to select the input. After you have priority. If the Control for HDMI functions of both digital and analog audio input jacks on the receiver, you can fix the audio input mode to either of the... digital optical audio signals are more than one to the other audio input jacks (Audio Input Assign) You can use the input buttons on the remote control. 2 Press INPUT MODE repeatedly on the display panel. • Auto: Gives priority to digital audio signals. If your connected equipment. You can also ...
...the type of material you intend to watch. 1 Turn INPUT SELECTOR on the receiver to select the input. After you have priority. If the Control for HDMI functions of both digital and analog audio input jacks on the receiver, you can fix the audio input mode to either of the... digital optical audio signals are more than one to the other audio input jacks (Audio Input Assign) You can use the input buttons on the remote control. 2 Press INPUT MODE repeatedly on the display panel. • Auto: Gives priority to digital audio signals. If your connected equipment. You can also ...
Operating Instructions
Page 66
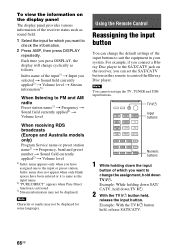
... 1 While holding down SAT/ CATV, hold down the input button of which you connect a Bluray Disc player to the SAT/CATV jack on this remote to the input or preset station. For example, if you want to FM and AM radio Preset station name1) t Frequency t Sound field currently applied2...t Volume level 1) Index name appears only when you have been entered or it is activated. 3) Stream information may not be displayed. Using the Remote Control Reassigning the input button You can set the SAT/CATV button on the receiver, you can change the default settings of the input1) t Input you...
... 1 While holding down SAT/ CATV, hold down the input button of which you connect a Bluray Disc player to the SAT/CATV jack on this remote to the input or preset station. For example, if you want to FM and AM radio Preset station name1) t Frequency t Sound field currently applied2...t Volume level 1) Index name appears only when you have been entered or it is activated. 3) Stream information may not be displayed. Using the Remote Control Reassigning the input button You can set the SAT/CATV button on the receiver, you can change the default settings of the input1) t Input you...


