
Limited Warranty (US Only)
Page 1
...will , at its original packaging or packaging affording an equal degree of Sony. This Limited Warranty does not cover Sony products sold AS IS or WITH ALL FAULTS or consumables (such as set forth below is your exclusive remedies. DURATION OF IMPLIED WARRANTIES: EXCEPT ... it does not cover any such software is required. Printed in material or workmanship during service and Sony will , at its original specifications. Only) Sony Electronics Inc. ("Sony") warrants this Limited Warranty will supply new or refurbished replacement parts in material or workmanship for in the...
...will , at its original packaging or packaging affording an equal degree of Sony. This Limited Warranty does not cover Sony products sold AS IS or WITH ALL FAULTS or consumables (such as set forth below is your exclusive remedies. DURATION OF IMPLIED WARRANTIES: EXCEPT ... it does not cover any such software is required. Printed in material or workmanship during service and Sony will , at its original specifications. Only) Sony Electronics Inc. ("Sony") warrants this Limited Warranty will supply new or refurbished replacement parts in material or workmanship for in the...
Operating Instructions
Page 7
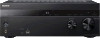
...26 5: Connecting the antennas (aerials 27 6: Connecting the AC power cord (mains lead 27 Preparing the Receiver Turning on the receiver 28 Setting up the receiver using the Easy Setup 28 Guide to on-screen display (OSD) operation 30 Basic Operations Playing an input source equipment ...Mode function ...45 Selecting the calibration type ......45 Adjusting the equalizer 45 Using the Pure Direct function ....46 Resetting sound fields to the default settings 46 "BRAVIA" Sync Features What is "BRAVIA" Sync? ..........47 Preparing for the "BRAVIA" Sync 47 One-Touch Play 48 System Audio ...
...26 5: Connecting the antennas (aerials 27 6: Connecting the AC power cord (mains lead 27 Preparing the Receiver Turning on the receiver 28 Setting up the receiver using the Easy Setup 28 Guide to on-screen display (OSD) operation 30 Basic Operations Playing an input source equipment ...Mode function ...45 Selecting the calibration type ......45 Adjusting the equalizer 45 Using the Pure Direct function ....46 Resetting sound fields to the default settings 46 "BRAVIA" Sync Features What is "BRAVIA" Sync? ..........47 Preparing for the "BRAVIA" Sync 47 One-Touch Play 48 System Audio ...
Operating Instructions
Page 9
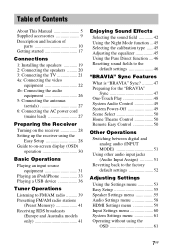
... lighting apparatuses. Supplied accessories • Operating Instructions (this happens, reassign the input buttons (page 66). • When the receiver no longer responds to their default settings. Observe the correct polarity when installing batteries. • AM loop antenna (aerial) (1) • Optimizer microphone (ECM-AC2) (1) Notes • Do not leave the remote control...
... lighting apparatuses. Supplied accessories • Operating Instructions (this happens, reassign the input buttons (page 66). • When the receiver no longer responds to their default settings. Observe the correct polarity when installing batteries. • AM loop antenna (aerial) (1) • Optimizer microphone (ECM-AC2) (1) Notes • Do not leave the remote control...
Operating Instructions
Page 10
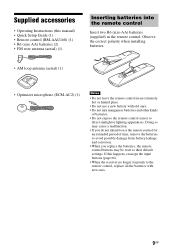
...) indicator Lights up when Pure Direct function is in standby mode, and - "Control for HDMI" and "Pass Through" are set to "On". - Lights off the speaker system. "Pass Through" (page 60) is set to "On"* or "Auto". Press to scan a station. E A.F.D./2CH, MOVIE, MUSIC (page 42) F Display panel... B ?/1 (on . D TUNING MODE, TUNING +/- to operate a tuner (FM/AM). Amber: The receiver is in standby mode and "Control for HDMI" (page 59) is set to headphones. 10GB N MASTER VOLUME (page 32) O INPUT SELECTOR (page 29, 32, 51) P (USB) port (page 26) Q AUTO CAL MIC jack (page 29) ...
...) indicator Lights up when Pure Direct function is in standby mode, and - "Control for HDMI" and "Pass Through" are set to "On". - Lights off the speaker system. "Pass Through" (page 60) is set to "On"* or "Auto". Press to scan a station. E A.F.D./2CH, MOVIE, MUSIC (page 42) F Display panel... B ?/1 (on . D TUNING MODE, TUNING +/- to operate a tuner (FM/AM). Amber: The receiver is in standby mode and "Control for HDMI" (page 59) is set to headphones. 10GB N MASTER VOLUME (page 32) O INPUT SELECTOR (page 29, 32, 51) P (USB) port (page 26) Q AUTO CAL MIC jack (page 29) ...
Operating Instructions
Page 12
Note These indicators may not light up when iPod/iPhone or USB device is detected. * When playing a Dolby Digital or DTS format disc, make sure that you have completed the digital connections and that INPUT MODE is not set to "Analog" (page 51) or "Analog Direct" is not selected. 12GB L USB Lights up depending on the speaker pattern setting.
Note These indicators may not light up when iPod/iPhone or USB device is detected. * When playing a Dolby Digital or DTS format disc, make sure that you have completed the digital connections and that INPUT MODE is not set to "Analog" (page 51) or "Analog Direct" is not selected. 12GB L USB Lights up depending on the speaker pattern setting.
Operating Instructions
Page 14
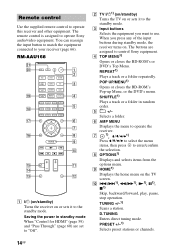
...the equipment you press any of the input buttons during standby mode, the receiver turns on or sets it to "Off". REPEAT1) Plays a track or a folder repeatedly. F AMP MENU Displays the menu to operate Sony audio/video equipment. TUNING +/-1) Scans a station. RM-AAU168 A ?/1 (on/standby) Turns ...the TV screen. Selects a folder. J ./>1), m/M1), N1), X1), x1) Skip, backward/forward, play, pause, stop operation. When you want to control Sony equipment. POP UP/MENU1) Opens or closes the BD-ROM's Pop-up Menu, or the DVD's menu. SHUFFLE1) Plays a track or a folder in standby...
...the equipment you press any of the input buttons during standby mode, the receiver turns on or sets it to "Off". REPEAT1) Plays a track or a folder repeatedly. F AMP MENU Displays the menu to operate Sony audio/video equipment. TUNING +/-1) Scans a station. RM-AAU168 A ?/1 (on/standby) Turns ...the TV screen. Selects a folder. J ./>1), m/M1), N1), X1), x1) Skip, backward/forward, play, pause, stop operation. When you want to control Sony equipment. POP UP/MENU1) Opens or closes the BD-ROM's Pop-up Menu, or the DVD's menu. SHUFFLE1) Plays a track or a folder in standby...
Operating Instructions
Page 15
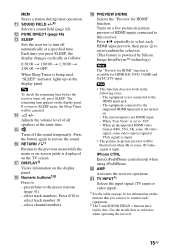
...00 t 1:30:00 t 2:00:00 t OFF When Sleep Timer is not connected to turn off the sound temporarily. L PURE DIRECT (page 46) M SLEEP Sets the receiver to the HDMI input jack. - O Turns off automatically at the same time. Press the button again to the preset stations (page 41). - When... table on page 16 for information on . - N +/- P RETURN O1) Returns to the previous menu while the menu or on-screen guide is set to enter/confirm the selection. (This feature is powered by Silicon Image InstaPrevue™ technology) Note The "Preview for HDMI" function is not turned on...
...00 t 1:30:00 t 2:00:00 t OFF When Sleep Timer is not connected to turn off the sound temporarily. L PURE DIRECT (page 46) M SLEEP Sets the receiver to the HDMI input jack. - O Turns off automatically at the same time. Press the button again to the preset stations (page 41). - When... table on page 16 for information on . - N +/- P RETURN O1) Returns to the previous menu while the menu or on-screen guide is set to enter/confirm the selection. (This feature is powered by Silicon Image InstaPrevue™ technology) Note The "Preview for HDMI" function is not turned on...
Operating Instructions
Page 17
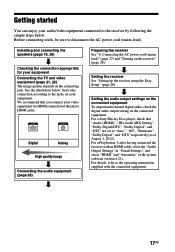
...with system software version 4.21). For a PlayStation 3, after having connected the receiver with an HDMI cable, select the "Audio Output Settings" in "Sound Settings", and select "HDMI" and "Automatic" (with the connected equipment. 17GB Installing and connecting the speakers (page 19, 20) ... refer to disconnect the AC power cord (mains lead). Setting the audio output settings on the connected equipment To output multi channel digital audio, check the digital audio output setting on the connecting jack. For a Sony Blu-ray Disc player, check that you connect your equipment ...
...with system software version 4.21). For a PlayStation 3, after having connected the receiver with an HDMI cable, select the "Audio Output Settings" in "Sound Settings", and select "HDMI" and "Automatic" (with the connected equipment. 17GB Installing and connecting the speakers (page 19, 20) ... refer to disconnect the AC power cord (mains lead). Setting the audio output settings on the connected equipment To output multi channel digital audio, check the digital audio output setting on the connecting jack. For a Sony Blu-ray Disc player, check that you connect your equipment ...
Operating Instructions
Page 20
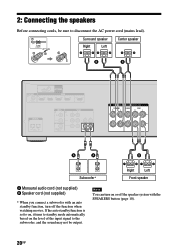
... audio cord (not supplied) B Speaker cord (not supplied) * When you connect a subwoofer with the SPEAKERS button (page 10). 20GB If the auto standby function is set to on, it turns to disconnect the AC power cord (mains lead). Note You can turn on the level of the input signal to the...
... audio cord (not supplied) B Speaker cord (not supplied) * When you connect a subwoofer with the SPEAKERS button (page 10). 20GB If the auto standby function is set to on, it turns to disconnect the AC power cord (mains lead). Note You can turn on the level of the input signal to the...
Operating Instructions
Page 22
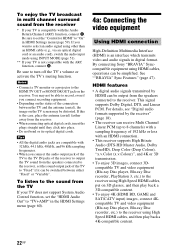
... sampling frequencies. • When you connect recording equipment. • Depending on the status of the TV to "TV+AMP" in the HDMI Settings menu (page 60). 4a: Connecting the video equipment Using HDMI connection High-Definition Multimedia Interface (HDMI) is not compatible with the ARC function, ... "Control for HDMI" to the receiver. Be sure to set the "HDMI Audio Out" to "Fixed" if it can be switched between the TV and the antenna (aerial), the image on the receiver. By connecting Sony "BRAVIA" Synccompatible equipment using High Speed HDMI cables, and then play back ...
... sampling frequencies. • When you connect recording equipment. • Depending on the status of the TV to "TV+AMP" in the HDMI Settings menu (page 60). 4a: Connecting the video equipment Using HDMI connection High-Definition Multimedia Interface (HDMI) is not compatible with the ARC function, ... "Control for HDMI" to the receiver. Be sure to set the "HDMI Audio Out" to "Fixed" if it can be switched between the TV and the antenna (aerial), the image on the receiver. By connecting Sony "BRAVIA" Synccompatible equipment using High Speed HDMI cables, and then play back ...
Operating Instructions
Page 23
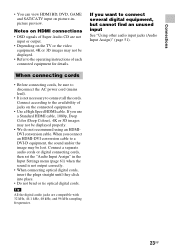
.... If you connect an HDMI-DVI conversion cable to connect all the cords. Connect a separate audio cords or digital connecting cords, then set the "Audio Input Assign" in the Input Settings menu (page 61) when the sound is not necessary to a DVI-D equipment, the sound and/or the image may not be...
.... If you connect an HDMI-DVI conversion cable to connect all the cords. Connect a separate audio cords or digital connecting cords, then set the "Audio Input Assign" in the Input Settings menu (page 61) when the sound is not necessary to a DVI-D equipment, the sound and/or the image may not be...
Operating Instructions
Page 25
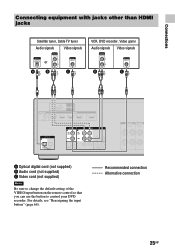
Recommended connection Alternative connection 25GB For details, see "Reassigning the input button" (page 66). Connections Connecting equipment with jacks other than HDMI jacks Satellite tuner, Cable TV tuner Audio signals Video signals VCR, DVD recorder, Video game Audio signals Video signals or A B C B C A Optical digital cord (not supplied) B Audio cord (not supplied) C Video cord (not supplied) Note Be sure to change the default setting of the VIDEO input button on the remote control so that you can use the button to control your DVD recorder.
Recommended connection Alternative connection 25GB For details, see "Reassigning the input button" (page 66). Connections Connecting equipment with jacks other than HDMI jacks Satellite tuner, Cable TV tuner Audio signals Video signals VCR, DVD recorder, Video game Audio signals Video signals or A B C B C A Optical digital cord (not supplied) B Audio cord (not supplied) C Video cord (not supplied) Note Be sure to change the default setting of the VIDEO input button on the remote control so that you can use the button to control your DVD recorder.
Operating Instructions
Page 28
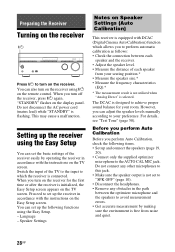
... Setup screen. Language - Do not connect any other microphones to this jack. • Make sure the speaker output is not set the basic settings of the receiver easily by making sure the environment is flashing. Preparing the Receiver Turning on the receiver ?/1 Press ?/1 to turn...• Measure the frequency characteristics (EQ).* * The measurement result is not utilized when "Analog Direct" is equipped with the instructions on Speaker Settings (Auto Calibration) This receiver is selected. Switch the input of each speaker and the receiver. • Adjust the speaker level. • ...
... Setup screen. Language - Do not connect any other microphones to this jack. • Make sure the speaker output is not set the basic settings of the receiver easily by making sure the environment is flashing. Preparing the Receiver Turning on the receiver ?/1 Press ?/1 to turn...• Measure the frequency characteristics (EQ).* * The measurement result is not utilized when "Analog Direct" is equipped with the instructions on Speaker Settings (Auto Calibration) This receiver is selected. Switch the input of each speaker and the receiver. • Adjust the speaker level. • ...
Operating Instructions
Page 29
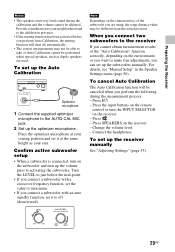
...to the receiver If you cannot obtain measurement results of the subwoofer you connect a subwoofer with an auto standby function, set it at your seating position and set it to off automatically. • The correct measurements may not be able to take or Auto Calibration cannot be ...performed when special speakers, such as your neighborhood and to the children in the Speaker Settings menu (page 56). To cancel Auto Calibration The Auto Calibration function will shut off (deactivated). Press . - Turn the LEVEL to your ...
...to the receiver If you cannot obtain measurement results of the subwoofer you connect a subwoofer with an auto standby function, set it at your seating position and set it to off automatically. • The correct measurements may not be able to take or Auto Calibration cannot be ...performed when special speakers, such as your neighborhood and to the children in the Speaker Settings menu (page 56). To cancel Auto Calibration The Auto Calibration function will shut off (deactivated). Press . - Turn the LEVEL to your ...
Operating Instructions
Page 31
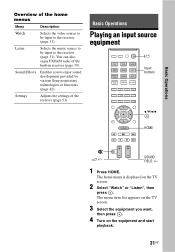
... to the receiver (page 31). The menu item list appears on the TV screen. 3 Select the equipment you to enjoy sound development provided by various Sony proprietary technologies or functions (page 42). Sound Effects Enables you want, then press . 4 Turn on the TV screen. 2 Select "Watch" or "Listen", then press...
... to the receiver (page 31). The menu item list appears on the TV screen. 3 Select the equipment you to enjoy sound development provided by various Sony proprietary technologies or functions (page 42). Sound Effects Enables you want, then press . 4 Turn on the TV screen. 2 Select "Watch" or "Listen", then press...

Operating Instructions
Page 40
.... 2 While holding down TUNING MODE, press ?/1 on the receiver. Make sure you cannot tune to enter the frequency, then press . Notes • Depending on the settings, the receiver may not be erased when you still cannot tune to a station, the frequency may take some time to an AM station. kHz" appears...
.... 2 While holding down TUNING MODE, press ?/1 on the receiver. Make sure you cannot tune to enter the frequency, then press . Notes • Depending on the settings, the receiver may not be erased when you still cannot tune to a station, the frequency may take some time to an AM station. kHz" appears...
Operating Instructions
Page 42
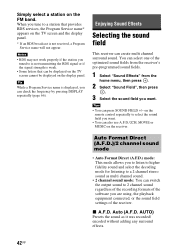
... the output sound to 2 channel sound regardless of the recording formats of the software you are using, the playback equipment connected, or the sound field settings of the optimized sound fields from the receiver's pre-programmed sound fields. 1 Select "Sound Effects" from the home menu, then press . 2 Select "Sound Field", then...
... the output sound to 2 channel sound regardless of the recording formats of the software you are using, the playback equipment connected, or the sound field settings of the optimized sound fields from the receiver's pre-programmed sound fields. 1 Select "Sound Effects" from the home menu, then press . 2 Select "Sound Field", then...
Operating Instructions
Page 43
... is not sufficient). It emphasizes the reflection of sound and reproduces the sound of movie theaters into 5 channels. 43GB There is Sony's new innovative home theater technology using this function, only the volume and front speaker level can take advantage of surround sound simply by...The level of reflection and reverberation of sound just like in 5.1 channel for watching videos of the receiver's pre-programmed sound fields. This setting is decoded into your home. x 2ch Stereo (2CH ST.) The receiver outputs the sound from all speakers. Standard 2 channel stereo sources ...
... is not sufficient). It emphasizes the reflection of sound and reproduces the sound of movie theaters into 5 channels. 43GB There is Sony's new innovative home theater technology using this function, only the volume and front speaker level can take advantage of surround sound simply by...The level of reflection and reverberation of sound just like in 5.1 channel for watching videos of the receiver's pre-programmed sound fields. This setting is decoded into your home. x 2ch Stereo (2CH ST.) The receiver outputs the sound from all speakers. Standard 2 channel stereo sources ...
Operating Instructions
Page 44
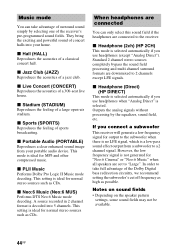
...mode is selected automatically if you use headphones (except "Analog Direct"). x Jazz Club (JAZZ) Reproduces the acoustics of sports broadcasting. This setting is ideal for output to the subwoofer when there is no LFE signal, which is selected. Outputs the analog signals without processing by ...2 channel format is ideal for normal stereo sources such as CDs. Notes on sound fields • Depending on the speaker pattern settings, some sound fields may not be available. 44GB Music mode You can only select this sound field if the headphones are connected to...
...mode is selected automatically if you use headphones (except "Analog Direct"). x Jazz Club (JAZZ) Reproduces the acoustics of sports broadcasting. This setting is ideal for output to the subwoofer when there is no LFE signal, which is selected. Outputs the analog signals without processing by ...2 channel format is ideal for normal stereo sources such as CDs. Notes on sound fields • Depending on the speaker pattern settings, some sound fields may not be available. 44GB Music mode You can only select this sound field if the headphones are connected to...
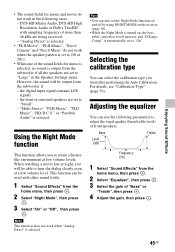
Operating Instructions
Page 45
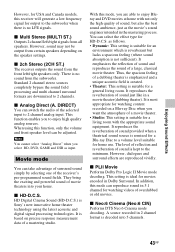
... at night, you will be used with sampling frequency of "Bass" or "Treble", then press . 4 Adjust the gain, then press . 45GB is automatically set to hear the dialog clearly even at low volume levels. DTS-HD Master Audio, DTS-HD High Resolution Audio or Dolby TrueHD with other sound... Music", "Neo:6 Cinema" and "Neo:6 Music" do not work when "Analog Direct" is selected. Note This function does not work in the Speaker Settings menu. However, the sound will be able to "On". This function can select the calibration type you to "Large" in the following parameters to "Small...
... at night, you will be used with sampling frequency of "Bass" or "Treble", then press . 4 Adjust the gain, then press . 45GB is automatically set to hear the dialog clearly even at low volume levels. DTS-HD Master Audio, DTS-HD High Resolution Audio or Dolby TrueHD with other sound... Music", "Neo:6 Cinema" and "Neo:6 Music" do not work when "Analog Direct" is selected. Note This function does not work in the Speaker Settings menu. However, the sound will be able to "On". This function can select the calibration type you to "Large" in the following parameters to "Small...


