
Operating Instructions
Page 1
Multi Channel AV Receiver Operating Instructions 4-448-425-12(1) STR-DH540
Multi Channel AV Receiver Operating Instructions 4-448-425-12(1) STR-DH540
Operating Instructions
Page 3
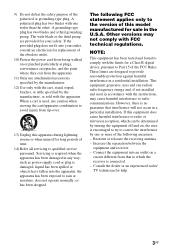
...for sale in a residential installation. Servicing is connected. - Other versions may cause harmful interference to radio or television reception, which the receiver is required when the apparatus has been damaged in accordance with the cart, stand, tripod, bracket, or table specified by one wider... other. If this model manufactured for long periods of this equipment does cause harmful interference to radio communications. Reorient or relocate the receiving antenna. - NOTE: This equipment has been tested and found to Part 15 of the polarized or grounding-type plug. 9) Do...
...for sale in a residential installation. Servicing is connected. - Other versions may cause harmful interference to radio or television reception, which the receiver is required when the apparatus has been damaged in accordance with the cart, stand, tripod, bracket, or table specified by one wider... other. If this model manufactured for long periods of this equipment does cause harmful interference to radio communications. Reorient or relocate the receiving antenna. - NOTE: This equipment has been tested and found to Part 15 of the polarized or grounding-type plug. 9) Do...

Operating Instructions
Page 5
...,872; 7,333,929; 7,392,195; 7,272,567 & other European countries with the supplied remote control. This receiver incorporates High-Definition Multimedia Interface (HDMITM) technology. For more detailed information about recycling of this manual are for the ...of Apple Inc., registered in this manual describe the operation of Sony Corporation, 1-7-1 Konan Minato-ku Tokyo, 108-0075 Japan. and other countries. On copyrights This receiver incorporates Dolby* Digital and Pro Logic Surround and the DTS**...and worldwide patents issued & pending. collection point for model STR-DH540.
...,872; 7,333,929; 7,392,195; 7,272,567 & other European countries with the supplied remote control. This receiver incorporates High-Definition Multimedia Interface (HDMITM) technology. For more detailed information about recycling of this manual are for the ...of Apple Inc., registered in this manual describe the operation of Sony Corporation, 1-7-1 Konan Minato-ku Tokyo, 108-0075 Japan. and other countries. On copyrights This receiver incorporates Dolby* Digital and Pro Logic Surround and the DTS**...and worldwide patents issued & pending. collection point for model STR-DH540.
Operating Instructions
Page 7
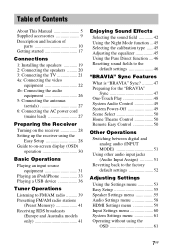
... equipment 26 5: Connecting the antennas (aerials 27 6: Connecting the AC power cord (mains lead 27 Preparing the Receiver Turning on the receiver 28 Setting up the receiver using the Easy Setup 28 Guide to on-screen display (OSD) operation 30 Basic Operations Playing an input source equipment... 33 Playing a USB device 36 Tuner Operations Listening to FM/AM radio .......... 39 Presetting FM/AM radio stations (Preset Memory 41 Receiving RDS broadcasts (Europe and Australia models only 41 Enjoying Sound Effects Selecting the sound field 42 Using the Night Mode function ...45 Selecting...
... equipment 26 5: Connecting the antennas (aerials 27 6: Connecting the AC power cord (mains lead 27 Preparing the Receiver Turning on the receiver 28 Setting up the receiver using the Easy Setup 28 Guide to on-screen display (OSD) operation 30 Basic Operations Playing an input source equipment... 33 Playing a USB device 36 Tuner Operations Listening to FM/AM radio .......... 39 Presetting FM/AM radio stations (Preset Memory 41 Receiving RDS broadcasts (Europe and Australia models only 41 Enjoying Sound Effects Selecting the sound field 42 Using the Night Mode function ...45 Selecting...
Operating Instructions
Page 9
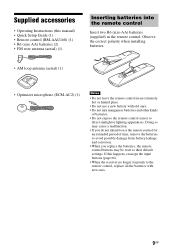
.... Doing so may be reset to their default settings. Supplied accessories • Operating Instructions (this happens, reassign the input buttons (page 66). • When the receiver no longer responds to the remote control, replace all the batteries with old ones. • Do not mix manganese batteries and other kinds of time...
.... Doing so may be reset to their default settings. Supplied accessories • Operating Instructions (this happens, reassign the input buttons (page 66). • When the receiver no longer responds to the remote control, replace all the batteries with old ones. • Do not mix manganese batteries and other kinds of time...
Operating Instructions
Page 10
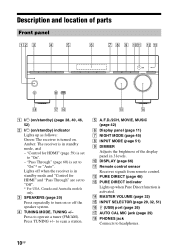
...B ?/1 (on/standby) indicator Lights up when Pure Direct function is activated. L PURE DIRECT (page 46) M PURE DIRECT indicator Lights up as follows: Green: The receiver is set to "On"* or "Auto". N MASTER VOLUME (page 32) O INPUT SELECTOR (page 29, 32, 51) P (USB) port (page 26) Q...a tuner (FM/AM). C SPEAKERS (page 20) Press repeatedly to "On". - Press to headphones. 10GB J DISPLAY (page 66) K Remote control sensor Receives signals from remote control. Description and location of the display panel in standby mode, and - to "Off". * For USA, Canada and Australia models only....
...B ?/1 (on/standby) indicator Lights up when Pure Direct function is activated. L PURE DIRECT (page 46) M PURE DIRECT indicator Lights up as follows: Green: The receiver is set to "On"* or "Auto". N MASTER VOLUME (page 32) O INPUT SELECTOR (page 29, 32, 51) P (USB) port (page 26) Q...a tuner (FM/AM). C SPEAKERS (page 20) Press repeatedly to "On". - Press to headphones. 10GB J DISPLAY (page 66) K Remote control sensor Receives signals from remote control. Description and location of the display panel in standby mode, and - to "Off". * For USA, Canada and Australia models only....
Operating Instructions
Page 11
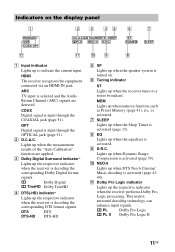
...DTS format signals. C Dolby Digital Surround indicator* Lights up the respective indicator when the receiver is activated. Dolby Digital TrueHD Dolby TrueHD D DTS(-HD) indicator* Lights up the respective indicator when the receiver is activated (page 15). G SLEEP Lights up to a stereo broadcast. B D.C.A.C....Pro Logic PL II Dolby Pro Logic II 11GB Indicators on . DTS DTS DTS-HD DTS-HD E SP Lights up when the receiver tunes to indicate the current input. F Tuning indicator ST Lights up when the speaker system is turned on the display panel A ...
...DTS format signals. C Dolby Digital Surround indicator* Lights up the respective indicator when the receiver is activated. Dolby Digital TrueHD Dolby TrueHD D DTS(-HD) indicator* Lights up the respective indicator when the receiver is activated (page 15). G SLEEP Lights up to a stereo broadcast. B D.C.A.C....Pro Logic PL II Dolby Pro Logic II 11GB Indicators on . DTS DTS DTS-HD DTS-HD E SP Lights up when the receiver tunes to indicate the current input. F Tuning indicator ST Lights up when the speaker system is turned on the display panel A ...
Operating Instructions
Page 14
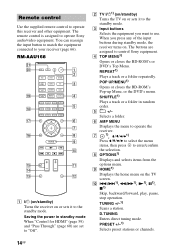
... reassign the input button to match the equipment connected to enter/confirm the selection. RM-AAU168 A ?/1 (on/standby) Turns the receiver on or sets it to control Sony equipment. The buttons are set to the standby mode. REPEAT1) Plays a track or a folder repeatedly. E +/- H OPTIONS1) Displays...any of the input buttons during standby mode, the receiver turns on the TV screen. Remote control Use the supplied remote control to operate Sony audio/video equipment. The remote control is assigned to operate this receiver and other equipment. Saving the power in random order....
... reassign the input button to match the equipment connected to enter/confirm the selection. RM-AAU168 A ?/1 (on/standby) Turns the receiver on or sets it to control Sony equipment. The buttons are set to the standby mode. REPEAT1) Plays a track or a folder repeatedly. E +/- H OPTIONS1) Displays...any of the input buttons during standby mode, the receiver turns on the TV screen. Remote control Use the supplied remote control to operate Sony audio/video equipment. The remote control is assigned to operate this receiver and other equipment. Saving the power in random order....
Operating Instructions
Page 15
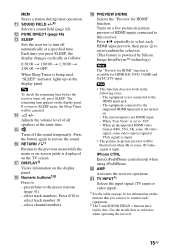
... input preview, then press to the supported HDMI input jack is not connected to restore the sound. P RETURN O1) Returns to this receiver. Turns on . - The equipment is not turned on a live picture-in-picture preview of all speakers at a specified time. iPhone...in the following cases. - MEM Stores a station during tuner operation. If you press SLEEP, the display changes cyclically as reference when operating the receiver. 15GB Press V/v repeatedly to select each equipment. 2) The 5 and SOUND FIELD + buttons have tactile dots. The equipment connected to enter/confirm ...
... input preview, then press to the supported HDMI input jack is not connected to restore the sound. P RETURN O1) Returns to this receiver. Turns on . - The equipment is not turned on a live picture-in-picture preview of all speakers at a specified time. iPhone...in the following cases. - MEM Stores a station during tuner operation. If you press SLEEP, the display changes cyclically as reference when operating the receiver. 15GB Press V/v repeatedly to select each equipment. 2) The 5 and SOUND FIELD + buttons have tactile dots. The equipment connected to enter/confirm ...
Operating Instructions
Page 17
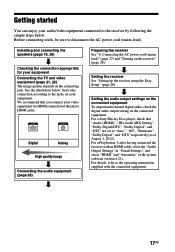
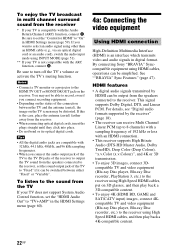
... You can enjoy your equipment. For a Sony Blu-ray Disc player, check that you connect your equipment Connecting the TV and video equipment (page 21, 22) The image quality depends on your audio/video equipment connected to the receiver by following the simple steps below . Select... select "HDMI" and "Automatic" (with the connected equipment. 17GB Digital Analog High quality image Connecting the audio equipment (page 26) Preparing the receiver See "6: Connecting the AC power cord (mains lead)" (page 27) and "Turning on the connected equipment. Setting the audio output settings on ...
... You can enjoy your equipment. For a Sony Blu-ray Disc player, check that you connect your equipment Connecting the TV and video equipment (page 21, 22) The image quality depends on your audio/video equipment connected to the receiver by following the simple steps below . Select... select "HDMI" and "Automatic" (with the connected equipment. 17GB Digital Analog High quality image Connecting the audio equipment (page 26) Preparing the receiver See "6: Connecting the AC power cord (mains lead)" (page 27) and "Turning on the connected equipment. Setting the audio output settings on ...
Operating Instructions
Page 18
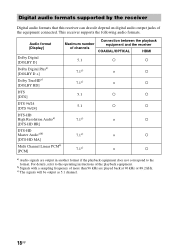
... signals will be output as 5.1 channel. 18GB For details, refer to the format. Audio format [Display] Connection between the playback Maximum number equipment and the receiver of channels COAXIAL/OPTICAL HDMI Dolby Digital [DOLBY D] 5.1 a a Dolby Digital Plusa) 7.1c) × a [DOLBY D +] Dolby TrueHDa) [DOLBY HD] 7.1c) ...PCM] a) Audio signals are played back at 96 kHz or 88.2 kHz. Digital audio formats supported by the receiver Digital audio formats that this receiver can decode depend on digital audio output jacks of more than 96 kHz are output in another format if the...
... signals will be output as 5.1 channel. 18GB For details, refer to the format. Audio format [Display] Connection between the playback Maximum number equipment and the receiver of channels COAXIAL/OPTICAL HDMI Dolby Digital [DOLBY D] 5.1 a a Dolby Digital Plusa) 7.1c) × a [DOLBY D +] Dolby TrueHDa) [DOLBY HD] 7.1c) ...PCM] a) Audio signals are played back at 96 kHz or 88.2 kHz. Digital audio formats supported by the receiver Digital audio formats that this receiver can decode depend on digital audio output jacks of more than 96 kHz are output in another format if the...
Operating Instructions
Page 19
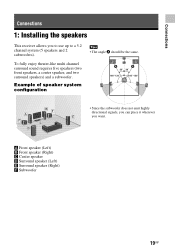
... (5 speakers and 2 subwoofers). A Front speaker (Left) B Front speaker (Right) C Center speaker D Surround speaker (Left) E Surround speaker (Right) F Subwoofer 19GB Connections Connections 1: Installing the speakers This receiver allows you want.
... (5 speakers and 2 subwoofers). A Front speaker (Left) B Front speaker (Right) C Center speaker D Surround speaker (Left) E Surround speaker (Right) F Subwoofer 19GB Connections Connections 1: Installing the speakers This receiver allows you want.
Operating Instructions
Page 21
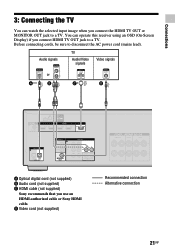
Connections 3: Connecting the TV You can operate this receiver using an OSD (On-Screen Display) if you connect HDMI TV OUT jack to a TV. D Video cord (not supplied) Recommended connection Alternative connection 21GB Audio ...signals TV Audio/Video signals Video signals or A** B ARC C* D A Optical digital cord (not supplied) B Audio cord (not supplied) C HDMI cable (not supplied) Sony recommends that you connect the HDMI TV OUT or MONITOR OUT jack to disconnect the AC power cord (mains lead). Before connecting cords, be sure...
Connections 3: Connecting the TV You can operate this receiver using an OSD (On-Screen Display) if you connect HDMI TV OUT jack to a TV. D Video cord (not supplied) Recommended connection Alternative connection 21GB Audio ...signals TV Audio/Video signals Video signals or A** B ARC C* D A Optical digital cord (not supplied) B Audio cord (not supplied) C HDMI cable (not supplied) Sony recommends that you connect the HDMI TV OUT or MONITOR OUT jack to disconnect the AC power cord (mains lead). Before connecting cords, be sure...
Operating Instructions
Page 22
...ARC) function, connect C. Be sure to turn off the TV's volume or activate the TV's muting function. By connecting Sony "BRAVIA" Synccompatible equipment using HDMI cables, operations can receive Multi Channel Linear PCM (up to 8 channels) with a sampling frequency of the connection between either "Fixed" or "... SAT/CATV input) images, connect 4Kcompatible TV and video equipment (Blu-ray Disc player, Blu-ray Disc recorder, etc.) to the receiver using High Speed HDMI cables, and then play back a 4K-compatible content. 22GB This signal supports Dolby Digital, DTS, and Linear PCM...
...ARC) function, connect C. Be sure to turn off the TV's volume or activate the TV's muting function. By connecting Sony "BRAVIA" Synccompatible equipment using HDMI cables, operations can receive Multi Channel Linear PCM (up to 8 channels) with a sampling frequency of the connection between either "Fixed" or "... SAT/CATV input) images, connect 4Kcompatible TV and video equipment (Blu-ray Disc player, Blu-ray Disc recorder, etc.) to the receiver using High Speed HDMI cables, and then play back a 4K-compatible content. 22GB This signal supports Dolby Digital, DTS, and Linear PCM...
Operating Instructions
Page 27
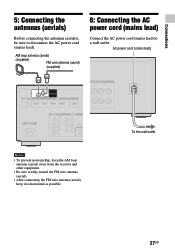
.... To the wall outlet 27GB AC power cord (mains lead) Notes • To prevent noise pickup, keep the AM loop antenna (aerial) away from the receiver and other equipment. • Be sure to a wall outlet. Connections 5: Connecting the antennas (aerials) Before connecting the antennas (aerials), be sure to disconnect the AC...
.... To the wall outlet 27GB AC power cord (mains lead) Notes • To prevent noise pickup, keep the AM loop antenna (aerial) away from the receiver and other equipment. • Be sure to a wall outlet. Connections 5: Connecting the antennas (aerials) Before connecting the antennas (aerials), be sure to disconnect the AC...
Operating Instructions
Page 28
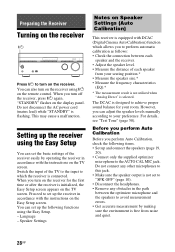
... the frequency characteristics (EQ).* * The measurement result is not utilized when "Analog Direct" is free from your room. Preparing the Receiver Turning on the receiver ?/1 Press ?/1 to turn on the TV screen. When you to perform automatic calibration as follows: • Check the connection between...page 19, 20). • Connect only the supplied optimizer microphone to achieve proper sound balance for the first time or after the receiver is flashing. Before you perform Auto Calibration Before you perform Auto Calibration, check the following items. • Set up the following ...
... the frequency characteristics (EQ).* * The measurement result is not utilized when "Analog Direct" is free from your room. Preparing the Receiver Turning on the receiver ?/1 Press ?/1 to turn on the TV screen. When you to perform automatic calibration as follows: • Check the connection between...page 19, 20). • Connect only the supplied optimizer microphone to achieve proper sound balance for the first time or after the receiver is flashing. Before you perform Auto Calibration Before you perform Auto Calibration, check the following items. • Set up the following ...
Operating Instructions
Page 29
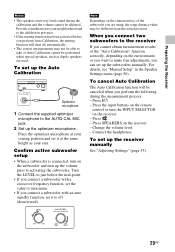
...The correct measurements may be different from the actual position. Note Depending on the characteristics of the "Auto Calibration" function correctly, depending on the receiver. - Change the volume level. - To set it at your neighborhood and to the children in the Speaker Settings menu (page 56). ...Connect the headphones. Press the input buttons on the receiver. - Preparing the Receiver Notes • The speakers emit very loud sound during the calibration and the volume cannot be canceled when you perform the...
...The correct measurements may be different from the actual position. Note Depending on the characteristics of the "Auto Calibration" function correctly, depending on the receiver. - Change the volume level. - To set it at your neighborhood and to the children in the Speaker Settings menu (page 56). ...Connect the headphones. Press the input buttons on the receiver. - Preparing the Receiver Notes • The speakers emit very loud sound during the calibration and the volume cannot be canceled when you perform the...
Operating Instructions
Page 30
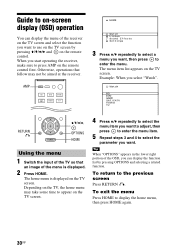
Example: When you start operating the receiver, make sure to display the home menu, then press HOME again. 30GB To return to enter ... home menu is displayed. 2 Press HOME. Depending on the TV, the home menu may not be aimed at the receiver. To exit the menu Press HOME to press AMP on the remote control first. The menu item list appears on the...can display the function list by pressing V/v/B/b and on the remote control. Otherwise, operations that an image of the receiver on the TV screen and select the function you can display the menu of the menu is displayed on the TV...
Example: When you start operating the receiver, make sure to display the home menu, then press HOME again. 30GB To return to enter ... home menu is displayed. 2 Press HOME. Depending on the TV, the home menu may not be aimed at the receiver. To exit the menu Press HOME to press AMP on the remote control first. The menu item list appears on the...can display the function list by pressing V/v/B/b and on the remote control. Otherwise, operations that an image of the receiver on the TV screen and select the function you can display the menu of the menu is displayed on the TV...
Operating Instructions
Page 31
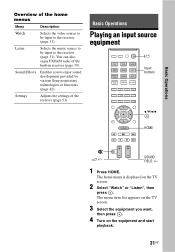
...source equipment ?/1 Input buttons V/v/B/b, HOME 2 +/- The menu item list appears on the TV screen. 3 Select the equipment you to the receiver (page 31). The home menu is displayed on the equipment and start playback. 31GB Listen Selects the music source to be input to enjoy ...sound development provided by various Sony proprietary technologies or functions (page 42). Sound Effects Enables you want, then press . 4 Turn on the TV screen. 2 Select "Watch"...
...source equipment ?/1 Input buttons V/v/B/b, HOME 2 +/- The menu item list appears on the TV screen. 3 Select the equipment you to the receiver (page 31). The home menu is displayed on the equipment and start playback. 31GB Listen Selects the music source to be input to enjoy ...sound development provided by various Sony proprietary technologies or functions (page 42). Sound Effects Enables you want, then press . 4 Turn on the TV screen. 2 Select "Watch"...
Operating Instructions
Page 32
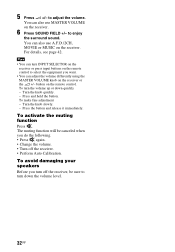
... +/- to enjoy the surround sound. For details, see page 42. To turn off the receiver. • Perform Auto Calibration. button on the receiver. You can adjust the volume differently using the MASTER VOLUME knob on the receiver. 6 Press SOUND FIELD +/- Tips • You can turn down quickly - The muting ...when you do the following. • Press again. • Change the volume. • Turn off the receiver, be sure to turn INPUT SELECTOR on the receiver or press input buttons on the remote control to select the equipment you turn the volume up or down the volume...
... +/- to enjoy the surround sound. For details, see page 42. To turn off the receiver. • Perform Auto Calibration. button on the receiver. You can adjust the volume differently using the MASTER VOLUME knob on the receiver. 6 Press SOUND FIELD +/- Tips • You can turn down quickly - The muting ...when you do the following. • Press again. • Change the volume. • Turn off the receiver, be sure to turn INPUT SELECTOR on the receiver or press input buttons on the remote control to select the equipment you turn the volume up or down the volume...


