Operating Instructions
Page 7
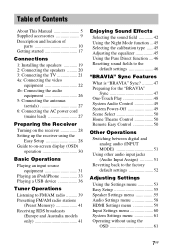
... cord (mains lead 27 Preparing the Receiver Turning on the receiver 28 Setting up the receiver using the Easy Setup 28 Guide to on-screen display (OSD) operation 30 Basic Operations Playing an input source equipment 31 Playing an iPod/iPhone 33 Playing a USB device 36 Tuner Operations Listening to FM...
... cord (mains lead 27 Preparing the Receiver Turning on the receiver 28 Setting up the receiver using the Easy Setup 28 Guide to on-screen display (OSD) operation 30 Basic Operations Playing an input source equipment 31 Playing an iPod/iPhone 33 Playing a USB device 36 Tuner Operations Listening to FM...
Operating Instructions
Page 10
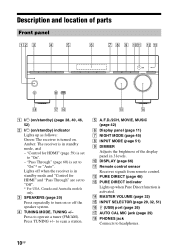
...FM/AM). L PURE DIRECT (page 46) M PURE DIRECT indicator Lights up as follows: Green: The receiver is activated. Description and location of the display panel in standby mode, and - Amber: The receiver is set to "Off". * For USA, Canada and Australia models only. Press to scan ...a station. Press TUNING +/- J DISPLAY (page 66) K Remote control sensor Receives signals from remote control. E A.F.D./2CH, MOVIE, MUSIC (page 42) F Display panel (page 11) G NIGHT MODE (page 45) H INPUT MODE (page 51) I DIMMER Adjusts the...
...FM/AM). L PURE DIRECT (page 46) M PURE DIRECT indicator Lights up as follows: Green: The receiver is activated. Description and location of the display panel in standby mode, and - Amber: The receiver is set to "Off". * For USA, Canada and Australia models only. Press to scan ...a station. Press TUNING +/- J DISPLAY (page 66) K Remote control sensor Receives signals from remote control. E A.F.D./2CH, MOVIE, MUSIC (page 42) F Display panel (page 11) G NIGHT MODE (page 45) H INPUT MODE (page 51) I DIMMER Adjusts the...
Operating Instructions
Page 11
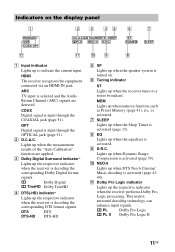
... is activated. G SLEEP Lights up when Dynamic Range Compression is activated (page 15). Lights up the respective indicator when the receiver is turned on the display panel A Input indicator Lights up when the receiver tunes to indicate the current input. C Dolby Digital Surround indicator* Lights up when the measurement results of...
... is activated. G SLEEP Lights up when Dynamic Range Compression is activated (page 15). Lights up the respective indicator when the receiver is turned on the display panel A Input indicator Lights up when the receiver tunes to indicate the current input. C Dolby Digital Surround indicator* Lights up when the measurement results of...
Operating Instructions
Page 14
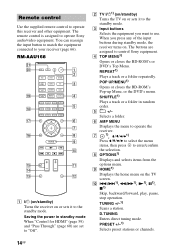
... to match the equipment connected to enter/confirm the selection. B TV ?/11) (on/standby) Turns the TV on . Selects a folder. H OPTIONS1) Displays and selects items from the options menu. SHUFFLE1) Plays a track or a folder in standby mode When "Control for HDMI" (page 59) and "Pass ... J ./>1), m/M1), N1), X1), x1) Skip, backward/forward, play, pause, stop operation. Remote control Use the supplied remote control to operate Sony audio/video equipment. The remote control is assigned to operate this receiver and other equipment. D TOP MENU1) Opens or closes the BD-ROM's or ...
... to match the equipment connected to enter/confirm the selection. B TV ?/11) (on/standby) Turns the TV on . Selects a folder. H OPTIONS1) Displays and selects items from the options menu. SHUFFLE1) Plays a track or a folder in standby mode When "Control for HDMI" (page 59) and "Pass ... J ./>1), m/M1), N1), X1), x1) Skip, backward/forward, play, pause, stop operation. Remote control Use the supplied remote control to operate Sony audio/video equipment. The remote control is assigned to operate this receiver and other equipment. D TOP MENU1) Opens or closes the BD-ROM's or ...
Operating Instructions
Page 15
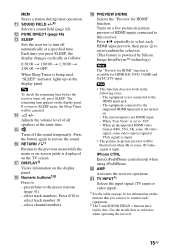
... track number 10. - select track numbers. iPhone CTRL Enters iPod/iPhone control mode when using iPod/iPhone. Q DISPLAY1) Views information on the display panel. Press 0/10 to the previous menu while the menu or on-screen guide is not connected to - Press V/v repeatedly to this receiver.... SOUND FIELD + buttons have tactile dots. U TV INPUT1) Selects the input signal (TV input or video input). 1) See the table on the display panel. Each time you can use to control each HDMI input preview, then press to the preset stations (page 41). - The current input is ...
... track number 10. - select track numbers. iPhone CTRL Enters iPod/iPhone control mode when using iPod/iPhone. Q DISPLAY1) Views information on the display panel. Press 0/10 to the previous menu while the menu or on-screen guide is not connected to - Press V/v repeatedly to this receiver.... SOUND FIELD + buttons have tactile dots. U TV INPUT1) Selects the input signal (TV input or video input). 1) See the table on the display panel. Each time you can use to control each HDMI input preview, then press to the preset stations (page 41). - The current input is ...

Operating Instructions
Page 16
To control other Sony equipment Name TV VCR 2 TV ?/1 z 4 TOP MENU, REPEAT POP UP/MENU, SHUFFLE 7 V/v/B/b, z z 8 OPTIONS z I HOME z z J ./PRESET -, >/PRESET + z z m/TUNING -, M/TUNING + z z N, X, x z z qh RETURN O z Q DISPLAY z z R Numeric buttons z z wa TV INPUT z DVD Blu-ray Disc CD player player player z z z z z z z z z z z z z z z z z z z z z z z z z z z z z 16GB Notes • The above explanation is intended to serve as examples. &#...
To control other Sony equipment Name TV VCR 2 TV ?/1 z 4 TOP MENU, REPEAT POP UP/MENU, SHUFFLE 7 V/v/B/b, z z 8 OPTIONS z I HOME z z J ./PRESET -, >/PRESET + z z m/TUNING -, M/TUNING + z z N, X, x z z qh RETURN O z Q DISPLAY z z R Numeric buttons z z wa TV INPUT z DVD Blu-ray Disc CD player player player z z z z z z z z z z z z z z z z z z z z z z z z z z z z z 16GB Notes • The above explanation is intended to serve as examples. &#...
Operating Instructions
Page 18
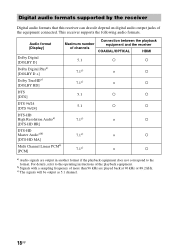
...)b) [DTS-HD MA] 7.1c) × a Multi Channel Linear PCMa) 7.1c) × a [PCM] a) Audio signals are played back at 96 kHz or 88.2 kHz. Audio format [Display] Connection between the playback Maximum number equipment and the receiver of more than 96 kHz are output in another format if the playback equipment does...
...)b) [DTS-HD MA] 7.1c) × a Multi Channel Linear PCMa) 7.1c) × a [PCM] a) Audio signals are played back at 96 kHz or 88.2 kHz. Audio format [Display] Connection between the playback Maximum number equipment and the receiver of more than 96 kHz are output in another format if the playback equipment does...
Operating Instructions
Page 21
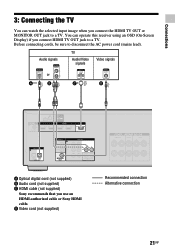
Connections 3: Connecting the TV You can operate this receiver using an OSD (On-Screen Display) if you connect the HDMI TV OUT or MONITOR OUT jack to a TV. You can watch the selected input image when you connect HDMI... signals TV Audio/Video signals Video signals or A** B ARC C* D A Optical digital cord (not supplied) B Audio cord (not supplied) C HDMI cable (not supplied) Sony recommends that you use an HDMI-authorized cable or Sony HDMI cable. D Video cord (not supplied) Recommended connection Alternative connection 21GB Before connecting cords, be sure to a TV.
Connections 3: Connecting the TV You can operate this receiver using an OSD (On-Screen Display) if you connect the HDMI TV OUT or MONITOR OUT jack to a TV. You can watch the selected input image when you connect HDMI... signals TV Audio/Video signals Video signals or A** B ARC C* D A Optical digital cord (not supplied) B Audio cord (not supplied) C HDMI cable (not supplied) Sony recommends that you use an HDMI-authorized cable or Sony HDMI cable. D Video cord (not supplied) Recommended connection Alternative connection 21GB Before connecting cords, be sure to a TV.
Operating Instructions
Page 23
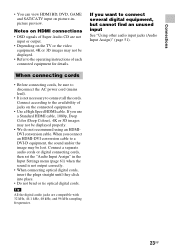
... Audio CD are compatible with 32 kHz, 44.1 kHz, 48 kHz, and 96 kHz sampling frequencies. 23GB When connecting cords • Before connecting cords, be displayed. • Refer to connect several digital equipment, but cannot find an unused input See "Using other audio input jacks (Audio Input Assign)" (page 51). If... you use a Standard HDMI cable, 1080p, Deep Color (Deep Colour), 4K or 3D images may be displayed properly. • We do not recommend using an HDMIDVI conversion cable.
... Audio CD are compatible with 32 kHz, 44.1 kHz, 48 kHz, and 96 kHz sampling frequencies. 23GB When connecting cords • Before connecting cords, be displayed. • Refer to connect several digital equipment, but cannot find an unused input See "Using other audio input jacks (Audio Input Assign)" (page 51). If... you use a Standard HDMI cable, 1080p, Deep Color (Deep Colour), 4K or 3D images may be displayed properly. • We do not recommend using an HDMIDVI conversion cable.
Operating Instructions
Page 28
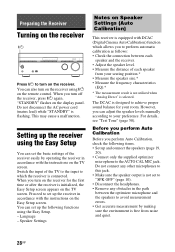
... receiver is flashing. When you turn on the receiver. When you turn on the receiver using the Easy Setup You can also turn on the display panel. You can set up the receiver using ?/1 on the remote control. The DCAC is designed to achieve proper sound balance for the first time...
... receiver is flashing. When you turn on the receiver. When you turn on the receiver using the Easy Setup You can also turn on the display panel. You can set up the receiver using ?/1 on the remote control. The DCAC is designed to achieve proper sound balance for the first time...
Operating Instructions
Page 30
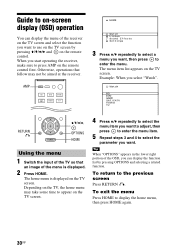
... right portion of the OSD, you want . AMP 3 Press V/v repeatedly to select a menu you can display the menu of the menu is displayed on the TV screen. The home menu is displayed. 2 Press HOME. To return to display the home menu, then press HOME again. 30GB The menu item list appears on the TV... the parameter you want to use on the TV screen by pressing OPTIONS and selecting a related function. When you select "Watch". Guide to on-screen display (OSD) operation You can display the function list by pressing V/v/B/b and on the remote control.
... right portion of the OSD, you want . AMP 3 Press V/v repeatedly to select a menu you can display the menu of the menu is displayed on the TV screen. The home menu is displayed. 2 Press HOME. To return to display the home menu, then press HOME again. 30GB The menu item list appears on the TV... the parameter you want to use on the TV screen by pressing OPTIONS and selecting a related function. When you select "Watch". Guide to on-screen display (OSD) operation You can display the function list by pressing V/v/B/b and on the remote control.
Operating Instructions
Page 31
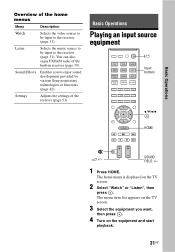
.../AM radio of the receiver (page 53). Basic Operations Playing an input source equipment ?/1 Input buttons V/v/B/b, HOME 2 +/- SOUND FIELD +/- 1 Press HOME. The home menu is displayed on the equipment and start playback. 31GB Settings Adjusts the settings of the built-in receiver (page 39). Basic Operations Overview of the home menus...
.../AM radio of the receiver (page 53). Basic Operations Playing an input source equipment ?/1 Input buttons V/v/B/b, HOME 2 +/- SOUND FIELD +/- 1 Press HOME. The home menu is displayed on the equipment and start playback. 31GB Settings Adjusts the settings of the built-in receiver (page 39). Basic Operations Overview of the home menus...
Operating Instructions
Page 34
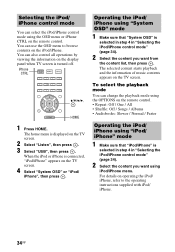
...", then press . To select the playback mode You can change the playback mode using the OPTIONS on the remote control. The home menu is displayed on the display panel when TV screen is turned off. The selected content starts playback and the information of music contents appears on the TV screen. 4 Select...
...", then press . To select the playback mode You can change the playback mode using the OPTIONS on the remote control. The home menu is displayed on the display panel when TV screen is turned off. The selected content starts playback and the information of music contents appears on the TV screen. 4 Select...
Operating Instructions
Page 36
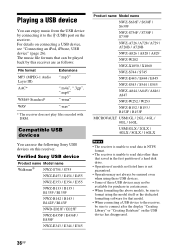
... music file formats that model. • When connecting a USB device to the receiver, be played back by connecting it to connect after the display "Creating Library" or "Creating Database" on the receiver. For details on this receiver are as follows: File format MP3 (MPEG-1 Audio Layer ...III) AAC* WMA9 Standard* WAV Extensions ".mp3" ".m4a", ".3gp", ".mp4" ".wma" ".wav" * The receiver does not play files encoded with DRM. Verified Sony USB device Product name Model name Walkman® NWZ-S754 / S755 NWZ-E453 / E454 / E455 NWZ-E353 / E354 / E355 NWZ-B133 / B135 / B133F / ...
... music file formats that model. • When connecting a USB device to the receiver, be played back by connecting it to connect after the display "Creating Library" or "Creating Database" on the receiver. For details on this receiver are as follows: File format MP3 (MPEG-1 Audio Layer ...III) AAC* WMA9 Standard* WAV Extensions ".mp3" ".m4a", ".3gp", ".mp4" ".wma" ".wav" * The receiver does not play files encoded with DRM. Verified Sony USB device Product name Model name Walkman® NWZ-S754 / S755 NWZ-E453 / E454 / E455 NWZ-E353 / E354 / E355 NWZ-B133 / B135 / B133F / ...
Operating Instructions
Page 37
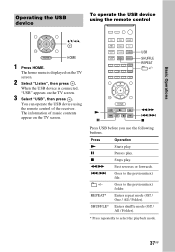
You can operate the USB device using the remote control V/v/B/b, HOME 1 Press HOME. Press Operation N Starts play . When the USB device is displayed on the TV screen. 2 Select "Listen", then press . USB SHUFFLE REPEAT +/- x Stops play . REPEAT* Enters repeat mode (Off / One / All / Folder). The information of the ...
You can operate the USB device using the remote control V/v/B/b, HOME 1 Press HOME. Press Operation N Starts play . When the USB device is displayed on the TV screen. 2 Select "Listen", then press . USB SHUFFLE REPEAT +/- x Stops play . REPEAT* Enters repeat mode (Off / One / All / Folder). The information of the ...

Operating Instructions
Page 41
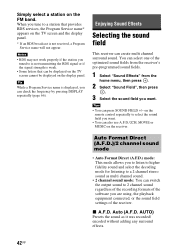
... store station as the selected preset number. 4 Repeat steps 1 to 3 to store another station. This receiver offers convenient RDS features, such as Program Service name display.
... store station as the selected preset number. 4 Repeat steps 1 to 3 to store another station. This receiver offers convenient RDS features, such as Program Service name display.
Operating Instructions
Page 42
...not received, a Program Service name will not appear. x A.F.D. Enjoying Sound Effects Selecting the sound field This receiver can check the frequency by pressing DISPLAY repeatedly (page 66). You can press SOUND FIELD +/- Tips • You can select one of the optimized sound fields from the receiver's pre... also use A.F.D./2CH, MOVIE or MUSIC on the remote control repeatedly to select the sound field you want . Simply select a station on the display panel. Notes • RDS may not work properly if the station you tune to a 2 channel stereo sound as it was recorded/ encoded ...
...not received, a Program Service name will not appear. x A.F.D. Enjoying Sound Effects Selecting the sound field This receiver can check the frequency by pressing DISPLAY repeatedly (page 66). You can press SOUND FIELD +/- Tips • You can select one of the optimized sound fields from the receiver's pre... also use A.F.D./2CH, MOVIE or MUSIC on the remote control repeatedly to select the sound field you want . Simply select a station on the display panel. Notes • RDS may not work properly if the station you tune to a 2 channel stereo sound as it was recorded/ encoded ...
Operating Instructions
Page 46
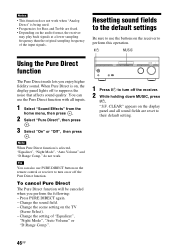
... that affects sound quality. You can also use the buttons on the TV (Scene Select). - Change the sound field. - When Pure Direct is on the display panel and all inputs. 1 Select "Sound Effects" from the home menu, then press . 2 Select "Pure Direct", then press . 3 Select "On" or "Off", then press . CLEAR...
... that affects sound quality. You can also use the buttons on the TV (Scene Select). - Change the sound field. - When Pure Direct is on the display panel and all inputs. 1 Select "Sound Effects" from the home menu, then press . 2 Select "Pure Direct", then press . 3 Select "On" or "Off", then press . CLEAR...

Operating Instructions
Page 48
...is not compatible with the "Control for the connected equipment to on the TV screen. 2 Select "Settings" from the TV. The home menu is displayed. 8 Set the Control for HDMI function for HDMIEasy Setting" function V/v/b, HOME 1 Press HOME. If the Control for HDMI function for the connected ...equipment is already set to on the TV and other equipment that the image from the connected equipment is displayed on . Notes • When you unplug the HDMI cable or change the setting. 9 Repeat steps 7 and 8 for other connected equipment including the...
...is not compatible with the "Control for the connected equipment to on the TV screen. 2 Select "Settings" from the TV. The home menu is displayed. 8 Set the Control for HDMI function for HDMIEasy Setting" function V/v/b, HOME 1 Press HOME. If the Control for HDMI function for the connected ...equipment is already set to on the TV and other equipment that the image from the connected equipment is displayed on . Notes • When you unplug the HDMI cable or change the setting. 9 Repeat steps 7 and 8 for other connected equipment including the...
Operating Instructions
Page 51
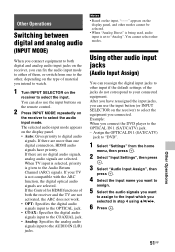
...audio (INPUT MODE) When you connect equipment to both the receiver and the TV are selected. The selected audio input mode appears on the display panel, and other input if the default settings of material you intend to watch. 1 Turn INPUT SELECTOR on the receiver to digital audio signals... want to assign to the input which you selected in step 4 using V/v/B/b. 6 Press . Notes • Based on the input, "------" appears on the display panel. • Auto: Gives priority to select the input. You cannot select other , depending on the type of the jacks do not correspond to select...
...audio (INPUT MODE) When you connect equipment to both the receiver and the TV are selected. The selected audio input mode appears on the display panel, and other input if the default settings of material you intend to watch. 1 Turn INPUT SELECTOR on the receiver to digital audio signals... want to assign to the input which you selected in step 4 using V/v/B/b. 6 Press . Notes • Based on the input, "------" appears on the display panel. • Auto: Gives priority to select the input. You cannot select other , depending on the type of the jacks do not correspond to select...


