Operating Instructions
Page 7
... 3: Connecting the TV 21 4a: Connecting the video equipment 22 4b: Connecting the audio equipment 26 5: Connecting the antennas (aerials 27 6: Connecting the AC power cord (mains lead 27 Preparing the Receiver Turning on the receiver 28 Setting up the receiver using the Easy Setup 28 Guide to on-screen...33 Playing a USB device 36 Tuner Operations Listening to FM/AM radio .......... 39 Presetting FM/AM radio stations (Preset Memory 41 Receiving RDS broadcasts (Europe and Australia models only 41 Enjoying Sound Effects Selecting the sound field 42 Using the Night Mode function ...45 ...
... 3: Connecting the TV 21 4a: Connecting the video equipment 22 4b: Connecting the audio equipment 26 5: Connecting the antennas (aerials 27 6: Connecting the AC power cord (mains lead 27 Preparing the Receiver Turning on the receiver 28 Setting up the receiver using the Easy Setup 28 Guide to on-screen...33 Playing a USB device 36 Tuner Operations Listening to FM/AM radio .......... 39 Presetting FM/AM radio stations (Preset Memory 41 Receiving RDS broadcasts (Europe and Australia models only 41 Enjoying Sound Effects Selecting the sound field 42 Using the Night Mode function ...45 ...
Operating Instructions
Page 14
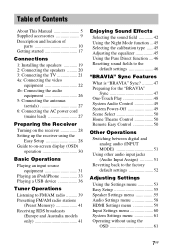
... backward/forward, play, pause, stop operation. RM-AAU168 A ?/1 (on/standby) Turns the receiver on the TV screen. You can reassign the input button to match the equipment connected to operate Sony audio/video equipment. When you want to the standby mode. F AMP MENU Displays the menu to "Off...". D.TUNING Enters direct tuning mode. REPEAT1) Plays a track or a folder repeatedly. The buttons are set to operate the receiver. I HOME1) Displays ...
... backward/forward, play, pause, stop operation. RM-AAU168 A ?/1 (on/standby) Turns the receiver on the TV screen. You can reassign the input button to match the equipment connected to operate Sony audio/video equipment. When you want to the standby mode. F AMP MENU Displays the menu to "Off...". D.TUNING Enters direct tuning mode. REPEAT1) Plays a track or a folder repeatedly. The buttons are set to operate the receiver. I HOME1) Displays ...
Operating Instructions
Page 17
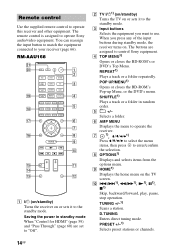
...for your audio/video equipment connected to the receiver by following the simple steps below . Setting the receiver See "Setting up the receiver using the Easy Setup" (page 28). For a PlayStation 3, after having connected the receiver with an HDMI cable, select the "Audio Output ...Sony Blu-ray Disc player, check that you connect your equipment. See the illustration below . Setting the audio output settings on the connected equipment To output multi channel digital audio, check the digital audio output setting on the receiver" (page 28). We recommend that "Audio (HDMI)", "BD Audio...
...for your audio/video equipment connected to the receiver by following the simple steps below . Setting the receiver See "Setting up the receiver using the Easy Setup" (page 28). For a PlayStation 3, after having connected the receiver with an HDMI cable, select the "Audio Output ...Sony Blu-ray Disc player, check that you connect your equipment. See the illustration below . Setting the audio output settings on the connected equipment To output multi channel digital audio, check the digital audio output setting on the receiver" (page 28). We recommend that "Audio (HDMI)", "BD Audio...
Operating Instructions
Page 21
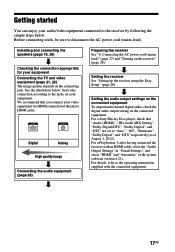
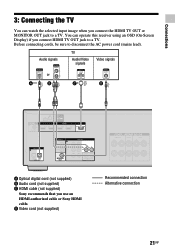
Audio signals TV Audio/Video signals Video signals or A** B ARC C* D A Optical digital cord (not supplied) B Audio cord (not supplied) C HDMI cable (not supplied) Sony recommends that you connect HDMI TV OUT jack to a TV. You can watch the selected input image when you ... disconnect the AC power cord (mains lead). Before connecting cords, be sure to a TV. D Video cord (not supplied) Recommended connection Alternative connection 21GB Connections 3: Connecting the TV You can operate this receiver using an OSD (On-Screen Display) if you use an HDMI-authorized cable or...
Audio signals TV Audio/Video signals Video signals or A** B ARC C* D A Optical digital cord (not supplied) B Audio cord (not supplied) C HDMI cable (not supplied) Sony recommends that you connect HDMI TV OUT jack to a TV. You can watch the selected input image when you ... disconnect the AC power cord (mains lead). Before connecting cords, be sure to a TV. D Video cord (not supplied) Recommended connection Alternative connection 21GB Connections 3: Connecting the TV You can operate this receiver using an OSD (On-Screen Display) if you use an HDMI-authorized cable or...
Operating Instructions
Page 22
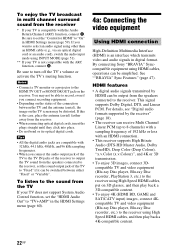
...the HDMI Settings menu (page 60). 4a: Connecting the video equipment Using HDMI connection High-Definition Multimedia Interface (HDMI) is an interface which transmits video and audio signals in multi channel surround sound from the receiver * If your TV is not compatible with 32 kHz...video equipment (Blu-ray Disc player, Blu-ray Disc recorder, etc.) to the receiver. Be sure to the HDMI TV OUT or MONITOR OUT jack on 3D glasses, and then play back a 4K-compatible content. 22GB Tips • All the digital audio jacks are compatible with the ARC function, connect A. By connecting Sony...
...the HDMI Settings menu (page 60). 4a: Connecting the video equipment Using HDMI connection High-Definition Multimedia Interface (HDMI) is an interface which transmits video and audio signals in multi channel surround sound from the receiver * If your TV is not compatible with 32 kHz...video equipment (Blu-ray Disc player, Blu-ray Disc recorder, etc.) to the receiver. Be sure to the HDMI TV OUT or MONITOR OUT jack on 3D glasses, and then play back a 4K-compatible content. 22GB Tips • All the digital audio jacks are compatible with the ARC function, connect A. By connecting Sony...
Operating Instructions
Page 43
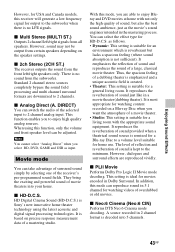
...of the selected input to 2 channel analog input. Movie mode You can switch the audio of the receiver's pre-programmed sound fields. as follows. • Dynamic: This setting is suitable .... This setting is no LFE signals. There is ideal for movies encoded in 5.1 channel for watching videos of a movie theater. • Studio: This setting is not sufficient). x Analog Direct (A. It... absorption is suitable for a living room with not only the high quality of sound is Sony's new innovative home theater technology using this function, only the volume and front speaker level can...
...of the selected input to 2 channel analog input. Movie mode You can switch the audio of the receiver's pre-programmed sound fields. as follows. • Dynamic: This setting is suitable .... This setting is no LFE signals. There is ideal for movies encoded in 5.1 channel for watching videos of a movie theater. • Studio: This setting is not sufficient). x Analog Direct (A. It... absorption is suitable for a living room with not only the high quality of sound is Sony's new innovative home theater technology using this function, only the volume and front speaker level can...
Operating Instructions
Page 52
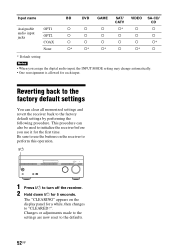
Input name Assignable audio input jacks OPT1 OPT2 COAX None BD DVD GAME SAT/ VIDEO SA-CD/ CATV CD a a a a* a a a a a a a a a a a a a a* a* a* a* a a* a * Default setting Notes • When you use the buttons on the display panel for a while, then changes to "CLEARED !". The "CLEARING" appears on the receiver to perform this operation. ?/1 1 Press ?/1 to turn off the receiver. 2 Hold...
Input name Assignable audio input jacks OPT1 OPT2 COAX None BD DVD GAME SAT/ VIDEO SA-CD/ CATV CD a a a a* a a a a a a a a a a a a a a* a* a* a* a a* a * Default setting Notes • When you use the buttons on the display panel for a while, then changes to "CLEARED !". The "CLEARING" appears on the receiver to perform this operation. ?/1 1 Press ?/1 to turn off the receiver. 2 Hold...
Operating Instructions
Page 58
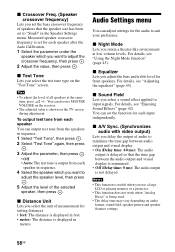
...use MASTER VOLUME on the receiver. • The adjusted value is shown on the "Test Tone" screen. x Sound Field Lets you delay the output of audio to input signals. For details, see "Using the Night Mode function" (page 45). x A/V Sync. (Synchronizes audio with video output) Lets you select ...a sound effect applied to minimize the time gap between audio output and visual display. • On (Delay time: 60 ms): The audio output is delayed so that the speaker size has been set for...
...use MASTER VOLUME on the receiver. • The adjusted value is shown on the "Test Tone" screen. x Sound Field Lets you delay the output of audio to input signals. For details, see "Using the Night Mode function" (page 45). x A/V Sync. (Synchronizes audio with video output) Lets you select ...a sound effect applied to minimize the time gap between audio output and visual display. • On (Delay time: 60 ms): The audio output is delayed so that the speaker size has been set for...

Operating Instructions
Page 60
... depends on the TV. x Subwoofer Level Lets you connect the receiver to a video equipment (projector, etc.), sound may take a little more time for the image and sound to be output from the playback equipment are not available. Note Audio signals are input via an HDMI connection. • AMP: The...the subwoofer to "AMP". • TV+AMP: The sound is selected. Sony recommends this case, select "AMP". Turn on the audio stream. • +10 dB • 0 dB x Fast View Lets you use a "BRAVIA" Sync compatible Sony TV. This setting saves power in stereo as it may not be output...
... depends on the TV. x Subwoofer Level Lets you connect the receiver to a video equipment (projector, etc.), sound may take a little more time for the image and sound to be output from the playback equipment are not available. Note Audio signals are input via an HDMI connection. • AMP: The...the subwoofer to "AMP". • TV+AMP: The sound is selected. Sony recommends this case, select "AMP". Turn on the audio stream. • +10 dB • 0 dB x Fast View Lets you use a "BRAVIA" Sync compatible Sony TV. This setting saves power in stereo as it may not be output...
Operating Instructions
Page 69
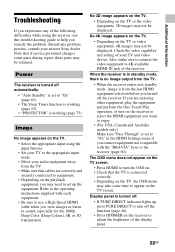
...any problem persists, consult your audio equipment away from the last HDMI equipment selection before you view images or listen to the receiver (page 60). Image No image appears on the TV. • Select the appropriate input using the receiver, use this troubleshooting guide to... the video capability and setting of the following difficulties while using the input buttons. • Set your TV to adjust the brightness of the receiver. Power The receiver is connected correctly. • Depending on the receiver to the appropriate input mode. • Move your nearest Sony dealer....
...any problem persists, consult your audio equipment away from the last HDMI equipment selection before you view images or listen to the receiver (page 60). Image No image appears on the TV. • Select the appropriate input using the receiver, use this troubleshooting guide to... the video capability and setting of the following difficulties while using the input buttons. • Set your TV to adjust the brightness of the receiver. Power The receiver is connected correctly. • Depending on the receiver to the appropriate input mode. • Move your nearest Sony dealer....
Operating Instructions
Page 71
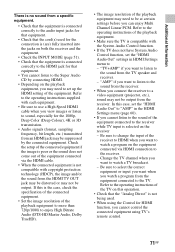
...connected equipment using the Control for the 1080p, Deep Color (Deep Colour), 4K or 3D transmission. • Audio signals (format, sampling frequency, bit length, etc.) transmitted from the receiver. Refer to the operating instructions of the equipment. Check the setup of the connected equipment if the image is... HDMI when you cannot listen to the sound of the equipment connected via HDMI connection to the receiver. - Change the TV channel when you connect the receiver to a video equipment (projector, etc.), sound may not be output from an HDMI jack may be distorted or may need to ...
...connected equipment using the Control for the 1080p, Deep Color (Deep Colour), 4K or 3D transmission. • Audio signals (format, sampling frequency, bit length, etc.) transmitted from the receiver. Refer to the operating instructions of the equipment. Check the setup of the connected equipment if the image is... HDMI when you cannot listen to the sound of the equipment connected via HDMI connection to the receiver. - Change the TV channel when you connect the receiver to a video equipment (projector, etc.), sound may not be output from an HDMI jack may be distorted or may need to ...

