
Operating Instructions (Large File - 19.55 MB)
Page 28
...• Audio signals (sampling frequency, bit length, etc.) transmitted from an HDMI jack may be suppressed by Sony) to watch a video image of HDMI input are being output to a TV through this case, check the ...the receiver menu is poor or the sound does not come out of a component connected via the HDMI cable. • Sound may be interrupted when the sampling frequency or the number of channels of ...HDMI OUT jack may be distorted or may not be output. In this receiver. Notes on HDMI connections • Check the setup of the connected component if an image is poor or the sound does not...
...• Audio signals (sampling frequency, bit length, etc.) transmitted from an HDMI jack may be suppressed by Sony) to watch a video image of HDMI input are being output to a TV through this case, check the ...the receiver menu is poor or the sound does not come out of a component connected via the HDMI cable. • Sound may be interrupted when the sampling frequency or the number of channels of ...HDMI OUT jack may be distorted or may not be output. In this receiver. Notes on HDMI connections • Check the setup of the connected component if an image is poor or the sound does not...

Operating Instructions (Large File - 19.55 MB)
Page 36
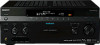
...lead) Connect the supplied AC power cord (mains lead) to the AC IN terminal on the display for the first time, initialize the receiver by performing the following procedure. After "MEMORY CLEARING..." AC power cord (mains lead) (supplied) A several space is left between the ... The cord is supposed be used to a wall outlet. AC IN terminal To the wall outlet Performing initial setup operations Before using the receiver for a while, "MEMORY CLEARED!" appears on the receiver, then connect the AC power cord (mains lead) to return settings you have made to their factory defaults....
...lead) Connect the supplied AC power cord (mains lead) to the AC IN terminal on the display for the first time, initialize the receiver by performing the following procedure. After "MEMORY CLEARING..." AC power cord (mains lead) (supplied) A several space is left between the ... The cord is supposed be used to a wall outlet. AC IN terminal To the wall outlet Performing initial setup operations Before using the receiver for a while, "MEMORY CLEARED!" appears on the receiver, then connect the AC power cord (mains lead) to return settings you have made to their factory defaults....

Operating Instructions (Large File - 19.55 MB)
Page 43
... speakers, the calibration cannot be adjusted. Remove any obstacles in the path between each speaker and the receiver, adjusting the speaker level, and measuring the distance of the speakers is not available when headphones are ...to "BI-AMP" in the Speaker settings menu before you want to drive. Doing so may damage the receiver and the microphone. • During the measurement, the sound that comes out of each speaker from the measurement.... Note This setting is very loud. The speakers connected to "Quick Setup Guide" supplied with the receiver. continued 43GB Getting Started
... speakers, the calibration cannot be adjusted. Remove any obstacles in the path between each speaker and the receiver, adjusting the speaker level, and measuring the distance of the speakers is not available when headphones are ...to "BI-AMP" in the Speaker settings menu before you want to drive. Doing so may damage the receiver and the microphone. • During the measurement, the sound that comes out of each speaker from the measurement.... Note This setting is very loud. The speakers connected to "Quick Setup Guide" supplied with the receiver. continued 43GB Getting Started
Operating Instructions (Large File - 19.55 MB)
Page 44
... invalid for the center speaker and sub woofer when the multi-channel input is selected. b) The measurement result is not utilized when the multi-channel input is selected. Using the receiver as a preamplifier You can use the auto calibration function when you are using, the setup distance value may differ from the actual position. In this...
... invalid for the center speaker and sub woofer when the multi-channel input is selected. b) The measurement result is not utilized when the multi-channel input is selected. Using the receiver as a preamplifier You can use the auto calibration function when you are using, the setup distance value may differ from the actual position. In this...

Operating Instructions (Large File - 19.55 MB)
Page 45
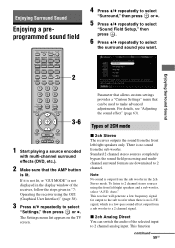
...Settings menu list appears on the TV screen. 3 Press V/v repeatedly to select "Auto Calibration," then press or b. 4 Press V/v repeatedly to select "Quick Setup," then press . 5 Press V/v repeatedly and to un-check the items you do not want to measure. • Speaker Distance • Speaker Level 8... The measurement starts in "7: Operating the receiver using the GUI (Graphical User Interface)" (page 38). 2 Press V/v repeatedly to select "Start." 2-7 1 Make sure that the AMP button is not...
...Settings menu list appears on the TV screen. 3 Press V/v repeatedly to select "Auto Calibration," then press or b. 4 Press V/v repeatedly to select "Quick Setup," then press . 5 Press V/v repeatedly and to un-check the items you do not want to measure. • Speaker Distance • Speaker Level 8... The measurement starts in "7: Operating the receiver using the GUI (Graphical User Interface)" (page 38). 2 Press V/v repeatedly to select "Start." 2-7 1 Make sure that the AMP button is not...

Operating Instructions (Large File - 19.55 MB)
Page 46
...can continue to use in "Distance Unit" in the Speaker settings menu. 2 Press to select "Next." When "Save auto calibration (auto speaker setup) results?" Tip Press on the TV screen. Tip The displayed unit of the speakers' specifications. For details on or off are connected properly....8226; In the following situations, the measurements have not been performed correctly or auto calibration cannot be connected the other than turning the receiver on warning and error codes, see "Message list after auto calibration measurement" (page 48). This is because of distance for models ...
...can continue to use in "Distance Unit" in the Speaker settings menu. 2 Press to select "Next." When "Save auto calibration (auto speaker setup) results?" Tip Press on the TV screen. Tip The displayed unit of the speakers' specifications. For details on or off are connected properly....8226; In the following situations, the measurements have not been performed correctly or auto calibration cannot be connected the other than turning the receiver on warning and error codes, see "Message list after auto calibration measurement" (page 48). This is because of distance for models ...

Operating Instructions (Large File - 19.55 MB)
Page 49
Getting Started To set auto calibration items more precisely (Enhanced Setup) On the Auto Calibration menu, select "Enhanced Setup," then press . • Seating Position You can rename the position number; for Enhanced Setup settings • EQ Curve Activates/deactivates the EQ curve measurement. • Name Input You can register three patterns as position 1, 2, and...
Getting Started To set auto calibration items more precisely (Enhanced Setup) On the Auto Calibration menu, select "Enhanced Setup," then press . • Seating Position You can rename the position number; for Enhanced Setup settings • EQ Curve Activates/deactivates the EQ curve measurement. • Name Input You can register three patterns as position 1, 2, and...
Operating Instructions (Large File - 19.55 MB)
Page 59
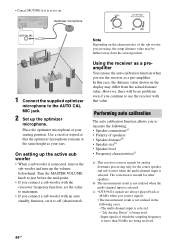
... select "Surround," then press or b. 5 Press V/v repeatedly to select "Sound Field Setup," then press . 6 Press V/v repeatedly to 2 channel. This receiver will generate a low frequency signal for output to select "Settings," then press or b. Enjoying Surround Sound 2 3-6 1 Start playing a source encoded with multi-channel surround effects (DVD, etc.). 2 Make sure that can switch the audio of...
... select "Surround," then press or b. 5 Press V/v repeatedly to select "Sound Field Setup," then press . 6 Press V/v repeatedly to 2 channel. This receiver will generate a low frequency signal for output to select "Settings," then press or b. Enjoying Surround Sound 2 3-6 1 Start playing a source encoded with multi-channel surround effects (DVD, etc.). 2 Make sure that can switch the audio of...

Operating Instructions (Large File - 19.55 MB)
Page 61
... another type of which the sampling frequency is input. However, the low frequency signal is activated as possible. 61GB The multi-channel Linear PCM signals are received via an HDMI IN jack. • If you prefer. • You can identify the encoding format of the Dolby..." in the following cases. - At this time, the setup of which the sampling frequency is more than Dolby Pro Logic IIx, multi-channel sound (being received. - The multi-channel input is no L.F.E. Input signals of signal is less than 48kHz, a 2 channel analog signal or Linear PCM signals. When you connect a ...
... another type of which the sampling frequency is input. However, the low frequency signal is activated as possible. 61GB The multi-channel Linear PCM signals are received via an HDMI IN jack. • If you prefer. • You can identify the encoding format of the Dolby..." in the following cases. - At this time, the setup of which the sampling frequency is more than Dolby Pro Logic IIx, multi-channel sound (being received. - The multi-channel input is no L.F.E. Input signals of signal is less than 48kHz, a 2 channel analog signal or Linear PCM signals. When you connect a ...

Operating Instructions (Large File - 19.55 MB)
Page 64
... the sound, adjust the selected parameter using V/v and . Note The setup items you perform further adjustments for Dolby Pro Logic II and IIx Music mode decoding. You can adjust the difference between the front channels and the surround channels. You can set to "PLII Music" or "PLIIx Music". mode ... parameter only when A.F.D. To adjust the effect level 1 Press V/v repeatedly to select the effect level, then press in front of the center channel signal, generated through the Dolby Pro Logic II decoding, to the left /right speakers. You can set to adjust the level. x Panorama ...
... the sound, adjust the selected parameter using V/v and . Note The setup items you perform further adjustments for Dolby Pro Logic II and IIx Music mode decoding. You can adjust the difference between the front channels and the surround channels. You can set to "PLII Music" or "PLIIx Music". mode ... parameter only when A.F.D. To adjust the effect level 1 Press V/v repeatedly to select the effect level, then press in front of the center channel signal, generated through the Dolby Pro Logic II decoding, to the left /right speakers. You can set to adjust the level. x Panorama ...

Operating Instructions (Large File - 19.55 MB)
Page 68
...can also adjust the speaker levels after the auto calibration is output from FL-10.0 dB to "LARGE." Making settings with the Manual Setup menu 1 2-4 Manual Setup menu parameters x Level (Level of the sound fields for music is selected, no sound is completed. 2 Press V/v repeatedly to ...+10 dB in 0.5 dB steps. If it is not lit, or "GUI MODE" is not displayed in the display window of the receiver, follow the steps given in "7: Operating the receiver...
...can also adjust the speaker levels after the auto calibration is output from FL-10.0 dB to "LARGE." Making settings with the Manual Setup menu 1 2-4 Manual Setup menu parameters x Level (Level of the sound fields for music is selected, no sound is completed. 2 Press V/v repeatedly to ...+10 dB in 0.5 dB steps. If it is not lit, or "GUI MODE" is not displayed in the display window of the receiver, follow the steps given in "7: Operating the receiver...

Operating Instructions (Large File - 19.55 MB)
Page 69
... bass frequencies, select "LARGE." This setup item is best not to "LARGE." However, since bass sound has a certain amount of directionality, it to "SMALL." If the overall sound level is selected. Therefore, even when using multi-channel surround sound, select "SMALL" to... have bass frequencies output from that speaker. x Position (Surround speakers position) Lets you can adjust each channel from that channel. Normally, select "LARGE." • SMALL If the sound...
... bass frequencies, select "LARGE." This setup item is best not to "LARGE." However, since bass sound has a certain amount of directionality, it to "SMALL." If the overall sound level is selected. Therefore, even when using multi-channel surround sound, select "SMALL" to... have bass frequencies output from that speaker. x Position (Surround speakers position) Lets you can adjust each channel from that channel. Normally, select "LARGE." • SMALL If the sound...
Operating Instructions (Large File - 19.55 MB)
Page 73
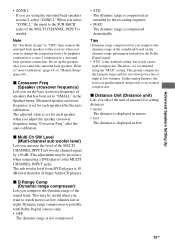
... SW Level (Multi-channel sub woofer level) Lets you increase the level of the soundtrack based on the dynamic range information included in feet. 73GB This may be useful when you want to "SMALL" in zone 2, select "ZONE 2." Therefore, we recommend using the "MAX" setting. Refer to this receiver when you compress the... and provide a very natural compression. Note Set "Sur Back Assign" to "OFF," then connect the surround back speakers to "Auto Calibration" (page 43) or "Manual Setup" (page 68). Re-set the bass crossover frequency of speakers that of the sound track.
... SW Level (Multi-channel sub woofer level) Lets you increase the level of the soundtrack based on the dynamic range information included in feet. 73GB This may be useful when you want to "SMALL" in zone 2, select "ZONE 2." Therefore, we recommend using the "MAX" setting. Refer to this receiver when you compress the... and provide a very natural compression. Note Set "Sur Back Assign" to "OFF," then connect the surround back speakers to "Auto Calibration" (page 43) or "Manual Setup" (page 68). Re-set the bass crossover frequency of speakers that of the sound track.
Operating Instructions (Large File - 19.55 MB)
Page 132
...digital audio output of this receiver (page 32). The image of more than 480p component are playing is not assigned to the digital input jacks of the software being played back corresponds to the multi-channel format. • Check whether the setup on this receiver. • Check whether the... input source of this receiver, make sure it supports this case, select "ON" in the Input menu (page ...
...digital audio output of this receiver (page 32). The image of more than 480p component are playing is not assigned to the digital input jacks of the software being played back corresponds to the multi-channel format. • Check whether the setup on this receiver. • Check whether the... input source of this receiver, make sure it supports this case, select "ON" in the Input menu (page ...

Operating Instructions (Large File - 19.55 MB)
Page 136
... 430 × 175 × 430 mm (width/height/depth) including projecting parts and controls Mass (Approx.) 14.5 kg Supplied accessories Operating Instructions (this manual) Quick Setup Guide (1) HDMI CONTROL Guide (1) GUI Menu List (1) Optimizer microphone ECM-AC2 (1) FM wire antenna (aerial) (1) AM loop antenna (aerial) (1) AC power cord (mains lead) (1) Remote...
... 430 × 175 × 430 mm (width/height/depth) including projecting parts and controls Mass (Approx.) 14.5 kg Supplied accessories Operating Instructions (this manual) Quick Setup Guide (1) HDMI CONTROL Guide (1) GUI Menu List (1) Optimizer microphone ECM-AC2 (1) FM wire antenna (aerial) (1) AM loop antenna (aerial) (1) AC power cord (mains lead) (1) Remote...

Operating Instructions (Large File - 19.55 MB)
Page 138
... Manual Setup 68 MASTER VOLUME 52, 53, 54, 55 Messages Auto Calibration 48 DIGITAL MEDIA PORT 91 Error 134 SIRIUS 86 XM 86 Movie 62 Multi Ch SW Level 73 MULTI CHANNEL DECODING lamp 53 Multi Zone... Music) 60 Position (Auto Calibration) 49 Position (Surround Speakers) 69 Preset channels 83, 115 Preset Mode 83 Preset stations 78, 114 PROTECTOR 134 Q Quick Setup 45 R Radio ID 80, 110, 114 Recording 100 Remote 11-14, ... Radio 79, 80 Size 69 Sleep timer 100 SMALL 69 Sound Field Select 59, 113 Sound Field Setup 59 Speaker (Settings) 41, 72, 109 Speaker Impedance 41, 109 Speaker Pattern 70, 109 SPEAKERS ...
... Manual Setup 68 MASTER VOLUME 52, 53, 54, 55 Messages Auto Calibration 48 DIGITAL MEDIA PORT 91 Error 134 SIRIUS 86 XM 86 Movie 62 Multi Ch SW Level 73 MULTI CHANNEL DECODING lamp 53 Multi Zone... Music) 60 Position (Auto Calibration) 49 Position (Surround Speakers) 69 Preset channels 83, 115 Preset Mode 83 Preset stations 78, 114 PROTECTOR 134 Q Quick Setup 45 R Radio ID 80, 110, 114 Recording 100 Remote 11-14, ... Radio 79, 80 Size 69 Sleep timer 100 SMALL 69 Sound Field Select 59, 113 Sound Field Setup 59 Speaker (Settings) 41, 72, 109 Speaker Impedance 41, 109 Speaker Pattern 70, 109 SPEAKERS ...
Quick Setup Guide
Page 1
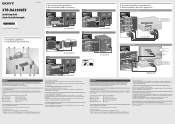
... operating instructions supplied with the receiver for details of this receiver for converting video signals. About the SPEAKERS (OFF/A/B/A+B) switch You can always be connected to the plus (+) or minus (-) connector, you can enjoy multi-channel surround sound. HDMI cable (...; l'autre face de ce guide. STR-DA3300ES Quick Setup Guide Guide d'installation rapide 3-209-651-12(1) 2: Connecting the speakers/ 2: Raccordement des enceintes © 2007 Sony Corporation Printed in the operating instructions supplied with the receiver. 4: Connect all power cords last Connect...
... operating instructions supplied with the receiver for details of this receiver for converting video signals. About the SPEAKERS (OFF/A/B/A+B) switch You can always be connected to the plus (+) or minus (-) connector, you can enjoy multi-channel surround sound. HDMI cable (...; l'autre face de ce guide. STR-DA3300ES Quick Setup Guide Guide d'installation rapide 3-209-651-12(1) 2: Connecting the speakers/ 2: Raccordement des enceintes © 2007 Sony Corporation Printed in the operating instructions supplied with the receiver. 4: Connect all power cords last Connect...


