
Operating Instructions
Page 27
...correctly. Refer to the operating instructions of the player. • Not every HDMI component supports all functions that are defined by Sony) for details. 27US When you cannot play back multi channel audio source, set "Audio Out" to sound during a Deep Color transmission or when you watch a video image of each ...signals of Super Audio CD are not input and output. • Be sure to turn on the receiver when the video and audio of the receiver is not turned on HDMI connections • Check the setup of the connected component if an image is poor or the sound does not come out of...
...correctly. Refer to the operating instructions of the player. • Not every HDMI component supports all functions that are defined by Sony) for details. 27US When you cannot play back multi channel audio source, set "Audio Out" to sound during a Deep Color transmission or when you watch a video image of each ...signals of Super Audio CD are not input and output. • Be sure to turn on the receiver when the video and audio of the receiver is not turned on HDMI connections • Check the setup of the connected component if an image is poor or the sound does not come out of...

Operating Instructions
Page 36
... AC power cord (mains lead), make sure that metallic wires of the speaker cords are reset to a wall outlet. After "CLEARING" appears on the receiver. 3 Release TONE MODE and 2CH/ A.DIRECT after a few seconds. This is inserted firmly. AC INLET terminal To the wall outlet AC power cord ...(mains lead) (supplied) Performing initial setup operations Before using the receiver for this way. Be sure to use the buttons on the receiver for the first time, initialize the receiver by performing the following procedure. The cord is supposed to be used to return...
... AC power cord (mains lead), make sure that metallic wires of the speaker cords are reset to a wall outlet. After "CLEARING" appears on the receiver. 3 Release TONE MODE and 2CH/ A.DIRECT after a few seconds. This is inserted firmly. AC INLET terminal To the wall outlet AC power cord ...(mains lead) (supplied) Performing initial setup operations Before using the receiver for this way. Be sure to use the buttons on the receiver for the first time, initialize the receiver by performing the following procedure. The cord is supposed to be used to return...

Operating Instructions
Page 44
...Press SPEAKERS (OFF/A/B/A+B) repeatedly to select the front speaker system you want to drive. The speakers connected to "Quick Setup Guide" supplied with the receiver. Note You cannot switch the front speaker system by pressing SPEAKERS (OFF/A/B/A+B) when the headphones are output from the measurement... area to avoid measurement error. • When you use the buttons on the receiver for a while. To turn off the speaker output Press SPEAKERS (OFF/A/B/A+B) repeatedly until the "SP A", "SP B" and "SP A +...
...Press SPEAKERS (OFF/A/B/A+B) repeatedly to select the front speaker system you want to drive. The speakers connected to "Quick Setup Guide" supplied with the receiver. Note You cannot switch the front speaker system by pressing SPEAKERS (OFF/A/B/A+B) when the headphones are output from the measurement... area to avoid measurement error. • When you use the buttons on the receiver for a while. To turn off the speaker output Press SPEAKERS (OFF/A/B/A+B) repeatedly until the "SP A", "SP B" and "SP A +...

Operating Instructions
Page 45
... to off (deactivated). 1 Connect the supplied optimizer microphone to off . - Use a stool or tripod so that value. 45US headphones are using, the setup distance value may differ from the actual position. In this case, the distance value shown on the display may be no problems even if you... knob to just before you continue to off automatically. Place the optimizer microphone at the same height as a pre-amplifier. Using the receiver as a preamplifier You can use the Auto Calibration function when you connect a subwoofer with an auto standby function, set to use the...
... to off (deactivated). 1 Connect the supplied optimizer microphone to off . - Use a stool or tripod so that value. 45US headphones are using, the setup distance value may differ from the actual position. In this case, the distance value shown on the display may be no problems even if you... knob to just before you continue to off automatically. Place the optimizer microphone at the same height as a pre-amplifier. Using the receiver as a preamplifier You can use the Auto Calibration function when you connect a subwoofer with an auto standby function, set to use the...

Operating Instructions
Page 59
...sound you want. 3 Press . Higher settings apply more surround effect. To select enhanced surround mode 1 Select "Enhanced Sur Mode" in "Sound Field Setup" parameter. GUI MODE 2 3-6 HOME MENU 1 Start playing a sound source you have selected "Enhanced Sur" as a sound field in step 5 above. 2 Press V/v repeatedly to select... Setup", then press or b. To adjust the effect level 1 After you want . You can only be applied if you want to listen to (CD, DVD, etc.). 2 Press GUI MODE to select "Settings", then press or b. "GUI MODE" appears on the display window of the receiver and...
...sound you want. 3 Press . Higher settings apply more surround effect. To select enhanced surround mode 1 Select "Enhanced Sur Mode" in "Sound Field Setup" parameter. GUI MODE 2 3-6 HOME MENU 1 Start playing a sound source you have selected "Enhanced Sur" as a sound field in step 5 above. 2 Press V/v repeatedly to select... Setup", then press or b. To adjust the effect level 1 After you want . You can only be applied if you want to listen to (CD, DVD, etc.). 2 Press GUI MODE to select "Settings", then press or b. "GUI MODE" appears on the display window of the receiver and...
Operating Instructions
Page 66
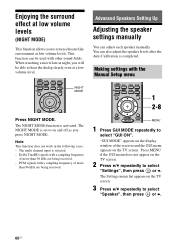
...Speaker", then press or b. 66US You can also adjust the speaker levels after the Auto Calibration is selected. - The multi channel input is completed. HOME MENU 1 Press GUI MODE repeatedly to hear the dialog clearly even at low volume levels. Press MENU if the GUI menu ...receiver and the GUI menu appears on and off as you press NIGHT MODE. The NIGHT MODE function is set to retain a theater like environment at a low volume level. 2CH/ A.DIRECT A.F.D. Enjoying the surround effect at low volume levels (NIGHT MODE) This function allows you will be used with the Manual Setup...
...Speaker", then press or b. 66US You can also adjust the speaker levels after the Auto Calibration is selected. - The multi channel input is completed. HOME MENU 1 Press GUI MODE repeatedly to hear the dialog clearly even at low volume levels. Press MENU if the GUI menu ...receiver and the GUI menu appears on and off as you press NIGHT MODE. The NIGHT MODE function is set to retain a theater like environment at a low volume level. 2CH/ A.DIRECT A.F.D. Enjoying the surround effect at low volume levels (NIGHT MODE) This function allows you will be used with the Manual Setup...

Operating Instructions
Page 67
.... continued 67US You can adjust the front left /right speakers, you want. 8 Press V/v repeatedly to FR+10.0 dB in 0.5 dB steps. Manual Setup menu parameters x Level (Level of speaker) You can adjust each speaker (front left/right, center, surround left/right, surround back left /right, subwoofer... speaker) You can adjust the distance from FR-10.0 dB to adjust the setting. Advanced Speakers Setting Up 4 Press V/v repeatedly to select "Manual Setup", then press or b. 5 Press V/v/B/b to select speaker you want to adjust. 6 Press . 7 Press B/b repeatedly to select the parameter you...
.... continued 67US You can adjust the front left /right speakers, you want. 8 Press V/v repeatedly to FR+10.0 dB in 0.5 dB steps. Manual Setup menu parameters x Level (Level of speaker) You can adjust each speaker (front left/right, center, surround left/right, surround back left /right, subwoofer... speaker) You can adjust the distance from FR-10.0 dB to adjust the setting. Advanced Speakers Setting Up 4 Press V/v repeatedly to select "Manual Setup", then press or b. 5 Press V/v/B/b to select speaker you want to adjust. 6 Press . 7 Press B/b repeatedly to select the parameter you...

Operating Instructions
Page 71
..."BI-AMP Speaker" to "OFF", then connect the surround back speakers to this receiver when you want to change the connection from each speaker in sequence. • .... The adjusted value is output from a bi-amplifier connection to "Auto Calibration" (page 44) or "Manual Setup" (page 67). Advanced Speakers Setting Up continued 71US Some items may not be displayed, depending on the setting.../SBR, SBR/SBL, SR/SB, SBL/ SL, SB/SL, SL/FL, FL/SR Lets you output front 2 channel source sound (instead of Speaker settings menu x BI-AMP Speaker • OFF If you have not connected surround back ...
..."BI-AMP Speaker" to "OFF", then connect the surround back speakers to this receiver when you want to change the connection from each speaker in sequence. • .... The adjusted value is output from a bi-amplifier connection to "Auto Calibration" (page 44) or "Manual Setup" (page 67). Advanced Speakers Setting Up continued 71US Some items may not be displayed, depending on the setting.../SBR, SBR/SBL, SR/SB, SBL/ SL, SB/SL, SL/FL, FL/SR Lets you output front 2 channel source sound (instead of Speaker settings menu x BI-AMP Speaker • OFF If you have not connected surround back ...

Operating Instructions
Page 131
...jack and the input is selected properly on this receiver. • Check whether the input source of the software being played back corresponds to the multi channel format. • Check whether the setup on the playback component is set to multi channel sound. • Check to make sure it supports... this receiver. you are playing is recorded in blue. • Check that the...
...jack and the input is selected properly on this receiver. • Check whether the input source of the software being played back corresponds to the multi channel format. • Check whether the setup on the playback component is set to multi channel sound. • Check to make sure it supports... this receiver. you are playing is recorded in blue. • Check that the...
Operating Instructions
Page 136
...; 388 mm) (width/height/depth) including projecting parts and controls Mass (Approx.) 26 lb 15 oz (12.2 kg) Supplied accessories Operating Instructions (this manual) Quick Setup Guide (1) GUI Menu List (1) Optimizer microphone (ECM-AC2) (1) FM wire antenna (aerial) (1) AM loop antenna (aerial) (1) AC power cord (mains lead) (1) Remote commander (RM-AAP025...
...; 388 mm) (width/height/depth) including projecting parts and controls Mass (Approx.) 26 lb 15 oz (12.2 kg) Supplied accessories Operating Instructions (this manual) Quick Setup Guide (1) GUI Menu List (1) Optimizer microphone (ECM-AC2) (1) FM wire antenna (aerial) (1) AM loop antenna (aerial) (1) AC power cord (mains lead) (1) Remote commander (RM-AAP025...
Operating Instructions
Page 138
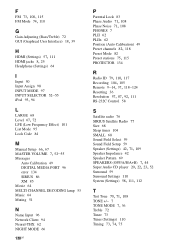
... NIGHT MODE 66 138US P Parental Lock 83 Phase Audio 71, 108 Phase Noise 71, 108 PHONES 7 PLII 62 PLIIx 62 Position (Auto Calibration) 49 Preset channels 82, 118 Preset Mode 82 Preset stations 75, 115 PROTECTOR 134 R Radio ID 79, 110, 117 Recording 104, 105 Remote 9-14, 37, 118-124 Resetting..., 111 RS-232C Control 58 S Satellite radio 76 SIRIUS Satellite Radio 77 Size 68 Sleep timer 104 SMALL 68 Sound Field Select 59 Sound Field Setup 59 Speaker (Settings) 42, 71, 109 Speaker Impedance 42 Speaker Pattern 69 SPEAKERS (OFF/A/B/A+B) 7, 44 Super Audio CD player 20, 22, 23, 52 Surround 59...
... NIGHT MODE 66 138US P Parental Lock 83 Phase Audio 71, 108 Phase Noise 71, 108 PHONES 7 PLII 62 PLIIx 62 Position (Auto Calibration) 49 Preset channels 82, 118 Preset Mode 82 Preset stations 75, 115 PROTECTOR 134 R Radio ID 79, 110, 117 Recording 104, 105 Remote 9-14, 37, 118-124 Resetting..., 111 RS-232C Control 58 S Satellite radio 76 SIRIUS Satellite Radio 77 Size 68 Sleep timer 104 SMALL 68 Sound Field Select 59 Sound Field Setup 59 Speaker (Settings) 42, 71, 109 Speaker Impedance 42 Speaker Pattern 69 SPEAKERS (OFF/A/B/A+B) 7, 44 Super Audio CD player 20, 22, 23, 52 Surround 59...

Service Manual
Page 2
...STR-DA2400ES... W Surround Mode Output Power2) (8 ohms, 1 kHz, THD 10%) 150 W per channel 1) Measured under the following conditions: Area code Power requirements U, CA 120 V AC,... Supplied accessories Operating Instructions Quick Setup Guide (1) GUI Menu List (1) Optimizer microphone (ECM-AC2) (1) FM wire ...DA2400ES: AEP, ECE, UK) Remote commander (RM-AAP025) (1) (DA2400ES: US) Remote commander (RM-AAU039) (1) (DA2400ES) R6 (size-AA) batteries (4 (DA2400ES) or 2 (DG920)) Design and specifications are subject to 9 kHz or 10 kHz. After tuning in any AM station, turn off the receiver...
...STR-DA2400ES... W Surround Mode Output Power2) (8 ohms, 1 kHz, THD 10%) 150 W per channel 1) Measured under the following conditions: Area code Power requirements U, CA 120 V AC,... Supplied accessories Operating Instructions Quick Setup Guide (1) GUI Menu List (1) Optimizer microphone (ECM-AC2) (1) FM wire ...DA2400ES: AEP, ECE, UK) Remote commander (RM-AAP025) (1) (DA2400ES: US) Remote commander (RM-AAU039) (1) (DA2400ES) R6 (size-AA) batteries (4 (DA2400ES) or 2 (DG920)) Design and specifications are subject to 9 kHz or 10 kHz. After tuning in any AM station, turn off the receiver...

