The Sony Guide to Home Theater
Page 49
... lines. In both direct-view and projection television. Local channels. No need for color TV broadcasting, adopted in both cases, LCDs require a light to automatically start and stop your VCR. Luminance. MID™ circuitry. NTSC. standard for cable or a local TV antenna. NTSC officially stands for "Never The Same Color." A method of connecting high-quality digital audio from the program guide at the touch of surround sound...
... lines. In both direct-view and projection television. Local channels. No need for color TV broadcasting, adopted in both cases, LCDs require a light to automatically start and stop your VCR. Luminance. MID™ circuitry. NTSC. standard for cable or a local TV antenna. NTSC officially stands for "Never The Same Color." A method of connecting high-quality digital audio from the program guide at the touch of surround sound...
The Sony Guide to Home Theater
Page 50
... sequence, for source material, transmission channels, recorders and displays. Enables you . A VCR feature that records video onto a hard drive. A flat panel television display type in "lines of resolution." Progressive Scanning. Front projectors are also "active," meaning that project onto a translucent screen. Satellite Speaker. Super Audio CD playback. S-Video connection. Simplifies operation by also controlling many new opportunities, including the ability to hold 80 hours of video signal detail for a more...
... sequence, for source material, transmission channels, recorders and displays. Enables you . A VCR feature that records video onto a hard drive. A flat panel television display type in "lines of resolution." Progressive Scanning. Front projectors are also "active," meaning that project onto a translucent screen. Satellite Speaker. Super Audio CD playback. S-Video connection. Simplifies operation by also controlling many new opportunities, including the ability to hold 80 hours of video signal detail for a more...
Warranty Card
Page 1
... : Sony VCR Customer Information Services Center 1-800-VHS-SONY Or Visit Sony VHS Service Website: www.sony.com/vcrhelp For an accessory or part not available from the date of original purchase, if this Product is within the Warranty period must send the Product in Japan For service assistance or resolution of a service problem, or for a replacement fee. To obtain warranty service, you must be defective, Sony will replace the...
... : Sony VCR Customer Information Services Center 1-800-VHS-SONY Or Visit Sony VHS Service Website: www.sony.com/vcrhelp For an accessory or part not available from the date of original purchase, if this Product is within the Warranty period must send the Product in Japan For service assistance or resolution of a service problem, or for a replacement fee. To obtain warranty service, you must be defective, Sony will replace the...
Operating Instructions
Page 2
... filename[010WAR.fm] model name1[SLV-N99] [3-071-065-11 (1)] This equipment generates, uses, and can be fully inserted to the video head and tape. CAUTION To prevent electric shock, do not expose the unit to the presence of the unit. When you first install the unit, or when you are located at the rear of important operating and maintenance (servicing) instructions in the spaces...
... filename[010WAR.fm] model name1[SLV-N99] [3-071-065-11 (1)] This equipment generates, uses, and can be fully inserted to the video head and tape. CAUTION To prevent electric shock, do not expose the unit to the presence of the unit. When you first install the unit, or when you are located at the rear of important operating and maintenance (servicing) instructions in the spaces...
Operating Instructions
Page 4
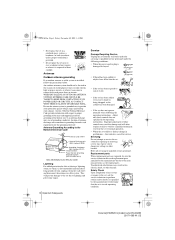
... the set exhibits a distinct change in performance - this set during a lightning storm, or when it is installed, follow the precautions below. Antennas Outdoor antenna grounding If an outdoor antenna or cable system is left unattended and unused for service. Replacement parts When replacement parts are specified in the operating instructions. An outdoor antenna system should not be sure the service technician has used replacement parts specified...
... the set exhibits a distinct change in performance - this set during a lightning storm, or when it is installed, follow the precautions below. Antennas Outdoor antenna grounding If an outdoor antenna or cable system is left unattended and unused for service. Replacement parts When replacement parts are specified in the operating instructions. An outdoor antenna system should not be sure the service technician has used replacement parts specified...
Operating Instructions
Page 5
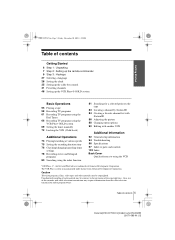
...remote commander 9 Step 3 : Hookups 27 Selecting a language 28 Setting the clock 35 Setting up the cable box control 41 Presetting channels 48 Setting up the VCR Plus+® GOLD system Basic Operations 55 Playing a tape 58 Recording TV programs 61 Recording TV programs using the Dial Timer 66 Recording TV programs using the VCR Plus+ GOLD system 69 Setting the timer manually 72 Locking the VCR (Child Lock) Additional Operations 73 Playing/searching at various speeds 75 Setting the recording duration time 76 Checking/changing/canceling timer settings 78 Recording stereo and bilingual programs...
...remote commander 9 Step 3 : Hookups 27 Selecting a language 28 Setting the clock 35 Setting up the cable box control 41 Presetting channels 48 Setting up the VCR Plus+® GOLD system Basic Operations 55 Playing a tape 58 Recording TV programs 61 Recording TV programs using the Dial Timer 66 Recording TV programs using the VCR Plus+ GOLD system 69 Setting the timer manually 72 Locking the VCR (Child Lock) Additional Operations 73 Playing/searching at various speeds 75 Setting the recording duration time 76 Checking/changing/canceling timer settings 78 Recording stereo and bilingual programs...
Operating Instructions
Page 9
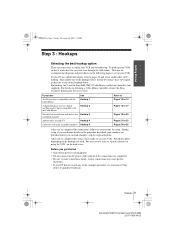
... doesn't match any of the hookups below. Then use the Sony RM-CM101 Cable Mouse (cable box controller) (not supplied). If your VCR. Before you get started • Turn off the power to all equipment. • Do not connect the AC power cords until all of the hookups below. Hookups 9 filename[010GET.fm] model name1[SLV-N99] [3-071-065-11(1)] Then follow the instructions for you, first scan through...
... doesn't match any of the hookups below. Then use the Sony RM-CM101 Cable Mouse (cable box controller) (not supplied). If your VCR. Before you get started • Turn off the power to all equipment. • Do not connect the AC power cords until all of the hookups below. Hookups 9 filename[010GET.fm] model name1[SLV-N99] [3-071-065-11(1)] Then follow the instructions for you, first scan through...
Operating Instructions
Page 10
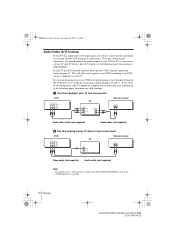
... Audio/video (A/V) hookup If your TV has audio/video (A/V) input jacks, you will allow you to operate your VCR by pointing your VCR's remote commander at your VCR using these connections first, and then go to the following pages for antenna or cable hookups. This will get a better picture and sound if you hook up the VCR after you 're finished setting up your TV. 10 Hookups filename[010GET.fm] model name1[SLV-N99...
... Audio/video (A/V) hookup If your TV has audio/video (A/V) input jacks, you will allow you to operate your VCR by pointing your VCR's remote commander at your VCR using these connections first, and then go to the following pages for antenna or cable hookups. This will get a better picture and sound if you hook up the VCR after you 're finished setting up your TV. 10 Hookups filename[010GET.fm] model name1[SLV-N99...
Operating Instructions
Page 17
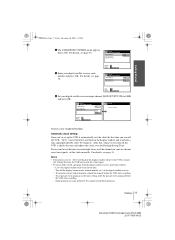
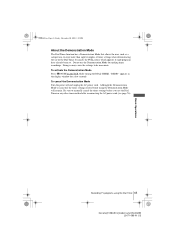
.... Select ON. SET UP CABLE BOX CONTROL CABLE MOUSE BOX CODE NO. To record or receive locked channels, unlock the channel before the VCR starts recording. - For details, see page 33. If you turn off . "ACS" (Auto Clock Set) will search for a time signal provided by some TV channels. After that, whenever you want to use the timer to LINE and press OK. You cannot record these programs. Hookups 17 filename[010GET.fm] model name1[SLV-N99] [3-071-065...
.... Select ON. SET UP CABLE BOX CONTROL CABLE MOUSE BOX CODE NO. To record or receive locked channels, unlock the channel before the VCR starts recording. - For details, see page 33. If you turn off . "ACS" (Auto Clock Set) will search for a time signal provided by some TV channels. After that, whenever you want to use the timer to LINE and press OK. You cannot record these programs. Hookups 17 filename[010GET.fm] model name1[SLV-N99] [3-071-065...
Operating Instructions
Page 34
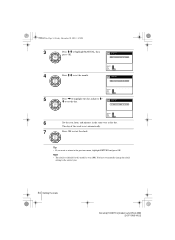
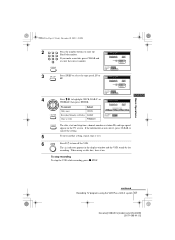
... : MENU CLOCK SET 9 / 1 / 2 0 0 2 SUN 1 2 : 0 0 AM SELECT : SET : END : OK QUIT : MENU 5 Press , to highlight the day and press M/ m to set automatically. 7 Press OK to the correct year. 34 Setting the clock filename[010GET.fm] model name1[SLV-N99] [3-071-065-11(1)] The day of the week is year 2001.You have to manually change the clock setting to start the clock. PLAY OK CLOCK SET 9 / 2 8 / 2 0 0 2 SAT 1 2 : 0 0 AM SELECT : SET : END : OK QUIT : MENU 6 Set...
... : MENU CLOCK SET 9 / 1 / 2 0 0 2 SUN 1 2 : 0 0 AM SELECT : SET : END : OK QUIT : MENU 5 Press , to highlight the day and press M/ m to set automatically. 7 Press OK to the correct year. 34 Setting the clock filename[010GET.fm] model name1[SLV-N99] [3-071-065-11(1)] The day of the week is year 2001.You have to manually change the clock setting to start the clock. PLAY OK CLOCK SET 9 / 2 8 / 2 0 0 2 SAT 1 2 : 0 0 AM SELECT : SET : END : OK QUIT : MENU 6 Set...
Operating Instructions
Page 35
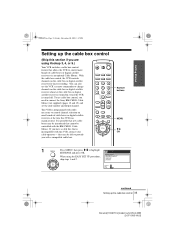
... optional Cable Mouse. SETTINGS When using Hookup 3, 4, or 5.) Your VCR includes a cable box control feature that cannot be controlled with codes necessary to control channel selection on most brands of cable boxes or digital satellite receivers at the time this VCR, contact your cable operator -- they may be able to provide you need to highlight SETTINGS and press OK. It is incompatible with a compatible cable box. 123 456 789 0 Number buttons MENU M/m OK 1 MENU Press MENU, then press M/m to connect the Sony...
... optional Cable Mouse. SETTINGS When using Hookup 3, 4, or 5.) Your VCR includes a cable box control feature that cannot be controlled with codes necessary to control channel selection on most brands of cable boxes or digital satellite receivers at the time this VCR, contact your cable operator -- they may be able to provide you need to highlight SETTINGS and press OK. It is incompatible with a compatible cable box. 123 456 789 0 Number buttons MENU M/m OK 1 MENU Press MENU, then press M/m to connect the Sony...
Operating Instructions
Page 60
... a channel, you can use the number buttons on . Notes • The remaining tape length may take up to one minute for short tapes suchas T-20or T- 30, or tapes recorded in the display window. 2 If the TV is connected to the VCR's LINE OUT jacks, set the TV to calculate and display the remaining tape length after you press DISPLAY. 60 Recording TV programs filename[010BAS.fm] model name1[SLV-N99] [3-071...
... a channel, you can use the number buttons on . Notes • The remaining tape length may take up to one minute for short tapes suchas T-20or T- 30, or tapes recorded in the display window. 2 If the TV is connected to the VCR's LINE OUT jacks, set the TV to calculate and display the remaining tape length after you press DISPLAY. 60 Recording TV programs filename[010BAS.fm] model name1[SLV-N99] [3-071...
Operating Instructions
Page 64
... set the year, "CLOCK" appears in the display window again. 6 Turn and press DIAL TIMER to set the hour and minute. 7 When you want to keep the tape speed, set AUTO TAPE SPEED to OFF in the ADVANCED OPTIONS menu (page 88). • To check, change the tape speed, press SP/EP before you complete the setting in step 9 (page 63). • When you are using the Dial Timer filename[010BAS.fm] model name1[SLV-N99...
... set the year, "CLOCK" appears in the display window again. 6 Turn and press DIAL TIMER to set the hour and minute. 7 When you want to keep the tape speed, set AUTO TAPE SPEED to OFF in the ADVANCED OPTIONS menu (page 88). • To check, change the tape speed, press SP/EP before you complete the setting in step 9 (page 63). • When you are using the Dial Timer filename[010BAS.fm] model name1[SLV-N99...
Operating Instructions
Page 65
....fm] model name1[SLV-N99] [3-071-065-11 (1)] To activate the Demonstration Mode Press X PAUSE on the VCR while turning the DIAL TIMER. Recording TV programs using the Demonstration Mode will remain. Do not use the Demonstration Mode for a few seconds. Be sure to manually cancel the timer settings before you use of timer settings when demonstrating the use the Dial Timer or any other timer method after reconnecting the AC power cord (see...
....fm] model name1[SLV-N99] [3-071-065-11 (1)] To activate the Demonstration Mode Press X PAUSE on the VCR while turning the DIAL TIMER. Recording TV programs using the Demonstration Mode will remain. Do not use the Demonstration Mode for a few seconds. Be sure to manually cancel the timer settings before you use of timer settings when demonstrating the use the Dial Timer or any other timer method after reconnecting the AC power cord (see...
Operating Instructions
Page 67
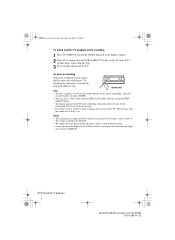
...] model name1[SLV-N99] [3-071-065-11 (1)] continued Recording TV programs using a cable box, leave it on the TV screen. The indicator appears in the display window and the VCR stands by for recording. VCR Plus+ system PlusCode # 12345--- To stop recording To stop time, channel number or station ID, and tape speed appear on . Basic Operations 010BAS.fm Page 67 Friday, November 30, 2001 1:52 PM 2 Press the number buttons to turn off...
...] model name1[SLV-N99] [3-071-065-11 (1)] continued Recording TV programs using a cable box, leave it on the TV screen. The indicator appears in the display window and the VCR stands by for recording. VCR Plus+ system PlusCode # 12345--- To stop recording To stop time, channel number or station ID, and tape speed appear on . Basic Operations 010BAS.fm Page 67 Friday, November 30, 2001 1:52 PM 2 Press the number buttons to turn off...
Operating Instructions
Page 94
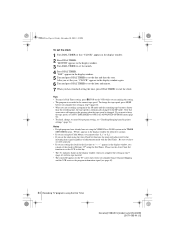
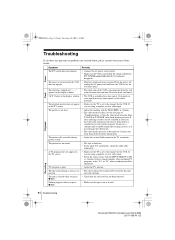
... hours. Clean the video heads using the Sony T-25CLD or T-25CLDR video head cleaning cassette. Select a channel number when recording TV programs; TV reception is defective. • If you press • Check that the safety tab has not been removed. If these cleaning cassettes are dirty (see the last page of "Troubleshooting"). The picture has no sound. • The tape is poor. • Adjust the TV antenna. buttons. Recording 94 Troubleshooting filename[010ADDI.fm] model name1[SLV-N99...
... hours. Clean the video heads using the Sony T-25CLD or T-25CLDR video head cleaning cassette. Select a channel number when recording TV programs; TV reception is defective. • If you press • Check that the safety tab has not been removed. If these cleaning cassettes are dirty (see the last page of "Troubleshooting"). The picture has no sound. • The tape is poor. • Adjust the TV antenna. buttons. Recording 94 Troubleshooting filename[010ADDI.fm] model name1[SLV-N99...
Operating Instructions
Page 95
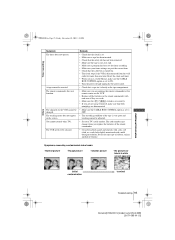
... PM Timer recording Symptom The timer does not operate. Symptoms caused by contaminated video heads • Normal picture • Rough picture • Unclear picture • No picture (or black & white screen appears) Others initial contamination terminal Additional Information Troubleshooting 95 filename[010ADDI.fm] model name1[SLV-N99] [3-071-065-11 (1)] You cannot control other TVs. A tape cannot be adjusted. • Set your timer settings are disconnected. • Make sure the CABLE BOX CONTROL option is set...
... PM Timer recording Symptom The timer does not operate. Symptoms caused by contaminated video heads • Normal picture • Rough picture • Unclear picture • No picture (or black & white screen appears) Others initial contamination terminal Additional Information Troubleshooting 95 filename[010ADDI.fm] model name1[SLV-N99] [3-071-065-11 (1)] You cannot control other TVs. A tape cannot be adjusted. • Set your timer settings are disconnected. • Make sure the CABLE BOX CONTROL option is set...
Operating Instructions
Page 96
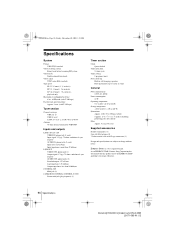
... LINE OUT VIDEO OUT, phono jack (1) Output signal: 1 Vp-p, 75 ohms, unbalanced, sync negative AUDIO OUT, phono jacks (2) Standard output: 327 mVrms Load impedance: 47 kilohms Output impedance: less than 10 kilohms CONTROL S IN Mini jack (1) CABLE BOX CONTROL (CONTROL S OUT) Stereo mini jack (plug in power) (1) Timer section Clock Quartz locked Timer indication 12-hour cycle Timer setting 8 programs (max.) Power back-up Built-in EP mode (with T-160 tape) Fast-forward and rewind time...
... LINE OUT VIDEO OUT, phono jack (1) Output signal: 1 Vp-p, 75 ohms, unbalanced, sync negative AUDIO OUT, phono jacks (2) Standard output: 327 mVrms Load impedance: 47 kilohms Output impedance: less than 10 kilohms CONTROL S IN Mini jack (1) CABLE BOX CONTROL (CONTROL S OUT) Stereo mini jack (plug in power) (1) Timer section Clock Quartz locked Timer indication 12-hour cycle Timer setting 8 programs (max.) Power back-up Built-in EP mode (with T-160 tape) Fast-forward and rewind time...
Operating Instructions
Page 102
... Smart channel mapping 49 SP mode 59 Station ID 83 Stereo 78 T Timer setting 69 canceling 76 changing 76 checking 76 daily/weekly recording 71 using the VCR Plus+ GOLD system 66 Tracking adjustment. 010COVIX.fm Page 102 Friday, November 30, 2001 2:03 PM Index A Adjusting picture 46, 86 tracking 86 Advanced option 88 AFT (Auto Fine Tuning) 46 Antenna hookup 21 APC (Adaptive Picture Control) 87 Audio track 79 Audio/video (A/V) hookup 10 Auto Clock Set 28 Auto Tape Speed 88 C Cable box control cable box code number...
... Smart channel mapping 49 SP mode 59 Station ID 83 Stereo 78 T Timer setting 69 canceling 76 changing 76 checking 76 daily/weekly recording 71 using the VCR Plus+ GOLD system 66 Tracking adjustment. 010COVIX.fm Page 102 Friday, November 30, 2001 2:03 PM Index A Adjusting picture 46, 86 tracking 86 Advanced option 88 AFT (Auto Fine Tuning) 46 Antenna hookup 21 APC (Adaptive Picture Control) 87 Audio track 79 Audio/video (A/V) hookup 10 Auto Clock Set 28 Auto Tape Speed 88 C Cable box control cable box code number...
Operating Instructions
Page 103
... using the VCR Hookup 1 To play a tape 1 Set the TV to channel 3 or 4 (or to video input, if you made A/V connections). 2 Insert a tape and press H PLAY. To record a program 1 Turn on the cable box. 2 Press VCR Plus+ on the remote commander. 3 Enter the PlusCode number. 4 Select ONCE, DAILY, or WEEKLY, then press ENTER. 5 Insert a tape. 6 Press ?/1 to video input, if you made A/V connections). 2 Insert a tape and press H PLAY. Hookup 4 To play a tape 1 Set the TV to channel 3 or 4 (or to turn off the VCR...
... using the VCR Hookup 1 To play a tape 1 Set the TV to channel 3 or 4 (or to video input, if you made A/V connections). 2 Insert a tape and press H PLAY. To record a program 1 Turn on the cable box. 2 Press VCR Plus+ on the remote commander. 3 Enter the PlusCode number. 4 Select ONCE, DAILY, or WEEKLY, then press ENTER. 5 Insert a tape. 6 Press ?/1 to video input, if you made A/V connections). 2 Insert a tape and press H PLAY. Hookup 4 To play a tape 1 Set the TV to channel 3 or 4 (or to turn off the VCR...

