
Operating Instructions (SLVN750)
Page 7
Check your VCR. Getting Started Getting Started Step 1 : Unpacking Check that you have received the following items with the VCR: • Remote commander • Size AA (R6) batteries • 75-ohm coaxial cable with F-type connectors Note • The supplied remote commander is the model used for the exclusive use of your model name The instructions in this VCR. Check your model name by looking at the rear panel of this manual are for the 2 models: SLV-N750 and SLV-N650. SLV-N750 is for illustration purposes. Unpacking 7
Check your VCR. Getting Started Getting Started Step 1 : Unpacking Check that you have received the following items with the VCR: • Remote commander • Size AA (R6) batteries • 75-ohm coaxial cable with F-type connectors Note • The supplied remote commander is the model used for the exclusive use of your model name The instructions in this VCR. Check your model name by looking at the rear panel of this manual are for the 2 models: SLV-N750 and SLV-N650. SLV-N750 is for illustration purposes. Unpacking 7

Operating Instructions (SLVN750)
Page 14
... presetting the clock and channels. You have now completed VCR setup. If the clock is set . Notes • If you purchase the VCR. • Auto preset can be performed by some TV channels. To add or disable channels manually, see "Step 6 : Presetting channels" on page 24. • Do ...not press any buttons on page 26. If this happens, see "Presetting/disabling channels manually" on the VCR or remote commander during Auto preset. • Auto preset starts automatically only when you plug in the AC power cord for 5 seconds or ...
... presetting the clock and channels. You have now completed VCR setup. If the clock is set . Notes • If you purchase the VCR. • Auto preset can be performed by some TV channels. To add or disable channels manually, see "Step 6 : Presetting channels" on page 24. • Do ...not press any buttons on page 26. If this happens, see "Presetting/disabling channels manually" on the VCR or remote commander during Auto preset. • Auto preset starts automatically only when you plug in the AC power cord for 5 seconds or ...

Operating Instructions (SLVN750)
Page 16
..., or "--:--" appears in the display window. To add or disable channels manually, see "Step 4 : Selecting a language" on the VCR continuously for 5 seconds or more with the VCR power turned off. 16 Hookups If this happens, see "Using Manual Clock Set" on the VCR or remote commander during Auto preset. • Auto preset starts automatically only...
..., or "--:--" appears in the display window. To add or disable channels manually, see "Step 4 : Selecting a language" on the VCR continuously for 5 seconds or more with the VCR power turned off. 16 Hookups If this happens, see "Using Manual Clock Set" on the VCR or remote commander during Auto preset. • Auto preset starts automatically only...
Operating Instructions (SLVN750)
Page 19
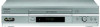
.... Before you start... • Turn on . • Set the "VCR Output CH" to automatically set the time manually (page 22). When using A/V connections, set the TV to video input. • Press TV/VIDEO to display the VCR indicator in your area are used, set the "VCR Output CH" to "Clock set," then press OK. If both...
.... Before you start... • Turn on . • Set the "VCR Output CH" to automatically set the time manually (page 22). When using A/V connections, set the TV to video input. • Press TV/VIDEO to display the VCR indicator in your area are used, set the "VCR Output CH" to "Clock set," then press OK. If both...
Operating Instructions (SLVN750)
Page 22
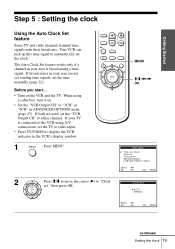
... : Vv Set : OK Quit : MENU 3 Press M/m to select MANUAL, then press OK. If your TV is connected to the VCR using A/V connections, set the TV to video input. • Press TV/VIDEO to display the VCR indicator in ADVANCED OPTIONS menu (page 47). MAIN MENU Timer set / check Clock set Tuner preset Advanced ...DATE YEAR TIME 1 / 0 1 2 0 0 4 THU 12 : 0 0 AM Select : Bb End : OK Set : Vv Quit : MENU 22 Setting the clock MENU M/m/, OK 1 MENU Press MENU. Using Manual Clock Set Before you start... • Turn on the VCR and the TV. • Set the "VCR Output CH" to "3CH" or "4CH" in the...
... : Vv Set : OK Quit : MENU 3 Press M/m to select MANUAL, then press OK. If your TV is connected to the VCR using A/V connections, set the TV to video input. • Press TV/VIDEO to display the VCR indicator in ADVANCED OPTIONS menu (page 47). MAIN MENU Timer set / check Clock set Tuner preset Advanced ...DATE YEAR TIME 1 / 0 1 2 0 0 4 THU 12 : 0 0 AM Select : Bb End : OK Set : Vv Quit : MENU 22 Setting the clock MENU M/m/, OK 1 MENU Press MENU. Using Manual Clock Set Before you start... • Turn on the VCR and the TV. • Set the "VCR Output CH" to "3CH" or "4CH" in the...
Operating Instructions (SLVN750)
Page 24
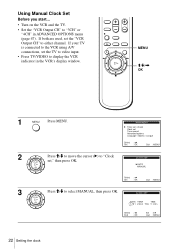
...box, turn it on the VCR and the TV. OK MENU M/m/ Step 6 : Presetting channels This VCR is connected to the VCR using A/V connections, set the TV to video input. • Press TV/VIDEO to display the VCR indicator in the VCR's display window. 1 MENU ...Press MENU. 2 Press M/m to move the cursor (B) to "Tuner PLAY preset," then press OK. Presetting all receivable channels automatically Before you wish to preset, set the "VCR Output CH" to 125. If both are any unwanted channels, disable them directly using manual...
...box, turn it on the VCR and the TV. OK MENU M/m/ Step 6 : Presetting channels This VCR is connected to the VCR using A/V connections, set the TV to video input. • Press TV/VIDEO to display the VCR indicator in the VCR's display window. 1 MENU ...Press MENU. 2 Press M/m to move the cursor (B) to "Tuner PLAY preset," then press OK. Presetting all receivable channels automatically Before you wish to preset, set the "VCR Output CH" to 125. If both are any unwanted channels, disable them directly using manual...
Operating Instructions (SLVN750)
Page 26
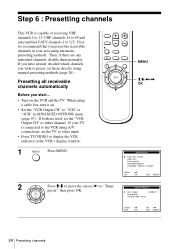
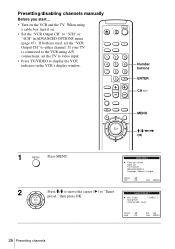
If your TV is connected to the VCR using a cable box, turn it on the VCR and the TV. When using A/V connections, set the "VCR Output CH" to either channel. If both are used, set the TV to video input. • Press TV/VIDEO to display the VCR indicator in ADVANCED OPTIONS menu (page 47). Presetting/disabling channels manually Before you start... • Turn on . • Set the "VCR Output CH" to "3CH" or "4CH" in the VCR's display window. 123 456 789 0 Number buttons ENTER CH +/- MENU M/m/
If your TV is connected to the VCR using a cable box, turn it on the VCR and the TV. When using A/V connections, set the "VCR Output CH" to either channel. If both are used, set the TV to video input. • Press TV/VIDEO to display the VCR indicator in ADVANCED OPTIONS menu (page 47). Presetting/disabling channels manually Before you start... • Turn on . • Set the "VCR Output CH" to "3CH" or "4CH" in the VCR's display window. 123 456 789 0 Number buttons ENTER CH +/- MENU M/m/

Operating Instructions (SLVN750)
Page 46
...manually adjust the tracking. To resume automatic tracking adjustment, eject the tape and reinsert it. on other VCRs. 46 Adjusting the picture (tracking) The distortion should disappear as you press one of the two tracking buttons. Press TRACKING +/- Adjusting the picture (tracking) Although the VCR... automatically adjusts the tracking when playing a tape, distortion may occur if the recording is in the LP mode on the VCR to work with tapes recorded in poor condition. TRACKING Tracking meter Note • ...
...manually adjust the tracking. To resume automatic tracking adjustment, eject the tape and reinsert it. on other VCRs. 46 Adjusting the picture (tracking) The distortion should disappear as you press one of the two tracking buttons. Press TRACKING +/- Adjusting the picture (tracking) Although the VCR... automatically adjusts the tracking when playing a tape, distortion may occur if the recording is in the LP mode on the VCR to work with tapes recorded in poor condition. TRACKING Tracking meter Note • ...
Marketing Specifications (SLVN750)
Page 2
...sony.com Full Chassis 4 Head Hi-Fi VCR Please visit the Dealer Network for current information at www.sony.com/dn Last Updated: 06/15/2009 All other trademarks are subject to change without notice. Features and specifications are property of Sony. SLV-N750 Features General Background Graphics: Yes Video... TV) Display: 17" Regulation and Standard Compliance Energy Star® Compliant: Yes Supplied Accessories Instruction Manual Multi-Brand Remote Control Size AA (R6) Batteries (2) 75-Ohm Coaxial Video Cable w/F Type Connector (1) RF Cable Color: Silver UPC Code: 027242643949 ©2009...
...sony.com Full Chassis 4 Head Hi-Fi VCR Please visit the Dealer Network for current information at www.sony.com/dn Last Updated: 06/15/2009 All other trademarks are subject to change without notice. Features and specifications are property of Sony. SLV-N750 Features General Background Graphics: Yes Video... TV) Display: 17" Regulation and Standard Compliance Energy Star® Compliant: Yes Supplied Accessories Instruction Manual Multi-Brand Remote Control Size AA (R6) Batteries (2) 75-Ohm Coaxial Video Cable w/F Type Connector (1) RF Cable Color: Silver UPC Code: 027242643949 ©2009...

