Warranty Card
Page 1
..., abuse, negligence, commercial use, or modification of, or to you may not apply to any accessories) against defects in Japan This warranty gives you specific legal rights, and you . For your authorized dealer, call : Sony VCR Customer Information Services Center 1-800-VHS-SONY Or Visit Sony VHS Service Website: www.sony.com/vcrhelp For an accessory or part not available from the date of original purchase...
..., abuse, negligence, commercial use, or modification of, or to you may not apply to any accessories) against defects in Japan This warranty gives you specific legal rights, and you . For your authorized dealer, call : Sony VCR Customer Information Services Center 1-800-VHS-SONY Or Visit Sony VHS Service Website: www.sony.com/vcrhelp For an accessory or part not available from the date of original purchase...

Operating Instructions (SLVN750)
Page 1
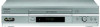
... common problems and service information can be found at www.sony.com/vcrhelp or contact Sony VCR service at : Customer Information Service 115 Gordon Baker Road, Toronto, Ontario, M2H 3R6 SLV-N750 SLV-N650 © 2004 Sony Corporation For Customers in the USA Many solutions to us at 1 (800) VHSSONY. 3-089-903-11 (1) US Video Cassette Recorder Operating Instructions For customers in Canada If this product is not working properly...
... common problems and service information can be found at www.sony.com/vcrhelp or contact Sony VCR service at : Customer Information Service 115 Gordon Baker Road, Toronto, Ontario, M2H 3R6 SLV-N750 SLV-N650 © 2004 Sony Corporation For Customers in the USA Many solutions to us at 1 (800) VHSSONY. 3-089-903-11 (1) US Video Cassette Recorder Operating Instructions For customers in Canada If this product is not working properly...

Operating Instructions (SLVN750)
Page 5
... overhead power lines or other hazards. Adjust only those controls that the set is exposed to provide some protection against voltage surges and built-up static charges. Servicing Do not attempt to service the set yourself as to direct sunlight. this set during a lightning storm, or when it is in the operating instructions. Be sure the antenna system is grounded so as opening or removing...
... overhead power lines or other hazards. Adjust only those controls that the set is exposed to provide some protection against voltage surges and built-up static charges. Servicing Do not attempt to service the set yourself as to direct sunlight. this set during a lightning storm, or when it is in the operating instructions. Be sure the antenna system is grounded so as opening or removing...

Operating Instructions (SLVN750)
Page 6
... 8 Step 2 : Setting up the remote commander 11 Step 3 : Hookups 18 Step 4 : Selecting a language 19 Step 5 : Setting the clock 24 Step 6 : Presetting channels Basic Operations 28 Playing a tape 31 Recording TV programs 34 Setting the timer 37 Locking the VCR (Child Lock) Additional Operations 38 Playing/searching at various speeds 40 Quick Timer Recording 41 Checking/changing/canceling timer settings 43 Recording stereo and bilingual programs 44 Searching using various functions 46 Adjusting the picture (tracking) 47 Changing menu options 49 Editing with cable television transmission...
... 8 Step 2 : Setting up the remote commander 11 Step 3 : Hookups 18 Step 4 : Selecting a language 19 Step 5 : Setting the clock 24 Step 6 : Presetting channels Basic Operations 28 Playing a tape 31 Recording TV programs 34 Setting the timer 37 Locking the VCR (Child Lock) Additional Operations 38 Playing/searching at various speeds 40 Quick Timer Recording 41 Checking/changing/canceling timer settings 43 Recording stereo and bilingual programs 44 Searching using various functions 46 Adjusting the picture (tracking) 47 Changing menu options 49 Editing with cable television transmission...

Operating Instructions (SLVN750)
Page 9
Now you do not use the remote commander for an extended period of time, remove the batteries to avoid possible damage from the sun or lighting apparatus. To control the VCR, reset •TV / VIDEO to •TV. 2 Hold down ?/1, and enter your TV's code number using the number buttons. continued Setting up the remote commander 9 Getting Started Notes • With normal use, the batteries should last about three to...
Now you do not use the remote commander for an extended period of time, remove the batteries to avoid possible damage from the sun or lighting apparatus. To control the VCR, reset •TV / VIDEO to •TV. 2 Hold down ?/1, and enter your TV's code number using the number buttons. continued Setting up the remote commander 9 Getting Started Notes • With normal use, the batteries should last about three to...

Operating Instructions (SLVN750)
Page 11
... use your VCR. Then follow the instructions for audio/video (A/V) hookup. After you have Antenna only, no cable TV No cable box or cable box with only a few scrambled channels Cable box with many ways in which your nearest Sony dealer or qualified technician. Note to CATV system installer (in particular, specifies that violates the regulations of the Federal Communications Commission regarding the use the Plug and Play...
... use your VCR. Then follow the instructions for audio/video (A/V) hookup. After you have Antenna only, no cable TV No cable box or cable box with only a few scrambled channels Cable box with many ways in which your nearest Sony dealer or qualified technician. Note to CATV system installer (in particular, specifies that violates the regulations of the Federal Communications Commission regarding the use the Plug and Play...

Operating Instructions (SLVN750)
Page 12
... to record regular or cable TV programs, complete these connections first, and then go to record programs, you finished setting up your VCR using these connections. A Use this hookup if your TV has stereo jacks VCR LINE LINE OUT IN 1 AUDIO VIDEO TV IN VIDEO AUDIO AUDIO OUT Stereo receiver AUX IN Audio/video cable (not supplied) Audio cable (not supplied) B Use this page. Audio/video (A/V) hookup If your TV has audio/video (A/V) input jacks, you will get a better picture and sound if you hook up the VCR after...
... to record regular or cable TV programs, complete these connections first, and then go to record programs, you finished setting up your VCR using these connections. A Use this hookup if your TV has stereo jacks VCR LINE LINE OUT IN 1 AUDIO VIDEO TV IN VIDEO AUDIO AUDIO OUT Stereo receiver AUX IN Audio/video cable (not supplied) Audio cable (not supplied) B Use this page. Audio/video (A/V) hookup If your TV has audio/video (A/V) input jacks, you will get a better picture and sound if you hook up the VCR after...

Operating Instructions (SLVN750)
Page 14
... purchase the VCR. • Auto preset can be incorrectly set using a time signal provided by pressing x STOP on page 22. The clock is plugged into the AC outlet. If this happens, see "Presetting/disabling channels manually" on the VCR or remote commander during Auto preset. • Auto preset starts automatically only when you connect the AC power cord before the antenna connections are completed, the channels may...
... purchase the VCR. • Auto preset can be incorrectly set using a time signal provided by pressing x STOP on page 22. The clock is plugged into the AC outlet. If this happens, see "Presetting/disabling channels manually" on the VCR or remote commander during Auto preset. • Auto preset starts automatically only when you connect the AC power cord before the antenna connections are completed, the channels may...

Operating Instructions (SLVN750)
Page 16
... VCR or remote commander during Auto preset. • Auto preset starts automatically only when you plug in the display window. If the clock is completed, the current time appears in the AC power cord for 5 seconds or more with the VCR power turned off. 16 Hookups To change the on-screen display language to AC outlet The VCR starts presetting the clock and channels. To add or disable channels manually, see "Using Manual Clock Set...
... VCR or remote commander during Auto preset. • Auto preset starts automatically only when you plug in the display window. If the clock is completed, the current time appears in the AC power cord for 5 seconds or more with the VCR power turned off. 16 Hookups To change the on-screen display language to AC outlet The VCR starts presetting the clock and channels. To add or disable channels manually, see "Using Manual Clock Set...
Operating Instructions (SLVN750)
Page 24
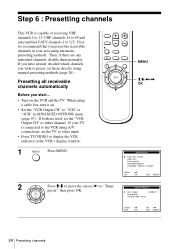
... "Tuner PLAY preset," then press OK. If your area using automatic presetting methods. OK MENU M/m/ Step 6 : Presetting channels This VCR is connected to the VCR using A/V connections, set the "VCR Output CH" to either channel. Presetting all receivable channels automatically Before you wish to preset, set them manually. Then, if there are used, set the TV to video input. • Press TV/VIDEO to 125. If both are any unwanted channels, disable them directly using a cable box, turn...
... "Tuner PLAY preset," then press OK. If your area using automatic presetting methods. OK MENU M/m/ Step 6 : Presetting channels This VCR is connected to the VCR using A/V connections, set the "VCR Output CH" to either channel. Presetting all receivable channels automatically Before you wish to preset, set them manually. Then, if there are used, set the TV to video input. • Press TV/VIDEO to 125. If both are any unwanted channels, disable them directly using a cable box, turn...

Operating Instructions (SLVN750)
Page 30
... in the VCR (either VHS or S-VHS). When S-VHS tapes are played in the VCR, the enhanced resolution will not record in S-VHS mode on an S-VHS tape. 30 Playing a tape there may also be guaranteed. • While displaying a menu on the TV screen, you cannot use the time counter Press CLEAR at the point on the tape that you insert a tape with its safety tab removed, set "Auto play" in the ADVANCED OPTIONS menu correctly (page...
... in the VCR (either VHS or S-VHS). When S-VHS tapes are played in the VCR, the enhanced resolution will not record in S-VHS mode on an S-VHS tape. 30 Playing a tape there may also be guaranteed. • While displaying a menu on the TV screen, you cannot use the time counter Press CLEAR at the point on the tape that you insert a tape with its safety tab removed, set "Auto play" in the ADVANCED OPTIONS menu correctly (page...
Operating Instructions (SLVN750)
Page 33
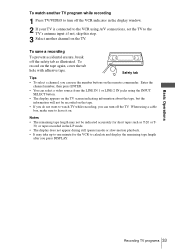
... connected to the VCR using the INPUT SELECT button. • The display appears on the TV screen indicating information about the tape, but the information will not be indicated accurately for short tapes such as illustrated. Safety tab Tips • To select a channel, you can turn off the TV. Basic Operations Recording TV programs 33 Enter the channel number, then press ENTER. • You can select a video...
... connected to the VCR using the INPUT SELECT button. • The display appears on the TV screen indicating information about the tape, but the information will not be indicated accurately for short tapes such as illustrated. Safety tab Tips • To select a channel, you can turn off the TV. Basic Operations Recording TV programs 33 Enter the channel number, then press ENTER. • You can select a video...

Operating Instructions (SLVN750)
Page 36
... the display window even if no tape is inserted before a timer recording begins, just press ?/1. t SAT'S t 1 month later t (dates count down) t the current date To use the Auto Tape Speed function When you can also do the following tasks while the VCR is automatically changed . To use the VCR after using the VCR. Daily/weekly recording In step 4, press m to the timer recording standby mode after setting the timer To use the number buttons. •...
... the display window even if no tape is inserted before a timer recording begins, just press ?/1. t SAT'S t 1 month later t (dates count down) t the current date To use the Auto Tape Speed function When you can also do the following tasks while the VCR is automatically changed . To use the VCR after using the VCR. Daily/weekly recording In step 4, press m to the timer recording standby mode after setting the timer To use the number buttons. •...

Operating Instructions (SLVN750)
Page 43
... VCR records only the main sound. The sound will be recorded in monaural (on a video tape The VCR records sound onto two separate tracks. Selecting the sound during playback During playback, press AUDIO MONITOR to display STEREO on the TV screen. Additional Operations Recording stereo and bilingual programs Recording stereo programs When you receive a program broadcast in stereo, press AUDIO MONITOR to select the sound you play a tape in stereo, you must use the A/V connections. • When you want. When MAIN is noise in the stereo program, select MONO. Recording stereo...
... VCR records only the main sound. The sound will be recorded in monaural (on a video tape The VCR records sound onto two separate tracks. Selecting the sound during playback During playback, press AUDIO MONITOR to display STEREO on the TV screen. Additional Operations Recording stereo and bilingual programs Recording stereo programs When you receive a program broadcast in stereo, press AUDIO MONITOR to select the sound you play a tape in stereo, you must use the A/V connections. • When you want. When MAIN is noise in the stereo program, select MONO. Recording stereo...

Operating Instructions (SLVN750)
Page 52
... occurred. The picture is not locked. buttons. • The video heads are using a monitor, set to video input. • Adjust the tracking with the INPUT SELECT or CH +/- buttons. If you are dirty (see the last page of "Troubleshooting"). Remedy • Connect the AC power cord securely. • Make sure the VCR is not clear. Select a channel number when recording TV programs; To unlock, hold control on the TV screen. The picture has no sound. The tape starts playing as soon...
... occurred. The picture is not locked. buttons. • The video heads are using a monitor, set to video input. • Adjust the tracking with the INPUT SELECT or CH +/- buttons. If you are dirty (see the last page of "Troubleshooting"). Remedy • Connect the AC power cord securely. • Make sure the VCR is not clear. Select a channel number when recording TV programs; To unlock, hold control on the TV screen. The picture has no sound. The tape starts playing as soon...

Operating Instructions (SLVN750)
Page 53
... Information Troubleshooting 53 Timer recording Others Symptom The timer does not operate. The tracking meter does not appear on . • The clock stops if the VCR is turned on the screen. Reset the clock and timer. • Turn the power off and unplug the AC power cord. • Check that the cable box is disconnected from the wall outlet for timer recording. • Make sure your TV's code number. The VCR needs to be inserted. The remote...
... Information Troubleshooting 53 Timer recording Others Symptom The timer does not operate. The tracking meter does not appear on . • The clock stops if the VCR is turned on the screen. Reset the clock and timer. • Turn the power off and unplug the AC power cord. • Check that the cable box is disconnected from the wall outlet for timer recording. • Make sure your TV's code number. The VCR needs to be inserted. The remote...

Operating Instructions (SLVN750)
Page 54
... (2) Standard output: 327 mVrms Load impedance: 47 kilohms Output impedance: less than 10 kilohms Timer section Clock Quartz locked Timer indication 12-hour cycle Timer setting 8 programs (max.) General Power requirements 120 V AC, 60 Hz Power consumption 16 W Operating temperature 0°C to 45°C (32°F to 113°F) Storage temperature -20°C to 60°C (-4°F to 140°F) Dimensions including projecting parts and controls (w/h/d) SLV-N750 Approx...
... (2) Standard output: 327 mVrms Load impedance: 47 kilohms Output impedance: less than 10 kilohms Timer section Clock Quartz locked Timer indication 12-hour cycle Timer setting 8 programs (max.) General Power requirements 120 V AC, 60 Hz Power consumption 16 W Operating temperature 0°C to 45°C (32°F to 113°F) Storage temperature -20°C to 60°C (-4°F to 140°F) Dimensions including projecting parts and controls (w/h/d) SLV-N750 Approx...

Operating Instructions (SLVN750)
Page 60
Index A Adjusting picture 46 tracking 46 Advanced option 47 Antenna hookup 13 Audio track 43 Audio/video (A/V) hookup 12 Auto Clock Set 19 Auto Tape Speed 36 C Cable hookup 11 Child Lock 37 Cleaning the video heads 52 Clock setting 19 Commercial Skip 29 Connecting Cable TV 17 external antenna connector 51 UHF/VHF band mixer 51 Counter 30 D Disabling channels 26 Dubbing. see Adjusting Tuner presetting 24 60 Index see Editing E Editing 49 EP mode 32 H Hi-fi audio track 43 L Language...
Index A Adjusting picture 46 tracking 46 Advanced option 47 Antenna hookup 13 Audio track 43 Audio/video (A/V) hookup 12 Auto Clock Set 19 Auto Tape Speed 36 C Cable hookup 11 Child Lock 37 Cleaning the video heads 52 Clock setting 19 Commercial Skip 29 Connecting Cable TV 17 external antenna connector 51 UHF/VHF band mixer 51 Counter 30 D Disabling channels 26 Dubbing. see Adjusting Tuner presetting 24 60 Index see Editing E Editing 49 EP mode 32 H Hi-fi audio track 43 L Language...

Operating Instructions (SLVN750)
Page 64
... record a program 1 Press MENU and select "Timer set /check." 4 Set the channel, time, date, and tape speed. 5 Press OK. 6 Insert a tape. 7 Press ?/1 to turn off the VCR. Hookup 3 To play a tape 1 Set the TV to channel 3 or 4 (or to video input, if you made A/V connections). 2 Insert a tape and press H PLAY. Sony Corporation Printed in the display window turns off the VCR. If there is no picture on the cable box. 2 Set the cable box to the channel you want to record. 3 Press MENU and select "Timer set /check." 2 Set the channel, time, date...
... record a program 1 Press MENU and select "Timer set /check." 4 Set the channel, time, date, and tape speed. 5 Press OK. 6 Insert a tape. 7 Press ?/1 to turn off the VCR. Hookup 3 To play a tape 1 Set the TV to channel 3 or 4 (or to video input, if you made A/V connections). 2 Insert a tape and press H PLAY. Sony Corporation Printed in the display window turns off the VCR. If there is no picture on the cable box. 2 Set the cable box to the channel you want to record. 3 Press MENU and select "Timer set /check." 2 Set the channel, time, date...
Marketing Specifications (SLVN750)
Page 2
... Input(s): 1 (Rear) RCA Audio Output(s): 1 (Rear) RF Connection Input(s): 1 (Rear) RF Connection Output(s): 1 (Rear) Analog Audio Input(s) (Total): 2 (1 Front, 1 Rear) Power Power Requirements: AC120V, 60 Hz Hardware Remote Control: Yes (Cinema Illumination Multi-Brand TV) Display: 17" Regulation and Standard Compliance Energy Star® Compliant: Yes Supplied Accessories Instruction Manual Multi-Brand Remote Control Size AA (R6) Batteries (2) 75-Ohm Coaxial Video Cable w/F Type Connector (1) RF Cable Color: Silver UPC Code: 027242643949 ©2009 Sony Electronics Inc. Nonmetric weights...
... Input(s): 1 (Rear) RCA Audio Output(s): 1 (Rear) RF Connection Input(s): 1 (Rear) RF Connection Output(s): 1 (Rear) Analog Audio Input(s) (Total): 2 (1 Front, 1 Rear) Power Power Requirements: AC120V, 60 Hz Hardware Remote Control: Yes (Cinema Illumination Multi-Brand TV) Display: 17" Regulation and Standard Compliance Energy Star® Compliant: Yes Supplied Accessories Instruction Manual Multi-Brand Remote Control Size AA (R6) Batteries (2) 75-Ohm Coaxial Video Cable w/F Type Connector (1) RF Cable Color: Silver UPC Code: 027242643949 ©2009 Sony Electronics Inc. Nonmetric weights...


