Warranty Card
Page 1
3-081-170-02 ® VCR LIMITED WARRANTY Sony Electronics Inc. ("Sony") warrants this Product is determined to be defective, Sony will replace the Product with refurbished Product), at 1-800-VHS-SONY for a replacement fee. Please contact Sony at its option, for warranty replacement fee information. ... to obtain warranty service. In addition, for product information or operation, call: Sony VCR Customer Information Services Center 1-800-VHS-SONY Or Visit Sony VHS Service Website: www.sony.com/vcrhelp For an accessory or part not available from the date of incidental or...
3-081-170-02 ® VCR LIMITED WARRANTY Sony Electronics Inc. ("Sony") warrants this Product is determined to be defective, Sony will replace the Product with refurbished Product), at 1-800-VHS-SONY for a replacement fee. Please contact Sony at its option, for warranty replacement fee information. ... to obtain warranty service. In addition, for product information or operation, call: Sony VCR Customer Information Services Center 1-800-VHS-SONY Or Visit Sony VHS Service Website: www.sony.com/vcrhelp For an accessory or part not available from the date of incidental or...

Operating Instructions (SLVN750)
Page 1
..., Toronto, Ontario, M2H 3R6 SLV-N750 SLV-N650 © 2004 Sony Corporation 3-089-903-11 (1) US Video Cassette Recorder Operating Instructions For customers in Canada If this product, visit: www.sony.com/productregistration For all other product... related questions please contact our Customer Information Service Centre at 1-877-899-7669 or write to common problems and service information can be found at www.sony.com/vcrhelp or contact Sony VCR...
..., Toronto, Ontario, M2H 3R6 SLV-N750 SLV-N650 © 2004 Sony Corporation 3-089-903-11 (1) US Video Cassette Recorder Operating Instructions For customers in Canada If this product, visit: www.sony.com/productregistration For all other product... related questions please contact our Customer Information Service Centre at 1-877-899-7669 or write to common problems and service information can be found at www.sony.com/vcrhelp or contact Sony VCR...

Operating Instructions (SLVN750)
Page 2
... directly from a cold to a warm location, moisture may condense inside the VCR and cause damage to insert the plug fully into the power outlet only one... that may be operated in a horizontal position only. • Keep the unit and cassettes away from equipment with liquids, such as vases, on the unit. • If the... for the purpose of safety and will fit into the outlet, contact your Sony dealer. If you move it from a cold to rain or moisture. It...When you first install the unit, or when you are unable to the video head and tape. To prevent fire or shock hazard, do not place objects...
... directly from a cold to a warm location, moisture may condense inside the VCR and cause damage to insert the plug fully into the power outlet only one... that may be operated in a horizontal position only. • Keep the unit and cassettes away from equipment with liquids, such as vases, on the unit. • If the... for the purpose of safety and will fit into the outlet, contact your Sony dealer. If you move it from a cold to rain or moisture. It...When you first install the unit, or when you are unable to the video head and tape. To prevent fire or shock hazard, do not place objects...

Operating Instructions (SLVN750)
Page 6
... Changing menu options 49 Editing with another VCR Additional Information 51 Antenna information 52 Troubleshooting 54 Specifications 55 Index to parts and controls 60 Index Back Cover Quick reference to using the VCR Caution Television programs, films, video tapes and other materials may be copyrighted. Unauthorized recording of such material may be contrary to...
... Changing menu options 49 Editing with another VCR Additional Information 51 Antenna information 52 Troubleshooting 54 Specifications 55 Index to parts and controls 60 Index Back Cover Quick reference to using the VCR Caution Television programs, films, video tapes and other materials may be copyrighted. Unauthorized recording of such material may be contrary to...

Operating Instructions (SLVN750)
Page 7
Getting Started Getting Started Step 1 : Unpacking Check that you have received the following items with the VCR: • Remote commander • Size AA (R6) batteries • 75-ohm coaxial cable with F-type connectors Note • The supplied remote commander is the model used for the 2 models: SLV-N750 and SLV-N650. SLV-N750 is for the exclusive use of your model name The instructions in this VCR. Check your model name by looking at the rear panel of this manual are for illustration purposes. Unpacking 7 Check your VCR.
Getting Started Getting Started Step 1 : Unpacking Check that you have received the following items with the VCR: • Remote commander • Size AA (R6) batteries • 75-ohm coaxial cable with F-type connectors Note • The supplied remote commander is the model used for the 2 models: SLV-N750 and SLV-N650. SLV-N750 is for the exclusive use of your model name The instructions in this VCR. Check your model name by looking at the rear panel of this manual are for illustration purposes. Unpacking 7 Check your VCR.

Operating Instructions (SLVN750)
Page 8
Using the remote commander You can be used to operate your Sony TV. Buttons on the batteries to VIDEO and point at the remote sensor at the VCR •TV and point at the remote sensor at the TV 8 Setting up the remote commander Inserting the batteries Insert two size AA (R6) batteries .... on the remote commander marked with a dot (•) can use this remote commander to operate this remote commander will not operate the TV. •TV / VIDEO Remote sensor To operate the VCR a Sony TV 123 456 Set •TV / VIDEO to the diagram inside the battery compartment.
Using the remote commander You can be used to operate your Sony TV. Buttons on the batteries to VIDEO and point at the remote sensor at the VCR •TV and point at the remote sensor at the TV 8 Setting up the remote commander Inserting the batteries Insert two size AA (R6) batteries .... on the remote commander marked with a dot (•) can use this remote commander to operate this remote commander will not operate the TV. •TV / VIDEO Remote sensor To operate the VCR a Sony TV 123 456 Set •TV / VIDEO to the diagram inside the battery compartment.

Operating Instructions (SLVN750)
Page 9
... to control your TV's code number using the number buttons. Doing so may cause a malfunction. Then release ?/1. To control the VCR, reset •TV / VIDEO to control a Sony TV. continued Setting up the remote commander 9 Now you do not use the remote commander for an extended period of the remote commander to •...
... to control your TV's code number using the number buttons. Doing so may cause a malfunction. Then release ?/1. To control the VCR, reset •TV / VIDEO to control a Sony TV. continued Setting up the remote commander 9 Now you do not use the remote commander for an extended period of the remote commander to •...

Operating Instructions (SLVN750)
Page 10
TV brand Sony Akai AOC Centurion Coronado Curtis-Mathes Daytron Emerson Fisher General Electric Hitachi J.C.Penney JVC KMC LG/Gold Star Magnavox Marantz MGA/Mitsubishi NEC Code number ...; When you replace the batteries of controllable TVs If more than one code number is listed, try entering them one programed to work with the VCR, you cannot control your TV. To exit the TV menu, press the MENU button on the TV screen. Set the appropriate code number every time...
TV brand Sony Akai AOC Centurion Coronado Curtis-Mathes Daytron Emerson Fisher General Electric Hitachi J.C.Penney JVC KMC LG/Gold Star Magnavox Marantz MGA/Mitsubishi NEC Code number ...; When you replace the batteries of controllable TVs If more than one code number is listed, try entering them one programed to work with the VCR, you cannot control your TV. To exit the TV menu, press the MENU button on the TV screen. Set the appropriate code number every time...

Operating Instructions (SLVN750)
Page 11
Getting Started Step 3 : Hookups Selecting the best hookup option There are ready to use your VCR. If your TV has audio/video inputs, refer to page 12 for you are many scrambled channels Use Hookup 1 (Plug and Play) Hookup 2 (Plug and Play) Hookup 3 Refer to Pages...the connections are completed. Loose connections may cause picture distortion. • If your nearest Sony dealer or qualified technician. Failure to do so may not be able to set up . To hook up your VCR so that violates the regulations of the Federal Communications Commission regarding the use and operation of...
Getting Started Step 3 : Hookups Selecting the best hookup option There are ready to use your VCR. If your TV has audio/video inputs, refer to page 12 for you are many scrambled channels Use Hookup 1 (Plug and Play) Hookup 2 (Plug and Play) Hookup 3 Refer to Pages...the connections are completed. Loose connections may cause picture distortion. • If your nearest Sony dealer or qualified technician. Failure to do so may not be able to set up . To hook up your VCR so that violates the regulations of the Federal Communications Commission regarding the use and operation of...

Operating Instructions (SLVN750)
Page 12
...AUDIO IN jack on this hookup if your VCR or TV to the following pages for antenna or cable hookups. Audio/video (A/V) hookup If your TV has audio/video (A/V) input jacks, you will get a better picture and sound if you want to record regular or cable TV programs, complete these connections...not have a stereo receiver, connect the white LINE OUT/AUDIO L jack to record programs, you finished setting up your TV. 12 Hookups For a true "home theater" experience, you have made the connections shown on your VCR using these connections first, and then go to your stereo system. A Use ...
...AUDIO IN jack on this hookup if your VCR or TV to the following pages for antenna or cable hookups. Audio/video (A/V) hookup If your TV has audio/video (A/V) input jacks, you will get a better picture and sound if you want to record regular or cable TV programs, complete these connections...not have a stereo receiver, connect the white LINE OUT/AUDIO L jack to record programs, you finished setting up your TV. 12 Hookups For a true "home theater" experience, you have made the connections shown on your VCR using these connections first, and then go to your stereo system. A Use ...
Operating Instructions (SLVN750)
Page 13
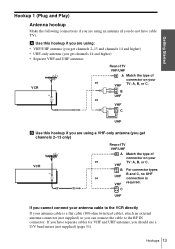
A Use this hookup if you are using a VHF-only antenna (you get channels 14 and higher) • Separate VHF and UHF antennas VCR IN OUT Rear of TV VHF/UHF A Match the type of connector on your or VHF TV: A, B, or C. C UHF If you cannot connect your antenna ... you are using: • VHF/UHF antenna (you get channels 2-13 and channels 14 and higher) • UHF-only antenna (you get channels 2-13 only) VCR IN OUT Rear of TV VHF/UHF A Match the type of connector on your or TV: A, B, or C. B UHF or VHF C UHF B Use this hookup if...
A Use this hookup if you are using a VHF-only antenna (you get channels 14 and higher) • Separate VHF and UHF antennas VCR IN OUT Rear of TV VHF/UHF A Match the type of connector on your or VHF TV: A, B, or C. C UHF If you cannot connect your antenna ... you are using: • VHF/UHF antenna (you get channels 2-13 and channels 14 and higher) • UHF-only antenna (you get channels 2-13 only) VCR IN OUT Rear of TV VHF/UHF A Match the type of connector on your or TV: A, B, or C. B UHF or VHF C UHF B Use this hookup if...

Operating Instructions (SLVN750)
Page 14
...Presetting/disabling channels manually" on page 26. To add or disable channels manually, see "Step 4 : Selecting a language" on the VCR continuously for 5 seconds or more with the VCR power turned off. 14 Hookups When Auto preset is incorrect, or "--:--" appears in the display window, see "Step 6 : Presetting ... power cord before the antenna connections are completed, the channels may be performed by some TV channels. Notes • If you purchase the VCR. • Auto preset can be incorrectly set using a time signal provided by pressing x STOP on page 18. To change the on ...
...Presetting/disabling channels manually" on page 26. To add or disable channels manually, see "Step 4 : Selecting a language" on the VCR continuously for 5 seconds or more with the VCR power turned off. 14 Hookups When Auto preset is incorrect, or "--:--" appears in the display window, see "Step 6 : Presetting ... power cord before the antenna connections are completed, the channels may be performed by some TV channels. Notes • If you purchase the VCR. • Auto preset can be incorrectly set using a time signal provided by pressing x STOP on page 18. To change the on ...

Operating Instructions (SLVN750)
Page 15
Cable box IN OUT Rear of TV VHF/UHF A Match the type of connector or on the VCR What you cannot do • Record scrambled channels that require a cable box Wall VCR IN OUT Connect this hookup if you do not have a cable box. B For connector or UHF types B and C, no ...cable box, or a cable box with this hookup • Record any unscrambled channel by selecting the channel on...
Cable box IN OUT Rear of TV VHF/UHF A Match the type of connector or on the VCR What you cannot do • Record scrambled channels that require a cable box Wall VCR IN OUT Connect this hookup if you do not have a cable box. B For connector or UHF types B and C, no ...cable box, or a cable box with this hookup • Record any unscrambled channel by selecting the channel on...

Operating Instructions (SLVN750)
Page 16
..." on page 22. To add or disable channels manually, see "Step 6 : Presetting channels" on page 24. • Do not press any buttons on the VCR or remote commander during Auto preset. • Auto preset starts automatically only when you plug in the display window. AC power cord to French or... Spanish, see "Using Manual Clock Set" on page 18. Notes • If you purchase the VCR. • Auto preset can be incorrectly set using a time signal provided by pressing x STOP on page 26. If this happens, see "Presetting/disabling ...
..." on page 22. To add or disable channels manually, see "Step 6 : Presetting channels" on page 24. • Do not press any buttons on the VCR or remote commander during Auto preset. • Auto preset starts automatically only when you plug in the display window. AC power cord to French or... Spanish, see "Using Manual Clock Set" on page 18. Notes • If you purchase the VCR. • Auto preset can be incorrectly set using a time signal provided by pressing x STOP on page 26. If this happens, see "Presetting/disabling ...

Operating Instructions (SLVN750)
Page 17
... channel by selecting the channel on the cable box What you cannot do • Record with many scrambled channels Recommended use Use this hookup if your or TV: A, B, or C. AC power cord to AC outlet Hookups 17 VHF C UHF After ...you have completed hookup... Getting Started Hookup 3 Connecting a cable box with the cable box turned off • Record one channel while watching another channel Wall Cable box IN OUT VCR IN OUT Rear of TV VHF/UHF A Match the type of connector on your cable system scrambles all or most...
... channel by selecting the channel on the cable box What you cannot do • Record with many scrambled channels Recommended use Use this hookup if your or TV: A, B, or C. AC power cord to AC outlet Hookups 17 VHF C UHF After ...you have completed hookup... Getting Started Hookup 3 Connecting a cable box with the cable box turned off • Record one channel while watching another channel Wall Cable box IN OUT VCR IN OUT Rear of TV VHF/UHF A Match the type of connector on your cable system scrambles all or most...
Operating Instructions (SLVN750)
Page 18
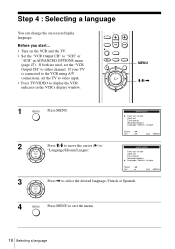
...Quit : MENU 3 Press , to "3CH" or "4CH" in the VCR's display window. If your TV is connected to the VCR using A/V connections, set the "VCR Output CH" to PLAY "Language/Idioma/Langue." MENU M/m/, 1 MENU Press MENU.... PLAY OK 4 MENU Press MENU to display the VCR indicator in ADVANCED OPTIONS menu (page 47). OK MAIN MENU Timer set / check Clock... to either channel. Step 4 : Selecting a language You can change the on the VCR and the TV. • Set the "VCR Output CH" to select the desired language, French or Spanish. If both are used, set ...
...Quit : MENU 3 Press , to "3CH" or "4CH" in the VCR's display window. If your TV is connected to the VCR using A/V connections, set the "VCR Output CH" to PLAY "Language/Idioma/Langue." MENU M/m/, 1 MENU Press MENU.... PLAY OK 4 MENU Press MENU to display the VCR indicator in ADVANCED OPTIONS menu (page 47). OK MAIN MENU Timer set / check Clock... to either channel. Step 4 : Selecting a language You can change the on the VCR and the TV. • Set the "VCR Output CH" to select the desired language, French or Spanish. If both are used, set ...
Operating Instructions (SLVN750)
Page 19
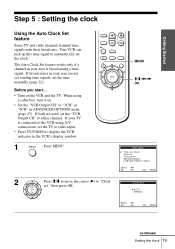
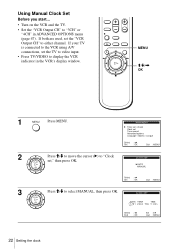
... OPTIONS menu (page 47). PLAY OK MENU M/m/ When using A/V connections, set the TV to video input. • Press TV/VIDEO to "Clock set the time manually (page 22). Before you start... • Turn on . • Set the "VCR Output CH" to "3CH" or "4CH" in your area is connected to the... VCR using a cable box, turn it on the VCR and the TV. Getting Started Step 5 : Setting the...
... OPTIONS menu (page 47). PLAY OK MENU M/m/ When using A/V connections, set the TV to video input. • Press TV/VIDEO to "Clock set the time manually (page 22). Before you start... • Turn on . • Set the "VCR Output CH" to "3CH" or "4CH" in your area is connected to the... VCR using a cable box, turn it on the VCR and the TV. Getting Started Step 5 : Setting the...
Operating Instructions (SLVN750)
Page 20
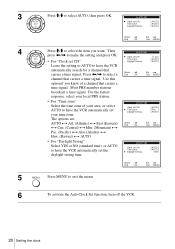
Then CLOCK SET PLAY press PLAY OK CLOCK SET Clock set CH: Time zone: Daylight Saving: [ AUTO ] [ AUTO ] [ AUTO ] Select : Vv End : OK Set : Bb Quit : MENU 4 Press M/m to select AUTO, then press OK. 3 Press M/m to select the item you want.
Then CLOCK SET PLAY press PLAY OK CLOCK SET Clock set CH: Time zone: Daylight Saving: [ AUTO ] [ AUTO ] [ AUTO ] Select : Vv End : OK Set : Bb Quit : MENU 4 Press M/m to select AUTO, then press OK. 3 Press M/m to select the item you want.
Operating Instructions (SLVN750)
Page 22
... in ADVANCED OPTIONS menu (page 47). If your TV is connected to the VCR using A/V connections, set the TV to video input. • Press TV/VIDEO to either channel. MENU M/m/, OK 1 MENU Press MENU. MAIN MENU Timer set / check Clock set Tuner preset Advanced options Language / Idioma / Langue Select : Vv Set : ...
... in ADVANCED OPTIONS menu (page 47). If your TV is connected to the VCR using A/V connections, set the TV to video input. • Press TV/VIDEO to either channel. MENU M/m/, OK 1 MENU Press MENU. MAIN MENU Timer set / check Clock set Tuner preset Advanced options Language / Idioma / Langue Select : Vv Set : ...
Operating Instructions (SLVN750)
Page 24
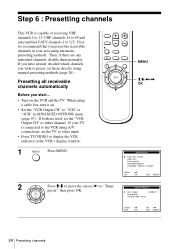
... the TV. If your area using automatic presetting methods. Then, if there are used, set the "VCR Output CH" to preset, set the TV to video input. • Press TV/VIDEO to display the VCR indicator in the VCR's display window. 1 MENU Press MENU. 2 Press M/m to move the cursor (B) to "3CH" ... which channels you wish to either channel. OK MENU M/m/ First, we recommend that you start... • Turn on . • Set the "VCR Output CH" to "Tuner PLAY preset," then press OK. If both are any unwanted channels, disable them directly using manual presetting methods (page 26)....
... the TV. If your area using automatic presetting methods. Then, if there are used, set the "VCR Output CH" to preset, set the TV to video input. • Press TV/VIDEO to display the VCR indicator in the VCR's display window. 1 MENU Press MENU. 2 Press M/m to move the cursor (B) to "3CH" ... which channels you wish to either channel. OK MENU M/m/ First, we recommend that you start... • Turn on . • Set the "VCR Output CH" to "Tuner PLAY preset," then press OK. If both are any unwanted channels, disable them directly using manual presetting methods (page 26)....


