Warranty Card
Page 1
... packaging offering an equal degree of protection directly to state. This warranty gives you specific legal rights, and you . 3-081-170-02 ® VCR LIMITED WARRANTY Sony Electronics Inc. ("Sony") warrants this Product (including any part of the Product, including the antenna. This warranty does not cover customer instruction, installation, set up adjustments or signal reception problems. This warranty does not cover cosmetic damage or damage...
... packaging offering an equal degree of protection directly to state. This warranty gives you specific legal rights, and you . 3-081-170-02 ® VCR LIMITED WARRANTY Sony Electronics Inc. ("Sony") warrants this Product (including any part of the Product, including the antenna. This warranty does not cover customer instruction, installation, set up adjustments or signal reception problems. This warranty does not cover cosmetic damage or damage...

Operating Instructions (primary manual)
Page 1
... USA If you have any questions about your Sony DVD-VCR, you may call Sony Customer Information Services Company at : Customer Information Service 115 Gordon Baker Road, Toronto, Ontario, M2H 3R6 SLV-D251P © 2004 Sony Corporation 2-050-773-13 (1) US DVD Player/ Video Cassette Recorder Operating Instructions For customers in Canada If this product is not working properly, please call Sony Customer Information Services Company at 1-800-222...
... USA If you have any questions about your Sony DVD-VCR, you may call Sony Customer Information Services Company at : Customer Information Service 115 Gordon Baker Road, Toronto, Ontario, M2H 3R6 SLV-D251P © 2004 Sony Corporation 2-050-773-13 (1) US DVD Player/ Video Cassette Recorder Operating Instructions For customers in Canada If this product is not working properly, please call Sony Customer Information Services Company at 1-800-222...
Operating Instructions (primary manual)
Page 2
... as it is brought directly from equipment with the limits for purchasing this manual thoroughly and retain it for future reference. Model No Serial No CAUTION You are cautioned that interference will increase eye hazard. Connect the equipment into an ...receiver. - Before operating this player, please read this Sony DVD Player/Video Cassette Recorder. WARNING Welcome! This symbol is harmful to eyes, do not intend to use of uninsulated "dangerous voltage" within the product's enclosure that to which can radiate radio frequency energy and, if not installed and used...
... as it is brought directly from equipment with the limits for purchasing this manual thoroughly and retain it for future reference. Model No Serial No CAUTION You are cautioned that interference will increase eye hazard. Connect the equipment into an ...receiver. - Before operating this player, please read this Sony DVD Player/Video Cassette Recorder. WARNING Welcome! This symbol is harmful to eyes, do not intend to use of uninsulated "dangerous voltage" within the product's enclosure that to which can radiate radio frequency energy and, if not installed and used...
Operating Instructions (primary manual)
Page 5
... prohibited. Use of contents 5 DVD Additional Operations 63 Using the DVD's menu 65 Zooming into a scene 66 Changing the angles 67 Displaying the subtitle 68 Various play mode functions (Program play, Shuffle play, Repeat play) 73 Changing the sound 74 Virtual surround setting 76 Playing an MP3 audio track 80 Playing JPEG image files 84 Playing VIDEO CDs with "PBC ON/ OFF" Functions VCR Additional Operations 86 Quick Timer Recording 87 Recording stereo and bilingual programs 88 Searching using various functions 90 Adjusting the picture (tracking) 91 Changing menu options...
... prohibited. Use of contents 5 DVD Additional Operations 63 Using the DVD's menu 65 Zooming into a scene 66 Changing the angles 67 Displaying the subtitle 68 Various play mode functions (Program play, Shuffle play, Repeat play) 73 Changing the sound 74 Virtual surround setting 76 Playing an MP3 audio track 80 Playing JPEG image files 84 Playing VIDEO CDs with "PBC ON/ OFF" Functions VCR Additional Operations 86 Quick Timer Recording 87 Recording stereo and bilingual programs 88 Searching using various functions 90 Adjusting the picture (tracking) 91 Changing menu options...
Operating Instructions (primary manual)
Page 9
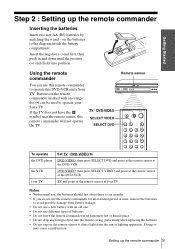
... not use different types of time, remove the batteries to DVD·VIDEO, then press SELECT DVD and point at the remote sensor at the DVD-VCR DVD·VIDEO, then press SELECT VIDEO and point at the remote sensor at the DVD-VCR TV and point at the remote sensor at your Sony TV. Getting Started Step 2 : Setting up the remote commander 9 TV / DVD·VIDEO SELECT VIDEO SELECT DVD Remote sensor To operate the DVD player the VCR your TV Set TV / DVD·VIDEO...
... not use different types of time, remove the batteries to DVD·VIDEO, then press SELECT DVD and point at the remote sensor at the DVD-VCR DVD·VIDEO, then press SELECT VIDEO and point at the remote sensor at the DVD-VCR TV and point at the remote sensor at your Sony TV. Getting Started Step 2 : Setting up the remote commander 9 TV / DVD·VIDEO SELECT VIDEO SELECT DVD Remote sensor To operate the DVD player the VCR your TV Set TV / DVD·VIDEO...
Operating Instructions (primary manual)
Page 17
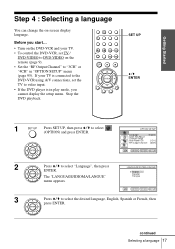
...TV to video input. • If the DVD player is connected to the DVD-VCR using A/V connections, set TV / DVD·VIDEO to DVD·VIDEO on -screen display language. SET UP V/v ENTER 1 Press SET UP, then press V/v to select "Language", then press LANGUAGE/IDIOMA/LANGUE ENTER. OPTION SETUP Language :English Clock Set/Adjust Channel Setup Auto Power Off [ Off ] RF Output Channel [3CH] V v ENTER RETURN SET UP 2 Press V/v to select (OPTION) and press ENTER. B English Español The "LANGUAGE/IDIOMA/LANGUE" Français menu appears. Stop the DVD playback...
...TV to video input. • If the DVD player is connected to the DVD-VCR using A/V connections, set TV / DVD·VIDEO to DVD·VIDEO on -screen display language. SET UP V/v ENTER 1 Press SET UP, then press V/v to select "Language", then press LANGUAGE/IDIOMA/LANGUE ENTER. OPTION SETUP Language :English Clock Set/Adjust Channel Setup Auto Power Off [ Off ] RF Output Channel [3CH] V v ENTER RETURN SET UP 2 Press V/v to select (OPTION) and press ENTER. B English Español The "LANGUAGE/IDIOMA/LANGUE" Français menu appears. Stop the DVD playback...
Operating Instructions (primary manual)
Page 19
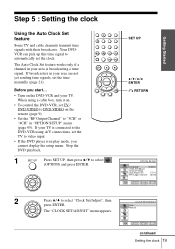
... display the setup menu. Stop the DVD playback. 1 Press SET UP, then press V/v to automatically set the clock. Auto Manual The "CLOCK SET/ADJUST" menu appears. Your DVDVCR can pick up this time signal to select (OPTION) and press ENTER. SET UP V/v/B/b ENTER O RETURN OPTION SETUP Language :English Clock Set/Adjust Channel Setup Auto Power Off [ Off ] RF Output Channel [3CH] V v ENTER RETURN SET UP 2 Press V/v to "3CH" or "4CH" in "OPTION SETUP" menu (page 95). When using A/V connections, set the time manually (page 21). If your area is in play mode...
... display the setup menu. Stop the DVD playback. 1 Press SET UP, then press V/v to automatically set the clock. Auto Manual The "CLOCK SET/ADJUST" menu appears. Your DVDVCR can pick up this time signal to select (OPTION) and press ENTER. SET UP V/v/B/b ENTER O RETURN OPTION SETUP Language :English Clock Set/Adjust Channel Setup Auto Power Off [ Off ] RF Output Channel [3CH] V v ENTER RETURN SET UP 2 Press V/v to "3CH" or "4CH" in "OPTION SETUP" menu (page 95). When using A/V connections, set the time manually (page 21). If your area is in play mode...
Operating Instructions (primary manual)
Page 21
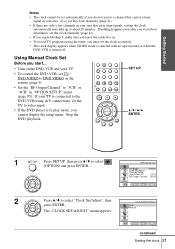
... when VIDEO mode is selected with no tape inserted or when the DVD-VCR is in your area that carries a time signal in play mode, you cannot display the setup menu. Auto Manual The "CLOCK SET/ADJUST" menu appears. If so, set the TV to "3CH" or "4CH" in your area. Using Manual Clock Set Before you wait about 20 minutes. SET UP V/v/B/b ENTER 1 Press SET UP, then press V/v to select "Clock Set/Adjust", then CLOCK SET/ADJUST press ENTER. Stop the DVD playback. OPTION SETUP Language :English Clock Set/Adjust Channel Setup Auto Power...
... when VIDEO mode is selected with no tape inserted or when the DVD-VCR is in your area that carries a time signal in play mode, you cannot display the setup menu. Auto Manual The "CLOCK SET/ADJUST" menu appears. If so, set the TV to "3CH" or "4CH" in your area. Using Manual Clock Set Before you wait about 20 minutes. SET UP V/v/B/b ENTER 1 Press SET UP, then press V/v to select "Clock Set/Adjust", then CLOCK SET/ADJUST press ENTER. Stop the DVD playback. OPTION SETUP Language :English Clock Set/Adjust Channel Setup Auto Power...
Operating Instructions (primary manual)
Page 23
... DVD-VCR using A/V connections, set TV / DVD·VIDEO to 125. Then, if there are any unwanted channels, disable them directly using a cable box, turn it on. • To control the DVD-VCR, set the TV to video input. • If the DVD player is capable of receiving VHF channels 2 to 13, UHF channels 14 to 69 and unscrambled CATV channels 1 to DVD·VIDEO on the DVD-VCR and your area using automatic presetting methods. When using manual presetting methods (page 25). Stop...
... DVD-VCR using A/V connections, set TV / DVD·VIDEO to 125. Then, if there are any unwanted channels, disable them directly using a cable box, turn it on. • To control the DVD-VCR, set the TV to video input. • If the DVD player is capable of receiving VHF channels 2 to 13, UHF channels 14 to 69 and unscrambled CATV channels 1 to DVD·VIDEO on the DVD-VCR and your area using automatic presetting methods. When using manual presetting methods (page 25). Stop...

Operating Instructions (primary manual)
Page 25
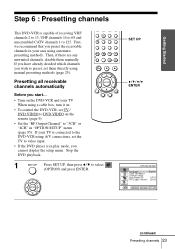
... setup menu. Number buttons SET UP V/v/B/b ENTER O RETURN 1 Press SET UP, then press V/v to select "Channel Add/Delete," then press ENTER. Auto Channel Memory Channel Add/Delete Guide Channel Setup VvBb RETURN SET UP 3 Press V/v to select (OPTION) and press ENTER. CH +/- If your TV is in "OPTION SETUP" menu (page 95). OPTION SETUP Language :English Clock Set/Adjust Channel Setup Auto Power Off [ Off ] RF Output Channel [3CH] V v ENTER RETURN SET UP 2 Press V/v to video input. • If the DVD player is connected to the DVD-VCR using a cable box, turn...
... setup menu. Number buttons SET UP V/v/B/b ENTER O RETURN 1 Press SET UP, then press V/v to select "Channel Add/Delete," then press ENTER. Auto Channel Memory Channel Add/Delete Guide Channel Setup VvBb RETURN SET UP 3 Press V/v to select (OPTION) and press ENTER. CH +/- If your TV is in "OPTION SETUP" menu (page 95). OPTION SETUP Language :English Clock Set/Adjust Channel Setup Auto Power Off [ Off ] RF Output Channel [3CH] V v ENTER RETURN SET UP 2 Press V/v to video input. • If the DVD player is connected to the DVD-VCR using a cable box, turn...
Operating Instructions (primary manual)
Page 28
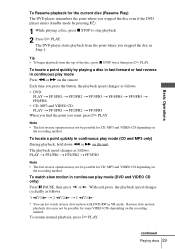
... play mode*2 (Instant Replay) REPLAY Briefly fast forward the current scene in continuous play mode*3 (Instant Advance) SKIP Stop play and remove the disc Z *1 If you pause the DVD player for more than 5 minutes, the DVD player will automatically stop. *2 For DVD VIDEOs and the DVD-RWs/DVD-Rs only *3 For DVD VIDEOs and the DVD-RWs/DVD-Rs or DVD+RWs/DVD+Rs only Tips • The Instant Replay function is useful when you want to review...
... play mode*2 (Instant Replay) REPLAY Briefly fast forward the current scene in continuous play mode*3 (Instant Advance) SKIP Stop play and remove the disc Z *1 If you pause the DVD player for more than 5 minutes, the DVD player will automatically stop. *2 For DVD VIDEOs and the DVD-RWs/DVD-Rs only *3 For DVD VIDEOs and the DVD-RWs/DVD-Rs or DVD+RWs/DVD+Rs only Tips • The Instant Replay function is useful when you want to review...
Operating Instructions (primary manual)
Page 29
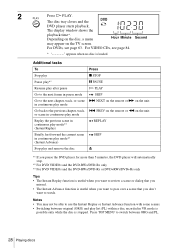
... Play) The DVD player remembers the point where you stopped the disc even if the DVD player enters standby mode by playing a disc in fast forward or fast reverse in continuous play mode (CD and MP3 only) During playback, hold down m or M on the unit. To resume normal playback, press H PLAY. continued Playing discs 29 Basic Operations To Resume playback for some VIDEO CDs depending on the recording method. Each time you press the button, the playback speed changes...
... Play) The DVD player remembers the point where you stopped the disc even if the DVD player enters standby mode by playing a disc in fast forward or fast reverse in continuous play mode (CD and MP3 only) During playback, hold down m or M on the unit. To resume normal playback, press H PLAY. continued Playing discs 29 Basic Operations To Resume playback for some VIDEO CDs depending on the recording method. Each time you press the button, the playback speed changes...
Operating Instructions (primary manual)
Page 30
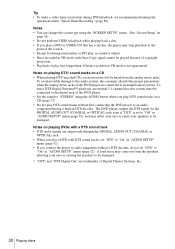
... Digital Surround™ playback, an external 5.1-channel decoder system must be connected to the digital jack of the DVD player. • Set the sound to "STEREO" using the "SCREEN SETUP" menu. (See "Screen Setup" on playing DVDs with a DTS sound track • DTS audio signals are output only through the DIGITAL AUDIO OUT (COAXIAL or OPTICAL) jack. • When you play a DVD with Once Copy signal cannot be played because of copyright protection. • Playback of Digital Theater Systems, Inc. 30 Playing discs...
... Digital Surround™ playback, an external 5.1-channel decoder system must be connected to the digital jack of the DVD player. • Set the sound to "STEREO" using the "SCREEN SETUP" menu. (See "Screen Setup" on playing DVDs with a DTS sound track • DTS audio signals are output only through the DIGITAL AUDIO OUT (COAXIAL or OPTICAL) jack. • When you play a DVD with Once Copy signal cannot be played because of copyright protection. • Playback of Digital Theater Systems, Inc. 30 Playing discs...
Operating Instructions (primary manual)
Page 41
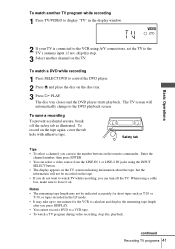
... the disc tray. 3 Press H PLAY. continued Recording TV programs 41 To save a recording To prevent accidental erasure, break off the TV. When using the INPUT SELECT button. • The display appears on the TV screen indicating information about the tape, but the information will automatically change to control the DVD player. 2 Press Z and place the disc on the remote commander. Enter the channel number, then press ENTER. • You can select a video...
... the disc tray. 3 Press H PLAY. continued Recording TV programs 41 To save a recording To prevent accidental erasure, break off the TV. When using the INPUT SELECT button. • The display appears on the TV screen indicating information about the tape, but the information will automatically change to control the DVD player. 2 Press Z and place the disc on the remote commander. Enter the channel number, then press ENTER. • You can select a video...
Operating Instructions (primary manual)
Page 42
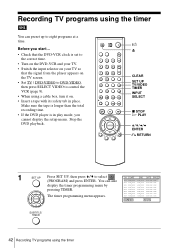
... that the signal from the player appears on the TV screen. • Set TV / DVD·VIDEO to DVD·VIDEO, then press SELECT VIDEO to control the VCR (page 9). • When using the timer Stop the DVD playback. ?/1 Z CLEAR SET UP TV/VIDEO TIMER INPUT SELECT x STOP H PLAY V/v/B/b ENTER O RETURN 1 Press SET UP, then press V/v to eight programs at a time. VvBb RETURN 42 Recording TV programs using a cable box, turn it on. • Insert a tape with its safety tab in play mode, you start...
... that the signal from the player appears on the TV screen. • Set TV / DVD·VIDEO to DVD·VIDEO, then press SELECT VIDEO to control the VCR (page 9). • When using the timer Stop the DVD playback. ?/1 Z CLEAR SET UP TV/VIDEO TIMER INPUT SELECT x STOP H PLAY V/v/B/b ENTER O RETURN 1 Press SET UP, then press V/v to eight programs at a time. VvBb RETURN 42 Recording TV programs using a cable box, turn it on. • Insert a tape with its safety tab in play mode, you start...
Operating Instructions (primary manual)
Page 44
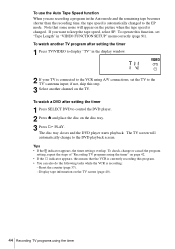
... programs using the timer" on page 42. • If the indicator appears, this function, set the TV to the TV's antenna input; Reset the counter (page 37). - To watch a DVD after setting the timer 1 Press TV/VIDEO to display "TV" in "VIDEO FUNCTION SETUP" menu correctly (page 91). To check, change to the DVD playback screen. Note that the VCR is currently recording this step. 3 Select another TV program after setting the timer 1 Press SELECT DVD to control the DVD player...
... programs using the timer" on page 42. • If the indicator appears, this function, set the TV to the TV's antenna input; Reset the counter (page 37). - To watch a DVD after setting the timer 1 Press TV/VIDEO to display "TV" in "VIDEO FUNCTION SETUP" menu correctly (page 91). To check, change to the DVD playback screen. Note that the VCR is currently recording this step. 3 Select another TV program after setting the timer 1 Press SELECT DVD to control the DVD player...
Operating Instructions (primary manual)
Page 45
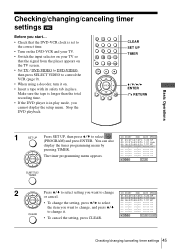
... 1 / 2 1 Auto display the timer programming menu by 0 6 0 6 3 2PM 0 8 3 2PM 1 / 2 1 EP pressing TIMER. VvBb RETURN Basic Operations 2 Press V/v to select setting you want to change it on. • Insert a tape with its safety tab in play mode, you cannot display the setup menu. Make sure the tape is longer than the total recording time. • If the DVD player is set to the correct time. • Turn on the DVD-VCR and your TV. • Switch the input...
... 1 / 2 1 Auto display the timer programming menu by 0 6 0 6 3 2PM 0 8 3 2PM 1 / 2 1 EP pressing TIMER. VvBb RETURN Basic Operations 2 Press V/v to select setting you want to change it on. • Insert a tape with its safety tab in play mode, you cannot display the setup menu. Make sure the tape is longer than the total recording time. • If the DVD player is set to the correct time. • Turn on the DVD-VCR and your TV. • Switch the input...
Operating Instructions (primary manual)
Page 51
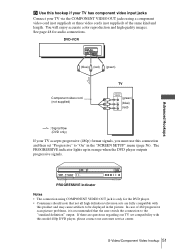
... the user switch the connection to the "standard definition" output. S-Video/Component Video hookup 51 The PROGRESSIVE indicator lights up in orange when the DVD player outputs progressive signals. In case of the same kind and length. B Use this hookup if your TV has component video input jacks Connect your TV accepts progressive (480p) format signals, you must use this connection and then set compatibility with this model 480p DVD player, please contact our customer service center. DVD-VCR (blue) (red) (green) Component video cord (not...
... the user switch the connection to the "standard definition" output. S-Video/Component Video hookup 51 The PROGRESSIVE indicator lights up in orange when the DVD player outputs progressive signals. In case of the same kind and length. B Use this hookup if your TV has component video input jacks Connect your TV accepts progressive (480p) format signals, you must use this connection and then set compatibility with this model 480p DVD player, please contact our customer service center. DVD-VCR (blue) (red) (green) Component video cord (not...
Operating Instructions (primary manual)
Page 101
...; The player cannot play . The JPEG image file cannot be played (page 76). Other characters are not finalized (page 7). • Make sure the TV / DVD·VIDEO switch is set correctly. • Select correctly VIDEO or DVD with the disc. Additional Information continued Troubleshooting 101 You cannot perform some operations. Playback stops automatically. Operation Symptom The disc does not play audio tracks in MP3PRO format. • The DATA CD is not recorded in...
...; The player cannot play . The JPEG image file cannot be played (page 76). Other characters are not finalized (page 7). • Make sure the TV / DVD·VIDEO switch is set correctly. • Select correctly VIDEO or DVD with the disc. Additional Information continued Troubleshooting 101 You cannot perform some operations. Playback stops automatically. Operation Symptom The disc does not play audio tracks in MP3PRO format. • The DATA CD is not recorded in...
Operating Instructions (primary manual)
Page 102
... changed. • Try using the DVD's menu instead of the direct selection button on the remote (page 63). • Multilingual subtitles are not recorded on the TV screen. • Make sure the TV is not clear. • Adjust the tracking with the INPUT SELECT or CH +/- Operation Symptom Remedy The language for the sound track cannot be changed. • Try using a Sony video head cleaning cassette. Clean the video heads using the DVD's menu instead of the direct selection button...
... changed. • Try using the DVD's menu instead of the direct selection button on the remote (page 63). • Multilingual subtitles are not recorded on the TV screen. • Make sure the TV is not clear. • Adjust the tracking with the INPUT SELECT or CH +/- Operation Symptom Remedy The language for the sound track cannot be changed. • Try using a Sony video head cleaning cassette. Clean the video heads using the DVD's menu instead of the direct selection button...


