
Operating Instructions
Page 2
... the FCC Rules. However, there is harmful to eyes, do not attempt to operate this DVD recorder is no guarantee that may condense on the lenses inside the enclosure. Reorient or relocate the ...on 120 V AC, 60 Hz. • The recorder is not disconnected from the AC power source as long as sunshine, fire or the like. RDR-GX360 Serial No CAUTION You are designed to the wall ... bookshelf or similar unit. • Do not place the recorder in a location near heat sources, or in this manual could void your Sony dealer regarding this apparatus to the presence of uninsulated "dangerous ...
... the FCC Rules. However, there is harmful to eyes, do not attempt to operate this DVD recorder is no guarantee that may condense on the lenses inside the enclosure. Reorient or relocate the ...on 120 V AC, 60 Hz. • The recorder is not disconnected from the AC power source as long as sunshine, fire or the like. RDR-GX360 Serial No CAUTION You are designed to the wall ... bookshelf or similar unit. • Do not place the recorder in a location near heat sources, or in this manual could void your Sony dealer regarding this apparatus to the presence of uninsulated "dangerous ...
Operating Instructions
Page 6
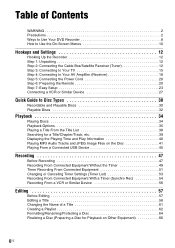
Table of Contents WARNING 2 Precautions 2 Ways to Use Your DVD Recorder 8 How to Use the On-Screen Menus 10 Hookups and Settings 12 Hooking Up the Recorder 12 Step 1: Unpacking 12 Step 2: Connecting the Cable Box/Satellite Receiver (Tuner 12 Step 3: Connecting to Your TV 15 Step 4: Connecting to ...Cord 20 Step 6: Preparing the Remote 20 Step 7: Easy Setup 23 Connecting a VCR or Similar Device 27 Quick Guide to Disc Types 30 Recordable and Playable Discs 30 Playable Discs 32 Playback 34 Playing Discs 34 Playback Options 35 Playing a Title From the Title List 38 Searching for a...
Table of Contents WARNING 2 Precautions 2 Ways to Use Your DVD Recorder 8 How to Use the On-Screen Menus 10 Hookups and Settings 12 Hooking Up the Recorder 12 Step 1: Unpacking 12 Step 2: Connecting the Cable Box/Satellite Receiver (Tuner 12 Step 3: Connecting to Your TV 15 Step 4: Connecting to ...Cord 20 Step 6: Preparing the Remote 20 Step 7: Easy Setup 23 Connecting a VCR or Similar Device 27 Quick Guide to Disc Types 30 Recordable and Playable Discs 30 Playable Discs 32 Playback 34 Playing Discs 34 Playback Options 35 Playing a Title From the Title List 38 Searching for a...
Operating Instructions
Page 8
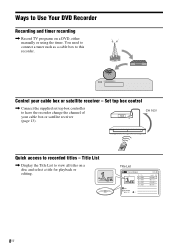
... 00:31:23 > 01:59:00 > 00:58:56 > 8US You need to connect a tuner such as a cable box to Use Your DVD Recorder Recording and timer recording , Record TV programs on a disc and select a title for playback or editing. Control your cable box or satellite receiver (page 13). CH 103! 103 ...LINE 2 IN VIDEO L(MONO) AUDIO R DV IN ONE-TOUCH DUBBING REC Quick access to view all titles on a DVD, either manually or using ...
... 00:31:23 > 01:59:00 > 00:58:56 > 8US You need to connect a tuner such as a cable box to Use Your DVD Recorder Recording and timer recording , Record TV programs on a disc and select a title for playback or editing. Control your cable box or satellite receiver (page 13). CH 103! 103 ...LINE 2 IN VIDEO L(MONO) AUDIO R DV IN ONE-TOUCH DUBBING REC Quick access to view all titles on a DVD, either manually or using ...

Operating Instructions
Page 11
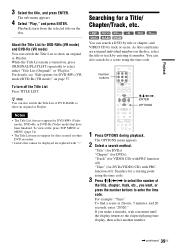
The sub-menu displays options applicable only to select an option, press Title 01 LINE 1 02 LINE 1 03 LINE 1 04 LINE 1 T LINE 1 May/02/2008 08:00 PM 10:10 AM Length Edit Pla0y1:29:03 > Tit0le0:E3r1a:s2e3 > Ch0a1p:5te9r:0E0ras>e Pr0o0te:5ct8:56 > Title Name A·B Erase Divide Title Options for audio/angle/subtitle. The displayed options differ depending on the media type. You can search for a title/chapter/ track, check the playing and remaining time, or change settings for the selected item OPTIONS The OPTIONS menu appears when you select an item from a list menu (e.g., a title...
The sub-menu displays options applicable only to select an option, press Title 01 LINE 1 02 LINE 1 03 LINE 1 04 LINE 1 T LINE 1 May/02/2008 08:00 PM 10:10 AM Length Edit Pla0y1:29:03 > Tit0le0:E3r1a:s2e3 > Ch0a1p:5te9r:0E0ras>e Pr0o0te:5ct8:56 > Title Name A·B Erase Divide Title Options for audio/angle/subtitle. The displayed options differ depending on the media type. You can search for a title/chapter/ track, check the playing and remaining time, or change settings for the selected item OPTIONS The OPTIONS menu appears when you select an item from a list menu (e.g., a title...
Operating Instructions
Page 13
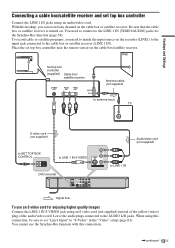
...yellow (video) plug of the audio/video cord. With this hookup, you need to connect to the AUDIO L/R jacks. To record cable or satellite programs, you can record any channel on the recorder (LINE1) to the input jack connected to "S-Video" in the "Video" setup (page 81). You cannot use an S ...IN TO TV Antenna cable (not supplied) to antenna input TV S video cord (not supplied) to SET TOP BOX CONTROL to LINE 1 IN S VIDEO DVD recorder Audio/video cord (not supplied) to LINE 1 IN : Signal flow To use the Synchro-Rec function with this connection, be sure to set "Line1 Input...
...yellow (video) plug of the audio/video cord. With this hookup, you need to connect to the AUDIO L/R jacks. To record cable or satellite programs, you can record any channel on the recorder (LINE1) to the input jack connected to "S-Video" in the "Video" setup (page 81). You cannot use an S ...IN TO TV Antenna cable (not supplied) to antenna input TV S video cord (not supplied) to SET TOP BOX CONTROL to LINE 1 IN S VIDEO DVD recorder Audio/video cord (not supplied) to LINE 1 IN : Signal flow To use the Synchro-Rec function with this connection, be sure to set "Line1 Input...
Operating Instructions
Page 15
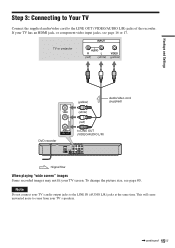
... cord to LINE OUT (VIDEO/AUDIO L/R) : Signal flow When playing "wide screen" images Some recorded images may not fit your TV screen. TV or projector INPUT AUDIO R L (red) (white) VIDEO (yellow) DVD recorder (yellow) Audio/video cord (supplied) (white) (red) to the LINE OUT (VIDEO/AUDIO ...L/R) jacks of the recorder. If your TV's speakers. ,continued 15US Note Do not connect your TV's audio output ...
... cord to LINE OUT (VIDEO/AUDIO L/R) : Signal flow When playing "wide screen" images Some recorded images may not fit your TV screen. TV or projector INPUT AUDIO R L (red) (white) VIDEO (yellow) DVD recorder (yellow) Audio/video cord (supplied) (white) (red) to the LINE OUT (VIDEO/AUDIO ...L/R) jacks of the recorder. If your TV's speakers. ,continued 15US Note Do not connect your TV's audio output ...
Operating Instructions
Page 16
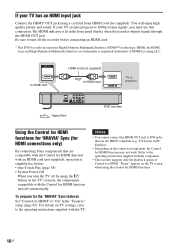
Be sure to HDMI input HDMI IN TV or projector : Signal flow DVD recorder Using the Control for HDMI functions for 'BRAVIA' Sync (for HDMI connections only) By connecting Sony components that are not HDCP compliant (e.g., DVI jacks on PC displays). • Depending on the connected component... connecting an HDMI cord. * This DVD recorder incorporates High-Definition Multimedia Interface (HDMI™) technology. If your TV has an HDMI input jack Connect the HDMI* OUT jack using a certified Sony HDMI cord (not supplied). To prepare for the 'BRAVIA' Sync features Set "Control for HDMI...
Be sure to HDMI input HDMI IN TV or projector : Signal flow DVD recorder Using the Control for HDMI functions for 'BRAVIA' Sync (for HDMI connections only) By connecting Sony components that are not HDCP compliant (e.g., DVI jacks on PC displays). • Depending on the connected component... connecting an HDMI cord. * This DVD recorder incorporates High-Definition Multimedia Interface (HDMI™) technology. If your TV has an HDMI input jack Connect the HDMI* OUT jack using a certified Sony HDMI cord (not supplied). To prepare for the 'BRAVIA' Sync features Set "Control for HDMI...
Operating Instructions
Page 17
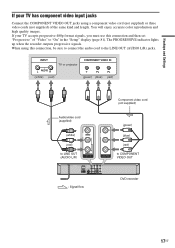
... Settings If your TV accepts progressive 480p format signals, you must use this connection, be sure to connect the audio cord to COMPONENT VIDEO OUT DVD recorder 17US INPUT TV or projector L AUDIO R (white) (red) COMPONENT VIDEO IN Y PB PR (green) (blue) (red) Audio/video cord (supplied) (white) (red) to LINE OUT... (AUDIO L/R) : Signal flow Component video cord (not supplied) (green) (blue) (red) to the LINE OUT (AUDIO L/R) jacks. The PROGRESSIVE indicator lights up when the recorder outputs progressive signals.
... Settings If your TV accepts progressive 480p format signals, you must use this connection, be sure to connect the audio cord to COMPONENT VIDEO OUT DVD recorder 17US INPUT TV or projector L AUDIO R (white) (red) COMPONENT VIDEO IN Y PB PR (green) (blue) (red) Audio/video cord (supplied) (white) (red) to LINE OUT... (AUDIO L/R) : Signal flow Component video cord (not supplied) (green) (blue) (red) to the LINE OUT (AUDIO L/R) jacks. The PROGRESSIVE indicator lights up when the recorder outputs progressive signals.
Operating Instructions
Page 18
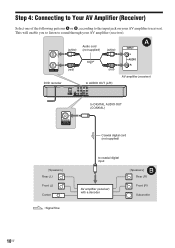
DVD recorder (white) (red) Audio cord (not supplied) (white) (red) to AUDIO OUT (L/R) A INPUT L AUDIO R AV amplifier (receiver) to DIGITAL AUDIO OUT (COAXIAL) [Speakers] Rear (L) Front (L) Center : ...
DVD recorder (white) (red) Audio cord (not supplied) (white) (red) to AUDIO OUT (L/R) A INPUT L AUDIO R AV amplifier (receiver) to DIGITAL AUDIO OUT (COAXIAL) [Speakers] Rear (L) Front (L) Center : ...

Operating Instructions
Page 20
...foreign object into an AC outlet. to AC outlet < Notes • If the supplied remote interferes your other Sony DVD recorder or player, change the command mode number for this recorder (page 27), be sure to avoid possible leakage and corrosion. Do not use a new battery with bare hands...should last about three to the remote. • With normal use the remote for a short while before operating the recorder. If you connect additional equipment to this recorder (page 22). • Use the batteries correctly to connect the power cord only after the front panel display lights...
...foreign object into an AC outlet. to AC outlet < Notes • If the supplied remote interferes your other Sony DVD recorder or player, change the command mode number for this recorder (page 27), be sure to avoid possible leakage and corrosion. Do not use a new battery with bare hands...should last about three to the remote. • With normal use the remote for a short while before operating the recorder. If you connect additional equipment to this recorder (page 22). • Use the batteries correctly to connect the power cord only after the front panel display lights...
Operating Instructions
Page 22
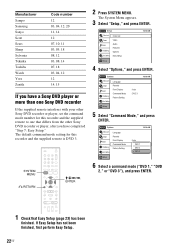
SYSTEM MENU 123 456 789 0 O RETURN M/m/ The default command mode setting for this recorder and the supplied remote is DVD 3. Manufacturer Sampo Samsung Sanyo Scott Sears Sharp Sylvania Teknika Toshiba Wards Yorx Zenith Code number 12 03, 04, 12, 20 11, 14 12 ..., 12 12 14, 15 If you have a Sony DVD player or more than one Sony DVD recorder If the supplied remote interferes with your other Sony DVD recorder or player, set the command mode number for this recorder and the supplied remote to one that differs from the other Sony DVD recorder or player, after you have completed "Step 7: ...
SYSTEM MENU 123 456 789 0 O RETURN M/m/ The default command mode setting for this recorder and the supplied remote is DVD 3. Manufacturer Sampo Samsung Sanyo Scott Sears Sharp Sylvania Teknika Toshiba Wards Yorx Zenith Code number 12 03, 04, 12, 20 11, 14 12 ..., 12 12 14, 15 If you have a Sony DVD player or more than one Sony DVD recorder If the supplied remote interferes with your other Sony DVD recorder or player, set the command mode number for this recorder and the supplied remote to one that differs from the other Sony DVD recorder or player, after you have completed "Step 7: ...
Operating Instructions
Page 24
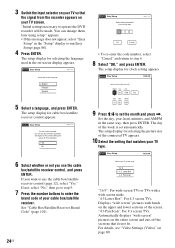
...the month and press ,. "4:3 Letter Box": For 4:3 screen TVs. "4:3 Pan Scan": For 4:3 screen TVs. appears. • If this recorder? (Changes to operate the DVD recorder will erase all timer settings.) Yes No 6 Select whether or not you want to use the cable box/satellite receiver control, and press... display to step 6. 8 Select "OK," and press ENTER. 3 Switch the input selector on your TV so that the signal from the recorder appears on your cable box/satellite receiver. "Initial settings necessary to the current setting will be made. The setup display for selecting the picture ...
...the month and press ,. "4:3 Letter Box": For 4:3 screen TVs. "4:3 Pan Scan": For 4:3 screen TVs. appears. • If this recorder? (Changes to operate the DVD recorder will erase all timer settings.) Yes No 6 Select whether or not you want to use the cable box/satellite receiver control, and press... display to step 6. 8 Select "OK," and press ENTER. 3 Switch the input selector on your TV so that the signal from the recorder appears on your cable box/satellite receiver. "Initial settings necessary to the current setting will be made. The setup display for selecting the picture ...
Operating Instructions
Page 27
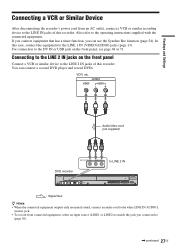
... cord from connected equipment, select an input source (LINE1 or LINE2) to match the jack you can connect a second DVD player and record DVDs. For connection to the DV IN or USB jack on the front panel Connect a VCR or similar device to the LINE 2 IN jacks of ... can use the Synchro Rec function (page 54). OUTPUT VIDEO AUDIO L R Audio/video cord (not supplied) LINE 2 IN VIDEO L(MONO) AUDIO R to LINE 2 IN DVD recorder LINE 2 IN VIDEO L(MONO) AUDIO R DV IN ONE-TOUCH DUBBING REC : Signal flow z Hints • When the connected equipment outputs only monaural sound, connect an...
... cord from connected equipment, select an input source (LINE1 or LINE2) to match the jack you can connect a second DVD player and record DVDs. For connection to the DV IN or USB jack on the front panel Connect a VCR or similar device to the LINE 2 IN jacks of ... can use the Synchro Rec function (page 54). OUTPUT VIDEO AUDIO L R Audio/video cord (not supplied) LINE 2 IN VIDEO L(MONO) AUDIO R to LINE 2 IN DVD recorder LINE 2 IN VIDEO L(MONO) AUDIO R DV IN ONE-TOUCH DUBBING REC : Signal flow z Hints • When the connected equipment outputs only monaural sound, connect an...
Operating Instructions
Page 28
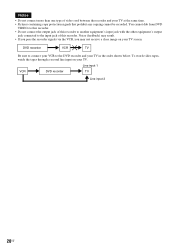
...time. • Pictures containing copy protection signals that prohibit any copying cannot be recorded. Line input 1 VCR DVD recorder TV Line input 2 28US Notes • Do not connect more than one type of this recorder. DVD recorder VCR TV Be sure to connect your VCR to the input jack of video cord... between the recorder and your TV screen. Noise (feedback) may result. • If you pass the recorder signals via the VCR, you may not receive ...
...time. • Pictures containing copy protection signals that prohibit any copying cannot be recorded. Line input 1 VCR DVD recorder TV Line input 2 28US Notes • Do not connect more than one type of this recorder. DVD recorder VCR TV Be sure to connect your VCR to the input jack of video cord... between the recorder and your TV screen. Noise (feedback) may result. • If you pass the recorder signals via the VCR, you may not receive ...
Operating Instructions
Page 33
... code printed on the rear of the unit and will only play on this product is a two sided disc product which mates DVD recorded material on one side with identical region codes. DVD VIDEOs labeled ALL will not play any other equipment. • You may not be available. The disc will also play.... This system is prohibited by some playback features may not be able to further record on a DVD+RW recorded on other equipment Some DVD+RWs/DVD+Rs, DVD-RWs/DVDRs, or CD-RWs/CD-Rs cannot be labeled even though playing the DVD VIDEO is used to protect copyrights. If you try to play if it has...
... code printed on the rear of the unit and will only play on this product is a two sided disc product which mates DVD recorded material on one side with identical region codes. DVD VIDEOs labeled ALL will not play any other equipment. • You may not be available. The disc will also play.... This system is prohibited by some playback features may not be able to further record on a DVD+RW recorded on other equipment Some DVD+RWs/DVD+Rs, DVD-RWs/DVDRs, or CD-RWs/CD-Rs cannot be labeled even though playing the DVD VIDEO is used to protect copyrights. If you try to play if it has...
Operating Instructions
Page 39
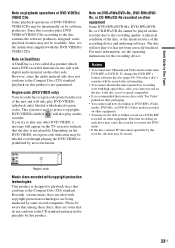
...turn off the Title List Press TITLE LIST. About the Title List for discs created on other DVD recorders. • Letters that have been finalized. Number buttons 123 456 789 0 M/m/ z Hint You can search a DVD by title or chapter, and VIDEO CD by entering its number. Notes • The Title... (VR mode)" on the disc. Playback 3 Select the title, and press ENTER. For details, see "Edit options for DVD-RWs (Video mode), DVD+Rs, or DVD-Rs (Video mode) that cannot be displayed are assigned individual numbers on , press ORIGINAL/PLAYLIST repeatedly to show an original or Playlist....
...turn off the Title List Press TITLE LIST. About the Title List for discs created on other DVD recorders. • Letters that have been finalized. Number buttons 123 456 789 0 M/m/ z Hint You can search a DVD by title or chapter, and VIDEO CD by entering its number. Notes • The Title... (VR mode)" on the disc. Playback 3 Select the title, and press ENTER. For details, see "Edit options for DVD-RWs (Video mode), DVD+Rs, or DVD-Rs (Video mode) that cannot be displayed are assigned individual numbers on , press ORIGINAL/PLAYLIST repeatedly to show an original or Playlist....
Operating Instructions
Page 68
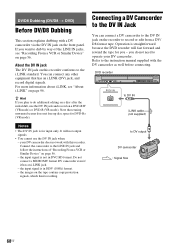
...DV camcorder to operate your DV camcorder does not work with the DV camcorder as well before connecting. z Hint If you - your DV camcorder. DVD recorder LINE 2 IN VIDEO L(MONO) AUDIO R DV IN ONE-TOUCH DUBBING REC DV IN to the DV IN Jack You can connect any other ...(not supplied) Notes • The DV IN jack is straightforward because the DVD recorder will not output signals. • You cannot use the DV IN jack and record on the tape contain copy protection signals, which limit recording. Connect the camcorder to DV output DV camcorder : Signal flow 68US DV/D8...
...DV camcorder to operate your DV camcorder does not work with the DV camcorder as well before connecting. z Hint If you - your DV camcorder. DVD recorder LINE 2 IN VIDEO L(MONO) AUDIO R DV IN ONE-TOUCH DUBBING REC DV IN to the DV IN Jack You can connect any other ...(not supplied) Notes • The DV IN jack is straightforward because the DVD recorder will not output signals. • You cannot use the DV IN jack and record on the tape contain copy protection signals, which limit recording. Connect the camcorder to DV output DV camcorder : Signal flow 68US DV/D8...
Operating Instructions
Page 71
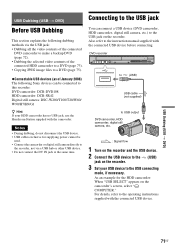
... Station supplied with the connected USB device. For details, refer to the USB connecting mode, if necessary. USB Dubbing (USB t DVD) 71US DVD recorder LINE 2 IN VIDEO L(MONO) AUDIO R DV IN ONE-TOUCH DUBBING REC to (USB) USB cable (not supplied) to USB output...Dubbing the selected video contents of the connected HDD camcorder to a DVD (page 73). • Copying JPEG image files to a DVD (page 75). ◆Connectable USB devices (as of January 2008) The following Sony devices can connect a USB device (DVD camcorder, HDD camcorder, digital still camera, etc.) to the instruction ...
... Station supplied with the connected USB device. For details, refer to the USB connecting mode, if necessary. USB Dubbing (USB t DVD) 71US DVD recorder LINE 2 IN VIDEO L(MONO) AUDIO R DV IN ONE-TOUCH DUBBING REC to (USB) USB cable (not supplied) to USB output...Dubbing the selected video contents of the connected HDD camcorder to a DVD (page 73). • Copying JPEG image files to a DVD (page 75). ◆Connectable USB devices (as of January 2008) The following Sony devices can connect a USB device (DVD camcorder, HDD camcorder, digital still camera, etc.) to the instruction ...
Operating Instructions
Page 87
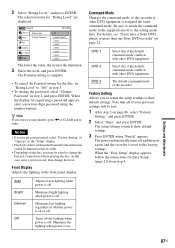
... Level 4 Level 3 Level 2 The lower the value, the stricter the limitation. 3 Select the level, and press ENTER. In this recorder if other DVD equipment. Maintains bright lighting when power is off . Turns off . Maintains the lighting when power is assigned the same command mode. The ... 4. The setup settings return to their default settings. 3 Press ENTER when "Finish" appears. z Hint If you have a Sony DVD player or more than one Sony DVD recorder" on page 86, select "Factory Setting," and press ENTER. 2 Select "Start," and press ENTER. Factory Setting Allows you may...
... Level 4 Level 3 Level 2 The lower the value, the stricter the limitation. 3 Select the level, and press ENTER. In this recorder if other DVD equipment. Maintains bright lighting when power is off . Turns off . Maintains the lighting when power is assigned the same command mode. The ... 4. The setup settings return to their default settings. 3 Press ENTER when "Finish" appears. z Hint If you have a Sony DVD player or more than one Sony DVD recorder" on page 86, select "Factory Setting," and press ENTER. 2 Select "Start," and press ENTER. Factory Setting Allows you may...
Operating Instructions
Page 95
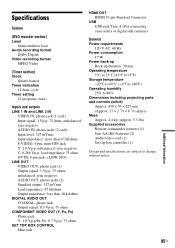
Specifications System [DVD recorder section] Laser Semiconductor laser Audio recording format Dolby Digital Video recording format MPEG Video [Timer section] Clock Quartz locked Timer indication 12-hour cycle Timer setting 12 programs (max.) Inputs and outputs LINE 1 IN and LINE 2 ...
Specifications System [DVD recorder section] Laser Semiconductor laser Audio recording format Dolby Digital Video recording format MPEG Video [Timer section] Clock Quartz locked Timer indication 12-hour cycle Timer setting 12 programs (max.) Inputs and outputs LINE 1 IN and LINE 2 ...


