
Operating Instructions
Page 2
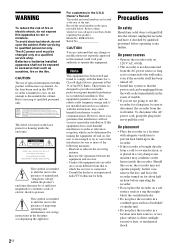
... the recorder in a particular installation. CAUTION The use the recorder for about half an hour before operating it is connected to the wall outlet, even if the recorder itself ; For customers in the U.S.A Owner's Record The model and serial numbers are designed to provide reasonable protection against harmful interference in a very damp room, moisture may cause harmful interference to radio communications. RDR-GX360 Serial...
... the recorder in a particular installation. CAUTION The use the recorder for about half an hour before operating it is connected to the wall outlet, even if the recorder itself ; For customers in the U.S.A Owner's Record The model and serial numbers are designed to provide reasonable protection against harmful interference in a very damp room, moisture may cause harmful interference to radio communications. RDR-GX360 Serial...
Operating Instructions
Page 6
...32 Playback 34 Playing Discs 34 Playback Options 35 Playing a Title From the Title List 38 Searching for a Title/Chapter/Track, etc 39 Displaying the Playing Time and Play Information 40 Playing MP3 Audio Tracks and JPEG Image Files on the Disc 41 Playing From a Connected USB Device 45 Recording 47 Before Recording 47 Recording From Connected Equipment Without the Timer 49 Timer Recording From Connected Equipment 51 Changing or Canceling Timer Settings (Timer List 53 Recording From Connected Equipment With a Timer (Synchro Rec 54 Recording From a VCR or Similar Device 56 Editing...
...32 Playback 34 Playing Discs 34 Playback Options 35 Playing a Title From the Title List 38 Searching for a Title/Chapter/Track, etc 39 Displaying the Playing Time and Play Information 40 Playing MP3 Audio Tracks and JPEG Image Files on the Disc 41 Playing From a Connected USB Device 45 Recording 47 Before Recording 47 Recording From Connected Equipment Without the Timer 49 Timer Recording From Connected Equipment 51 Changing or Canceling Timer Settings (Timer List 53 Recording From Connected Equipment With a Timer (Synchro Rec 54 Recording From a VCR or Similar Device 56 Editing...
Operating Instructions
Page 10
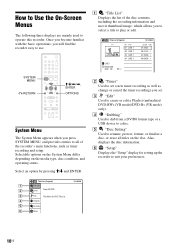
SYSTEM MENU 123 456 789 0 O RETURN M/m/ How to Use the On-Screen Menus The following three displays are mainly used to use. Once you become familiar with the basic operations, you will find the recorder easy to operate this recorder.
SYSTEM MENU 123 456 789 0 O RETURN M/m/ How to Use the On-Screen Menus The following three displays are mainly used to use. Once you become familiar with the basic operations, you will find the recorder easy to operate this recorder.
Operating Instructions
Page 16
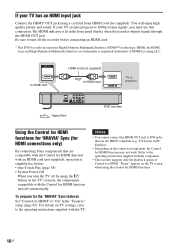
... TV accepts progressive 1080p format signals, you turn the TV off by using the "/1 button on TV settings, refer to the operating instructions supplied with the component. • The recorder supports only the playback option of HDMI Licensing LLC. to HDMI OUT HDMI cord (not supplied) to DVI jacks that are compatible with the Control for HDMI function with the Control for HDMI. Notes • You cannot connect the HDMI OUT jack to HDMI input HDMI IN TV...
... TV accepts progressive 1080p format signals, you turn the TV off by using the "/1 button on TV settings, refer to the operating instructions supplied with the component. • The recorder supports only the playback option of HDMI Licensing LLC. to HDMI OUT HDMI cord (not supplied) to DVI jacks that are compatible with the Control for HDMI function with the Control for HDMI. Notes • You cannot connect the HDMI OUT jack to HDMI input HDMI IN TV...
Operating Instructions
Page 22
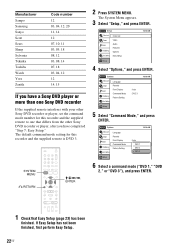
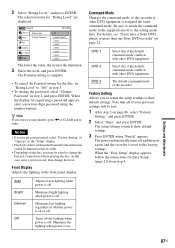
SYSTEM MENU 123 456 789 0 O RETURN M/m/ The default command mode setting for this recorder and the supplied remote to one Sony DVD recorder If the supplied remote interferes with your other Sony DVD recorder or player, after you have a Sony DVD player or more than one that differs from the other Sony DVD recorder or player, set the command mode number for this recorder and the supplied remote is DVD 3. Manufacturer Sampo Samsung Sanyo Scott Sears Sharp Sylvania Teknika Toshiba...
SYSTEM MENU 123 456 789 0 O RETURN M/m/ The default command mode setting for this recorder and the supplied remote to one Sony DVD recorder If the supplied remote interferes with your other Sony DVD recorder or player, after you have a Sony DVD player or more than one that differs from the other Sony DVD recorder or player, set the command mode number for this recorder and the supplied remote is DVD 3. Manufacturer Sampo Samsung Sanyo Scott Sears Sharp Sylvania Teknika Toshiba...
Operating Instructions
Page 24
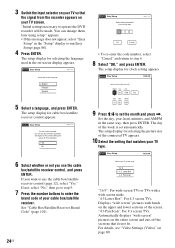
... Set the time and date manually. Set the day, year, hour, minutes, and AM/PM in the on-screen display appears. For details, see "Video Settings (Video)" on your TV screen. The setup display for cable box/satellite receiver control appears. The setup display for selecting the language used in the same way, then press ENTER. "4:3 Pan Scan": For 4:3 screen TVs. The setup display for selecting the picture size of your set automatically. No Disc Easy Setup Select the screen language. See "Cable Box...
... Set the time and date manually. Set the day, year, hour, minutes, and AM/PM in the on-screen display appears. For details, see "Video Settings (Video)" on your TV screen. The setup display for cable box/satellite receiver control appears. The setup display for selecting the language used in the same way, then press ENTER. "4:3 Pan Scan": For 4:3 screen TVs. The setup display for selecting the picture size of your set automatically. No Disc Easy Setup Select the screen language. See "Cable Box...
Operating Instructions
Page 69
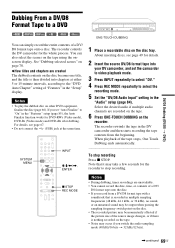
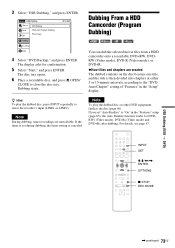
... "Dubbing selected scenes" on page 70. ◆How titles and chapters are created The dubbed contents on the tape using the onscreen display. DV/D8 Dubbing (DV/D8 t DVD) Dubbing From a DV/D8 Format Tape to "On" in the "Setup" display. The recorder controls the DV camcorder for DVD-RWs (Video mode), DVD-Rs (Video mode) and DVD+Rs after dubbing. You can simply record the entire contents of "Features" in the "Features" setup (page 85), the Auto Finalize function works...
... "Dubbing selected scenes" on page 70. ◆How titles and chapters are created The dubbed contents on the tape using the onscreen display. DV/D8 Dubbing (DV/D8 t DVD) Dubbing From a DV/D8 Format Tape to "On" in the "Setup" display. The recorder controls the DV camcorder for DVD-RWs (Video mode), DVD-Rs (Video mode) and DVD+Rs after dubbing. You can simply record the entire contents of "Features" in the "Features" setup (page 85), the Auto Finalize function works...
Operating Instructions
Page 72
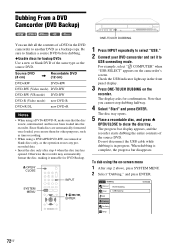
... using a DVD+RW/DVD-RW, use them for other purposes, such as timer recording. • When using a DVD+R/DVD-R, make sure that the disc is new, unformatted, and has not been loaded into the recorder. Otherwise the recorder may automatically format the disc, making it unusable for backup DVDs Use a new or blank DVD of a DVD in the DVD camcorder to finalize a source DVD before dubbing. ◆Usable discs for DVD Backup. Z OPEN/ CLOSE SYSTEM MENU 123 456 789 0 INPUT...
... using a DVD+RW/DVD-RW, use them for other purposes, such as timer recording. • When using a DVD+R/DVD-R, make sure that the disc is new, unformatted, and has not been loaded into the recorder. Otherwise the recorder may automatically format the disc, making it unusable for backup DVDs Use a new or blank DVD of a DVD in the DVD camcorder to finalize a source DVD before dubbing. ◆Usable discs for DVD Backup. Z OPEN/ CLOSE SYSTEM MENU 123 456 789 0 INPUT...
Operating Instructions
Page 73
... disc tray opens. 6 Place a recordable disc, and press Z OPEN/ CLOSE to the "DVD Auto Chapter" setting of "Features" in the "Features" setup (page 85), the Auto Finalize function works for confirmation. 5 Select "Start," and press ENTER. If you set during dubbing, the timer setting is canceled. No Disc USB Dubbing Title List Timer Edit DVD Backup HDD-Cam Program Dubbing Photo Copy Dubbing Disc Setting Setup 10:10 AM 4 Select "DVD Backup," and press ENTER. The display asks for DVDRWs (Video mode), DVD-Rs (Video mode) and DVD+Rs after dubbing. Note To play the dubbed...
... disc tray opens. 6 Place a recordable disc, and press Z OPEN/ CLOSE to the "DVD Auto Chapter" setting of "Features" in the "Features" setup (page 85), the Auto Finalize function works for confirmation. 5 Select "Start," and press ENTER. If you set during dubbing, the timer setting is canceled. No Disc USB Dubbing Title List Timer Edit DVD Backup HDD-Cam Program Dubbing Photo Copy Dubbing Disc Setting Setup 10:10 AM 4 Select "DVD Backup," and press ENTER. The display asks for DVDRWs (Video mode), DVD-Rs (Video mode) and DVD+Rs after dubbing. Note To play the dubbed...
Operating Instructions
Page 76
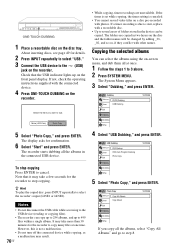
... Title List Timer DV/D8 Dubbing USB Dubbing Edit Dubbing Disc Setting Setup 10:10 AM 4 Select "USB Dubbing," and press ENTER. USB Dubbing Title List Timer Edit DVD Backup HDD-Cam Program Dubbing Photo Copy Dubbing Disc Setting Setup 10:10 AM 5 Select "Photo Copy," and press ENTER. REC ONE-TOUCH DUBBING 1 Place a recordable disc on the front panel display. If not, check the operating instructions supplied with other names. Notes • Do not disconnect the USB cable while accessing to the USB device (reading or copying files). • The recorder can select the albums using...
... Title List Timer DV/D8 Dubbing USB Dubbing Edit Dubbing Disc Setting Setup 10:10 AM 4 Select "USB Dubbing," and press ENTER. USB Dubbing Title List Timer Edit DVD Backup HDD-Cam Program Dubbing Photo Copy Dubbing Disc Setting Setup 10:10 AM 5 Select "Photo Copy," and press ENTER. REC ONE-TOUCH DUBBING 1 Place a recordable disc on the front panel display. If not, check the operating instructions supplied with other names. Notes • Do not disconnect the USB cable while accessing to the USB device (reading or copying files). • The recorder can select the albums using...

Operating Instructions
Page 78
Settings and Adjustments Using the Setup Displays By using the setup displays, you can make various adjustments to items such as picture and sound, as well as select a language for the subtitles. Note Playback settings stored on the disc take priority over the setup display settings, and not all of the functions described may work. SYSTEM MENU 123 456 789 0 O RETURN M/m/ The setup displays are used in the following way.
Settings and Adjustments Using the Setup Displays By using the setup displays, you can make various adjustments to items such as picture and sound, as well as select a language for the subtitles. Note Playback settings stored on the disc take priority over the setup display settings, and not all of the functions described may work. SYSTEM MENU 123 456 789 0 O RETURN M/m/ The setup displays are used in the following way.
Operating Instructions
Page 79
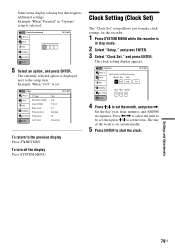
...:10 AM Title List Timer Edit Dubbing Disc Setting Setup TV Type Resolution (HDMI) Video (HDMI) Black Level Picture Control Progressive Line1 Input : 16:9 : Auto : Y Cb Cr : On : Standard : Off : Composite To return to the setup item. Set the day, year, hour, minutes, and AM/PM in "Options" setup is in stop mode. 2 Select "Setup," and press ENTER. 3 Select "Clock Set," and press ENTER. Create the password Title List 10:10 AM Timer Edit Create the password. The clock setting display appears. To turn off the display Press SYSTEM MENU. Press The...
...:10 AM Title List Timer Edit Dubbing Disc Setting Setup TV Type Resolution (HDMI) Video (HDMI) Black Level Picture Control Progressive Line1 Input : 16:9 : Auto : Y Cb Cr : On : Standard : Off : Composite To return to the setup item. Set the day, year, hour, minutes, and AM/PM in "Options" setup is in stop mode. 2 Select "Setup," and press ENTER. 3 Select "Clock Set," and press ENTER. Create the password Title List 10:10 AM Timer Edit Create the password. The clock setting display appears. To turn off the display Press SYSTEM MENU. Press The...
Operating Instructions
Page 80
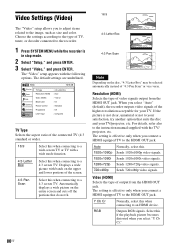
... Sends 1920×1080p video signals. RGB Outputs RGB signals. The default settings are underlined. Video 10:10 AM Title List Timer Edit Dubbing Disc Setting Setup TV Type Resolution (HDMI) Video (HDMI) Black Level Picture Control Progressive Line1 Input : 4:3 Letter Box : Auto : Y Cb Cr : On : Standard : Off : Composite TV Type Selects the aspect ratio of video signals output from the HDMI OUT jack. For details, refer also to the instruction manual supplied with a wide mode function. 4:3 Letter Box Select this when connecting to a wide-screen TV or TV with the...
... Sends 1920×1080p video signals. RGB Outputs RGB signals. The default settings are underlined. Video 10:10 AM Title List Timer Edit Dubbing Disc Setting Setup TV Type Resolution (HDMI) Video (HDMI) Black Level Picture Control Progressive Line1 Input : 4:3 Letter Box : Auto : Y Cb Cr : On : Standard : Off : Composite TV Type Selects the aspect ratio of video signals output from the HDMI OUT jack. For details, refer also to the instruction manual supplied with a wide mode function. 4:3 Letter Box Select this when connecting to a wide-screen TV or TV with the...
Operating Instructions
Page 82
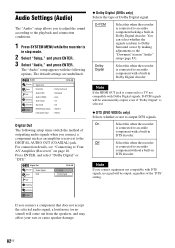
... stop mode. 2 Select "Setup," and press ENTER. 3 Select "Audio," and press ENTER. Dolby Digital Select this when the recorder is connected to an audio component with Dolby Digital signals, D-PCM signals will be output, regardless of the "DTS" setting. Digital Out Title List Timer Dolby Digital DTS 10:10 AM : 4:3DL-PetCteMr Box OnDolby Digital Edit Dubbing Disc Setting Setup ◆ Dolby Digital (DVDs only) Selects the type of Dolby Digital signal. Note If the HDMI OUT jack is connected to an audio component with DTS signals, no sound...
... stop mode. 2 Select "Setup," and press ENTER. 3 Select "Audio," and press ENTER. Dolby Digital Select this when the recorder is connected to an audio component with Dolby Digital signals, D-PCM signals will be output, regardless of the "DTS" setting. Digital Out Title List Timer Dolby Digital DTS 10:10 AM : 4:3DL-PetCteMr Box OnDolby Digital Edit Dubbing Disc Setting Setup ◆ Dolby Digital (DVDs only) Selects the type of Dolby Digital signal. Note If the HDMI OUT jack is connected to an audio component with DTS signals, no sound...
Operating Instructions
Page 86
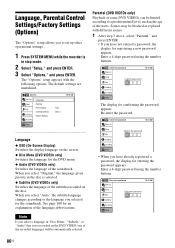
... in stop mode. 2 Select "Setup," and press ENTER. 3 Select "Options," and press ENTER. When you select "Auto," the subtitle language changes according to the language you select a language in "Disc Menu," "Subtitle," or "Audio" that is in the disc is selected. ◆ Subtitle (DVD VIDEOs only) Switches the language of the soundtrack. See page 100 for the DVD menu. ◆ Audio (DVD VIDEOs only) Switches the language of the subtitles recorded on the disc. Create the password Title List 10:10 AM Timer Edit Create the password. Dubbing Disc Setting Setup •...
... in stop mode. 2 Select "Setup," and press ENTER. 3 Select "Options," and press ENTER. When you select "Auto," the subtitle language changes according to the language you select a language in "Disc Menu," "Subtitle," or "Audio" that is in the disc is selected. ◆ Subtitle (DVD VIDEOs only) Switches the language of the soundtrack. See page 100 for the DVD menu. ◆ Audio (DVD VIDEOs only) Switches the language of the subtitles recorded on the disc. Create the password Title List 10:10 AM Timer Edit Create the password. Dubbing Disc Setting Setup •...
Operating Instructions
Page 87
..., see "If you have a Sony DVD player or more than one Sony DVD recorder" on . When the "Easy Setup" display appears, follow the instructions for registering a password appears, enter a new four-digit password using the number buttons. Maintains low lighting regardless of discs without the Parental Control function cannot be limited on this case, enter your password, then change the level. Settings and Adjustments 87US Parental Title List Timer Rating Level Change Password Edit Dubbing Disc Setting Setup 10:10 AM : OnO: fLf...
..., see "If you have a Sony DVD player or more than one Sony DVD recorder" on . When the "Easy Setup" display appears, follow the instructions for registering a password appears, enter a new four-digit password using the number buttons. Maintains low lighting regardless of discs without the Parental Control function cannot be limited on this case, enter your password, then change the level. Settings and Adjustments 87US Parental Title List Timer Rating Level Change Password Edit Dubbing Disc Setting Setup 10:10 AM : OnO: fLf...
Operating Instructions
Page 89
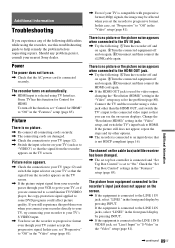
... recorder off and on again. 3Disconnect and then connect the i.LINK cable again. The channel on the cable box/satellite receiver has been changed. , The set "Control for HDMI" to the LINE 1 IN jack, select "LINE1" in the "Video" setup (page 81). , Even if your TV is no picture. , Re-connect all connecting cords securely. , The connecting cords are connected to a combination TV/VIDEO player, the copy-protection signal applied to help remedy the problem before requesting repairs...
... recorder off and on again. 3Disconnect and then connect the i.LINK cable again. The channel on the cable box/satellite receiver has been changed. , The set "Control for HDMI" to the LINE 1 IN jack, select "LINE1" in the "Video" setup (page 81). , Even if your TV is no picture. , Re-connect all connecting cords securely. , The connecting cords are connected to a combination TV/VIDEO player, the copy-protection signal applied to help remedy the problem before requesting repairs...
Operating Instructions
Page 91
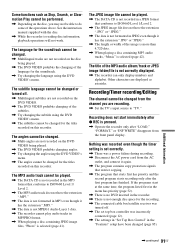
... disc being played. , The DVD VIDEO prohibits changing angles. , Try changing the angle using the DVD VIDEO's menu. , The subtitles cannot be changed or turned off . , The set correctly. , There was recorded even though the timer setting is selected (page 41). See the instruction manual supplied with the disc. , While the recorder is pressed. , Operate the recorder only after "LOAD," "FORMAT," or "INF WRITE" disappears from the front panel display. Recording does not start at the same time, the program listed first in the menu...
... disc being played. , The DVD VIDEO prohibits changing angles. , Try changing the angle using the DVD VIDEO's menu. , The subtitles cannot be changed or turned off . , The set correctly. , There was recorded even though the timer setting is selected (page 41). See the instruction manual supplied with the disc. , While the recorder is pressed. , Operate the recorder only after "LOAD," "FORMAT," or "INF WRITE" disappears from the front panel display. Recording does not start at the same time, the program listed first in the menu...
Operating Instructions
Page 92
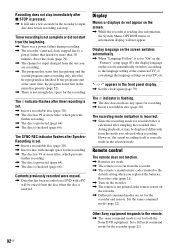
... a power failure during playback, it may be erased from the recorder. , The remote's manufacturer code returned to the language setting of the connected TV, if you are set to "On" in the selected mode. Reset the code (page 21). , Turn on the recorder. , Different command modes are recording. , The program that lasted for both the Sony DVD equipment. Other Sony equipment responds to input disc data before recording can stop immediately after the first program has finished. Recording...
... a power failure during playback, it may be erased from the recorder. , The remote's manufacturer code returned to the language setting of the connected TV, if you are set to "On" in the selected mode. Reset the code (page 21). , Turn on the recorder. , Different command modes are recording. , The program that lasted for both the Sony DVD equipment. Other Sony equipment responds to input disc data before recording can stop immediately after the first program has finished. Recording...
Operating Instructions
Page 106
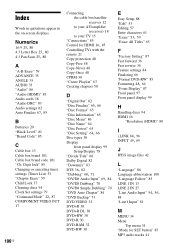
... cable box/satellite receiver 12 to your AV/amplifier (receiver) 18 to your TV 15 "Connections" 85 Control for HDMI 16, 85 Controlling TVs with the remote 21 Copy protection 48 Copy-Free 48 Copy-Never 48 Copy-Once 48 CPRM 30 "Create Playlist" 63 Creating chapters 50 D "Digital Out" 82 "Disc Finalize" 65, 66 "Disc Format" 65 "Disc Information" 65 "Disc Menu" 86 "Disc Name" 64 "Disc Protect" 65 "Disc Setting" 64, 66 Disc types 30 Display front panel display 99 Setup Display 78 "Divide Title...
... cable box/satellite receiver 12 to your AV/amplifier (receiver) 18 to your TV 15 "Connections" 85 Control for HDMI 16, 85 Controlling TVs with the remote 21 Copy protection 48 Copy-Free 48 Copy-Never 48 Copy-Once 48 CPRM 30 "Create Playlist" 63 Creating chapters 50 D "Digital Out" 82 "Disc Finalize" 65, 66 "Disc Format" 65 "Disc Information" 65 "Disc Menu" 86 "Disc Name" 64 "Disc Protect" 65 "Disc Setting" 64, 66 Disc types 30 Display front panel display 99 Setup Display 78 "Divide Title...


